编译安装nginx并实现反向代理负载均衡和缓存功能
一、编译安装nginx
1、下载
[root@ns1 ~]# wget http://nginx.org/download/nginx-1.10.0.tar.gz
2、解压
[root@ns1 ~]# tar xf nginx-1.10.0.tar.gz
[root@ns1 ~]# cd nginx-1.10.0
3、安装依赖组件
[root@ns1 nginx-1.10.0]# yum install pcre-devel    #url重写需要的组件
[root@ns1 nginx-1.10.0]# yum install zlib-devel    #gzip所依赖组件
[root@ns1 nginx-1.10.0]# yum install openssl-devel        #openssl依赖的组件
[root@ns1 nginx-1.10.0]# groupadd -r nginx           #创建一个nginx系统组
[root@ns1 nginx-1.10.0]# useradd -g nginx -r nginx   #在nginx组中加入nginx用户
[root@ns1 nginx-1.10.0]# id nginx
uid=996(nginx) gid=994(nginx) 组=994(nginx)
4、编译安装
【注意】因为nginx部分模块不支持动态加载,所以需要什么模块一定要提前指定好,淘宝的tengine则支持动态加载模块。
[root@ns1 nginx-1.10.0]# ./configure --prefix=/usr/local/nginx --conf-path=/etc/nginx/nginx.conf --user=nginx --group=nginx --error-log-path=/var/log/nginx/error.log --http-log-path=/var/log/nginx/access.log --pid-path=/var/run/nginx/nginx.pid --lock-path=/var/lock/nginx.lock --with-http_ssl_module --with-http_stub_status_module --with-http_gzip_static_module --with-http_flv_module --with-http_mp4_module --http-client-body-temp-path=/var/tmp/nginx/client --http-proxy-temp-path=/var/tmp/nginx/proxy --http-fastcgi-temp-path=/var/tmp/nginx/fastcgi --http-uwsgi-temp-path=/var/tmp/nginx/uwsgi
[root@ns1 nginx-1.10.0]# mkdir -pv /var/tmp/nginx/{client,proxy,fastcgi,uwsgi}
[root@ns1 nginx-1.10.0]# make && make install
5、./configure选项说明
[root@ns1 nginx-1.10.0]# ./configure --help--help print this message #帮助--prefix=PATH set installation prefix #安装路径--sbin-path=PATH set nginx binary pathname #主程序安装路径--modules-path=PATH set modules path #模块安装路径--conf-path=PATH set nginx.conf pathname #主配置文件安装路径--error-log-path=PATH set error log pathname #错误日志路径--pid-path=PATH set nginx.pid pathname #pid文件路径--lock-path=PATH set nginx.lock pathname #锁文件路径--user=USER set non-privileged user for #nginx启动时work进程以什么身份运行worker processes--group=GROUP set non-privileged group for #nginx启动时work进程以什么组运行worker processes--build=NAME set build name #指定编译的名称--builddir=DIR set build directory #指定编译的目录#with的是默认没启用的模块,with后启用#without的是默认启动的模块,without后关闭--with-select_module enable select module #开起select模块--without-select_module disable select module #关闭select模块--with-poll_module enable poll module #开起poll模块--without-poll_module disable poll module #关闭poll模块--with-threads enable thread pool support #启用线程池--with-file-aio enable file AIO support #开起文件AIO功能,一般用来提高图片站读i/o操作--with-ipv6 enable IPv6 support #开起ipv6支持--with-http_ssl_module enable ngx_http_ssl_module #启用ssl模块--with-http_v2_module enable ngx_http_v2_module #源自spdy协议,优先请求浏览器最继续的内容--with-http_realip_module enable ngx_http_realip_module #反向代理时把真实访问ip传给后端--with-http_addition_module enable ngx_http_addition_module #在页面后添加文本--with-http_xslt_module enable ngx_http_xslt_module #在响应XML文件时,转为一个或多个XSLT样式--with-http_xslt_module=dynamic enable dynamic ngx_http_xslt_module #动态的xslt模块--with-http_image_filter_module enable ngx_http_image_filter_module #开启图片转换功能,依赖 libgd 库,能够对图片进行转换格式,尺寸等--with-http_image_filter_module=dynamic #动态的image_filter模块enable dynamic ngx_http_image_filter_module--with-http_geoip_module enable ngx_http_geoip_module #开启GeoIP功能,需要geoIP 数据库的支持--with-http_geoip_module=dynamic enable dynamic ngx_http_geoip_module #动态geoip模块--with-http_sub_module enable ngx_http_sub_module #sub模块,用来替换相应包指定内容--with-http_dav_module enable ngx_http_dav_module #开启WebDAV功能,此方法可以开启PUT、DELETE、COPY、MKCOL、MOVE等HTTP方法,建议关闭--with-http_flv_module enable ngx_http_flv_module #流媒体模块--with-http_mp4_module enable ngx_http_mp4_module #mp4模块--with-http_gunzip_module enable ngx_http_gunzip_module #开启gzip方式传输模式,能够大大减少带宽消耗--with-http_gzip_static_module enable ngx_http_gzip_static_module #压缩静态页面的gizp模块--with-http_auth_request_module enable ngx_http_auth_request_module #基于请求的返回结果来控制用户鉴权--with-http_random_index_module enable ngx_http_random_index_module #响应用户以 “/” 结尾的请求,并在该目录下随机选择一个文件作为index文件。此模块先于 ngx_http_index_module 被执行--with-http_secure_link_module enable ngx_http_secure_link_module #开启安全链接功能。防盗链用--with-http_degradation_module enable ngx_http_degradation_module #内存不足时,Nginx将返回204或444给客户端--with-http_slice_module enable ngx_http_slice_module #开启切片模块,对大文件切片用--with-http_stub_status_module enable ngx_http_stub_status_module #nginx状态页面模块--without-http_charset_module disable ngx_http_charset_module #下面都是默认安装的模块,有需要可以关闭--without-http_gzip_module disable ngx_http_gzip_module--without-http_ssi_module disable ngx_http_ssi_module--without-http_userid_module disable ngx_http_userid_module--without-http_access_module disable ngx_http_access_module--without-http_auth_basic_module disable ngx_http_auth_basic_module--without-http_autoindex_module disable ngx_http_autoindex_module--without-http_geo_module disable ngx_http_geo_module--without-http_map_module disable ngx_http_map_module--without-http_split_clients_module disable ngx_http_split_clients_module--without-http_referer_module disable ngx_http_referer_module--without-http_rewrite_module disable ngx_http_rewrite_module--without-http_proxy_module disable ngx_http_proxy_module--without-http_fastcgi_module disable ngx_http_fastcgi_module--without-http_uwsgi_module disable ngx_http_uwsgi_module--without-http_scgi_module disable ngx_http_scgi_module--without-http_memcached_module disable ngx_http_memcached_module--without-http_limit_conn_module disable ngx_http_limit_conn_module--without-http_limit_req_module disable ngx_http_limit_req_module--without-http_empty_gif_module disable ngx_http_empty_gif_module--without-http_browser_module disable ngx_http_browser_module--without-http_upstream_hash_moduledisable ngx_http_upstream_hash_module--without-http_upstream_ip_hash_moduledisable ngx_http_upstream_ip_hash_module--without-http_upstream_least_conn_moduledisable ngx_http_upstream_least_conn_module--without-http_upstream_keepalive_moduledisable ngx_http_upstream_keepalive_module--without-http_upstream_zone_moduledisable ngx_http_upstream_zone_module--with-http_perl_module enable ngx_http_perl_module #开起perl模块--with-http_perl_module=dynamic enable dynamic ngx_http_perl_module #动态perl模块--with-perl_modules_path=PATH set Perl modules path--with-perl=PATH set perl binary pathname--http-log-path=PATH set http access log pathname #访问日志路径--http-client-body-temp-path=PATH set path to store #客户端上传内容临时存放位置,路径不存在则必须先创建http client request body temporary files--http-proxy-temp-path=PATH set path to store #作为代理服务器代理内容临时存放位置http proxy temporary files--http-fastcgi-temp-path=PATH set path to store #fastcgi协议工作时所需临时目录http fastcgi temporary files--http-uwsgi-temp-path=PATH set path to store #uwsgi协议工作时所需临时目录http uwsgi temporary files--http-scgi-temp-path=PATH set path to store #scgi协议工作时所需临时目录http scgi temporary files--without-http disable HTTP server--without-http-cache disable HTTP cache--with-mail enable POP3/IMAP4/SMTP proxy module #开起mail模块--with-mail=dynamic enable dynamic POP3/IMAP4/SMTP proxy module #开起mail动态模块--with-mail_ssl_module enable ngx_mail_ssl_module--without-mail_pop3_module disable ngx_mail_pop3_module--without-mail_imap_module disable ngx_mail_imap_module--without-mail_smtp_module disable ngx_mail_smtp_module--with-stream enable TCP/UDP proxy module #stream模块用于tcp/udp和负载均衡--with-stream=dynamic enable dynamic TCP/UDP proxy module #动态stream模块--with-stream_ssl_module enable ngx_stream_ssl_module--without-stream_limit_conn_module disable ngx_stream_limit_conn_module--without-stream_access_module disable ngx_stream_access_module--without-stream_upstream_hash_moduledisable ngx_stream_upstream_hash_module--without-stream_upstream_least_conn_moduledisable ngx_stream_upstream_least_conn_module--without-stream_upstream_zone_moduledisable ngx_stream_upstream_zone_module--with-google_perftools_module enable ngx_google_perftools_module #内存管理模块合理调配系统内存资源给服务器--with-cpp_test_module enable ngx_cpp_test_module #启用ngx_cpp_test_module支持--add-module=PATH enable external module #启用外部模块支持--add-dynamic-module=PATH enable dynamic external module #动态加载外部模块--with-cc=PATH set C compiler pathname #用于C编译环境非默认的情况,指向C编译器路径--with-cpp=PATH set C preprocessor pathname #指向C预处理路径--with-cc-opt=OPTIONS set additional C compiler options #设置C编译器参数--with-ld-opt=OPTIONS set additional linker options #设置连接文件参数--with-cpu-opt=CPU build for the specified CPU, valid values: #指定编译的CPUpentium, pentiumpro, pentium3, pentium4,athlon, opteron, sparc32, sparc64, ppc64--without-pcre disable PCRE library usage--with-pcre force PCRE library usage #url重写时所需模块,有更强大的正则引擎--with-pcre=DIR set path to PCRE library sources--with-pcre-opt=OPTIONS set additional build options for PCRE--with-pcre-jit build PCRE with JIT compilation support--with-md5=DIR set path to md5 library sources--with-md5-opt=OPTIONS set additional build options for md5--with-md5-asm use md5 assembler sources--with-sha1=DIR set path to sha1 library sources--with-sha1-opt=OPTIONS set additional build options for sha1--with-sha1-asm use sha1 assembler sources--with-zlib=DIR set path to zlib library sources gzip--with-zlib-opt=OPTIONS set additional build options for zlib--with-zlib-asm=CPU use zlib assembler sources optimizedfor the specified CPU, valid values:pentium, pentiumpro--with-libatomic force libatomic_ops library usage--with-libatomic=DIR set path to libatomic_ops library sources--with-openssl=DIR set path to OpenSSL library sources #openssl所在位置--with-openssl-opt=OPTIONS set additional build options for OpenSSL--with-debug enable debug logging
二、启动脚本
[root@ns1 init.d]# vim /etc/init.d/nginx    #编写启动脚本
#! /bin/bash
#
# nginx - this script starts and stops the nginx daemon
#
# chkconfig:   - 85 15
# description:  Nginx is an HTTP(S) server, HTTP(S) reverse \
#               proxy and IMAP/POP3 proxy server
#
# processname: nginx
# config:      /etc/nginx/nginx.conf
# pidfile:     /var/run/nginx/nginx.pid# Source function library.
. /etc/rc.d/init.d/functions# Source networking configuration.
. /etc/sysconfig/network# Check that networking is up.
[ "$NETWORKING" = "no" ] && exit 0nginx="/usr/local/nginx/sbin/nginx"    #根据自己的安装位置修改这里
prog=$(basename $nginx)NGINX_CONF_FILE="/etc/nginx/nginx.conf"    #修改这里[ -f /etc/sysconfig/nginx ] && . /etc/sysconfig/nginxlockfile=/var/lock/nginx.lock    #修改这里start() {[ -x $nginx ] || exit 5[ -f $NGINX_CONF_FILE ] || exit 6echo -n $"Starting $prog: "daemon $nginx -c $NGINX_CONF_FILEretval=$?echo[ $retval -eq 0 ] && touch $lockfilereturn $retval
}stop() {echo -n $"Stopping $prog: "killproc $prog -QUITretval=$?echo[ $retval -eq 0 ] && rm -f $lockfilereturn $retval
}restart() {configtest || return $?stopsleep 1start
}reload() {configtest || return $?echo -n $"Reloading $prog: "killproc $nginx -HUPRETVAL=$?echo
}force_reload() {restart
}configtest() {$nginx -t -c $NGINX_CONF_FILE
}rh_status() {status $prog
}rh_status_q() {rh_status >/dev/null 2>&1
}case "$1" instart)rh_status_q && exit 0$1;;stop)rh_status_q || exit 0$1;;restart|configtest)$1;;reload)rh_status_q || exit 7$1;;force-reload)force_reload;;status)rh_status;;condrestart|try-restart)rh_status_q || exit 0;;*)echo $"Usage: $0 {start|stop|status|restart|condrestart|try-restart|reload|force-reload|configtest}"exit 2
esac[root@localhost nginx-1.10.0]# chmod 755 /etc/init.d/nginx
[root@localhost nginx-1.10.0]# service nginx restart
#开机启动
[root@localhost nginx-1.10.0]# chkconfig --add nginx
[root@localhost nginx-1.10.0]# chkconfig nginx on
[root@localhost nginx-1.10.0]# chkconfig --list nginx
nginx           0:关 1:关 2:开 3:开 4:开 5:开 6:关
三、配置2个基于nginx的web
(172.16.22.39)(172.16.22.40)
[root@ns2 ~]# vim /etc/nginx/nginx.conf
user  nginx;    #以哪个用户的身份运行nginx
worker_processes  1;    #运行几个worker进程error_log  /var/log/nginx/error.log;    #错误日志位置
#error_log  logs/error.log  notice;
#error_log  logs/error.log  info;pid        /var/run/nginx/nginx.pid;    #pid文件位置events {worker_connections  1024;    #一个worker进程的最大并发数量
}http {include       mime.types;default_type  application/octet-stream;log_format  main  '$remote_addr - $remote_user [$time_local] "$request" '        #日志格式'$status $body_bytes_sent "$http_referer" ''"$http_user_agent" "$http_x_forwarded_for"';access_log  /var/log/nginx/access.log  main;    #访问日志位置和应用上面的格式sendfile        on;#tcp_nopush     on;#keepalive_timeout  0;keepalive_timeout  65;        #持久连接时间gzip  on;                #开起gzip压缩server {listen       80;server_name  ns3.xinfeng.com;#charset koi8-r;#access_log  logs/host.access.log  main;location / {root   /var/www/html;    #根目录位置index  index.html index.htm;    #首页索引文件}#error_page  404              /404.html;# redirect server error pages to the static page /50x.html#error_page   500 502 503 504  /50x.html;        #错误页面位置location = /50x.html {root   html;}
}
[root@ns2 ~]# vim /var/www/html/index.html
<h1>ns2.xinfeng.com</h1>
[root@ns2 ~]# service nginx start[root@ns3 ~]# vim /var/www/html/index.html
<h1>ns3.xinfeng.com</h1>
[root@ns3 ~]# vim /var/www/html/ds.html
<h1>There is ds.</h1>
[root@ns3 ~]# service nginx start
四、配置反向代理,负载均衡,缓存
1、创建缓存目录和修改hosts文件(172.16.22.38)
#创建缓存目录(172.16.22.38),修改hosts文件(全部主机)
[root@ns1 ~]# mkdir -pv /cache/nginx
[root@ns1 ~]# chown nginx:nginx /cache/nginx
[root@ns1 ~]# vim /etc/hosts
172.16.22.38    ns1.xinfeng.com
172.16.22.39    ns2.xinfeng.com
172.16.22.40    ns3.xinfeng.com
#另外两台也要修改
2、修改代理服务器配置文件(172.16.22.38)
[root@ns1 ~]# vim /etc/nginx/nginx.conf
user  nginx;
worker_processes  1;error_log  /var/log/nginx/error.log error;pid        /var/run/nginx/nginx.pid;events {worker_connections  1024;
}http {include       /etc/nginx/mime.types;default_type  application/octet-stream;log_format  main  '$remote_addr - $remote_user [$time_local] "$request" ''$status $body_bytes_sent "$http_referer" ''"$http_user_agent" "$http_x_forwarded_for"';access_log  /var/log/nginx/access.log  main;proxy_cache_path /cache/nginx/ levels=1:1 keys_zone=mycache:32m;    #缓存路径,1:1表示1级目录下有1个子目录,缓存key名称为mycache后面调用时要用,缓存大小为32msendfile        on;#tcp_nopush     on;keepalive_timeout  65;gzip  on;upstream xinfengsvr {        #定义一个负载均衡组,组名叫xinfengsvr,下面直接调用组名server 172.16.22.39:80 weight=1 max_fails=2 fail_timeout=1;    #权重1,错误2次,每次超时1秒,就算健康状态,检测失败,还可以在后面街上backup将次服务器作为备用服务器server 172.16.22.40:80 weight=1 max_fails=2 fail_timeout=1;    #}server {listen       80;server_name  ns1.xinfeng.com;location / {root    /var/www/html;index    index.html index.htm;proxy_pass   http://xinfengsvr/;    #将对本服务器首页的请求代理至负载均衡组xinfengsvr,以实现负载均衡}location /index/ {proxy_cache mycache;    #调用缓存key为mycaheproxy_cache_valid 200 1m;    #返回值为200的缓存1分钟#root   /var/www/html;proxy_pass http://172.16.22.40/ds.html;    #将url为/index/的代理至ns3.xinfeng.com/ds.htmlproxy_set_header Host $host;        #把客户端真实主机名传递给后端服务器proxy_set_header X-Real-IP $remote_addr;    #把客户端真实ip传递给后端服务器index  index.html index.htm;}error_page   500 502 503 504  /50x.html;location = /50x.html {root   /var/www/html;}}}[root@ns1 ~]# service nginx reload
[root@ns1 ~]# service nginx restart
在把客户端ip发给后端服务器时,apache需要修改httpd.conf
LogFormat "%{X-Real-IP}i %l %u %t \"%r\" %>s %b \"%{Referer}i\" \"%{User-Agent}i\"" combined
LogFormat "%h %l %u %t \"%r\" %>s %b" common
LogFormat "%{Referer}i -> %U" referer
LogFormat "%{User-agent}i" agent
如果是后端nginx,需要修改nginx.conf
--with-http_realip_module    #需要安装时开起此模块
set_real_ip_from   192.168.1.0/24;     #这里是前端代理服务器ip,可以是单个IP或者IP段
set_real_ip_from   192.168.2.1;
real_ip_header     X-Real-IP;
五、查看结果
1、查看缓存结果
[root@ns1 ~]# cd /cache/nginx
[root@ns1 ~]# ls
5
[root@ns1 ~]# ls 5/d/a9c378c70c62b5ed29dac22910c12ad5
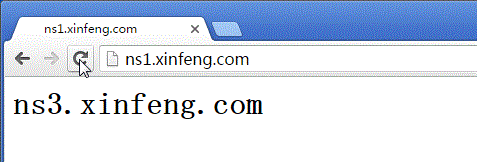
2、负载均衡效果
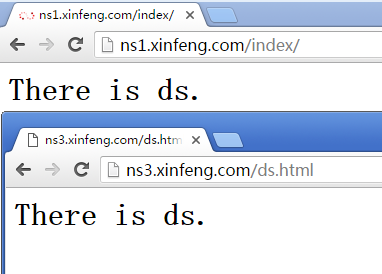
3、反向代理效果
转载于:https://blog.51cto.com/5165807/2317282
编译安装nginx并实现反向代理负载均衡和缓存功能相关推荐
- Nginx特性验证-反向代理/负载均衡/页面缓存/URL重定向
原文发表于cu:2016-08-25 参考文档: Nginx 反向代理.负载均衡.页面缓存.URL重写等:http://freeloda.blog.51cto.com/2033581/1288553 ...
- Centos7编译安装nginx并设置反向代理
一.编译部署Nginx 1.12 安装配置: [root@localhost ~]# groupadd nginx [root@localhost ~]# useradd -s /sbin/nolog ...
- 编译安装nginx实现反向代理、负载均衡、缓存功能
一.编译安装nginx 1.下载 [root@ns1 ~]# wget http://nginx.org/download/nginx-1.10.0.tar.gz 2.解压 [root@ns1 ~]# ...
- Nginx总结(安装,使用,正向代理,反向代理,负载均衡)
目录 Nginx介绍与安装 一.Nginx简介 1.什么是ngnix 2.nginx应用场景 二.Nginx安装与启动 Nginx静态网站部署 一.静态⽹站的部署 二.配置虚拟主机 1.端⼝绑定 2. ...
- Nginx反向代理 负载均衡sky
Nginx服务部署 Nginx简介 Nginx (engine x) 是一个轻量级的.高性能的HTTP和反向代理服务器,也是一个IMAP/POP3/SMTP服务器.Nginx是由伊戈尔·赛索耶夫为俄罗 ...
- Nginx反向代理负载均衡虚拟主机动静分离UrlRewrite防盗链
文章目录 1. Nginx简介 1.1 Nginx背景 1.2 Nginx的优点 1.3 Nginx的功能特性及常用功能 2.Nginx安装 2.1 下载上传解压 1.2 安装 3.nginx核心概念 ...
- Nginx 反向代理 负载均衡 虚拟主机
Nginx 反向代理 负载均衡 虚拟主机配置 通过本章你将学会利用Nginx配置多台虚拟主机,清楚代理服务器的作用,区分正向代理和反向代理的区别,搭建使用Nginx反向搭理和负载均衡,了解Nginx常 ...
- nginx 反向代理负载均衡 tomcat集群应用
nginx 反向代理负载均衡 tomcat集群应用 环境介绍: 系统:centos5.8_64 192.168.0.201:nginx服务器 192.168.0.202:tomcat服务器 192.1 ...
- linux上安装nginx及实现反向代理
nginx是高性能的http和反向代理的服务器.占用内存少,并发能力强. 主要作用有:反向代理.负载均衡.动静结合. 接下来我将描述一下如何安装nginx,同时实现反向代理功能. 1.安装nginx ...
最新文章
- AR智能提升工业效率的4大场景与应用实践!
- CentOS常见配置
- 重磅回击!ZeniMax回击Oculus新试验
- 神经网络模式识别matlab,基于matlab仿真的神经网络模式识别
- Material Design学习之 Snackbars(详细分析,Toast的加强版)
- 2019蓝桥杯省赛---java---A---4(迷宫)
- java ee基础知识_Java EE:基础知识
- #error This file requires compiler and library support for the ISO C++ 2011 standard
- 加载模型图_Tensorflow ckpt模型加载时的命名映射
- VBA如何打开html文件6,VBA程序中如何自动打开网页
- WPS_Word空白页删除
- 计算机学院王乐君,自动化学院2019年研究生科技报告会安排-中国地质大学(武汉)自动化学院...
- 真香啊,手把手教你使用 Python 获取基金信息
- 技术胖TypeScript图文视频教程
- [渝粤教育] 北京师范大学 中国哲学 参考 资料
- VUI参数语义,色彩原色图表,高宽比标示符含义图表
- uniapp修改字体
- 人人网的相册里图片上传功能是怎样实现的
- PostgreSQL 数据库下载安装
- java adt用vbox_JavaFX:动态添加的VBox没有显示出来