Mysql 复制原理以及配置 简要分析
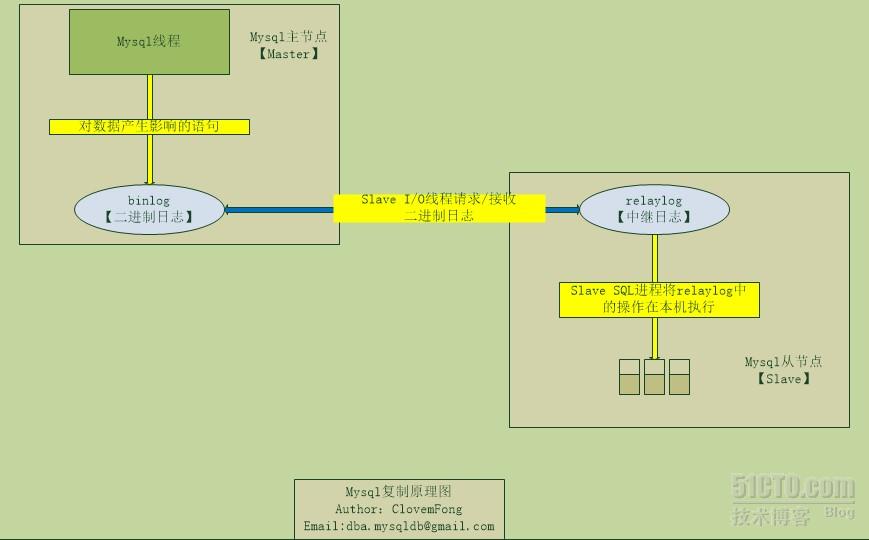
这个图是我根据自己的理解将Mysql的主从复制的流程给画了出来,关于什么是Mysql主从复制技术,这里简单说一下。
有一次去一家刚刚成立的游戏公司面试,面试官问用过Mysql主从技术吗?我说:用过,我在产品中使用了双主复制。然后他质疑:复制是什么?不是都说主从吗?
然后我就石化了,他可能只听过主从,却不知复制,这里阐述 一下,主从表示的是架构类型,主服务器跟从服务器,而复制是实现这种架构的技术,不管是主从,还是主主都是Mysql的复制技术实现的。一个是服务器架构层面,一个是技术层面,这是个插曲。
使用场景: 数据库数据做冗余策略 / 数据库读写过于频繁,用于读写分离
架构类型: 主从,主主,一主多从,双主多从,环形复制 等
配置复杂: 不复杂 :)
好了,现在来简单描述一下上图的流程。
首先需要做复制,必备条件:主服务器开启二进制日志[binlog]功能(主从架构中,从服务器不用开启二进制日志功能)
二进制日志文件主要用于存放对数据产生了影响的语句,对数据未产生影响的,比如select查询语句是不会被记录下来的,如果需要对数据库进行优化操作,有必要找出需要优化的SQL查询语句,则开启慢查询日志,用于记录性能低下的SQL语句(keystone先生 如果看到这边注意下吧: ) )
从服务器上面有个中继日志[relay-log] 以及两个线程(I/O线程以及SQL线程),当主服务器上面的数据发生了变化,二进制日志文件会记录相应的SQL语句,从服务器然后通过I/O线程请求并接受主服务器其的二进制日志文件内容,记录到本地的中继日志中,最后通过SQL线程将中继日志中的SQL语句再次执行,由此保证本地的数据跟主服务器一致。
以上就是主从复制的一个大概流程,也可以看出,复制的时候并不是主服务器的数据发生变化后,从服务器上的数据立即同步的,中间总会有这样的过程,所以复制技术被定义为:异步复制。所以复制只能从最大程度上面保证主从服务器的数据 ,而并不能完全保证,所以后来出现了“半同步复制技术”,特别是在一主多从复制中用的比较广泛,旨在保证至少一台从服务器跟主服务器完全一致。
那么什么是“半同步复制”呢? 听名字半同步也就知道肯定还是异步了,其实这个半同步复制个人觉得跟什么异步复制特性关系不大了,也应该从架构上面去分析,半同步复制指的是:主服务器必须保证其一个从服务器的中继日志完整之后才会提交操作,然后将数据从日志文件中写入磁盘。
现在简单说下如何配置Mysql的主从复制吧(mysql版本最好保证一致性或者从服务器高于主服务器)
1.安装主从服务器Mysql (版本5.6.11)
主服务器信息:
[root@master ~]# hostname  --fqdn
master.clovem.com
[root@master ~]# ip addr show eth0
2: eth0: <BROADCAST,MULTICAST,UP,LOWER_UP> mtu 1500 qdisc pfifo_fast state UP qlen 1000link/ether 52:54:00:a7:b7:56 brd ff:ff:ff:ff:ff:ffinet 192.168.3.176/24 brd 192.168.3.255 scope global eth0inet6 fe80::5054:ff:fea7:b756/64 scope linkvalid_lft forever preferred_lft forever
从服务器信息:
root@slave ~]# hostname  --fqdn
slave.clovem.com
[root@slave ~]# ip addr show eth0
2: eth0: <BROADCAST,MULTICAST,UP,LOWER_UP> mtu 1500 qdisc pfifo_fast state UP qlen 1000link/ether 52:54:00:63:dd:89 brd ff:ff:ff:ff:ff:ffinet 192.168.3.130/24 brd 192.168.3.255 scope global eth0inet6 fe80::5054:ff:fe63:dd89/64 scope linkvalid_lft forever preferred_lft forever
检查依赖包,开始安装mysql软件:
[root@master ~]# rpm -q gcc gcc-c++ make cmake ncurses-devel bison
gcc-4.4.6-4.el6.x86_64
gcc-c++-4.4.6-4.el6.x86_64
make-3.81-20.el6.x86_64
cmake-2.6.4-5.el6.x86_64
ncurses-devel-5.7-3.20090208.el6.x86_64
bison-2.4.1-5.el6.x86_64
[root@master ~]# cd mysql-5.6.11
[root@master mysql-5.6.11]# cmake . \
-DCMAKE_INSTALL_PREFIX=/usr/local/mysql/ \
-DWITH_INNOBASE_STORAGE_ENGINE=1\-DENABLED_LOCAL_INFILE=1\-DEXTRA_CHARSETS=all -DDEFAULT_CHARSET=utf8 \-DDEFAULT_COLLATION=utf8_general_ci -DWITH_DEBUG=0
[root@master mysql-5.6.11]#make ; make install
主要参数解释:
-DCMAKE_INSTALL_PREFIX=/usr/local/mysql/ 指定安装路径
-DWITH_INNOBASE_STORAGE_ENGINE=1 启用INNODB存储引擎
-DEXTRA_CHARSETS=all -DDEFAULT_CHARSET=utf8 允许所有字符集,默认字符集为utf8
-DDEFAULT_COLLATION=utf8_general_ci 指定字符校验规则为utf8_general_ci
2. 安装结束,初始化系统数据:
[root@master ~]# useradd  mysql
[root@master ~]# mkdir /data
[root@master ~]# chown  mysql.mysql /data/
[root@master ~]# /usr/local/mysql/scripts/mysql_install_db  --user=mysql --basedir=/usr/local/mysql/ --datadir=/data
3. 修改配置文件以及添加启动脚本:
[root@master ~]# cat /etc/my.cnf
[mysqld]
port=3306
user=mysql
basedir=/usr/local/mysql
datadir=/data
socket=/data/mysql.sock
pid-file=/data/mysql.pid
log-bin=master-bin
server-id=10
slave节点配置文件,主要区别server-id=11,数值需要大于主节点,优先级低
[root@slave ~]# cat /etc/my.cnf
[mysqld]
port=3306
user=mysql
basedir=/usr/local/mysql
datadir=/data
socket=/data/mysql.sock
pid-file=/data/mysql.pid
log-bin=slave-bin
server-id=11
配置启动脚本:
[root@slave ~]# cp /usr/local/mysql/support-files/mysql.server  /etc/init.d/mysqld
[root@slave ~]# chmod +x  /etc/init.d/mysqld
[root@slave ~]#chkconfig --add mysqld
[root@slave ~]#chkconfig mysqld  on //设为开机启动
4. 启动mysql
[root@master ~]# service mysqld start
Starting MySQL SUCCESS!
[root@master ~]# ps -ef |grep mysql
root     10903     1  0 06:01 pts/0    00:00:00 /bin/sh /usr/local/mysql/bin/mysqld_safe --datadir=/data --pid-file=/data/mysql.pid
mysql    11110 10903  0 06:01 pts/0    00:00:01 /usr/local/mysql/bin/mysqld --basedir=/usr/local/mysql --datadir=/data --plugin-dir=/usr/local/mysql/lib/plugin --user=mysql --log-error=/data/master.clovem.com.err --pid-file=/data/mysql.pid --socket=/data/mysql.sock --port=3306
[root@slave ~]# service mysqld start
Starting MySQL..          [  OK  ]
[root@slave ~]# ps -ef |grep mysql
root     31033     1  1 14:12 pts/0    00:00:00 /bin/sh /usr/local/mysql/bin/mysqld_safe --datadir=/data --pid-file=/data/mysql.pid
mysql    31238 31033  7 14:12 pts/0    00:00:00 /usr/local/mysql/bin/mysqld --basedir=/usr/local/mysql --datadir=/data --plugin-dir=/usr/local/mysql/lib/plugin --user=mysql --log-error=/data/slave.clovem.com.err --pid-file=/data/mysql.pid --socket=/data/mysql.sock --port=3306
5.创建具备复制权限的用户rep_slave
[root@master ~]# mysql -S /data/mysql.sock
Welcome to the MySQL monitor.  Commands end with ; or \g.
Your MySQL connection id is 2
Server version: 5.6.11-log Source distribution
Copyright (c) 2000, 2011, Oracle and/or its affiliates. All rights reserved.
Oracle is a registered trademark of Oracle Corporation and/or its
affiliates. Other names may be trademarks of their respective
owners.
Type 'help;' or '\h' for help. Type '\c' to clear the current input statement.
mysql> GRANT REPLICATION SLAVE,REPLICATION CLIENT ON *.* TO rep_slave@'slave.clovem.com' IDENTIFIED BY 'slave123456';
Query OK, 0 rows affected (0.01 sec)
mysql> FLUSH PRIVILEGES;
Query OK, 0 rows affected (0.00 sec)
mysql> QUIT
Bye
6.验证用户是否创建成功
[root@slave ~]# mysql -urep_slave -pslave123456 -hmaster.clovem.com
Welcome to the MySQL monitor.  Commands end with ; or \g.
Your MySQL connection id is 3
Server version: 5.6.11-log Source distribution
Copyright (c) 2000, 2011, Oracle and/or its affiliates. All rights reserved.
Oracle is a registered trademark of Oracle Corporation and/or its
affiliates. Other names may be trademarks of their respective
owners.
Type 'help;' or '\h' for help. Type '\c' to clear the current input statement.
mysql> SHOW GRANTS;
+---------------------------------------------------------------------------------------------------------------------------------------------------------+
| Grants for rep_slave@slave.clovem.com                                                                                                                   |
+---------------------------------------------------------------------------------------------------------------------------------------------------------+
| GRANT REPLICATION SLAVE, REPLICATION CLIENT ON *.* TO 'rep_slave'@'slave.clovem.com' IDENTIFIED BY PASSWORD '*F30CB7DBFF2ADA396886C76E18C15F6B8AE108C8' |
+---------------------------------------------------------------------------------------------------------------------------------------------------------+
1 row in set (0.00 sec)
mysql> QUIT
Bye
7.记录主服务器当前二进制日志文件信息
(1)查看二进制日志文件功能是否开启
(2)对所有的表加读锁,不可以写入数据【没有配置完成之前退出该mysql终端】
(3)查看当前二进制日志文件信息:当前二进制日志文件名[master-bin.000002]以及位置[437]
[root@master ~]# mysql -S /data/mysql.sock
Welcome to the MySQL monitor.  Commands end with ; or \g.
Your MySQL connection id is 6
Server version: 5.6.11-log Source distribution
Copyright (c) 2000, 2011, Oracle and/or its affiliates. All rights reserved.
Oracle is a registered trademark of Oracle Corporation and/or its
affiliates. Other names may be trademarks of their respective
owners.
Type 'help;' or '\h' for help. Type '\c' to clear the current input statement.
mysql> FLUSH TABLES WITH READ LOCK;
Query OK, 0 rows affected (0.00 sec)
mysql> SHOW VARIABLES LIKE '%log_bin%';
+---------------------------------+------------------------+
| Variable_name                   | Value                  |
+---------------------------------+------------------------+
| log_bin                         | ON                     |
| log_bin_basename                | /data/master-bin       |
| log_bin_index                   | /data/master-bin.index |
| log_bin_trust_function_creators | OFF                    |
| log_bin_use_v1_row_events       | OFF                    |
| sql_log_bin                     | ON                     |
+---------------------------------+------------------------+
6 rows in set (0.00 sec)
mysql> SHOW MASTER STATUS;
+-------------------+----------+--------------+------------------+-------------------+
| File              | Position | Binlog_Do_DB | Binlog_Ignore_DB | Executed_Gtid_Set |
+-------------------+----------+--------------+------------------+-------------------+
| master-bin.000002 |      437 |              |                  |                   |
+-------------------+----------+--------------+------------------+-------------------+
1 row in set (0.00 sec)
mysql>
8. 指向主服务器
[root@slave ~]# mysql -S /data/mysql.sock
Welcome to the MySQL monitor.  Commands end with ; or \g.
Your MySQL connection id is 2
Server version: 5.6.11-log Source distribution
Copyright (c) 2000, 2011, Oracle and/or its affiliates. All rights reserved.
Oracle is a registered trademark of Oracle Corporation and/or its
affiliates. Other names may be trademarks of their respective
owners.
Type 'help;' or '\h' for help. Type '\c' to clear the current input statement.
mysql> CHANGE MASTER TO-> MASTER_HOST='master.clovem.com',-> MASTER_USER='rep_slave',-> MASTER_PASSWORD='slave123456',-> MASTER_PORT=3306,-> MASTER_LOG_FILE='master-bin.000002',-> MASTER_LOG_POS=437;
Query OK, 0 rows affected, 2 warnings (0.36 sec)
mysql> START SLAVE;
Query OK, 0 rows affected (0.04 sec)
mysql> SHOW SLAVE STATUS\G
*************************** 1. row ***************************Slave_IO_State: Waiting for master to send eventMaster_Host: master.clovem.comMaster_User: rep_slaveMaster_Port: 3306Connect_Retry: 60Master_Log_File: master-bin.000002Read_Master_Log_Pos: 437Relay_Log_File: mysql-relay-bin.000002Relay_Log_Pos: 284Relay_Master_Log_File: master-bin.000002Slave_IO_Running: YesSlave_SQL_Running: YesReplicate_Do_DB:Replicate_Ignore_DB:Replicate_Do_Table:Replicate_Ignore_Table:Replicate_Wild_Do_Table:Replicate_Wild_Ignore_Table:Last_Errno: 0Last_Error:Skip_Counter: 0Exec_Master_Log_Pos: 437Relay_Log_Space: 457Until_Condition: NoneUntil_Log_File:Until_Log_Pos: 0Master_SSL_Allowed: NoMaster_SSL_CA_File:Master_SSL_CA_Path:Master_SSL_Cert:Master_SSL_Cipher:Master_SSL_Key:Seconds_Behind_Master: 0
Master_SSL_Verify_Server_Cert: NoLast_IO_Errno: 0Last_IO_Error:Last_SQL_Errno: 0Last_SQL_Error:Replicate_Ignore_Server_Ids:Master_Server_Id: 10Master_UUID: 0a2335d4-ce2b-11e2-bde9-525400a7b756Master_Info_File: /data/master.infoSQL_Delay: 0SQL_Remaining_Delay: NULLSlave_SQL_Running_State: Slave has read all relay log; waiting for the slave I/O thread to update itMaster_Retry_Count: 86400Master_Bind:Last_IO_Error_Timestamp:Last_SQL_Error_Timestamp:Master_SSL_Crl:Master_SSL_Crlpath:Retrieved_Gtid_Set:Executed_Gtid_Set:Auto_Position: 0
1 row in set (0.00 sec)
mysql>
成功标志:
Slave_IO_Running: Yes
Slave_SQL_Running: Yes
这两个线程就是上文所说的读取二进制日志,写中继日志的I/O进程
以及将中继日志中的SQL语句执行成功的SQL进程
状态均为YES,基本表明配置成功。
9.在主服务器上面创建数据进行测试
mysql> UNLOCK TABLES;
Query OK, 0 rows affected (0.00 sec)
mysql> SHOW DATABASES;
+--------------------+
| Database           |
+--------------------+
| information_schema |
| mysql              |
| performance_schema |
| test               |
+--------------------+
4 rows in set (0.00 sec)
mysql> CREATE DATABASE clovemdb;
Query OK, 1 row affected (0.00 sec)
mysql> USE  clovemdb;
Database changed
mysql> CREATE TABLE t1(id INT, name VARCHAR(10));
Query OK, 0 rows affected (0.20 sec)
mysql> INSERT INTO t1  SELECT 1,'clovemfong';
Query OK, 1 row affected (0.02 sec)
Records: 1  Duplicates: 0  Warnings: 0
mysql> INSERT INTO t1  SELECT 2,'wanghao';
Query OK, 1 row affected (0.03 sec)
Records: 1  Duplicates: 0  Warnings: 0
mysql> INSERT INTO t1  SELECT 3,'lichunfeng';
Query OK, 1 row affected (0.01 sec)
Records: 1  Duplicates: 0  Warnings: 0
mysql> SELECT COUNT(*) FROM t1;
+----------+
| COUNT(*) |
+----------+
|        3 |
+----------+
1 row in set (0.00 sec)
mysql> SELECT * FROM t1;
+------+------------+
| id   | name       |
+------+------------+
|    1 | clovemfong |
|    2 | wanghao    |
|    3 | lichunfeng |
+------+------------+
3 rows in set (0.00 sec)
mysql>
10.在从服务器上面验证数据是否同步
注意:由于没有在配置文件中指定需要复制的数据库或者表,默认复制主服务器上面的全部库以及表数据
[root@slave ~]# mysql -S /data/mysql.sock  -e "SHOW DATABASES;"
+--------------------+
| Database           |
+--------------------+
| information_schema |
| clovemdb           |
| mysql              |
| performance_schema |
| test               |
+--------------------+
[root@slave ~]# mysql -S /data/mysql.sock  clovemdb -e  "SHOW TABLES;"
+--------------------+
| Tables_in_clovemdb |
+--------------------+
| t1                 |
+--------------------+
[root@slave ~]# mysql -S /data/mysql.sock  clovemdb -e  "SELECT * FROM t1;"
+------+------------+
| id   | name       |
+------+------------+
|    1 | clovemfong |
|    2 | wanghao    |
|    3 | lichunfeng |
+------+------------+
通过上面的步骤可以成功配置两台mysql服务器为主从架构了,希望大家成功!
下面贴出一些生产环境中一些问题棘手问题的参数:
slave-skip-errors=all
//该参数用来跳过所有SQL报错的,一般情况下面,如果复制过程中发生了语句报错信息,比如主服务器删除一个有外键的表数据,结果删除失败,这个时候整个复制都会终止,就需要重新启动slave进程,如果对自己的产品中的语句信心没那么大的话,建议加上此参数,否则在主服务器宕机之后,你会很悲剧的发现原来从服务器没有最新数据!
log-slave-updates
//这个参数比较有意思了,这边暂时不阐述,后面有机会写双主多从的时候再去涉及,作用是非常大滴。
replicate-do-db = clovemdb
//这个参数用于定义需要复制的数据库,指定之后就不会复制所有的库了
//以上两个 参数是在配置主主复制的时候使用的,主要防止自动增长列发生重复
auto-increment-increment 该参数的值是定义“步长”,一般设置为主节点的个数,主主复制就是2
auto-increment-offset 该参数的值是定义初始化值,从1到主节点个数最大值。
Mysql 复制原理以及配置 简要分析相关推荐
- MySQL复制原理与配置
一.Mysql复制基本原理 二.Mysql复制中Binlog的三种格式 2.1 三种格式的介绍 2.2 Binlog格式的优缺点 2.3 Binlog基本配置 三.Mysql常见两种复制方式 3.1 ...
- mysql 半同步 原理_MySQL半同步复制原理与配置详解
一 .异步.同步和半同步复制概念 异步复制(Asynchronous replication),MySQL默认的复制是异步的,主库在执行完客户端提交的事务后会立即将结果返给给客户端,并不关心从库是否已 ...
- MYSQL复制原理及其流程-详
MySQL复制概述 保证主服务器(Master)和从服务器(Slave)的数据是一致性的,向Master插入数据后,Slave会自动从Master把修改的数据同步过来(有一定的延迟),通过这种方式来保 ...
- MySQL复制原理及过程
Replication基本原理 异步复制:从主机拷贝到备机过程中会有延迟,延迟通常由网络.资源可用性和系统负载来决定.使用合适架构和调优,大多复制几乎是瞬间完成的. 同步复制:数据同时向一台或多台机器 ...
- 高性能Mysql主从架构的复制原理及配置详解
1 复制概述 Mysql内建的复制功能是构建大型,高性能应用程序的基础.将Mysql的数据分布到多个系统上去,这种分布的机制,是通过将Mysql的某一台主机的数据复制到其它主机(slaves)上,并重 ...
- mysql (master/slave)复制原理及配置
1 复制概述 Mysql内建的复制功能是构建大型,高性能应用程序的基础.将Mysql的数据分布到多个系统上去,这种分布的机制,是通过将Mysql的某一台主机的数据复制到其它主机(slaves)上,并重 ...
- Mysql学习总结(18)——Mysql主从架构的复制原理及配置详解
一.复制概述 Mysql内建的复制功能是构建大型,高性能应用程序的基础.将Mysql的数据分布到多个系统上去,这种分布的机制,是通过将Mysql的某一台主机的数据复制到其它主机(slaves)上,并重 ...
- 猫眼电影MySQL数据库怎么写_MySQL简要分析猫眼电影TOP100榜
作者:国服帅座 经济学在读硕士 公众号:统计之家 提出问题 对于广大电影爱好者来说,猫眼平台提供了海量电影信息.在其官网上有一个TOP100榜单,我们使用SQL语句简单分析该榜单电影,试图了解如下这些 ...
- mq mysql复制_activemq持久化配置,设置为主从模式(带复制的主从模式,应用mysql数据库)...
配置文件如下 xmlns="http://www.springframework.org/schema/beans" xmlns:amq="http://activemq ...
最新文章
- 谁登录了你的linux
- 三十五、虚拟内存的基本概念
- zabbix安装--LAMP环境下
- K8S 基于NFS实现文件集群间共享
- 解决未知的服务器标记“asp:ListView”。
- 多层协议解析 c语言,基于DPI的应用层协议书解析.doc
- 寒武纪CTO梁军离职 公司股价跌超9%
- nsdictionary获取值_objective-c – 在NSDictionary中获取值
- NP、OSPF监测调试
- c#socket编程 (转)
- access笔试答案_ACCESS数据库考试试题及答案
- 三星电子能从硬件公司转型成软件公司吗?
- Django REST framework 中文文档
- 高性能计算机介绍,曙光个人高性能计算机介绍
- PAT(甲级)2021年冬季考试 7-2 Rank a Linked List
- java能否构成三角形_java中判断三个参数是否能构成三角形的方法
- 论文阅读《Contextual-based Image Inpainting: Infer, Match, and Translate》
- 今天去google中国采访从google总部回来的工程师(多图)
- 3种团队分组适应项目_对于新组建的团队,项目经理可以采用这5个破冰练习
- JZOJ-senior-5934. 【NOIP2018模拟10.29】列队
热门文章
- bat脚本交互输入_windows 10 如何设定计划任务自动执行 python 脚本?
- pro android学习笔记,【转】Pro Android学习笔记(一):Android 平台 2013.6.4
- python读取二进制数据转整形,在python中读取二进制数据(替换C代码)
- 爬取亚马逊评论_如何利用插件抓取亚马逊评论和关键词?
- java局部内部类_Java 局部内部类、匿名内部类详解
- C++ 变量和常量
- linux 定时任务 crontab
- opencv-api fit
- oracle linux hugepage,LInux下为什么配置HugePages及配置步骤
- kafka消息处理失败后如何处理_面试题:Kafka 会不会丢消息?怎么处理的?