NVIDIA之AI Course:Getting Started with AI on Jetson Nano—Class notes(二)
NVIDIA之AI Course:Getting Started with AI on Jetson Nano—Class notes(二)
Notice
The original text comes from NVIDIA-AI Course. This article only provides Chinese translation.
Setting up your Jetson Nano
正在更新……
Introduction
The NVIDIA® Jetson Nano™ Developer Kit is a small AI computer for makers, learners, and developers. After following along with this brief guide, you’ll be ready to start building practical AI applications, cool AI robots, and more.
NVIDIA®Jetson Nano™Developer Kit是一款面向制造商、学习者和开发人员的小型人工智能计算机。在遵循了这个简短的指南之后,您将准备好开始构建实际的AI应用程序、酷的AI机器人等等。
![]()
![]()
Initially, a computer with Internet connection and the ability to flash your microSD card is also required. Downloading the image may take a considerable amount of time, depending on your internet speed. You may wish to begin downloading the NVIDIA DLI Jetson Nano SD Card Image immediately so that it can work in the background while you review the rest of the setup information.
才开始,还需要一台具有能够联网和带有闪存microSD卡功能的计算机。下载图像可能需要相当长的时间,这取决于您的互联网速度。您可能希望立即开始下载NVIDIA DLI Jetson nano SD卡图像,以便在您查看其余设置信息时在后台工作。
Included In The Box
Your Jetson Nano Developer Kit box includes: 您的Jetson Nano开发工具包包括
- Jetson Nano Developer Kit Jetson Nano开发工具包
- Small paper card with quick start and support information. 小纸卡具有快速启动和支持信息
- Folded paper stand
For This Course, You’ll Also Need: 这门课,你还需要
- microSD Memory Card (32GB UHS-I minimum),microSD存储卡(最小32GB UHS-I)
- 5V 4A Power Supply with 2.1mm DC barrel connector,5V 4A电源,2.1mm直流电筒连接器
- 2-pin Jumper 2针跨接器
- Compatible camera: 兼容的相机:
- Logitech C270 USB Webcam,Logitech C270 USB网络摄像头
- Raspberry Pi Camera Module v2 with CSI camera connector ,Raspberry Pi相机模块v2与CSI相机连接器
- USB cable (Micro-B to Type-A) USB线(微型b至a型)
Prepare For Setup 准备安装
Items For Getting Started 入门项目
MicroSD Card
The Jetson Nano Developer Kit uses a microSD card as a boot device and for main storage. It’s important to have a card that’s fast and large enough for your projects; the minimum recommended for this course is a 32GB UHS-I card.
Jetson Nano开发工具包使用microSD卡作为引导设备和主存储。对于你的项目来说,拥有一张足够快和足够大的卡片是很重要的;本课程推荐的最小容量是32GB的UHS-I卡。
See the instructions in the "Write Image to the microSD Card" lesson that follows to flash your microSD card according to the type of computer you are using: Windows, Mac, or Linux.
请参阅“将图像写入microSD卡”教程中的说明,该教程将根据您使用的计算机类型(Windows、Mac或Linux)来刷新microSD卡。
5V 4A Power Supply With 2.1mm DC Barrel Connector 5V 4A电源,2.1mm直流电筒连接器
For this course, the 5V 4A DC barrel jack power supply is required. Although it is possible to power the Jetson Nano with a smaller microUSB supply, this is not robust enough for the high GPU compute load we require for our projects. In addition, you will need the microUSB port available as a direct connection to your computer for this course.
本课程需要5V 4A直流电筒千斤顶供电。虽然可以使用更小的microUSB电源为Jetson Nano供电,但对于我们项目所需的高GPU计算负载来说,这还不够健壮。此外,本课程还需要使用microUSB端口作为与计算机的直接连接。
The barrel jack must be 5.5mm OD x 2.1mm ID x 9.5mm length, center-positive. As an example of a good power supply, NVIDIA has validated Adafruit’s 5V 4A (4000mA) switching power supply - UL Listed.
筒形千斤顶外径5.5mm,内径2.1mm,长度9.5mm,中心正。作为一个良好电源的例子,NVIDIA已经验证了Adafruit的5V 4A (4000mA)开关电源- UL列出。
2-Pin Jumper
To specify use of the barrel-type power supply on the Jetson Nano Developer Kit, a 2-pin jumper is required. This is an inexpensive item available at many outlets.
要在Jetson Nano开发工具包上指定桶型电源的使用,需要一个2针跳线。这是许多商店都能买到的廉价商品。
Logitech C270 USB Webcam网络摄像头
You'll need a camera to capture images in the course projects. As an example of a compatible camera, NVIDIA has verified that the Logitech C270 USB Webcam works with these projects. The ability to position the camera easily for capturing images hands-free makes this a great choice. Some other USB webcams may also work with the projects. If you already have one on hand, you could test it as an alternative.
在课程设计中,你需要一个相机来捕捉图像。作为兼容摄像头的一个例子,NVIDIA已经验证了Logitech C270 USB网络摄像头可以与这些项目兼容。定位相机的能力,方便地捕捉图像免提使这是一个伟大的选择。其他一些USB网络摄像头也可以与该项目一起工作。如果您手头已经有一个,您可以测试它作为替代。
The Jetson Nano Developer Kit includes a MIPI Camera Serial Interface (CSI) port. As an example of a compatible camera, NVIDIA has verified that theRaspberry Pi Camera Module V2-8 Megapixel,1080p works with these projects.
Jetson Nano开发工具包包括一个MIPI摄像机串行接口(CSI)端口。作为兼容相机的一个例子,NVIDIA已经验证了Raspberry Pi相机模块v2 - 800万像素,1080p可以与这些项目兼容。
Instructions to test both USB and CSI cameras are provided in the Hello Camera lesson.
在Hello Camera教程中提供了测试USB和CSI摄像机的说明。
USB Cable (Micro-B To Type-A) USB线(微型b至a型)
You'll also need a Micro USB to USB-A cable to directly connect your computer to the Jetson Nano Developer Kit's Micro USB port. The cable must be capable of data transfers, rather than only designed to power a device. This is a common cable available at many outlets if you don't already have one on hand.
您还需要一个微型USB到USB-电缆直接连接到您的计算机到Jetson Nano开发工具包的微型USB端口。电缆必须能够传输数据,而不仅仅是为设备供电。如果你没有一个现成的话,这是一种常见的电缆,可在许多插座。
Write Image To The MicroSD Card
To prepare your microSD card, you’ll need a computer with Internet connection and the ability to read and write SD cards, either via a built-in SD card slot or adapter.
要准备你的microSD卡,你需要一台可以上网的电脑,并且能够读写SD卡,可以通过内置的SD卡插槽或适配器。
- Download the NVIDIA DLI Jetson Nano SD Card Image , and note where it was saved on the computer. 下载英伟达DLI Jetson Nano SD卡图像,并注意保存在计算机上的位置。
- Write the image to your microSD card by following the instructions below according to the type of computer you are using: Windows, Mac, or Linux. 根据您正在使用的计算机类型(Windows、Mac或Linux),按照下面的说明将图像写入microSD卡。
INSTRUCTIONS FOR WINDOWS
Format your microSD card using SD Memory Card Formatter from the SD Association.
使用SD协会的SD存储卡格式化程序格式化microSD卡。
![]()
- Download, install, and launch SD Memory Card Formatter for Windows. 下载、安装和启动Windows SD存储卡格式化程序。
- Select card drive 选择卡驱动
- Select “Quick format” 选择“快速格式化”
- Leave “Volume label” blank 将“卷标”留空
- Click “Format” to start formatting, and “Yes” on the warning dialog 点击“格式化”开始格式化,在警告对话框中点击“是”
Use Etcher to write the Jetson Nano Developer Kit SD Card Image to your microSD card
使用Etcher 将Jetson Nano开发人员工具包SD卡映像写入microSD卡
- Download, install, and launch Etcher. 下载、安装和启动Etcher。
- Click “Select image” and choose the zipped image file downloaded earlier. 点击“选择图像”,选择先前下载的压缩图像文件。
- Insert your microSD card if not already inserted. 插入你的microSD卡,如果还没有插入。
Click Cancel (per this explanation) if Windows prompts you with a dialog like this: 如果Windows提示您如下对话框,请单击Cancel(按此解释): - Click “Select drive” and choose the correct device. 点击“选择驱动器”,选择正确的设备。
- Click “Flash!” It will take Etcher about 10 minutes to write and validate the image if your microSD card is connected via USB3. 点击“闪!“如果你的microSD卡是通过USB3连接的,Etcher将花费大约10分钟来编写和验证图像。
- After Etcher finishes, Windows may let you know it doesn’t know how to read the SD Card. Just click Cancel and remove the microSD card. 蚀刻完成后,Windows可能会让你知道它不知道如何读取SD卡。只需单击“取消”并删除microSD卡。
![]()
![]()
![]()
INSTRUCTIONS FOR MAC
更多参考……
INSTRUCTIONS FOR LINUX
更多参考……
Setup And First Boot 安装和第一次引导
Headless Device Mode
For this course, we are running the Jetson Nano Developer Kit in a "headless" configuration. That means you do not hook up a monitor directly to the Jetson Nano Developer Kit. This method conserves memory resources on the Jetson Nano and has the added benefit of eliminating the requirement for extra hardware, i.e. a monitor, keyboard, and mouse.
在本课程中,我们将以“headless”配置运行Jetson Nano开发人员工具包。这意味着您不需要将监视器直接连接到Jetson Nano开发人员工具包。这种方法节省了Jetson Nano上的内存资源,而且还有一个额外的好处,那就是不需要额外的硬件,比如显示器、键盘和鼠标。
In addition, we will further simplify the configuration by using "USB Device Mode". In this mode, your Jetson Nano Developer Kit connects directly to your computer through a USB cable. This eliminates the need for a network connection on the Jetson Nano, as well as the need to determine the IP address on your network. It is always 192.168.55.1:8888 in this mode.
此外,我们还将使用“USB设备模式”进一步简化配置。在这种模式下,您的Jetson Nano开发工具包通过USB电缆直接连接到您的计算机。这样就不需要在Jetson Nano上建立网络连接,也不需要确定网络上的IP地址。在这种模式下,地址一直是192.168.55.1:8888。
In the steps that follow, you will boot the Jetson Nano in the minimum configuration (without a camera) to make sure it boots correctly from the microSD card you flashed with the DLI course image.
在接下来的步骤中,您将以最小配置启动Jetson Nano(没有摄像头),以确保它正确地从与DLI课程图像一起闪烁的microSD卡引导。
![]()
Setup Steps
- Unfold the paper stand and place inside the developer kit box. 展开纸架,放入显影盒内。
- Set the developer kit on top of the paper stand. 将开发工具包放在纸架上。
- Insert the microSD card (with system image already written to it) into the slot on the underside of the Jetson Nano module.将microSD卡(已写入系统映像)插入Jetson Nano模块下方的插槽中。
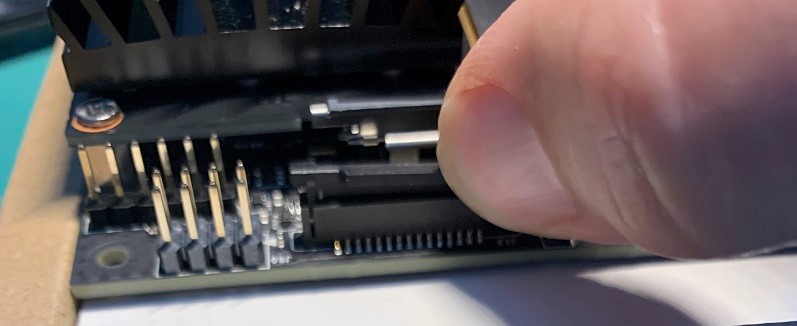
- Insert the 2-pin jumper across the 2-pin connector, J48, located next to the MIPI CSI camera connector. This enables the DC barrel power supply. 将2针跳线插入位于MIPI CSI摄像机连接器旁边的2针连接器J48上。这使得直流桶供电。
- Connect your DC barrel jack power supply (5V/4A). The Jetson Nano Developer Kit will power on and boot automatically.连接你的直流电筒千斤顶电源(5V/4A)。Jetson Nano开发工具包将自动启动并启动。
- A green LED next to the Micro-USB connector will light as soon as the developer kit powers on. Wait about 30 seconds. Then connect the USB cable from the Micro USB port on the Jetson Nano Developer Kit to the USB port on your computer.开发工具包一开机,微型usb连接器旁边的绿色LED灯就会亮起来。等大约30秒。然后将USB电缆从Jetson Nano开发工具包上的微型USB端口连接到计算机上的USB端口。
![]()
![]()
Logging Into The JupyterLab Server 登录到JupyterLab服务器
- Open the following link address : 192.168.55.1:8888
The JupyterLab server running on the Jetson Nano will open up with a login prompt the first time.
打开以下链接地址:192.168.55.1:8888
运行在Jetson Nano上的JupyterLab服务器将在第一次打开时显示一个登录提示。 - Enter the password:
dlinano输入密码:dlinano
You will see this screen. Congratulations!
![]()
Headless Device Mode Setup For Jetson Nano Demonstration
![]()
Troubleshooting 故障排除
- The LED does not light up when the DC barrel jack power supply is connected.
- Check to be sure you have shorted the two pins on the J48 header with a jumper.
- The LED lights up, but I cannot access the JupyterLab server from my browser.
- Try a different browser.
- I cannot access the JupyterLab server from any browser.
- Check your computer to see if any new USB devices are recognized when plugging in the USB cable to your computer
- If on Windows, check “Device Manager” to see if any new device was added.
- My computer does not recognize Jetson Nano when connected.
- Check your USB cable to see if it is enabled for data transfer.
- You can test it by connecting the Micro-B end of the USB cable to some other USB peripheral such as tablet, Kindle, or other device that communicates over a USB Micro-B port.
- My USB cable seems good, but my computer does not recognize Jetson Nano.
- Check if your Jetson Nano Developer Kit is properly booting by connecting it to a TV through an HDMI cable. See if the TV displays the NVIDIA logo when booted, and eventually displays the Ubuntu desktop.
- My Jetson Nano does not show anything on the TV when booting with the TV attached.
- Check if you have inserted your microSD card all the way into the microSD card slot. You should hear a small click sound.
- The microSD card is fully inserted, but my Jetson Nano does not boot properly.
- Go back to “Write Image To The MicroSD Card” to reflash your SD card.
Camera Setup 相机的设置
Now that you've verified that your system can boot to your Jetson Nano Developer Kit with the microSD card, let's add the camera! Power down the Jetson Nano Developer Kit by unplugging the power. Then connect the camera using the instructions below for your type of camera (Logitech C270 or Raspberry Pi v2).
现在,您已经验证了您的系统可以使用microSD卡引导到Jetson Nano开发人员工具包,让我们添加相机!拔掉电源,关掉Jetson Nano开发工具包。然后使用下面针对您的相机类型(Logitech C270或Raspberry Pi v2)的说明连接相机。
Connecting The Logitech C270 Webcam 连接Logitech C270网络摄像头
This is very straightforward. Just plug in the USB connector into any of the Jetson Nano Developer Kit USB ports.
这很简单。只需将USB连接器插入任何Jetson Nano开发人员Kit USB端口。

Connecting The Raspberry Pi V2 Camera
连接Raspberry Pi V2相机


- The Raspberry Pi v2 Camera connects to the MIPI CSI port. Begin by unlatching the MIPI CSI connector. This loosens the "grip" of the connector by just a small amount. Raspberry Pi v2摄像机连接到MIPI CSI端口。首先打开MIPI CSI连接器。这只放松了连接器的“抓地力”的一小部分
- Insert the ribbon cable of the camera so that the metal side faces into the Nano board. 插入相机的带状电缆,使金属侧面对纳米板。
- Latch the connector with a gentle push downward on the sides of the plastic. The ribbon cable should be securely held by the connector. 锁紧连接器,轻轻地向下推塑料的两侧。带状电缆应由连接器牢固地固定
- Remove the protective film from the lens of the camera. 从相机镜头上取下保护膜。
Other Cameras 其他的相机
Other cameras may also work with your Jetson Nano Developer Kit. You'll need to test them to find out. If you have another camera on hand, such as a USB webcam, feel free to give it a try using the "Hello Camera" test notebooks in the next lesson.
其他相机也可以与您的Jetson Nano开发工具包一起使用。你需要测试他们来找出答案。如果你手头有另一个相机,比如USB网络摄像头,请在下节课中使用“Hello camera”测试笔记本试试。
Raspberry Pi Camera Connection Demonstration 树莓派相机连接演示
Troubleshooting 故障排除
- The camera and JupyterLab appear "frozen"
- Check to be sure the Raspberry Pi Camera Module v2 does not touch any of the metal parts (headers, pads, t erminals, ports) of the Jetson Nano Developer Kit board as this may cause an electrical short.
- JupyterLab is working, but I cannot execute a cell to run my camera. I get an error or it "hangs"
- The camera may have previously been assigned but not released.
- Shutdown the kernel for the notebook using the pulldown menu at the top of JupyterLab.
- Open a terminal window from the Launch page (if no Launch page, click the '+' icon)
- enter
sudo systemctl restart nvargus-daemonin the terminal window. You will be prompted for the password, which isdlinano - Restart your notebook
- The camera may have previously been assigned but not released.
Hello Camera
Now with the camera attached, boot the system using headless Device Mode as you did before.
现在有了摄像头,像以前一样使用 headless 设备模式启动系统。
Boot With Camera Attached 带摄像头开机
- Disconnect the USB cable from the computer if it is still attached.
如果USB线还在电脑上,断开它 - Connect your DC barrel jack power supply (5V/4A). The Jetson Nano Developer Kit will power on and boot automatically.连接你的直流电筒千斤顶电源(5V/4A)。Jetson Nano开发工具包将自动启动并启动。
- Wait about 30 seconds. Then connect the USB cable from the Micro USB port on the Jetson Nano Developer Kit to the USB port on your computer. 等大约30秒。然后将USB电缆从Jetson Nano开发工具包上的微型USB端口连接到计算机上的USB端口。
- Open a browser window on your computer and enter the address to the Jetson Nano JupyterLab server:
192.168.55.1:8888
The JupyterLab server running on the Jetson Nano will open up.
打开计算机上的浏览器窗口,输入Jetson Nano JupyterLab服务器的地址:192.168.55.1:8888
Open The Hello Camera Notebook 打开Hello Camera笔记本
The JupyterLab interface is a dashboard that provides access to the Jupyter interactive notebooks and the operating system for Jetson Nano. The first view you'll see includes a directory tree on the left and a "Launcher" page on the right. To open the "Hello Camera" notebook:
JupyterLab接口是一个仪表板,提供访问Jupyter交互式笔记本和Jetson Nano操作系统的权限。您将看到的第一个视图包括左边的目录树和右边的“Launcher”页面。打开“相机你好”笔记本:
- Navigate to the
nvdli-nanofolder with a double-click
双击导航到nvdli-nano文件
- Navigate to the
hello_camerafolder in the same way
以同样的方式导航到hello_camera文件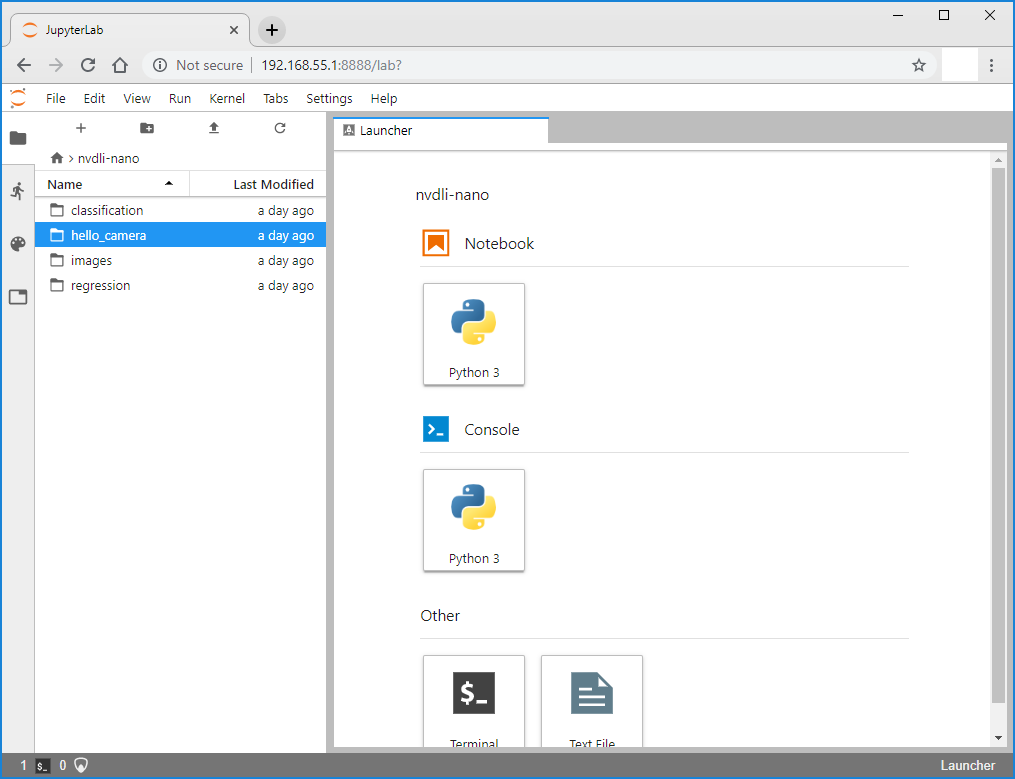
- If you are testing a USB webcam camera such as the Logitech C270, double-click the
usb_camera.ipynbnotebook to open it. If you are testing a CSI camera, double-click thecsi_camera.ipynbinstead.
如果您正在测试一个USB网络摄像头,如Logitech C270,双击usb_camera。ipynb笔记本打开它。如果您正在测试CSI摄像机,请双击csi_camera。ipynb代替。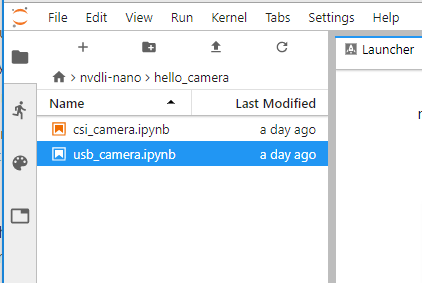
- Find out more about JupyterLab in the next section. If you are already familiar with JupyterLab features, go ahead and jump right in! When you're satisfied that your camera works correctly, return here for project instructions.
在下一节中了解更多关于JupyterLab 的信息。如果您已经熟悉JupyterLab的特性,那么就直接进入吧!当您满意您的相机工作正常,返回这里的项目说明。

JupyterLab
For this course, your Jetson Nano has been configured to run a JupyterLab server on port 8888. When you boot the system and open a browser to the Jetson Nano IP address at that port, you see the JupyterLab interface.
在本课程中,您的Jetson Nano已配置为在端口8888上运行JupyterLab terlab服务器。当您启动系统并打开浏览器到该端口的Jetson Nano IP地址时,您将看到JupyterLab接口。
JupyterLab Interface
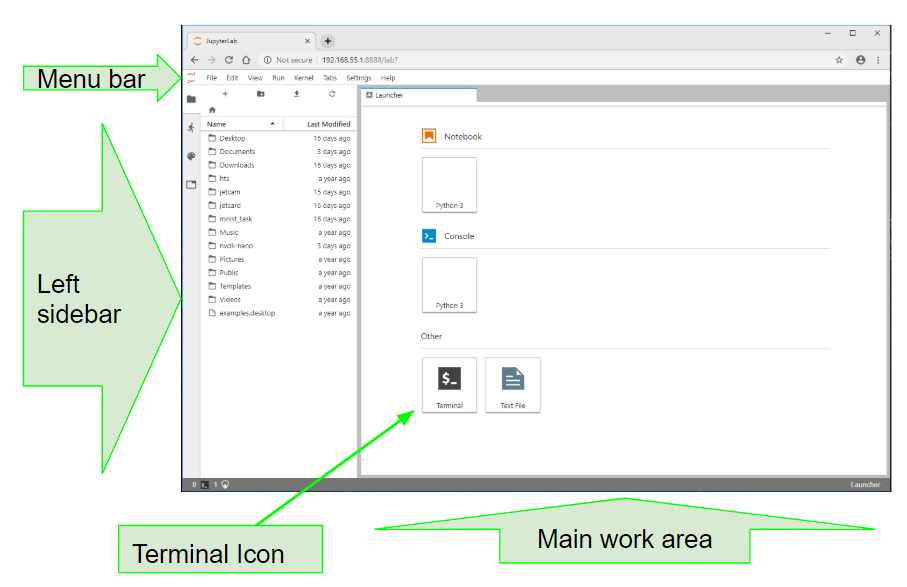
The JupyterLab Interface is a dashboard that provides access to interactive iPython notebooks, as well as the folder structure for your Jetson Nano and a terminal window into the Ubuntu operating system. The first view you'll see includes a menu bar at the top, a directory tree in the left sidebar, and a main work area that is initially open to the "Launcher" page.
JupyterLab接口是一个仪表板,提供了访问交互式iPython笔记本、Jetson Nano的文件夹结构以及Ubuntu操作系统的终端窗口。您将看到的第一个视图包括顶部的菜单栏、左侧侧边栏中的目录树和最初打开到“Launcher”页面的主工作区。
Complete details for all the features and menu actions available can be found in the JupyterLab Interface document. Here are some key capabilities that will be especially useful in this course:
所有功能和菜单操作的完整细节可以在JupyterLab接口文档中找到。以下是一些在本课程中特别有用的关键功能:
File browser: 文件浏览器:
The file browser in the left sidebar allows navigation through the Jetson Nano file structure. Double-clicking on a notebook or file opens it in the main work area.
左侧侧边栏中的文件浏览器允许导航通过Jetson Nano文件结构。双击笔记本或文件,就会在主工作区打开它。iPython notebooks: iPython笔记本:
The interactive notebooks used in this course have an ".ipynb" file extension. When a notebook is double-clicked from the file browser, it will open in the main work area and its process will start. The notebooks consist of text and code "cells". When a code cell is "run", by clicking the run button at the top of the notebook or the keyboard shortcut [CTRL][ENTER], the block of code in the cell is executed and the output, if there is any, appears below the cell in the notebook. To the left of each executable cell there is an "execution count" or "prompt number" in brackets. If the cell takes more than a few seconds to run, you will see an asterisk mark there, indicating that the cell has not finished its execution. Once processing of that cell is finished, a number will show in the brackets.
本课程所使用的互动笔记有一个“。ipynb”文件扩展名。当从文件浏览器双击笔记本时,它将在主工作区打开,并启动进程。笔记本由文本和代码“单元格”组成。当代码单元格“运行”时,通过单击笔记本顶部的运行按钮或键盘快捷键[CTRL][ENTER],执行单元格中的代码块,如果有输出,则显示在笔记本单元格的下方。在每个可执行单元的左边,括号中都有一个“执行计数”或“提示数”。如果计算单元运行时间超过几秒钟,您将在那里看到星号标记,表示计算单元尚未完成其执行。该单元格的处理完成后,方括号中将显示一个数字。
Kernel operations: 内核操作:
The kernel for each running notebook is a separate process that runs the user code. The kernel starts automatically when the notebook is opened from the file browser. The kernel menu on the main menu bar includes commands to shutdown or restart the kernel, which you will need to use periodically. After a kernel shutdown, no code cells can be executed. When a kernel is restarted, all memory is lost regarding imported packages, variable assignments, and so on.
每个运行的笔记本的内核都是一个运行用户代码的独立进程。当从文件浏览器打开笔记本时,内核将自动启动。主菜单栏中的内核菜单包含关闭或重启内核的命令,您需要定期使用这些命令。内核关闭后,不能执行任何代码单元格。当内核重新启动时,所有与导入包、变量赋值等相关的内存都会丢失。
Cell tabs: 单元格选项卡:
You can move any cell to new window tabs in the main work area by right-clicking the cell and selecting "Create New View for Output". This way, you can continue to scroll down the JupyterLab notebook while still watching a particular cell. This is especially helpful in the cell includes a camera view!
您可以通过右键单击单元格并选择“为输出创建新视图”,将任何单元格移动到主工作区中的新窗口选项卡。通过这种方式,您可以继续向下滚动JupyterLab笔记本,同时仍然可以查看特定的单元格。这是特别有用的,在单元格中包括一个相机视图!
Terminal window: 终端窗口:
You can work directly in a Terminal window on your Jetson Nano Ubuntu OS. From the Launcher page, click the Terminal icon under "Other". To bring up the Launcher page, if it is no longer visible, click the "+" icon at the top of the left sidebar.
您可以直接在Jetson Nano Ubuntu操作系统的终端窗口中工作。从启动页面,点击“其他”下的终端图标。要打开启动器页面,如果它不再可见,单击左边栏顶部的“+”图标。

NVIDIA之AI Course:Getting Started with AI on Jetson Nano—Class notes(二)相关推荐
- NVIDIA之AI Course:Getting Started with AI on Jetson Nano—Class notes(五)
NVIDIA之AI Course:Getting Started with AI on Jetson Nano-Class notes(五) Notice The original text come ...
- NVIDIA之AI Course:Getting Started with AI on Jetson Nano—Class notes(四)
NVIDIA之AI Course:Getting Started with AI on Jetson Nano-Class notes(四) Notice The original text come ...
- NVIDIA之AI Course:Getting Started with AI on Jetson Nano—Class notes(一)
NVIDIA之AI Course:Getting Started with AI on Jetson Nano-Class notes(一) 导读 在线参加面向初学者的深度学习研究院课 ...
- NVIDIA之AI Course:Getting Started with AI on Jetson Nano—Class notes(三)
NVIDIA之AI Course:Getting Started with AI on Jetson Nano-Class notes(三) Notice The original text come ...
- 【AI创造营】基于PaddleHub与Jetson Nano的智能宠物看护助手
基于PaddleHub与Jetson Nano的智能宠物看护助手 一.效果展示 二.实现思路 1.训练一个适用于该需求的模型 2.使用PaddleHub预训练模型 三.数据采集 硬件部分 代码部分 四 ...
- 【AI达人创造营第二期】基于Jetson nano的餐厅自助结账系统部署
基于Jetson nano的餐厅自助结账系统部署 一. 前言 二. 开发环境 2.1 硬件 2.2 软件 三. Jetson nano基础环境配置 3.1 镜像烧录 3.2 网络连接 3.3 更换镜像 ...
- NVIDIA Jetson Nano
NVIDIA Jetson Nano NVIDIA 引领人工智能计算 - NVIDIA https://www.nvidia.cn Artificial Intelligence Computing ...
- 强核问世:NVIDIA发布A100 80GB GPU,为AI超级计算带来全球最强GPU
近日,NVIDIA发布NVIDIA A100 80GB GPU,这一创新产品将支持NVIDIA HGX AI超级计算平台.该GPU内存比上一代提升一倍,能够为研究人员和工程师们提供空前的速度和性能,助 ...
- 全球权威MLPerf基准测试再发榜,浪潮AI服务器创18项AI性能纪录
美国东部时间10月21日,全球备受瞩目的权威AI基准测试MLPerf公布今年的推理测试榜单,浪潮AI服务器NF5488A5一举创造18项性能纪录,在数据中心AI推理性能上遥遥领先其他厂商产品. MLP ...
最新文章
- 根据悍马病毒小结android病毒如何提取root权限
- 分布式系统用户登录路由
- [pytorch、学习] - 3.9 多重感知机的从零开始实现
- 单循环链表中设置尾指针比设置头指针更好的原因
- 分解因数(信息学奥赛一本通-T1200)
- HRESULT是什么,应该如何理解
- 先睹为快!第十一届数据技术嘉年华七大看点全揭秘
- 第十篇学会编写python代码_Python 强化训练:第十篇
- 17 行代码实现的简易 Javascript 字符串模板
- 我,三十岁,还在做技术,被中年危机倒逼的程序员该何去何从?
- Hibernate的session一级缓存
- 关于http-server的备选方案-- browser-sync
- 【数学建模】基于matlab模拟十字路口车辆通行【含Matlab源码 1106期】
- 论文降重神器,一键毕业,真香!错过就后悔一整年的论文降重指南
- IM即时通讯项目讲解(二)--自定义实现图片选择GalleryView
- 服务器vga连接显示器不亮,HDMI转VGA显示器不亮怎么办?HDMI转VGA显示器没反应如何处理?...
- 用html实现贪吃蛇游戏思路,贪吃蛇游戏
- 微信PC版Hook发送群艾特消息研究
- java根据业务排序利用Comparator.comparing自定义排序规则
- 基于自适应参数及小生境的改进鲸鱼优化算法