python 人脸检测_厉害了,用Python一行代码实现人脸识别
编辑推荐:
来源于微信号datanami,从环境搭建到人脸识别,图文以及代码叙述详细,希望对大家有帮助。
摘要: 1行代码实现人脸识别,1. 首先你需要提供一个文件夹,里面是所有你希望系统认识的人的图片。其中每个人一张图片,图片以人的名字命名。2.
接下来,你需要准备另一个文件夹,里面是你要识别的图片。3. 然后你就可以运行face_recognition命令了,把刚刚准备的两个文件夹作为参数传入,命令就会返回需要识别的图片中都出现了谁,1行代码足以!!!
环境要求:
Ubuntu17.10
Python 2.7.14
环境搭建:
1.安装 Ubuntu17.10 > 安装步骤在这里
2.安装 Python2.7.14 (Ubuntu17.10 默认Python版本为2.7.14)
3.安装 git 、cmake 、 python-pip
#安装 git
$ sudo apt-get install -y git
# 安装 cmake
$ sudo apt-get install -y cmake
# 安装 python-pip
$ sudo apt-get install -y python-pip
4.安装编译dlib
安装face_recognition这个之前需要先安装编译dlib
# 编译dlib前先安装
boost
$ sudo apt-get install libboost-all-dev
# 开始编译dlib
# 克隆dlib源代码
$ git clone https://github.com/davisking/dlib.git
$ cd dlib
$ mkdir build
$ cd build
$ cmake .. -DDLIB_USE_CUDA=0 -DUSE_AVX_INSTRUCTIONS=1
$ cmake --build .(注意中间有个空格)
$ cd ..
$ python setup.py install --yes USE_AVX_INSTRUCTIONS
--no DLIB_USE_CUDA
5.安装 face_recognition
# 安装 face_recognition
$ pip install face_recognition
# 安装face_recognition过程中会自动安装 numpy、scipy 等
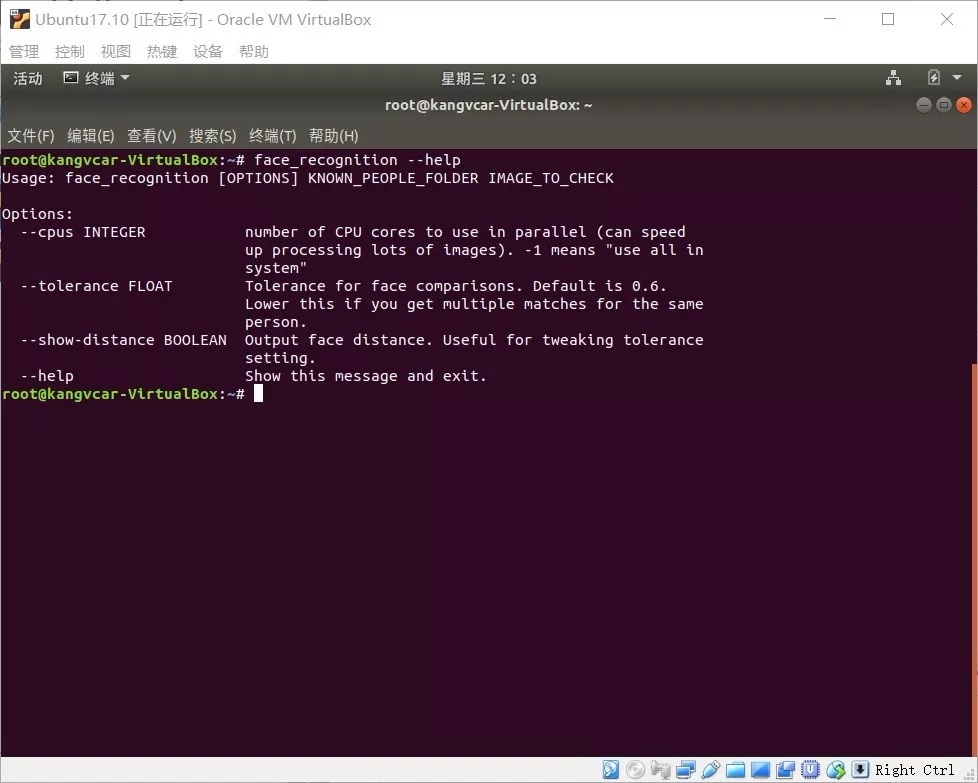
环境搭建完成后,在终端输入 face_recognition 命令查看是否成功
实现人脸识别:
示例一(1行代码实现人脸识别):
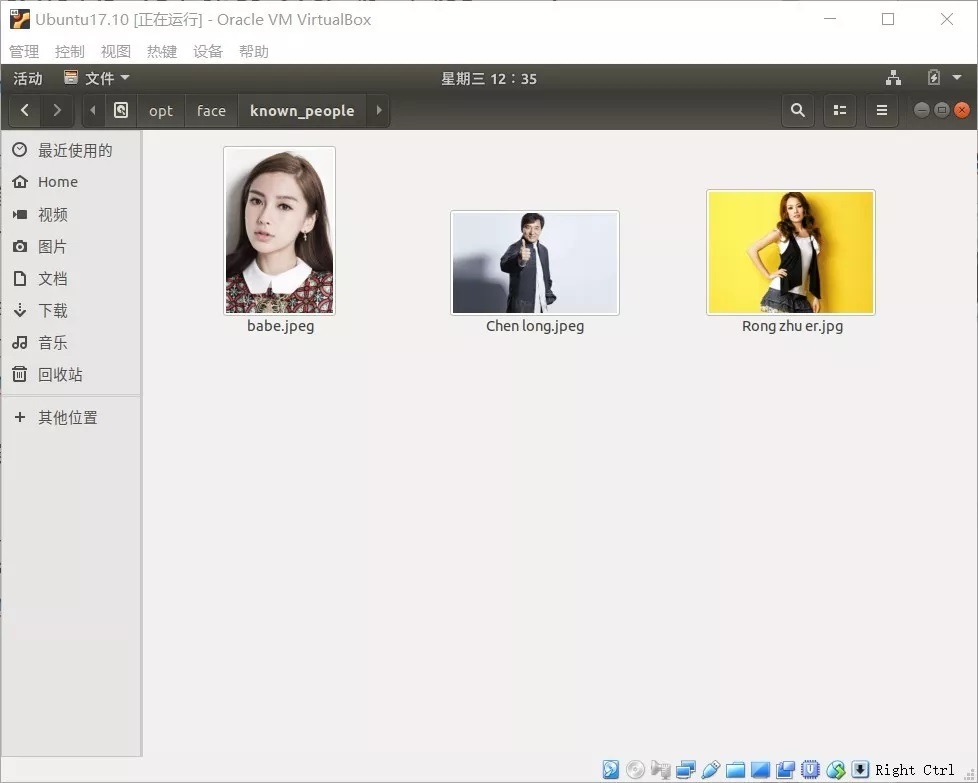
1.首先你需要提供一个文件夹,里面是所有你希望系统认识的人的图片。其中每个人一张图片,图片以人的名字命名:
known_people文件夹下有babe、成龙、容祖儿的照片
2.接下来,你需要准备另一个文件夹,里面是你要识别的图片:
unknown_pic文件夹下是要识别的图片,其中韩红是机器不认识的

3.然后你就可以运行face_recognition命令了,把刚刚准备的两个文件夹作为参数传入,命令就会返回需要识别的图片中都出现了谁:
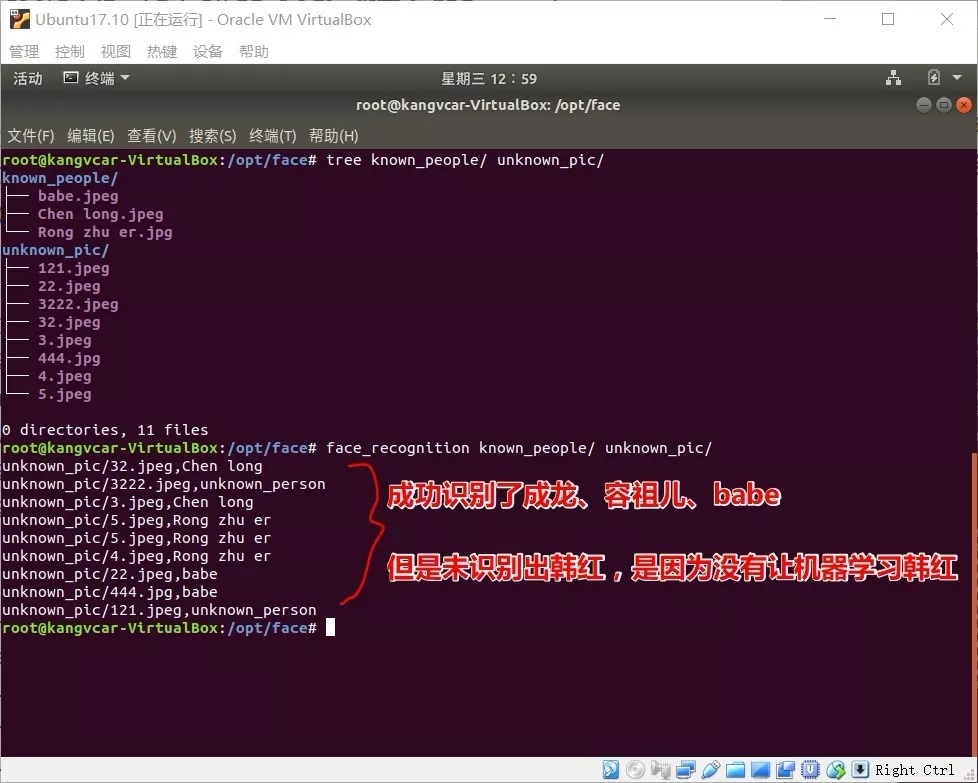
识别成功!!!
示例二(识别图片中的所有人脸并显示出来):
# filename :
find_faces_in_picture.py
# -*- coding: utf-8 -*-
# 导入pil模块 ,可用命令安装 apt-get install python-Imaging
from PIL import Image
# 导入face_recogntion模块,可用命令安装 pip install face_recognition
import face_recognition
# 将jpg文件加载到numpy 数组中
image = face_recognition.load_image_file ("/opt/face/unknown _pic/all_star.jpg")
# 使用默认的给予HOG模型查找图像中所有人脸
# 这个方法已经相当准确了,但还是不如CNN模型那么准确,因为没有使用GPU加速
# 另请参见: find_faces_in _picture_cnn.py
face_locations = face_recognition.face _locations(image)
# 使用CNN模型
# face_locations = face_recognition.face _locations(image,
number_of_times_to_upsample =0, model=" cnn")
# 打印:我从图片中找到了 多少 张人脸
print("I found {} face(s) in t his photograph.".format (len(face_locations)))
# 循环找到的所有人脸
for face_location in face_locations:
# 打印每张脸的位置信息
top, right, bottom, left = face_location
print("A face is located at pixel location
Top: {}, Left: {}, Bottom: {}, Right: {}".format (top,
left, bottom, right))
# 指定人脸的位置信息,然后显示人脸图片
face_image = image[top:bottom, left:right]
pil_image = Image.fromarray(face_image)
pil_image.show()
如下图为用于识别的图片

# 执行python文件
$ python find_faces_in_picture.py
从图片中识别出7张人脸,并显示出来,如下图

示例三(自动识别人脸特征):
# filename :
find_facial_features_in_picture.py
# -*- coding: utf-8 -*-
# 导入pil模块 ,可用命令安装 apt-get install python-Imaging
from PIL import Image, ImageDraw
# 导入face_recogntion模块,可用命令安装 pip install face_recognition
import face_recognition
# 将jpg文件加载到numpy 数组中
image = face_recognition.load_image_file("biden.jpg")
#查找图像中所有面部的所有面部特征
face_landmarks_list = face_recognition.face_landmarks(image)
print("I found {} face(s) in this photograph.".format(len(face_landmarks_list)))
for face_landmarks in face_landmarks_list:
#打印此图像中每个面部特征的位置
facial_features = [
'chin',
'left_eyebrow',
'right_eyebrow',
'nose_bridge',
'nose_tip',
'left_eye',
'right_eye',
'top_lip',
'bottom_lip'
]
for facial_feature in facial_features:
print("The {} in this face has the following
points: {}".format(facial_feature, face_landmarks[facial_feature]))
#让我们在图像中描绘出每个人脸特征!
pil_image = Image.fromarray(image)
d = ImageDraw.Draw(pil_image)
for facial_feature in facial_features:
d.line(face_landmarks[facial_feature], width=5)
pil_image.show()
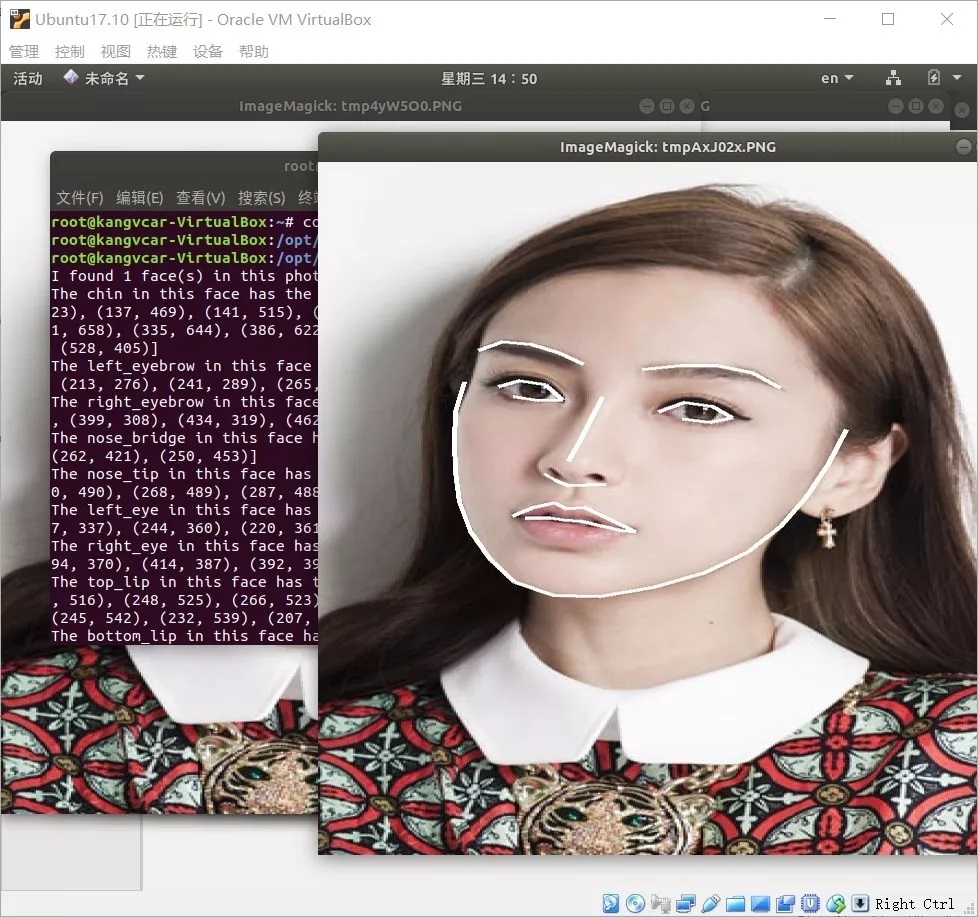
自动识别出人脸特征(轮廓)
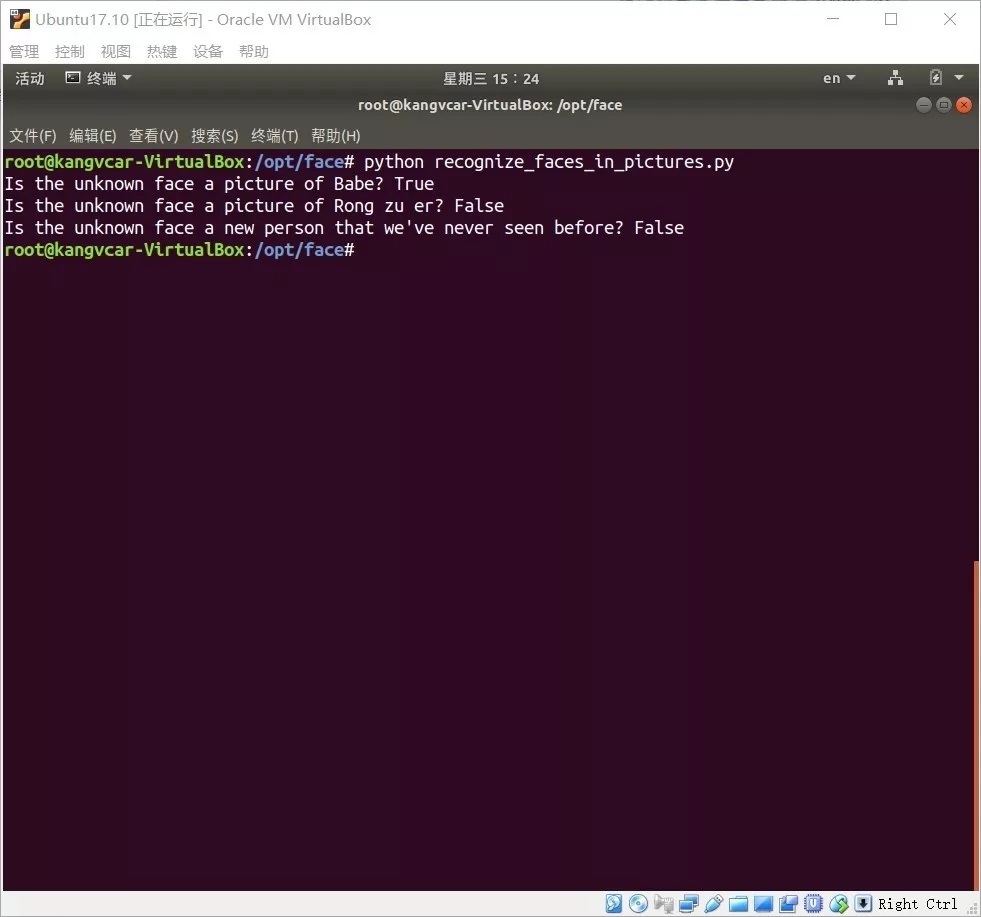
示例四(识别人脸鉴定是哪个人):
# filename : recognize_faces_in_pictures.py
# -*- conding: utf-8 -*-
# 导入face_recogntion模块,可用命令安装 pip install face_recognition
import face_recognition
#将jpg文件加载到numpy数组中
babe_image = face_recognition.load_image_file ("/opt/face/known_ people/babe.jpeg")
Rong_zhu_er_image = face_recognition.load_image_file ("/opt/face/known_ people/Rong
zhu er.jpg")
unknown_image = face_recognition.load_image_file ("/opt/face/unknown_pic/babe2.jpg")
#获取每个图像文件中每个面部的面部编码
#由于每个图像中可能有多个面,所以返回一个编码列表。
#但是由于我知道每个图像只有一个脸,我只关心每个图像中的第一个编码,所以我取索引0。
babe_face_encoding = face_recognition.face_encodings (babe_image)[0]
Rong_zhu_er_face_encoding = face_recognition.face_encodings (Rong_zhu_er_image)[0]
unknown_face_encoding = face_recognition.face_encodings (unknown_image)[0]
known_faces = [
babe_face_encoding,
Rong_zhu_er_face_encoding
]
#结果是True/false的数组,未知面孔known_faces阵列中的任何人相匹配的结果
results = face_recognition.compare_faces(known_faces,
unknown_face_encoding)
print("这个未知面孔是 Babe 吗? {} ".format(results[0]))
print("这个未知面孔是 容祖儿 吗? {} ".format(results[1]))
print("这个未知面孔是 我们从未见过的新面孔吗? {}".format (not
True in results))
显示结果下如图
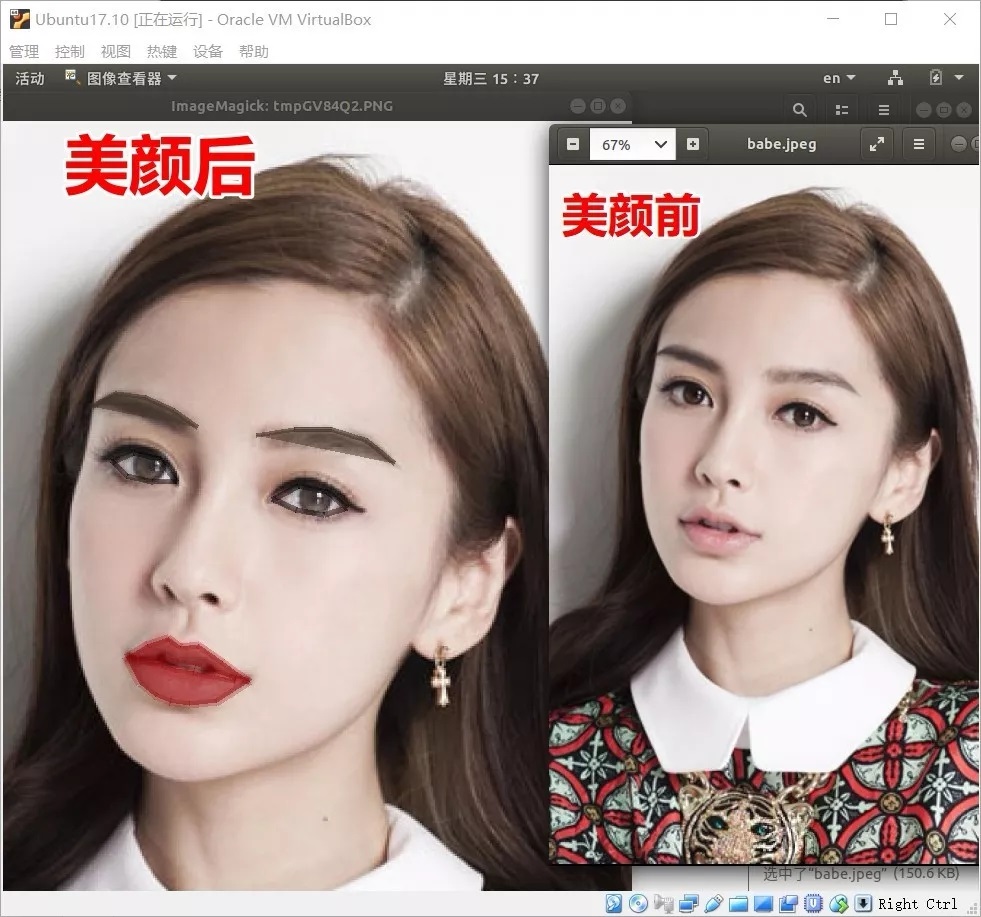
示例五(识别人脸特征并美颜):
# filename :
digital_makeup.py
# -*- coding: utf-8 -*-
# 导入pil模块 ,可用命令安装 apt-get install python-Imaging
from PIL import Image, ImageDraw
# 导入face_recogntion模块,可用命令安装 pip install face_recognition
import face_recognition
#将jpg文件加载到numpy数组中
image = face_recognition.load_image_file("biden.jpg")
#查找图像中所有面部的所有面部特征
face_landmarks_list = face_recognition.face_landmarks(image)
for face_landmarks in face_landmarks_list:
pil_image = Image.fromarray(image)
d = ImageDraw.Draw(pil_image, 'RGBA')
#让眉毛变成了一场噩梦
d.polygon(face_landmarks['left_eyebrow'], fill=(68,
54, 39, 128))
d.polygon(face_landmarks['right_eyebrow'], fill=(68,
54, 39, 128))
d.line(face_landmarks['left_eyebrow'], fill=(68,
54, 39, 150), width=5)
d.line(face_landmarks['right_eyebrow'], fill=(68,
54, 39, 150), width=5)
#光泽的嘴唇
d.polygon(face_landmarks['top_lip'], fill=(150,
0, 0, 128))
d.polygon(face_landmarks['bottom_lip'], fill=(150,
0, 0, 128))
d.line(face_landmarks['top_lip'], fill=(150,
0, 0, 64), width=8)
d.line(face_landmarks['bottom_lip'], fill=(150,
0, 0, 64), width=8)
#闪耀眼睛
d.polygon(face_landmarks['left_eye'], fill=(255,
255, 255, 30))
d.polygon(face_landmarks['right_eye'], fill=(255,
255, 255, 30))
#涂一些眼线
d.line(face_landmarks['left_eye'] + [face_landmarks['left_eye'][0]],
fill=(0, 0, 0, 110), width=6)
d.line(face_landmarks['right_eye'] + [face_landmarks['right_eye'][0]],
fill=(0, 0, 0, 110), width=6)
pil_image.show()
美颜前后对比如下图
python 人脸检测_厉害了,用Python一行代码实现人脸识别相关推荐
- python 人脸检测_借助摄像头在Python中实现人脸检测
Python部落(www.freelycode.com)组织翻译, 禁止转载 本文作者是Shantnu Tiwari--曾多年在C/C++的魔爪中饱受折磨,直到他发现了Python--使用起来感觉如呼 ...
- python 椭圆检测_使用OpenCV和Python检测触摸/重叠圆/椭圆
这是我检测圈子的尝试.综上所述 >执行BGR-> HSV转换,并使用V通道进行处理 V通道: >阈值,应用形态关闭,然后进行距离转换(我会称之为dist) 分区形象: >创建一 ...
- python 图像拼接 检测_图像处理之图像拼接(python)
一.算法目的 在同一位置拍摄两张以上图片,这些图片是单应性相关的,即图片之间有相同的拍摄区域.基于此将图片进行缝补,拼成一个大的图像来创建全景图像. 二.基本原理 要实现两张图片的简单拼接,其实只需找 ...
- CoLab - 图像人脸检测_框出人脸
CoLab - 图像人脸检测_框出人脸 此文章教你如何使用谷歌Colaboratory实现静止图片的人脸检测和划框框. CoLab最大好处:GPU计算速度快! 注: · 国内登陆Colab需使用到梯梯 ...
- python编程基础_月隐学python第2课
python编程基础_月隐学python第2课 学习目标 掌握变量的输入和输出 掌握数据类型的基本概念 掌握算数运算 1.变量的输入和输出 1.1 变量输入 使用input输入 input用于输入数据 ...
- 查看Python的版本_查看当前安装Python的版本
一.查看Python的版本_查看当前安装Python的版本 具体方法: 首先按[win+r]组合键打开运行: 然后输入cmd,点击[确定]: 最后执行[python --version]命令即可. 特 ...
- AI人工智能分析-人脸识别和分析(人脸检测跟踪、获取特征长度、提取用于人脸特征、比较相似度)
AI人工智能分析-人脸识别和分析(人脸检测跟踪.获取特征长度.提取用于人脸特征.比较相似度) 人工智能(Artificial Intelligence),英文缩写为AI.它是研究.开 ...
- opencv 训练人脸对比_【项目案例python与人脸识别】基于OpenCV开源计算机视觉库的人脸识别之python实现...
" 本项目是一个基于OpenCV开源库使用python语言程序实现人脸检测的项目,该项目将从[项目基础知识](即人脸识别的基本原理).[项目实践](人脸识别所需要的具体步骤及其python程 ...
- python图像检测_如何用Python检测图像中的矩形项
我发现了很多关于使用openCV等人在图像中找到"东西"的问题.在 Python中,但到目前为止,我一直无法将它们拼凑在一起,以便为我的问题提供可靠的解决方案. 我正在尝试使用计算 ...
最新文章
- 有关JNLP中传SESSIONID为参数的问题
- 【水滴石穿】react-native-book
- Jenkins命令可视化
- 【洛谷P3389】【模板】高斯消元
- ranger管mysql_添加Kafka的Ranger访问权限策略
- 面试官:为什么单线程的Redis可以实现高并发访问
- 服务器无法继续该事务 3400000006 错误原因--JAVA调用SQLSERVER存储过程时过程发生异常内部事务未
- 2021年3月热门报告盘点下载(文末有福利)
- CenterNet :Objects as Points 详解
- 7个和尚_一位高僧对世俗问题的7个回答,非常绝妙!
- 怎么看xp计算机是32位还是64位,教你查看XP系统的不同32位还是64位详细的步骤
- Symbian开发——Symbian开发知识(转)
- C++中Duration、Time_point和Clocks
- 沟通的艺术与处世智慧 ——戴尔卡耐基(笔记)
- 新浪体育——篮球足球的直播和战报爬取
- VMware中使用U盘PE系统
- 超好用的教程截取GIF动画软件GifCam
- 博弈背景下的记忆化搜索/题意理解 (HDU 2452 Navy maneuvers)
- Qt音视频开发39-人脸识别在线版
- 一文带你了解人工智能机器人实验室解决方案最新消息!