layui选项卡嵌套选项卡_在ProtoPie中使用嵌套组件构建选项卡栏
layui选项卡嵌套选项卡
One of the powerful features of ProtoPie is the ability to build fully portable and interactive UI components. We are going to make use of nested components, SVG icons, and layout constraints to build a tab bar UI component that is self-contained and flexible enough to reuse in any future project.
ProtoPie的强大功能之一是能够构建完全可移植的交互式UI组件。 我们将利用嵌套的组件,SVG图标和布局约束来构建选项卡式UI组件,该组件是独立的并且足够灵活,可以在以后的任何项目中重复使用。
01.导入SVG图标 (01. Importing the SVG icons)
I’m using the following icons downloaded from Feather icons. To follow along download Home, Activity, Bell, and Settings.
我正在使用从Feather图标下载的以下图标 。 要继续下载家庭,活动,铃声和设置。
Import your icons via Image import. You can shift-select and import them all in one go if you like
通过Image import导入图标。 如果愿意,您可以一次选择并导入所有内容
Currently, There’s a bug in ProtoPie which causes the icons to import at a smaller size so let’s fix that (not the bug obviously!). Taking each icon, in turn, make them 24 px (check that the padlock icon is locked to preserve the aspect ratio)
当前,ProtoPie中存在一个错误,该错误会导致图标以较小的尺寸导入,因此让我们对其进行修复(显然不是该错误!)。 依次将每个图标设为24像素 (检查挂锁图标是否已锁定以保持宽高比)
Select the first icon and tap Convert to Shape (you’ll find this under the image preview in the top right)
选择第一个图标,然后点击“ 转换为形状” (您会在右上角的图像预览下找到它)
Choose a border color for your icon (I chose #228BE6)
为图标选择边框颜色(我选择了#228BE6 )
- Repeat for 3 more icons重复3个以上的图标
- Organize the icons in the layer panel with your left most icon being at the top and the right-most icon at the bottom. The order I’m using is Home, Activity, Bell, Settings在图层面板中组织图标,最左边的图标在顶部,最右边的图标在底部。 我使用的顺序是家庭,活动,响铃,设置
- Position the icons roughly in the tab bar location across the bottom of the screen将图标大致放置在屏幕底部的标签栏位置
02.创建选项卡 (02. Creating the tabs)
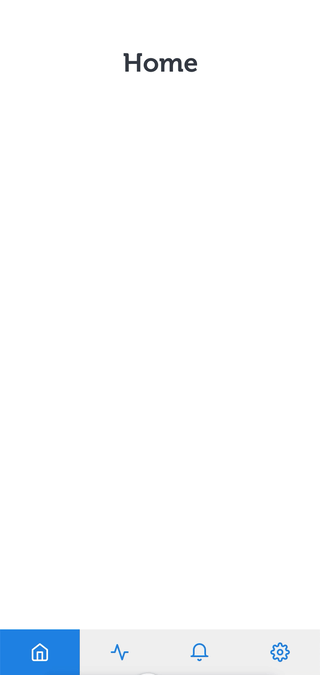
We are going to have 4 tab items that will link to 4 separate scenes. Let’s create the Home tab first.
我们将有4个选项卡项目,它们将链接到4个单独的场景。 首先创建“ 主页”选项卡。
Use the Shape menu to create a rectangle (or press R on your keyboard) and make it 56 px high. Type 25% in the width field to get a width exactly one-quarter of the width of your prototype; The value will be converted to pixels for you.
使用“形状”菜单创建一个矩形(或按键盘上的R)并将其设为56 px高。 在width字段中输入25% ,以获得正好等于原型宽度四分之一的宽度; 该值将为您转换为像素。
- Move the rectangle into the bottom left of your screen until it snaps into place and positions it under the home icon layer.将矩形移到屏幕的左下方,直到其固定到位并将其放置在主图标层下。
- Move the Home icon into the center of the rectangle so it is both vertically and horizontally centered. You will know when it’s in the center when you see the red alignment lines or you could use the alignment tools located in the top right of the screen above the image preview window; to do this select both the rectangle and the Home icon and select the center horizontal and vertical将主屏幕图标移到矩形的中心,使其在垂直和水平方向上居中。 当您看到红色的对齐线时,您将知道它何时位于中心,或者您可以使用图像预览窗口上方屏幕右上方的对齐工具; 为此,选择矩形和“主页”图标,然后选择水平和垂直居中
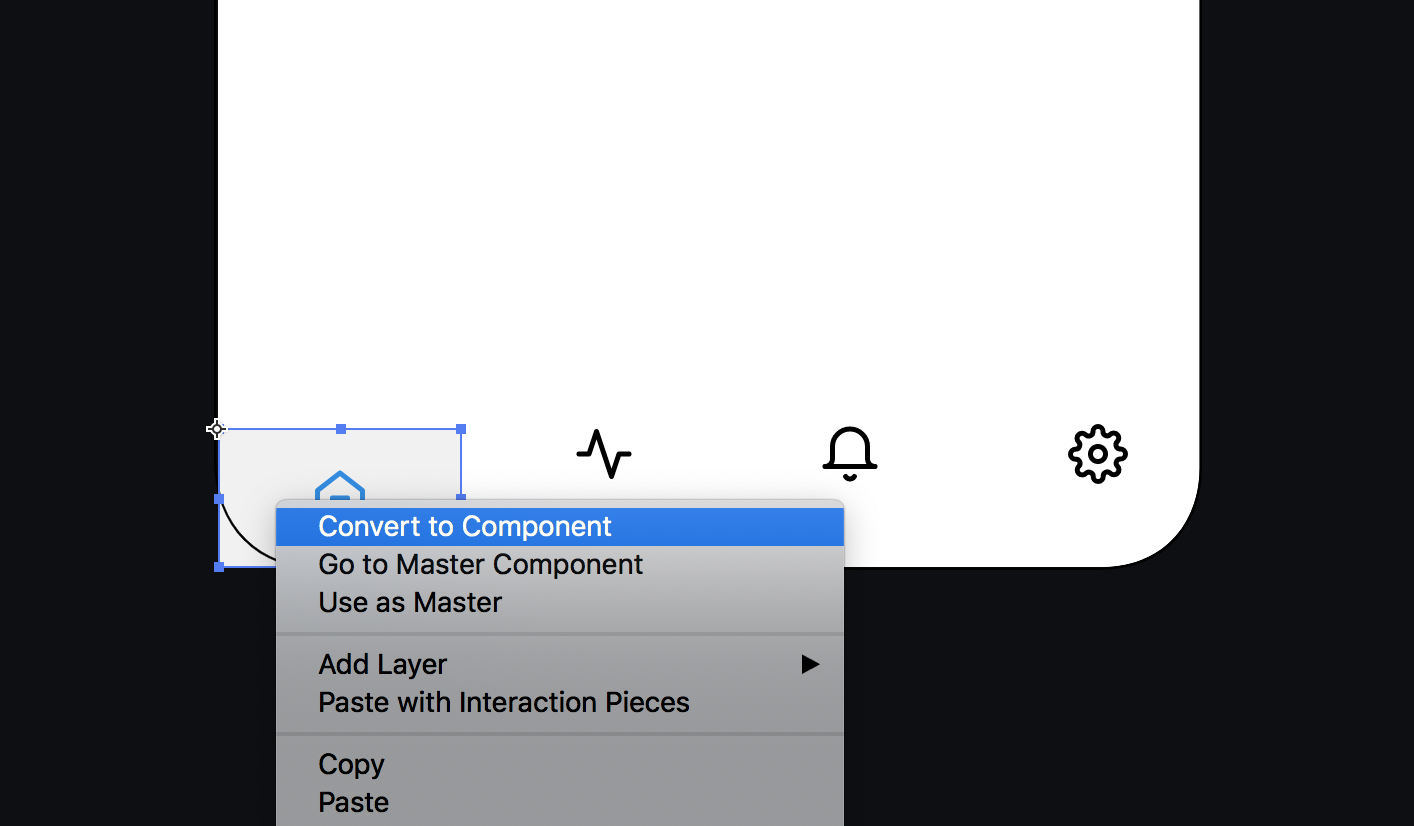
With both layers selected tap the component tool or right-click Convert to Component
选中两个图层后,点击组件工具或右键单击“ 转换为组件”
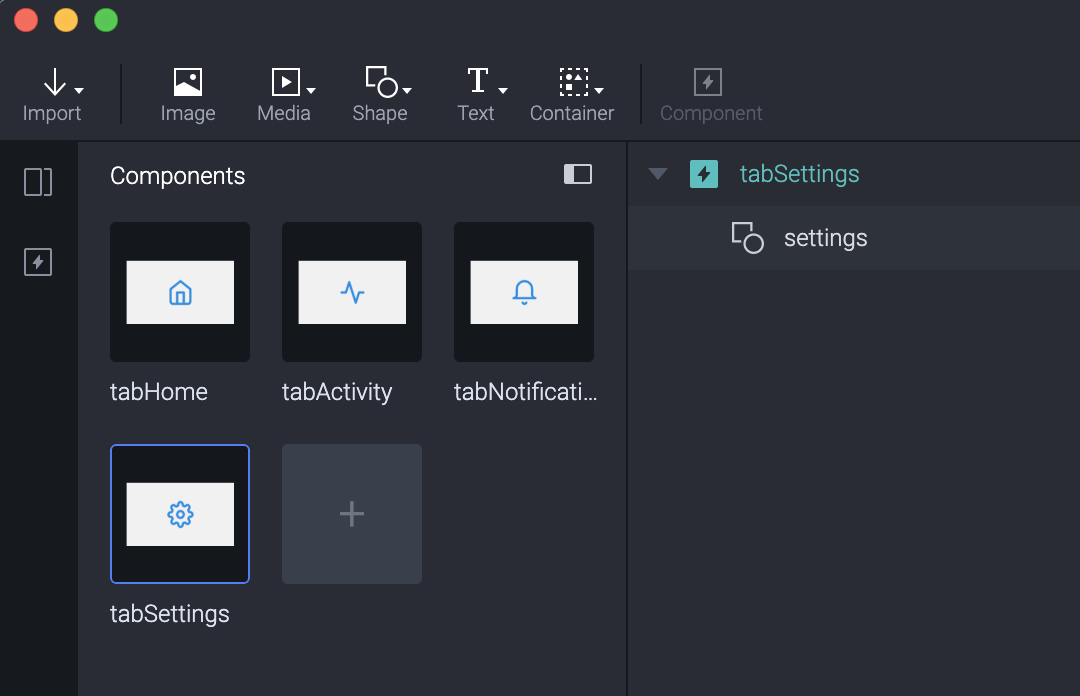
- Open the components panel and double-click on the ‘component 1’打开组件面板,然后双击“组件1”
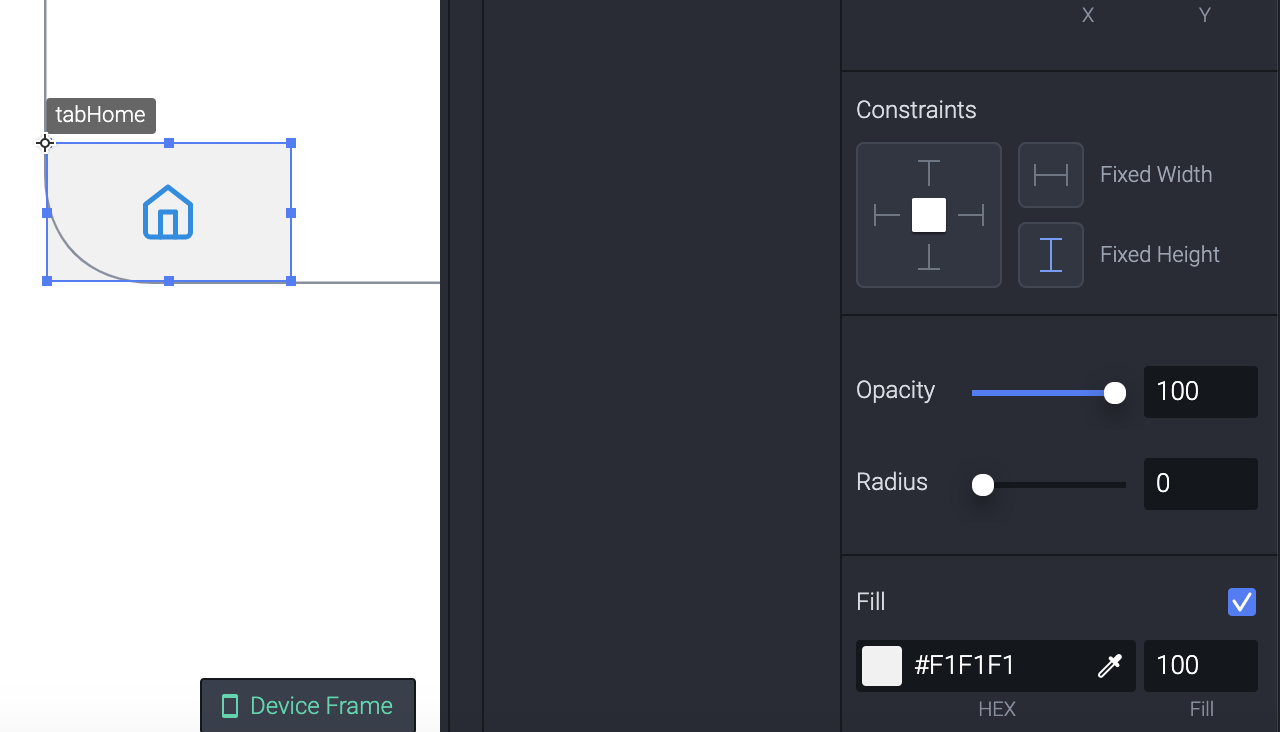
You’ll see a special group icon with the lightning bolt icon on it. Double-click the name and rename it to tabHome
您会看到一个特殊的组图标,上面带有闪电图标。 双击名称并将其重命名为tabHome
We can now remove the rectangle and instead apply the fill color to the group container instead. Select the component in the layers panel and change the fill color to #F1F1F1 and the fill opacity to 100.
现在,我们可以删除矩形,而是将填充颜色应用于组容器。 在“图层”面板中选择组件,然后将填充颜色更改为#F1F1F1 ,并将填充不透明度更改为100 。
设定约束 (Set constraints)
Next, we want to set some constraints so the tab can expand to any size. Select the tabHome component in the layers panel and find the constraints in the properties panel on the right of the interface. Constraints break down into 3 boxes here. The left box is the pin constraints, the top right, and bottom right boxes are the size constraints. Any applied constraints will show as blue so tap them to toggle them off, we don’t want any constraints applied here
接下来,我们要设置一些约束,以便选项卡可以扩展到任何大小。 在“图层”面板中选择tabHome组件,然后在界面右侧的属性面板中找到约束。 约束在这里分为3个框。 左边的框是管脚约束,右上方的框和右下方的框是尺寸约束。 任何应用的约束都将显示为蓝色,因此请点按以将其关闭,我们不想在此处应用任何约束
- Next, select the icon, we want to still constrain its aspect ratio so keep the size constraints set to on but remove all of the pin constraints. If you drag the middle -right container handle out now you should see that you have a flexible tab接下来,选择图标,我们仍要限制其宽高比,因此将尺寸限制设置为开,但删除所有的引脚限制。 如果现在将中间右容器的手柄拖出,则应该看到有一个灵活的选项卡
Tap the back button (top left) or double-click Scene 1 to navigate back to the scene
点击后退按钮(左上方)或双击场景1导航回到场景
- We now need to create the other 3 tabs现在,我们需要创建其他3个标签
Go to the Components panel and duplicate tabHome by selecting it and typing Cmd+D (Ctrl+D Windows)
转到“ 组件”面板并复制“ 选项卡”主页,方法是选择它并键入Cmd + D (Ctrl + D Windows)
Double-click the name and rename it tabActivity
双击名称并将其重命名为tabActivity
repeat steps for the other 2 tabs calling them tabNotifications and tabSettings respectively
对其他两个选项卡分别重复步骤,分别称为tabNotifications和tabSettings
Copy the activity icon and open tabActivity by double-clicking it in the component panel
复制活动图标并在组件面板中双击以打开tabActivity
Paste the icon and position its correctly then delete the old icon making sure you remove the pin constraints from the newly pasted icon
粘贴图标并正确放置其位置,然后删除旧图标,确保从新粘贴的图标中删除了引脚约束
- repeat 8–9 for the other two tabs对其他两个选项卡重复8–9
- Delete any loose icons from the main scene leaving only the home tab component从主场景中删除任何宽松的图标,仅保留主选项卡组件
Congratulations you should now have four flexible tabs in your components panel for your 4 app sections.
恭喜,您现在应该在组件面板中为4个应用程序部分提供了四个灵活的标签。
Next up we are going to create the TabBar
接下来,我们将创建TabBar
03.创建选项卡栏 (03. Creating the Tab Bar)
Next, we want to create the tab bar that the tabs will nest inside. This will give us a single tab bar component that we can reuse.
接下来,我们要创建标签栏,标签将嵌套在其中。 这将为我们提供一个可重复使用的选项卡栏组件。
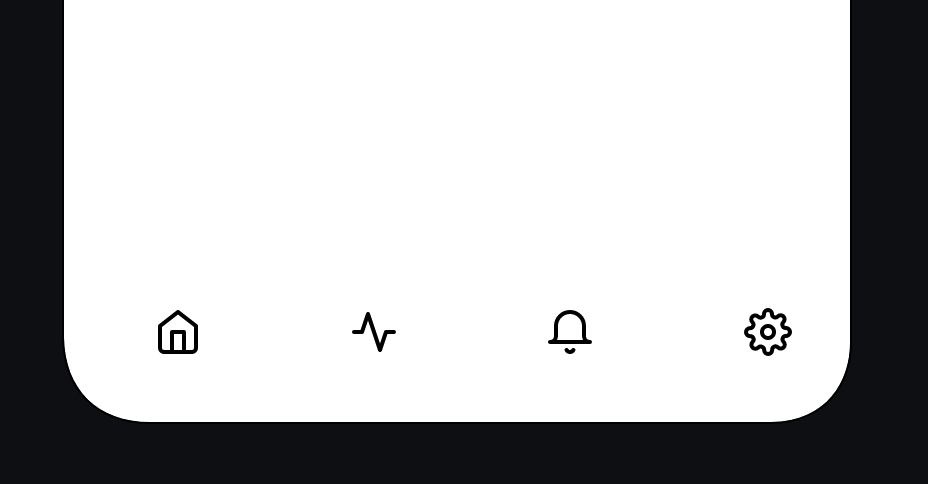
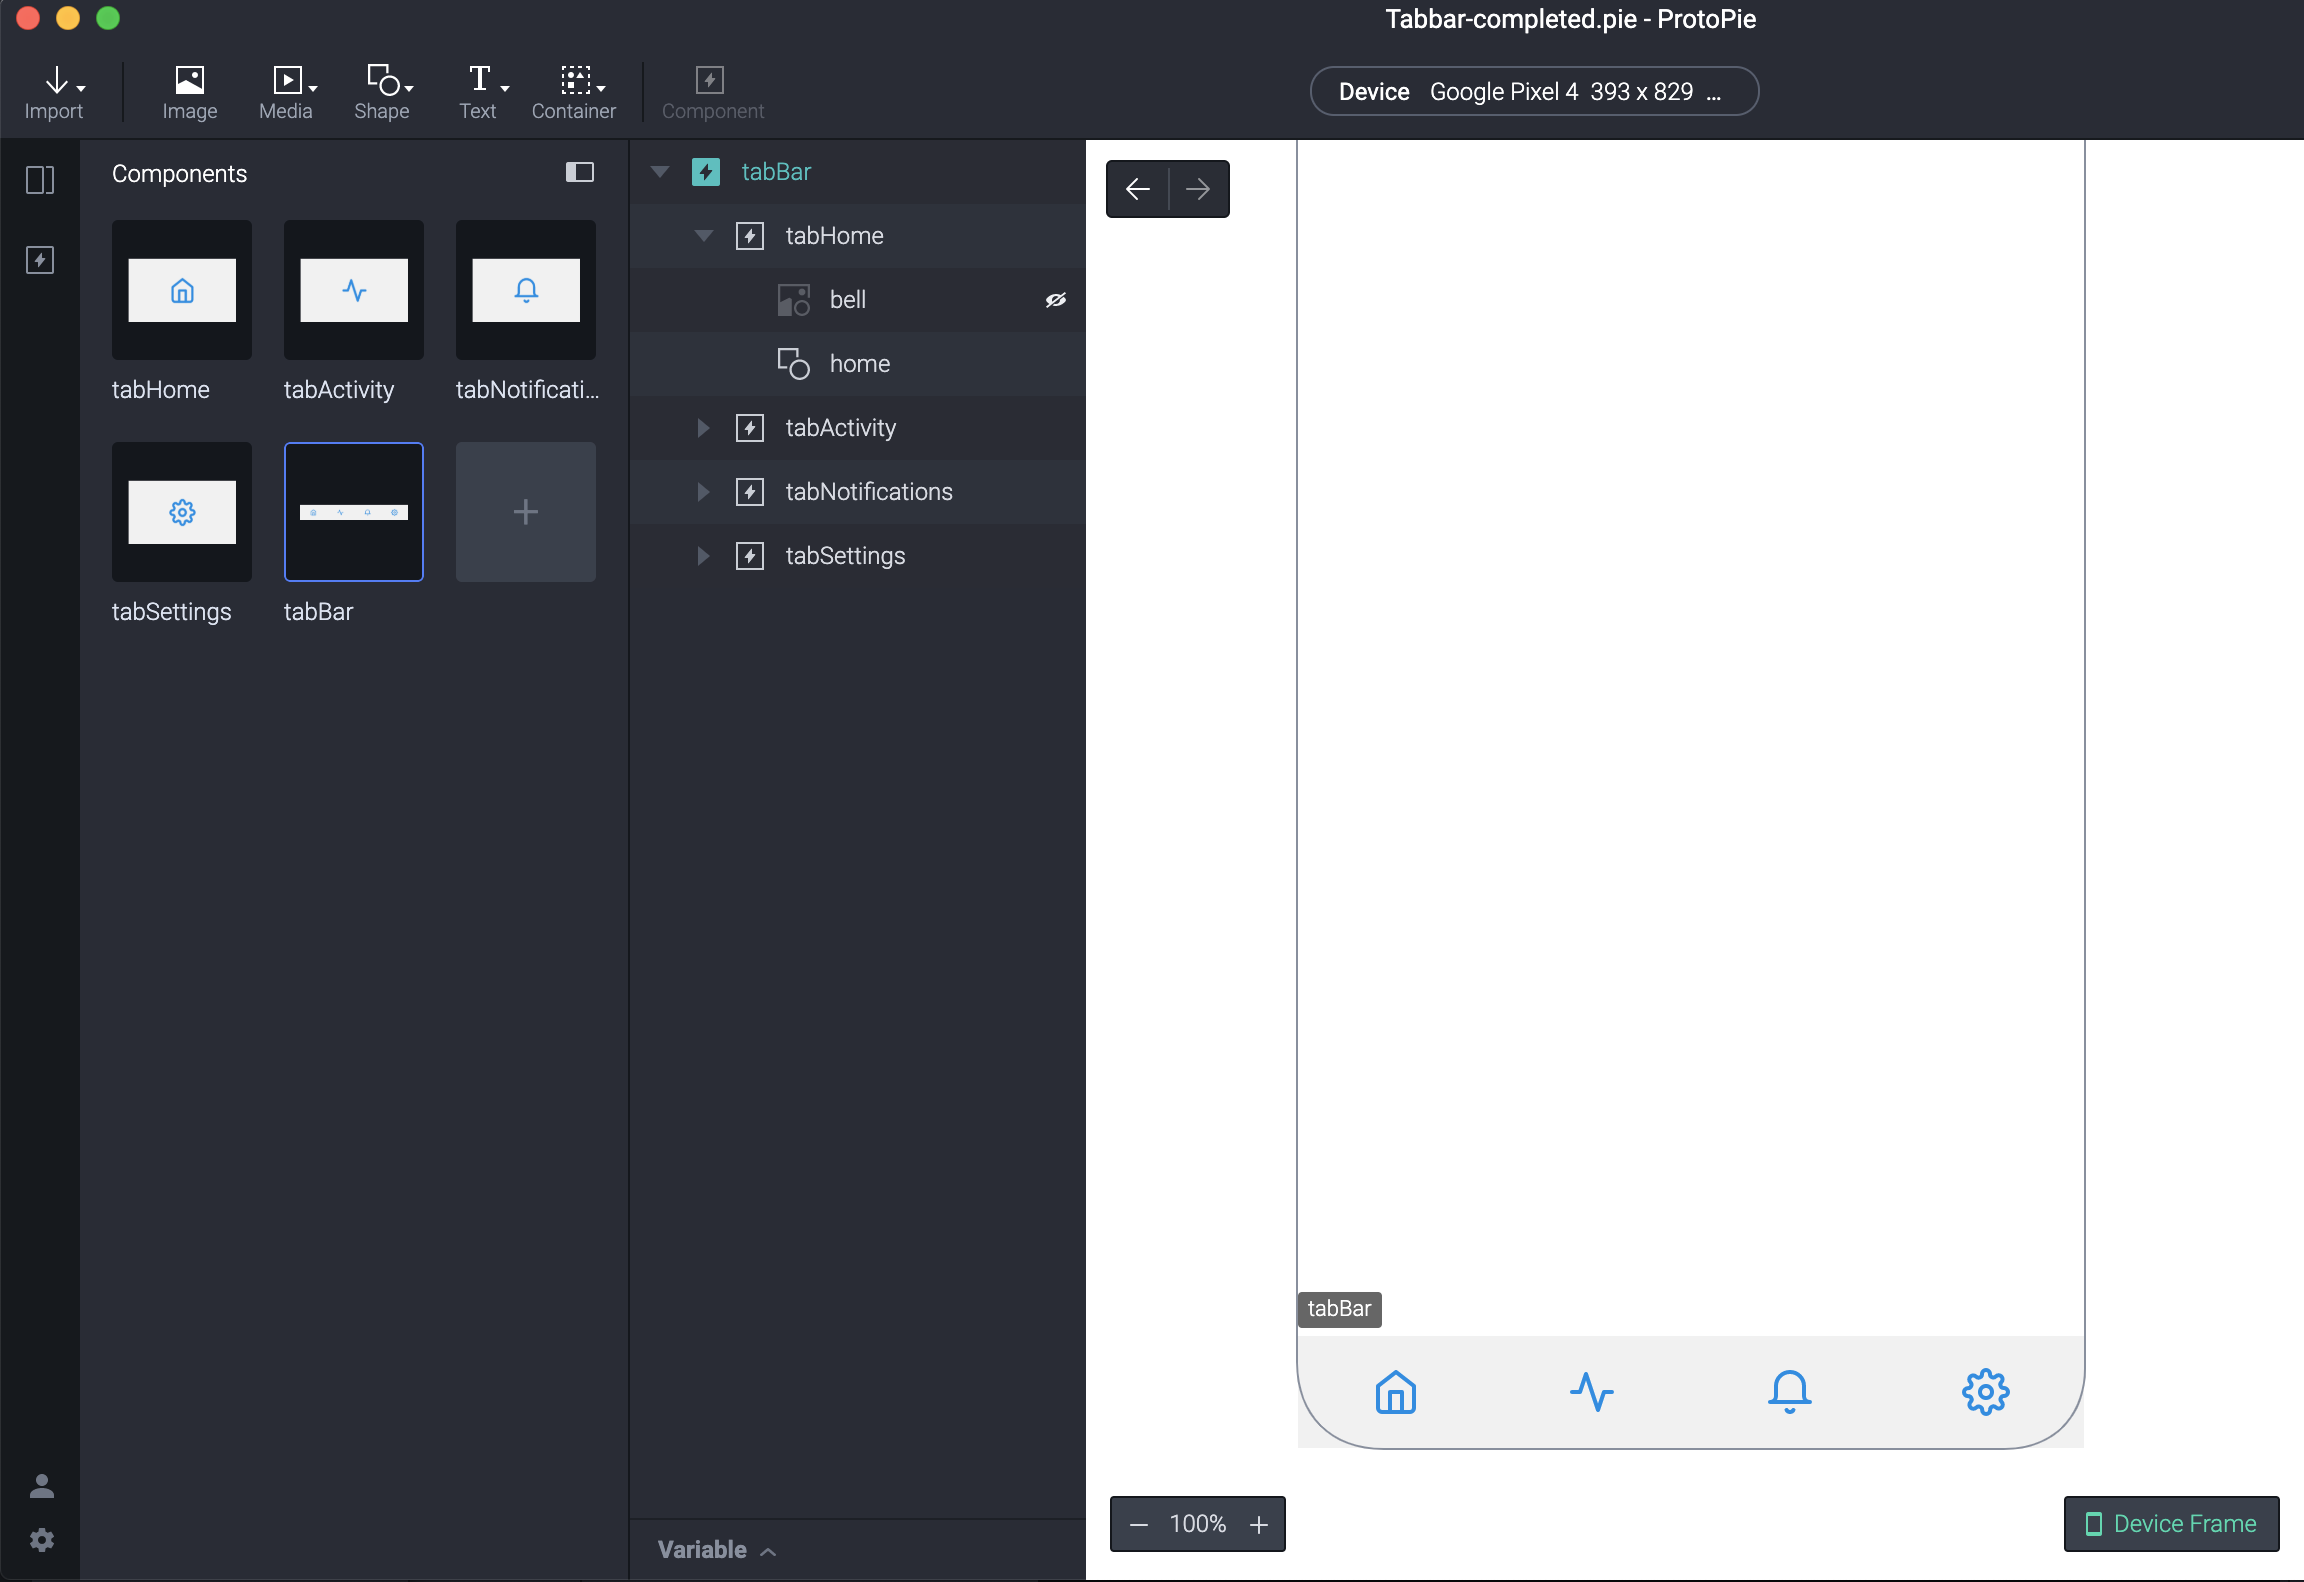
- Drag out an instance of each tab so that you have 4 tabs in the scene and position them at the bottom ordering them from left to right Home, Activity, Notifications, and Settings. You may notice some slight gaps between the tabs but don’t worry about that, we’ll fix it later拖出每个选项卡的一个实例,以使您在场景中拥有4个选项卡,并将它们放置在底部,以从左到右的顺序依次按“首页”,“活动”,“通知”和“设置”。 您可能会注意到各个标签之间存在一些细微的间隔,但不必担心,我们稍后会修复
- You now have four tab copies which we call ‘instances’ in your scene. Rename the layers to read TabHome, TabActivity, TabNotifications, and TabSettings. I like to order the layers top to bottom to match the order of left to right as well现在,您有四个选项卡副本,我们在您的场景中称其为“实例”。 重命名图层以读取TabHome,TabActivity,TabNotifications和TabSettings。 我喜欢按从上到下的顺序排列图层,以匹配从左到右的顺序
- Select all of the layers and right-click (Ctrl-click) and select Convert to component. You will now have a new in the layers panel选择所有图层,然后单击鼠标右键(Ctrl单击),然后选择“转换为零部件”。 现在,“图层”面板中将有一个新的
- Rename the component instance TabBar. You will have to do this as well to the component in the Components panel重命名组件实例TabBar。 您还必须对“组件”面板中的组件执行此操作
- Open the TabBar component and select the component group. We need to fix and gaps we might have between the tab items.打开TabBar组件,然后选择组件组。 我们需要修复选项卡项目之间可能存在的差距。
- Change the fill to #F1F1F1 and set the fill to 100将填充更改为#F1F1F1并将填充设置为100
We now have a fully constructed flexible Tabbar. Try dragging the width out and all of the tabs should expand as a flexible liquid component.
现在,我们有了一个完全构建的灵活的Tabbar。 尝试将宽度拉出,所有选项卡应作为一种灵活的液体成分展开。
04.设置选项卡项目状态 (04. Setting up the Tab Item states)
So at the moment, our Tabbar doesn’t do anything. The way we are going to set up our app to make use of this tab bar is to create a scene for each tab section. When each tab is tapped the prototype will change to the selected scene and the visual appearance of the selected item is going to change so that it looks active.
因此,目前,我们的Tabbar无效。 我们设置应用程序以使用此标签栏的方法是为每个标签部分创建一个场景。 轻触每个选项卡后,原型将更改为所选场景,并且所选项目的视觉外观也将更改,以使其看起来很活跃。
To trigger responses inside of our components we are going to use a special trigger and response that work together. These are called Send and Receive.
为了在组件内部触发响应,我们将使用特殊的触发和响应一起工作。 这些称为发送和接收 。
We are going to use the Send response to send a message to the nested tabs so that when each tab is tapped the app will move to the selected scene and make that tab active.
我们将使用“发送”响应将消息发送到嵌套的选项卡,以便在点击每个选项卡时,应用程序将移动到所选场景并使该选项卡处于活动状态。
设置场景 (Setting up the scenes)
- Lets first create the 4 sections of our app by duplicating the current scene three times (Cmd+D Mac / Ctrl+D Windows首先,通过将当前场景复制三遍来创建应用程序的4个部分(Cmd + D Mac / Ctrl + D Windows
- Rename the scenes by double-clicking their names in the scenes panel Home, Activity, Notifications, Settings通过在场景面板“主页”,“活动”,“通知”,“设置”中双击它们的名称来重命名场景

Next, we want to set the triggers inside of the tabBar so that when each tab is tapped the prototype navigates to the correct scene.
接下来,我们要在tabBar内设置触发器,以便在点击每个选项卡时,原型导航到正确的场景。
First, let’s add a title on each scene so that we know the navigation is working properly. On each scene add a text label by going to the Text tool and choosing Text. Then type in the name of the scene. You can style it how you want. Do this for all four scenes
首先,让我们在每个场景上添加一个标题,以便我们知道导航工作正常。 在每个场景上,通过转到“ 文本”工具并选择“ 文本”来添加文本标签。 然后输入场景名称。 您可以根据需要设置样式。 对所有四个场景都这样做
- Ok so now we need to add the actual navigation responses so go to the components panel and open the TabBar好的,现在我们需要添加实际的导航响应,因此转到组件面板并打开TabBar
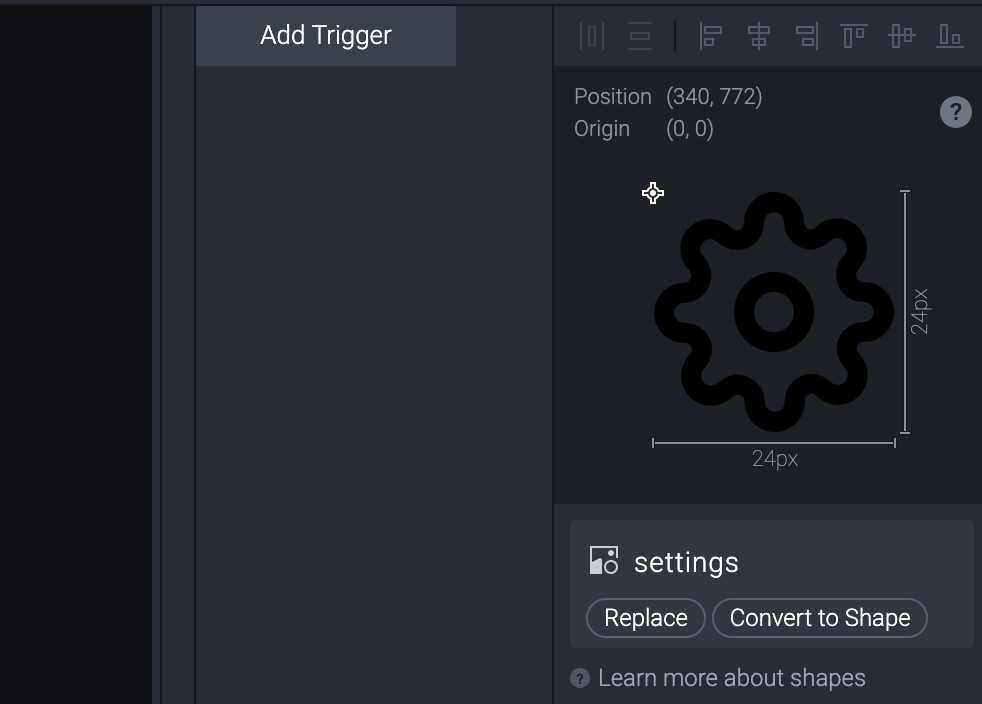
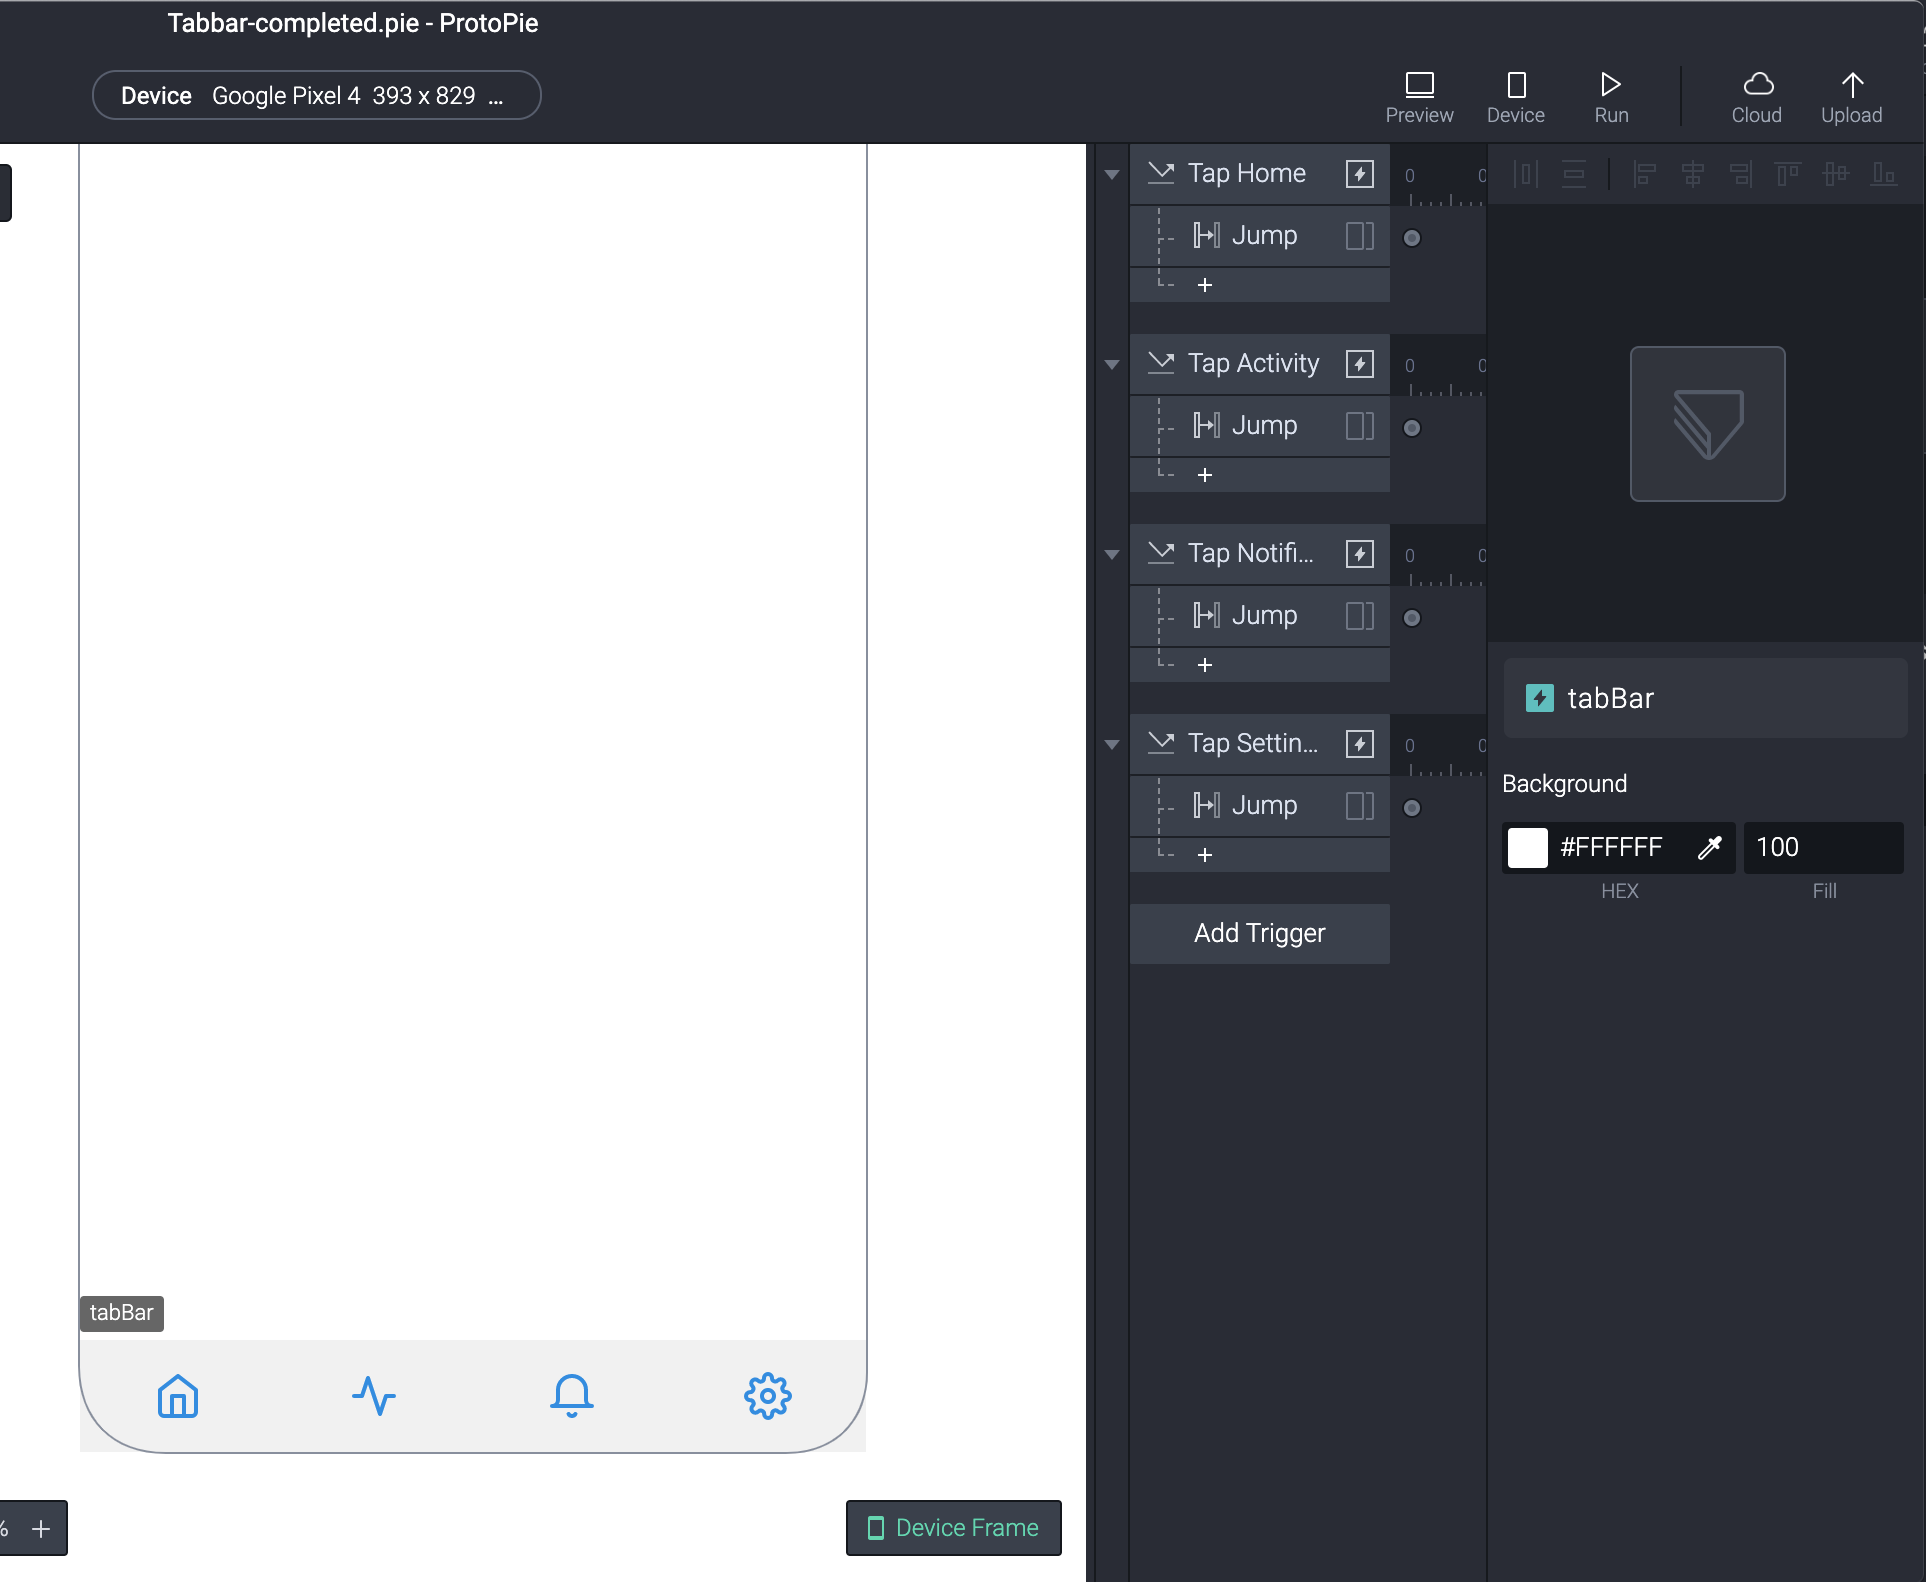
We are now going to add the jump response which is what we use to navigate from scene to scene. Select tabHome and select Add Trigger and choose Tap
现在,我们将添加跳转响应,这是我们用来在场景之间导航的内容。 选择选项卡主页,然后选择添加触发器,然后选择点击
Now add the response Jump
现在添加响应跳转
From the scene menu select Home. We are going to leave the transition as None as tabs typically have no animation between them
从场景菜单中选择“ 主页”。 我们将过渡设置为“无”,因为标签之间通常没有动画
- Repeat steps 3–4 for the other 3 tabs对其他3个选项卡重复步骤3-4
留言内容 (Messages)
Before we move on let’s chat a bit about messages. Messages are the mechanism we use to trigger actions within components and scenes. You can send any text message you like. It’s essentially something unique that you are matching so that you can trigger an action. There are however some important things to remember:
在继续之前,我们先聊一些消息。 消息是我们用来触发组件和场景中的动作的机制。 您可以发送任何您喜欢的短信。 实际上,这是您要匹配的唯一事物,因此您可以触发操作。 但是,有一些重要的事情要记住:
- Messages are case sensitive, HOME and home are two different messages消息区分大小写,HOME和home是两种不同的消息
- Messages need to be unique as they are being matched消息在匹配时需要唯一
- Messages should be clear and descriptive消息应清晰,描述性
I use a special format for all of my messages borrowed from programming. I type them in all caps and use underscores to separate words e.g MY_MESSAGE. You can, of course, use any format you like.
对于从编程中借来的所有消息,我都使用一种特殊的格式。 我用大写字母输入,并用下划线分隔单词,例如MY_MESSAGE。 当然,您可以使用任何喜欢的格式。
In the case of our tab bar, we are going to use messages to trigger the selected states so lets set that up now.
就我们的标签栏而言,我们将使用消息来触发所选状态,因此现在就进行设置。

- Navigate to the Home scene导航到家庭场景
Add a Start trigger to the scene
向场景添加开始触发器
Add a Send response to the Start trigger and choose Send to Current Scene from the Channel menu
将发送响应添加到“开始”触发器,然后从“通道”菜单中选择“ 发送到当前场景 ”
In the Message field for our Send response type HOME_SELECTED
在我们发送回复的消息字段中,输入HOME_SELECTED
Repeat 1–3 for the other 3 scenes using the messages ACTIVITY_SELECTED, NOTIFICATIONS_SELECTED AND SETTINGS_SELECTED. To speed things up you can copy the first Start interaction you created by selecting the Start trigger and pressing Cmd+C (Ctrl+C Windows) and then paste it onto the other scenes before making the necessary changes
使用消息ACTIVITY_SELECTED , NOTIFICATIONS_SELECTED和SETTINGS_SELECTED对其他3个场景重复1-3。 为了加快速度,您可以通过选择开始触发器并按Cmd + C(Ctrl + C Windows)复制您创建的第一个开始交互,然后将其粘贴到其他场景上,然后进行必要的更改
选项卡选择状态 (The tab selected state)
We now need to change the visual appearance of the tab so that it looks active. I’m going to style it like this:
现在,我们需要更改选项卡的外观,使其看起来处于活动状态。 我将按以下方式对其进行样式设置:

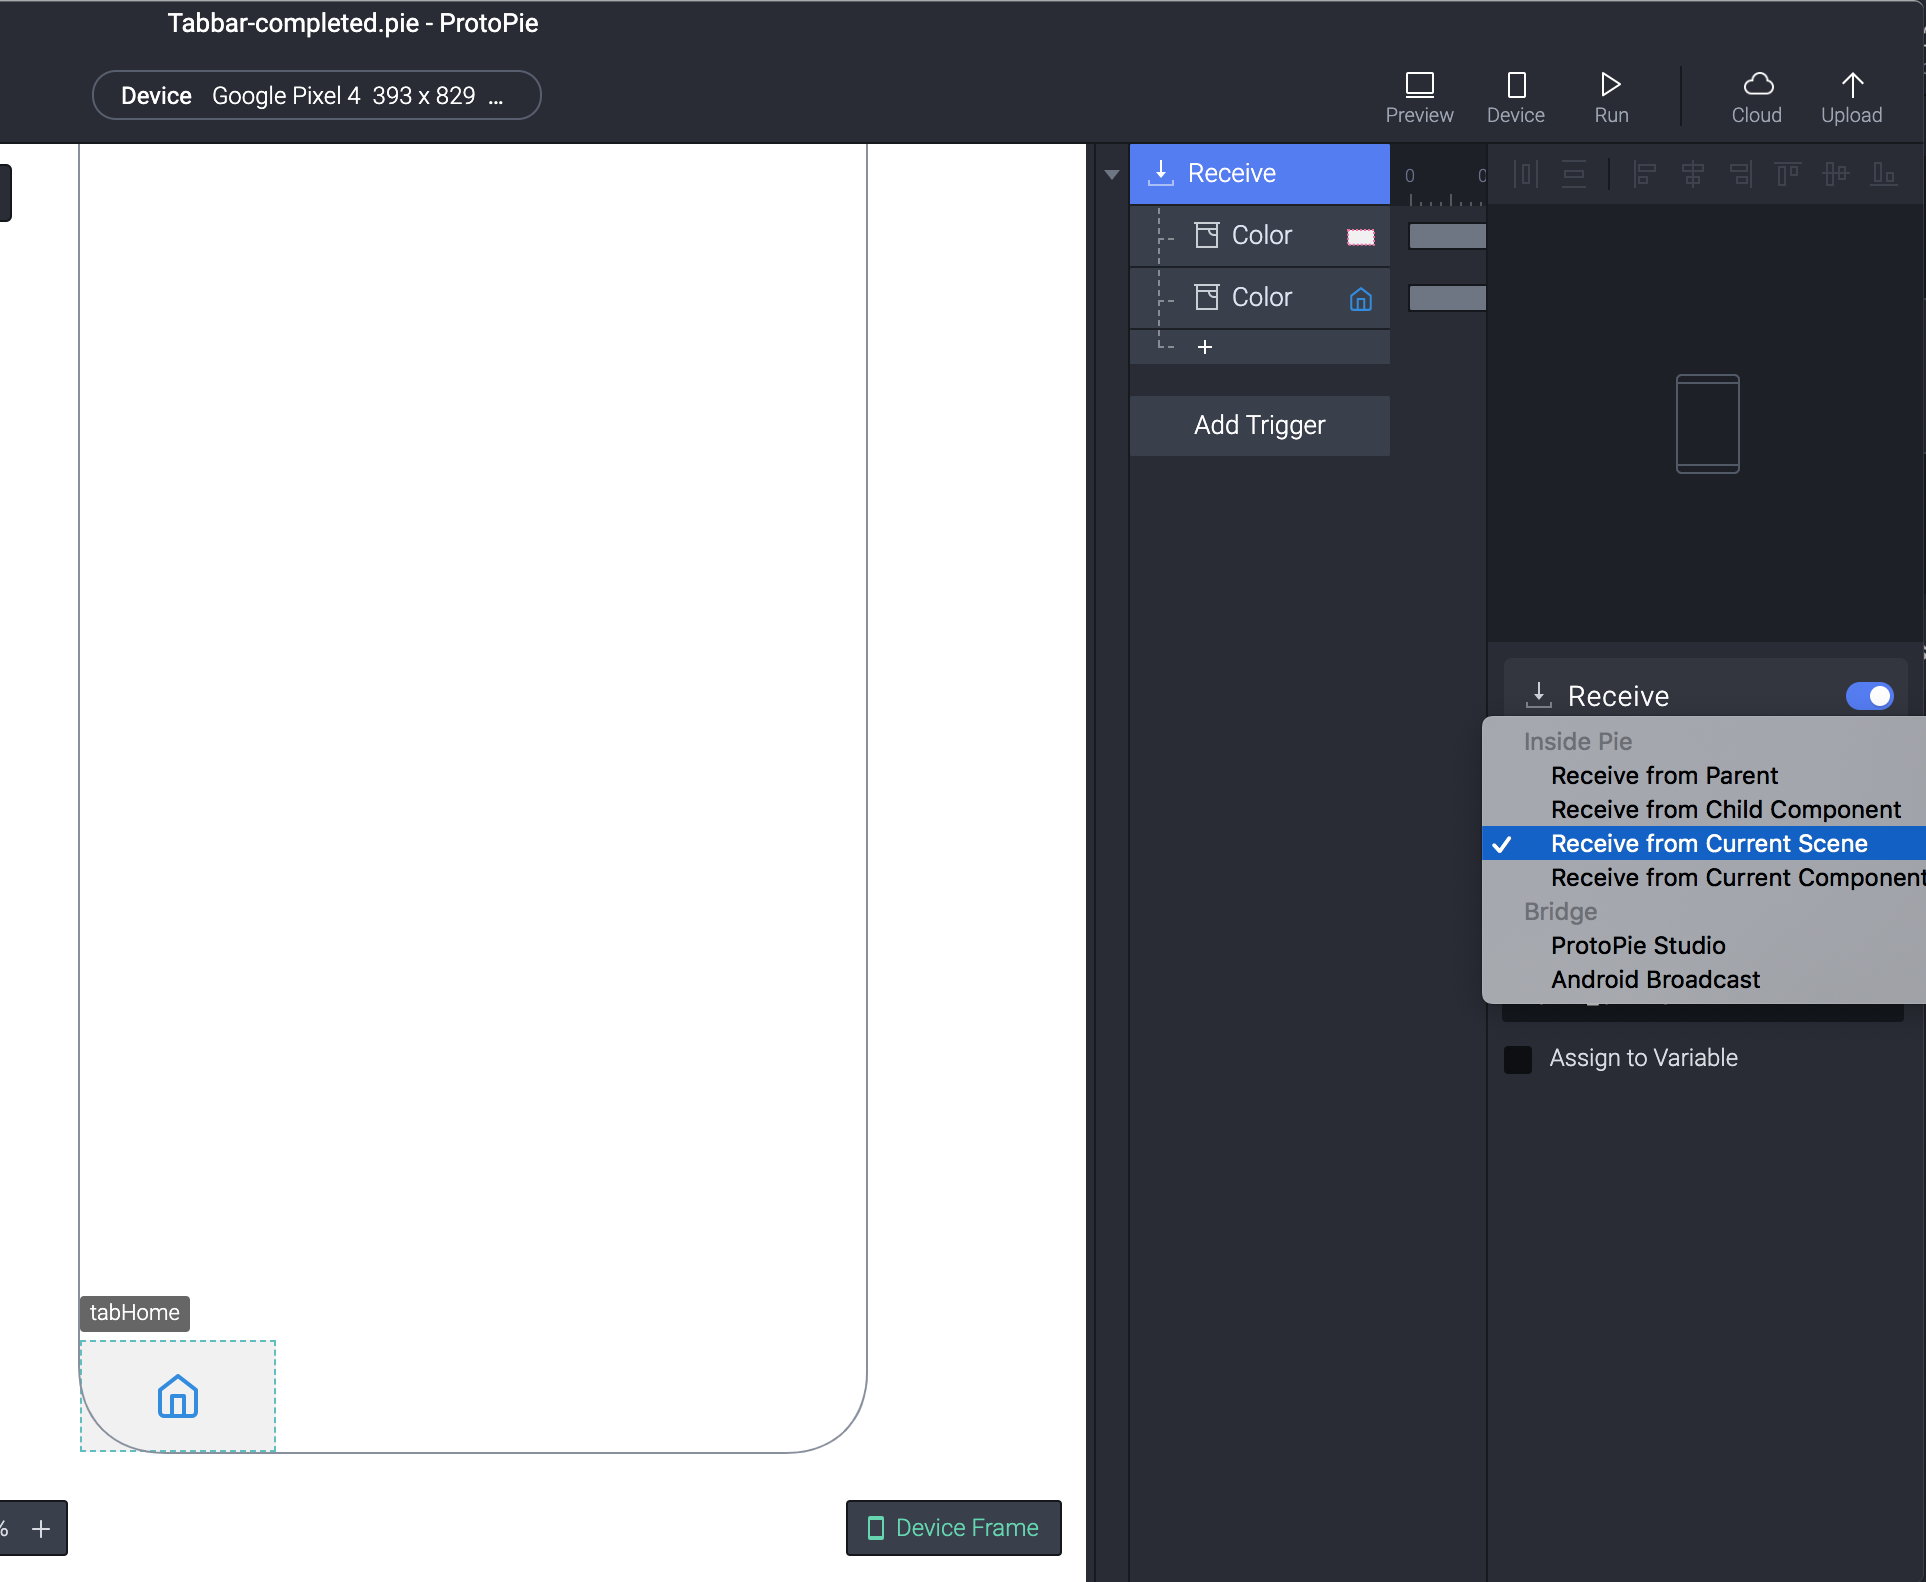
- Double-click the ‘tabHome’ component in the components panel在组件面板中双击“ tabHome”组件
Add a Receive trigger and select Receive from Current Scene from the Channel list
添加一个接收触发器,然后从“通道”列表中选择“ 从当前场景接收”
Tap in the Message field and type HOME_SELECTED, currently, auto-fill doesn’t work for this type of connection so we have to type it in.
在“消息”字段中点击,然后键入HOME_SELECTED ,当前,自动填充不适用于这种类型的连接,因此我们必须输入它。
Select TabHome and add a Color response. Change the fill property to #228BE6 and set the fill to 100
选择TabHome并添加颜色响应。 将填充属性更改为#228BE6并将填充设置为100
Add another Color response, this time for the icon. Check the Border checkbox and set it to #FFFFFF and the fill to 100.
添加另一个颜色响应,这次添加图标。 选中边框复选框 并将其设置为#FFFFFF ,并将填充设置为100 。
- Repeat steps 1–5 for the other tab components replacing the relevant message (ACTIVITY_SELECTED, NOTIFICATIONS_SELECTED AND SETTINGS_SELECTED) in the receive trigger. Remember you can use copy/paste对其他选项卡组件重复步骤1-5,以替换接收触发器中的相关消息(ACTIVITY_SELECTED,NOTIFICATIONS_SELECTED和SETTINGS_SELECTED)。 请记住,您可以使用复制/粘贴
- Return to the Home scene and tap preview to see your tab bar working返回主屏幕并点击预览以查看选项卡栏的工作情况
You have now completed a reusable tab component within ProtoPie. You can now copy and paste this across your prototypes. The only extra work you’ll need to do is copy the Start interaction group across that you added to each scene. You can do this by selecting it and simply performing a copy & paste.
现在,您已经完成了ProtoPie中的可重用选项卡组件。 您现在可以在整个原型中复制并粘贴它。 您唯一需要做的额外工作是复制添加到每个场景的“ 开始”交互组。 您可以选择它,然后简单地执行复制和粘贴操作。
There’s a lot more to explore with components but hopefully, you can see how useful they are and how you can create your UI in a reusable way
关于组件,还有很多要探索的东西,但是希望,您可以看到它们的有用性以及如何以可重用的方式创建UI
If you want to follow on by video check out the video here at ProtoPilot.
如果您想继续观看视频,请在ProtoPilot上观看视频。
Happy ProtoPie-ing!
快乐的原型制作!
翻译自: https://uxdesign.cc/building-a-tab-bar-with-nested-components-in-protopie-fcff8915b3b7
layui选项卡嵌套选项卡
http://www.taodudu.cc/news/show-894149.html
相关文章:
- myeclipse深色模式_完善深色模式的调色板
- figma设计_设计原型的最简单方法:Figma速成课程
- ios 按钮图片充满按钮_iOS有一些非常危险的按钮-UX评论
- swiftui_SwiftUI的混合包
- 数据挖掘 点击更多 界面_8(更多)技巧,可快速改善用户界面
- matlab绘制路线图_绘制国际水域路线图
- figma下载_通过构建7个通用UI动画来掌握Figma中的动画
- 黑客宣言_情感设计宣言
- 钮扣电池电压电量_纽扣厂
- 印发 指南 通知_通知设计的综合指南
- 现代人的压力和焦虑_设计师如何建立减少焦虑和压力的体验
- 去贵阳参观大数据到哪参观_您必须参观的四个世界
- figma下载_我关于Figma文件封面的故事
- lynda ux_如何进入UX领域
- :寻找指定和的整数对_寻找时间:如何增加设计的时间
- linkedin爬虫_重新设计Linkedin的指导功能-用户体验案例研究
- 大萧条时期什么行业走俏_大流行时期的用户体验
- nda协议_如何将NDA项目添加到您的投资组合
- 小程序卡片叠层切换卡片_现在,卡片和清单在哪里?
- $.when.apply_When2Meet vs.LettuceMeet:UI和美学方面的案例研究
- 利益相关者软件工程_如何向利益相关者解释用户体验的重要性
- 在当今移动互联网时代_谁在提供当今最好的电子邮件体验?
- 网络低俗词_从“低俗小说”中汲取7堂课,以创建有影响力的作品集
- webflow如何使用_我如何使用Webflow构建辅助项目以帮助设计人员进行连接
- cv::mat 颜色空间_网站设计基础:负空间
- shields 徽标_我的徽标素描过程
- ui设计未来十年前景_UI设计的10条诫命
- 如何了解自己的认知偏差_了解吸引力偏差
- 女生适合学ux吗_UX设计色彩心理学,理论与可访问性
- 视觉测试_视觉设计流行测验
layui选项卡嵌套选项卡_在ProtoPie中使用嵌套组件构建选项卡栏相关推荐
- 在python中函数不可以嵌套调用_在Python中调用嵌套函数
我有一个方法,我已经分解成更小的嵌套函数来分解代码基:def foo(x,y): def do_this(x,y): pass def do_that(x,y): pass do_this(x,y) ...
- 什么是计算机嵌套分类汇总,excel嵌套分类汇总 Excel表格中创建嵌套分类汇总和查看嵌套分类汇总明细的方法...
excel嵌套分类汇总 Excel表格中创建嵌套分类汇总和查看嵌套分类汇总明细的方法,我们在工作中会遇到很多文章,像excel嵌套分类汇总这类问题应该大家也都遇到过吧,今天这篇excel嵌套分类汇总 ...
- python中对列表排序_在Python中对嵌套列表进行排序和分组
在Python中对嵌套列表进行排序和分组 我具有以下数据结构(列表列表) [ ['4', '21', '1', '14', '2008-10-24 15:42:58'], ['3', '22', '4 ...
- h5 iframe嵌套页面_如何将一个HTML页面嵌套在另一个页面中
展开全部 这个在做网页中常e69da5e887aa62616964757a686964616f31333339666636要用到,有些通用的内容可集中放在一个页面文件中,其它要用到这些内容的页面只需要 ...
- c语言微课ppt嵌套函数,C语言课程中循环嵌套的微课教学设计与思考.pdf
课程教学 Cur r i cul um Teac hi ng C语 言 课 程 中 循 环 嵌 套 的 微 课 教 学 设 计 与 思 考 陈磊魏林 ( 江西经济管理干部学院江西 ·南昌330088) ...
- HTML怎么CSS表格嵌套,CSS#/ HTML5 Chrome中的嵌套表格和子填充
我正在尝试为我的UI库SlateJS设置一个多面板小部件.基本上,多面板小部件通过多个水平或垂直对齐的面板填充所有可用的空间.每个面板都可以有一个与之关联的工具栏.CSS#/ HTML5 Chrome ...
- c语言微课ppt嵌套函数,C语言课程中循环嵌套的微课教学设计与思考
C语言课程中循环嵌套的微课教学设计与思考 2018-12-01 话题:教育学习,教学方法 摘 要 本文以C语言课程中循环嵌套内容为例,通过观看全国高校微课比赛获奖作品与专家点评得到启示,本科与高职的微 ...
- vant在cell中加表格_在vant 中使用cell组件 定义图标该图片和位置操作
@本来想直接使用icon组件,使用阿里的图标库,可是怎么弄也不行,折腾一下午,最后决定使用最笨的办法,直接上代码 vant 中使用cell组件 定义图标该图片和位置像微信信息栏一样 二级经营单位 // ...
- graphql 嵌套查询_了解GraphQL中的查询
graphql 嵌套查询 介绍 (Introduction) In this tutorial, we'll take an in-depth look at queries in GraphQL s ...
最新文章
- 是同步方法还是 synchronized 代码?-- 详解多线程同步规则
- python barrier option pricing_《Python金融数据分析》书内代码实战与讲解(二)金融衍生物定价...
- 终于要考网络架构师了
- 2高并发服务器:多线程服务器
- 工作371-javascript判断数组为空
- 阿里技术专家都铎:一文搞懂技术债
- 公众号支付相关需要注意的问题
- 测试用例综合设计方法
- Bootstrap Datatable 简单的基本配置
- 摩拜APP、小程序停服 摩拜单车全面接入美团
- 100款违法违规APP下架整改:微店、更美等在列
- jquery获取加载的html内容,jquery 获取ajax加载的html中部分内容
- 马斯克地球事务麻烦不断:Model 3又有一起严重事故曝光
- Julia: 引用与copy: 关于数组、自定义类型与初始化
- 调用打码平台api获取验证码 (C#版)
- esp-idf的内存管理——tlsf之上的封装
- 小样本学习记录————MAML的改进MAML++
- 硕士研究生计算机专业录取分数线,全国所计算机研究生录取分数线.doc
- Xbrowser远程登录Ubuntu闪退问题的解决方案
- python ui界面设计(二)
热门文章
- 极域电子书包课堂管理系统_【君莲微讯】君莲学校(小学部)开展电子书包第13共同体数学研讨活动...
- 江西计算机一级考试教程,江西省2019年下半年计算机一级考试复习教程:计算机基础及MS Office应用上机指导...
- android studio不能更新代码,解决Android Studio 和 Android SDK Manager 无法在线更新的问题....
- pyplot输出的绘图界面中文乱码的解决方案
- 全虚拟化和半虚拟化的区别 cpu的ring0~ring3又是什么概念?
- React引入,运行
- 小白配置QConf遇到的问题
- tomcat运行问题解决方法
- 使用JXL组件操作Excel和导出文件
- js 获取java_js中获取当前时间