基于Linux的 Open×××网络之网络架构应用实例
基于Linux的 Open×××网络之网络架构应用实例
Open××× 概述
Open××× 是一个开源的加密隧道构建工具,基于 OpenSSL 的 SSL/TLS 协议,可以在 Internet中实现点对点的 SSL ××× 安全连接。使用 Open××× 的好处是安全、易用和稳定,且认证方式灵活,具备实现 SSL ××× 解决方案的完整特性。Open××× 可以应用于 Linux、Unix、Mac OS 以及Windows 等各种操作系统平台。
Open××× 提供两种类型的虚拟网络接口:TUN 和 TAP,分别用于建立 IP 隧道、以太网桥接。在 Linux 中使用这两种虚拟设备,需要对应的内核模块支持。RHEL5 系统默认已编译好 tun 模块,直接使用即可。
Open××× 的 官 方 站 点 是 http://open***.net , 目 前 发 布 的 最 新 测 试 版 本 为Open×××-2.1_rc13,稳定版为Open×××-2.0.9。
Open×××使用OpenSSL库加密数据与控制信息:它使用了OpenSSL的加密以及验证功能,意味着,它能够使用任何OpenSSL支持的算法。它提供了可选的数据包HMAC功能以提高连接的安全性。此外,OpenSSL的硬件加速也能提高它的性能。
Open×××提供了多种身份验证方式,用以确认参与连接双方的身份,包括:预享私钥,×××在vlan中的应用第三方证书以及用户名/密码组合。预享密钥最为简单,但同时它只能用于建立点对点的×××;基于PKI的第三方证书提供了最完善的功能,但是需要额外的精力去维护一个PKI证书体系。Open×××2.0后引入了用户名/口令组合的身份验证方式,它可以省略客户端证书,但是仍有一份服务器证书需要被用作加密。
本章案例中,需要下载使用的相关软件包参考如下:
最新稳定版源码包:http://open***.net/release/open***-2.0.9.tar.gz
Windows 安装包:
http://open***.se/files/install_packages/open***-2.0.9-gui-1.0.3-install.exe
LZO工具包:http://www.oberhumer.com/opensource/lzo/download/lzo-2.03.tar.gz
1. 案例需求分析
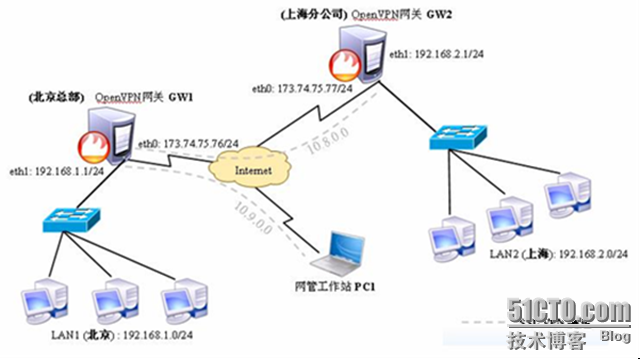
本案例主要基于RHEL5 和Windows XP系统环境,跨越不安全的Internet网络,为异地的两个局域网及远程网管工作站建立安全的SSL ×××连接(如图8.2所示)。
其中,北京总部和上海分公司的网关服务器均使用 RHEL5 系统,需要分别配置 Open×××,用于连接两个异地的局域网 LAN1、LAN2。此外,位于 Internet 中的网管工作站使用 Windows XP系统,需要随时通过 ××× 安全隧道访问总部的局域网 LAN1 和上海分公司的局域网 LAN2。
基于 Linux 的 Open××× 网络
Open××× 远程虚拟专用网络架构
基于上述需求,可以将北京总部的网关服务器 GW1 配置为 ××× Server 模式,上海的网关服务器GW2和Internet网 管工作站PC1均使用××× Client模式。分别建立两条点对点
(Point-to-Point)的SSL ×××安全隧道——“GW1 <----> GW2”、“GW1 <----> PC1”即可。
由于Internet 网络的细节不是本案例的重点,因此GW1、GW2的公网IP地址分别使用
173.74.75.76和173.74.75.77来模拟。其他网络接口地址设置如下:
GW1、GW2 的内网接口 IP 地址分别为 192.168.1.1、192.168.2.1。
? GW1 <----> GW2 隧道:分别使用虚拟 IP 地址 10.8.0.1/30、10.8.0.2/30。
? GW1 <----> PC1 隧道:分别使用虚拟 IP 地址 10.9.0.1/30、10.9.0.2/30。
另外,两地局域网的客户机需要正确设置好 IP 地址、默认网关等参数:
? LAN1 的主机使用 192.168.1.0/24 网段,默认网关设为 192.168.1.1。
? LAN2 的主机使用 192.168.2.0/24 网段,默认网关设为 192.168.2.1。
2. 配置 GW1 <----> GW2 隧道连接
本小节主要阐述如何创建第 1 条 SSL ××× 隧道,用于连接 GW1、GW2 两台服务器,以便实现北京、上海两地局域网(LAN1、LAN2)的安全互联。
主要实现过程如下:
第一步、配置主服务器(GW1)——北京
A. 配置 Internet 连接及 SNAT、路由转发
1) 配置 IP 地址
eth0 接口(173.74.75.76/24)用于连接 Internet,eth1 接口(192.168.1.1/24)用于连
接局域网(配置过程略)
2) 开启路由及 SNAT 转换
[root@gw1 ~]# vim /opt/gw1_nat.sh
sysctl -w net.ipv4.ip_forward=1
/sbin/iptables -t nat -I POSTROUTING -o eth0 -j SNAT --to-source 173.74.75.76
[root@gw1 ~]# chmod a+x /opt/gw1_nat.sh
[root@gw1 ~]# echo "/opt/gw1_nat.sh" >> /etc/rc.local
[root@gw1 ~]# /opt/gw1_nat.sh
net.ipv4.ip_forward = 1
[root@gw1 ~]# sysctl –p
B. 安装 Open××× 服务
[root@gw1 soft_dir]# tar zxvf lzo-2.03.tar.gz
[root@gw1 soft_dir]# cd lzo-2.03
[root@gw1 lzo-2.03]# ./configure && make && make install
[root@gw1 lzo-2.03]# cd ../
[root@gw1 soft_dir]# tar zxvf open***-2.0.9.tar.gz
[root@gw1 open***-2.0.9]# ./configure && make && make install
[root@gw1 ~]# cd /soft_dir/
[root@gw1 soft_dir]# cp -p open***-2.0.9/sample-scripts/open***.init /etc/init.d/open***
[root@gw1 soft_dir]# chmod +x /etc/init.d/open***
[root@gw1 soft_dir]# chkconfig --add open***
[root@gw1 soft_dir]# chkconfig --level 2345 open*** on
C. 创建证书和密钥文件
证书和密钥文件主要用于点对点客户端的认证,以便增强安全性。为了降低密钥创建过程的复杂性,可以充分利用 Open××× 源码包提供的 easy-rsa/目录,该目录中包含一系列简单易用的脚本工具(参考“open***-2.0.9/easy-rsa/README”文件)。
3) 配置变量环境
修改 easy-rsa/vars 文件,根据实际情况适当修改预定义变量,或保持默认。在后续
创建相关文件的过程中,将会直接读取这些变量的内容。其中“KEY_DIR”变量的值决定了
新创建的密钥等文件的存放位置。
[root@gw1 ~]# cd /soft_dir/open***-2.0.9/easy-rsa/
[root@gw1 easy-rsa]# vim vars
|
export D=`pwd` export KEY_CONFIG=$D/openssl.cnf export KEY_DIR=$D/keys echo NOTE: when you run ./clean-all, I will be doing a rm -rf on $KEY_DIR export KEY_SIZE=1024 export KEY_COUNTRY=CN //粗体部分根据具体应用情况进行修改 export KEY_PROVINCE=BeiJing export KEY_CITY=BeiJing export KEY_ORG="BENET.Inc" export KEY_EMAIL="***adm@benet.com" |
[root@gw1 easy-rsa]# source vars //执行 vars 文件中的代码
NOTE: when you run ./clean-all, I will be doing a rm -rf on /soft_dir/open***-2.0.9/easy-rsa/keys
[root@gw1 easy-rsa]# ./clean-all //预先清除$KEY_DIR 目录
4) 创建 CA 证书
执行“./build-ca”脚本建立 CA 证书文件,根据脚本提示设置好国家代码、省份、城市、
公司名等信息,如通用识别名称“Common Name”项可以设置为 GW1 的 FQDN 名称。
后续创建的密钥文件需要依据该 CA 文件。
[root@gw1 easy-rsa]# ./build-ca
|
Generating a 1024 bit RSA private key .....++++++ ..............................++++++ writing new private key to 'ca.key' ----- You are about to be asked to enter information that will be incorporated into your certificate request. What you are about to enter is what is called a Distinguished Name or a DN. There are quite a few fields but you can leave some blank For some fields there will be a default value, If you enter '.', the field will be left blank. ----- Country Name (2 letter code) [CN]: State or Province Name (full name) [BeiJing]: Locality Name (eg, city) [BISHKEK]: Organization Name (eg, company) [BENET.Inc]: Organizational Unit Name (eg, section) []: Common Name (eg, your name or your server's hostname) []:gw1.benet.com Email Address [***adm@benet.com]: |
5) 创建 dh(Diffie-Hellman)密钥算法文件
执行“./build-dh”脚本即可建立 dh 文件
[root@gw1 easy-rsa]# ./build-dh
Generating DH parameters, 1024 bit long safe prime, generator 2
This is going to take a long time
..........................................................................+.................................+................................................................+...................+.........................................+..+................................................................+.....................................................................................+........+.............+..............................+.......................................................................................+..........+.........................+.......................................................................................+.................+..............................+........+..............................+.........................................................................................................................................................+....................+......+.............+.........................................................+......+.......+.........................+.........................................................................................+.........................................+............................+............................+..........................................+.............................++*++*++*
6) 创建 GW1 主服务器端密钥
执行“./build-key-server”脚本可以建立××× 服务端密钥文件,根据提示设置好Common Name(gw1.benet.com),最后依次按“y”键签署(Sign)及提交(Commit)。
|
[root@gw1 easy-rsa]# ./build-key-server gw1 Generating a 1024 bit RSA private key .............................++++++ ....................................++++++ writing new private key to 'gw1.key' ----- You are about to be asked to enter information that will be incorporated into your certificate request. What you are about to enter is what is called a Distinguished Name or a DN. There are quite a few fields but you can leave some blank For some fields there will be a default value, If you enter '.', the field will be left blank. ----- Country Name (2 letter code) [CN]: State or Province Name (full name) [BeiJing]: Locality Name (eg, city) [BISHKEK]: Organization Name (eg, company) [BENET.Inc]: Organizational Unit Name (eg, section) []: Common Name (eg, your name or your server's hostname) []:gw1.benet.com Email Address [***adm@benet.com]: Please enter the following 'extra' attributes to be sent with your certificate request A challenge password []: An optional company name []: Using configuration from /soft_dir/open***-2.0.9/easy-rsa/openssl.cnf Check that the request matches the signature Signature ok The Subject's Distinguished Name is as follows countryName :PRINTABLE:'CN' stateOrProvinceName :PRINTABLE:'BeiJing' localityName :PRINTABLE:'BISHKEK' organizationName :PRINTABLE:'BENET.Inc' commonName :PRINTABLE:'gw1.benet.com' emailAddress :IA5STRING:'***adm@benet.com' Certificate is to be certified until Jul 12 02:42:17 2020 GMT (3650 days) Sign the certificate? [y/n]:y 1 out of 1 certificate requests certified, commit? [y/n]y Write out database with 1 new entries Data Base Updated |
7) 创建 GW2 对端服务器密钥
执行“./build-key”脚本可以建立 ××× 客户端密钥文件,同样根据提示设置好 Common Name(gw2.benet.com),最后依次按“y”签署(Sign)及提交(Commit)。
|
[root@gw1 easy-rsa]# ./build-key gw2 Generating a 1024 bit RSA private key ...................++++++ ..++++++ writing new private key to 'gw2.key' ----- You are about to be asked to enter information that will be incorporated into your certificate request. What you are about to enter is what is called a Distinguished Name or a DN. There are quite a few fields but you can leave some blank For some fields there will be a default value, If you enter '.', the field will be left blank. ----- Country Name (2 letter code) [CN]: State or Province Name (full name) [BeiJing]: Locality Name (eg, city) [BISHKEK]: Organization Name (eg, company) [BENET.Inc]: Organizational Unit Name (eg, section) []: Common Name (eg, your name or your server's hostname) []:gw2.benet.com Email Address [***adm@benet.com]: Please enter the following 'extra' attributes to be sent with your certificate request A challenge password []: An optional company name []: Using configuration from /soft_dir/open***-2.0.9/easy-rsa/openssl.cnf Check that the request matches the signature Signature ok The Subject's Distinguished Name is as follows countryName :PRINTABLE:'CN' stateOrProvinceName :PRINTABLE:'BeiJing' localityName :PRINTABLE:'BISHKEK' organizationName :PRINTABLE:'BENET.Inc' commonName :PRINTABLE:'gw2.benet.com' emailAddress :IA5STRING:'***adm@benet.com' Certificate is to be certified until Jul 12 02:44:30 2020 GMT (3650 days) Sign the certificate? [y/n]:y 1 out of 1 certificate requests certified, commit? [y/n]y Write out database with 1 new entries Data Base Updated |
注意:
使用“./build-key”脚本创建密钥时,不同的客户端对应的“Common Name”不能相同。
8) 生成 tls-auth 密钥
tls-auth 密钥可以为点对点的 ××× 连接提供了进一步的安全验证,如果选择使用这一方式,服务器端和客户端都必须拥有该密钥文件。
open*** 命令跟上“--genkey --secret”选项可以用于建立 ta 密钥文件。
[root@gw1 easy-rsa]# open*** --genkey --secret keys/ta.key
9) 最后将上述文件所在的 keys/文件夹转移至/etc/open***/目录
[root@gw1 easy-rsa]# mkdir -p /etc/open***/
[root@gw1 easy-rsa]# mv keys/ /etc/open***/
D. 创建主服务器配置文件
在服务器配置文件中指定使用 Server 模式,监听默认的 UDP 1194 端口。虚拟接口采用tun0设备。可以参考open*** 源码目录中的配置范例(open***-2.0.9/sample-config-files/server.conf)
[root@gw1 ~]# vim /etc/open***/gw1_tun0.conf
|
local 173.74.75.76 //指定监听服务的 IP 地址 port 1194 //为第 1 条隧道开启默认的 1194 端口 proto udp dev tun //使用 SSL Tune 的 ××× 隧道模式 ca keys/ca.crt cert keys/gw1.crt key keys/gw1.key dh keys/dh1024.pem server 10.8.0.0 255.255.255.0 //使用服务器模式,并指定 ××× 虚拟网络地址 ifconfig-pool-persist ipp.txt push "route 192.168.1.0 255.255.255.0" //为 GW2 添加到 LAN1 网段的路由 push "route 10.9.0.0 255.255.255.0" //为 GW2 添加到 PC1 的路由 push "dhcp-options DNS 210.22.84.3" //为客户端设置 DNS 服务器地址 route 192.168.2.0 255.255.255.0 //为 GW1 添加到 LAN2 网段的路由 client-config-dir ccd //允许读取 ccd/目录下的客户端配置文件 keepalive 10 120 tls-auth keys/ta.key 0 //指定 tls-auth 密钥 cipher BF-CBC //加密算法与客户端要保持一致 comp-lzo max-clients 100 //允许的最大并发 ××× 连接数 user nobody group nobody persist-key persist-tun status open***-status.log log-append open***.log verb 3 mute 20 |
E. 建立用于 GW2 的 ccd 配置文件
[root@gw1 ~]# mkdir -p /etc/open***/ccd
[root@gw1 ~]# cd /etc/open***/ccd/ //为对端服务器 GW2 创建独立的配置文件
[root@gw1 ccd]# vim gw2.benet.com
|
iroute 192.168.2.0 255.255.255.0 //声明 GW2 后端的 LAN2 子网络 ifconfig-push 10.8.0.2 10.8.0.1 //指定 GW2 的本地地址(tun0)、对端地址(P-t-P) |
F. 启动 Open××× 服务
[root@gw1 ~]# service open*** start
正在启动 open***: [确定]
[root@gw1 ~]# netstat -anp | grep open***
udp 0 0 173.74.75.76:1194 0.0.0.0:* 11220/open***
第二步、配置对端服务器(GW2)——上海
1. 配置 Internet 连接及 SNAT、路由转发
1) 配置 IP 地址
eth0 接口(173.74.75.77/24)用于连接 Internet,eth1 接口(192.168.2.1/24)用于连
接局域网(配置过程略)
2) 开启路由及 SNAT 转换
[root@gw2 ~]# vim /opt/gw2_nat.sh
|
sysctl -w net.ipv4.ip_forward=1 /sbin/iptables -t nat -I POSTROUTING -o eth0 -j SNAT --to-source 173.74.75.77 |
[root@gw2 ~]# chmod a+x /opt/gw2_nat.sh
[root@gw2 ~]# echo "/opt/gw2_nat.sh" >> /etc/rc.local
[root@gw2 ~]# /opt/gw2_nat.sh
net.ipv4.ip_forward = 1
2. 安装 Open××× 服务
[root@gw1 soft_dir]# tar zxvf lzo-2.03.tar.gz
[root@gw1 soft_dir]# cd lzo-2.03
[root@gw1 lzo-2.03]# ./configure && make && make install
[root@gw1 lzo-2.03]# cd ../
[root@gw1 soft_dir]# tar zxvf open***-2.0.9.tar.gz
[root@gw1 soft_dir]# cd open***-2.0.9
[root@gw1 open***-2.0.9]# ./configure && make && make install
[root@gw1 ~]# cd /soft_dir/
[root@gw1 soft_dir]# cp -p open***-2.0.9/sample-scripts/open***.init /etc/init.d/open***
[root@gw1 soft_dir]# chmod +x /etc/init.d/open***
[root@gw1 soft_dir]# chkconfig --add open***
[root@gw1 soft_dir]# chkconfig --level 2345 open*** on
3. 下载证书和密钥文件
下载在 GW1 主服务器端创建的 ca.crt、ta.key、gw2.key、gw2.crt 文件,使用 FTP、SCP、Email 等任何方式均可。
—— 在服务器 GW1 上:
|
[root@gw1 ~]# cd /etc/open***/keys/ [root@gw1 keys]# tar jcvf /var/ftp/send_to_gw2.tar.bz2 ca.crt ta.key gw2.key gw2.crt ca.crt ta.key gw2.key gw2.crt [root@gw1 keys]# service vsftpd start 为 vsftpd 启动 vsftpd: [确定] |
—— 在服务器 GW2 上:
|
[root@gw2 ~]# wget ftp://173.74.75.76/send_to_gw2.tar.bz2 --2010-07-15 11:17:08-- ftp://173.74.75.76/send_to_gw2.tar.bz2 => `send_to_gw2.tar.bz2' Connecting to 173.74.75.76:21... 已连接。 正在以 anonymous 登录 ... 登录成功! ==> SYST ... 完成。 ==> PWD ... 完成。 ==> TYPE I ... 完成。 ==> 不需要 CWD。 ==> SIZE send_to_gw2.tar.bz2 ... 4025 ==> PASV ... 完成。 ==> RETR send_to_gw2.tar.bz2 ... 完成。 长度:4025 (3.9K) 100%[======================================>] 4,025 --.-K/s in 0s 2010-07-15 11:17:09 (116 MB/s) - `send_to_gw2.tar.bz2' saved [4025] [root@gw2 ~]# ls anaconda-ks.cfg Desktop install.log install.log.syslog send_to_gw2.tar.bz2 |
将下载后的文件释放保存到 open*** 配置目录
|
[root@gw2 ~]# mkdir -p /etc/open***/keys/ [root@gw2 ~]# tar jxvf send_to_gw2.tar.bz2 -C /etc/open***/keys/ |
4. 创建客户端配置文件
在客户端配置文件中指定使用 Client 模式,以及远程 ××× 服务器的地址和端口。可以参考 open*** 源码目录中的配置范例(open***-2.0.9/sample-config-files/client.conf)
|
[root@gw2 ~]# vim /etc/open***/gw2.conf client //使用客户端模式 dev tun proto udp remote 173.74.75.76 1194 //点对点主服务器的地址、端口 resolv-retry infinite nobind user nobody group nobody persist-key persist-tun ca keys/ca.crt cert keys/gw2.crt key keys/gw2.key ns-cert-type server tls-auth keys/ta.key 1 cipher BF-CBC //需和 GW1 服务器端保持一致 comp-lzo verb 3 mute 20 |
5. 启动 Open××× 服务
使用安装时建立的服务脚本启动 open*** 服务
|
[root@gw2 ~]# service open*** start 正在启动 open***: [确定] [root@gw2 ~]# netstat -anp | grep open*** udp 0 0 0.0.0.0:39449 0.0.0.0:* 27004/open*** unix 2 [ ] DGRAM 65137 27004/open*** |
第三步、验证 SSL ××× 连接
1. GW1 服务器的 ××× 接口状态
5) GW1 主服务器 tun0 接口的 IP 地址为 10.8.0.1,点对点对端地址为 10.8.0.2
|
[root@gw1 keys]# ifconfig tun0 tun0 Link encap:UNSPEC HWaddr 00-00-00-00-00-00-00-00-00-00-00-00-00-00-00-00 inet addr:10.8.0.1 P-t-P:10.8.0.2 Mask:255.255.255.255 UP POINTOPOINT RUNNING NOARP MULTICAST MTU:1500 Metric:1 RX packets:0 errors:0 dropped:0 overruns:0 frame:0 TX packets:0 errors:0 dropped:0 overruns:0 carrier:0 collisions:0 txqueuelen:100 RX bytes:0 (0.0 b) TX bytes:0 (0.0 b) |
6) 路由表中应有通过 GW2 访问 LAN2 网段的路由记录
|
[root@gw1 ~]# route -n Kernel IP routing table Destination Gateway Genmask Flags Metric Ref Use Iface 10.8.0.2 0.0.0.0 255.255.255.255 UH 0 0 0 tun0 192.168.2.0 10.8.0.2 255.255.255.0 UG 0 0 0 tun0 10.8.0.0 10.8.0.2 255.255.255.0 UG 0 0 0 tun0 192.168.1.0 0.0.0.0 255.255.255.0 U 0 0 0 eth1 173.74.75.0 0.0.0.0 255.255.255.0 U 0 0 0 eth0 169.254.0.0 0.0.0.0 255.255.0.0 U 0 0 0 eth1 |
2. GW2 服务器的 ××× 接口状态
1) GW2 服务器 tun0 接口的 IP 地址为 10.8.0.2,点对点对端地址为 10.8.0.1
|
[root@gw2 ~]# ifconfig tun0 tun0 Link encap:UNSPEC HWaddr 00-00-00-00-00-00-00-00-00-00-00-00-00-00-00-00 inet addr:10.8.0.2 P-t-P:10.8.0.1 Mask:255.255.255.255 UP POINTOPOINT RUNNING NOARP MULTICAST MTU:1500 Metric:1 RX packets:0 errors:0 dropped:0 overruns:0 frame:0 TX packets:0 errors:0 dropped:0 overruns:0 carrier:0 collisions:0 txqueuelen:100 RX bytes:0 (0.0 b) TX bytes:0 (0.0 b) |
2) 路由表中应有通过 GW1 访问 LAN1 网段的路由记录
|
[root@gw2 ~]# route -n Kernel IP routing table Destination Gateway Genmask Flags Metric Ref Use Iface 10.8.0.1 0.0.0.0 255.255.255.255 UH 0 0 0 tun0 192.168.2.0 0.0.0.0 255.255.255.0 U 0 0 0 eth1 192.168.1.0 10.8.0.1 255.255.255.0 UG 0 0 0 tun0 173.74.75.0 0.0.0.0 255.255.255.0 U 0 0 0 eth0 10.9.0.0 10.8.0.1 255.255.255.0 UG 0 0 0 tun0 169.254.0.0 0.0.0.0 255.255.0.0 U 0 0 0 eth1 |
3. 测试 SSL ××× 隧道连接
|
[root@gw1 ~]# ping 10.8.0.2 -c 2 PING 10.8.0.2 (10.8.0.2) 56(84) bytes of data. 64 bytes from 10.8.0.2: icmp_seq=1 ttl=64 time=17.5 ms 64 bytes from 10.8.0.2: icmp_seq=2 ttl=64 time=0.613 ms --- 10.8.0.2 ping statistics --- 2 packets transmitted, 2 received, 0% packet loss, time 1188ms rtt min/avg/max/mdev = 0.613/9.101/17.590/8.489 ms |
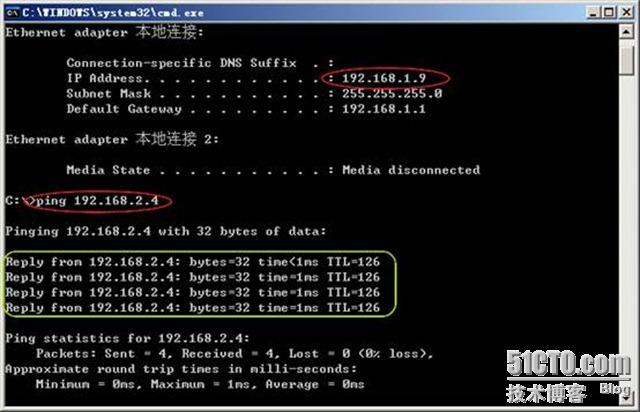
图 测试 LAN1、LAN2 中主机之间的互联
配置“GW1 <----> PC1”隧道连接
本小节主要描述如何创建第 2 条 SSL ××× 隧道,用于在 GW1、PC1 之间建立点到点的安全连接,以便 Windows XP 客户端能够从 Internet 中安全的接入总部的 ××× 网络,进一步访问两地的局域网络。
第一步、配置主服务器(GW1)——北京
1. 创建 PC1 用户端密钥
在 GW1 服务器上为 PC1 网管机建立单独的密钥文件,注意 Common Name 不要和其他密钥重复。生成的密钥文件必需放置到/etc/open***/keys/目录中(可以直接调整 KEY_DIR 变量)。
|
[root@gw1 ~]# cd /soft_dir/open***-2.0.9/easy-rsa/ [root@gw1 easy-rsa]# source vars NOTE: when you run ./clean-all, I will be doing a rm -rf on /soft_dir/open***-2.0.9/easy-rsa/keys [root@gw1 easy-rsa]# export KEY_DIR=/etc/open***/keys/ [root@gw1 easy-rsa]# ./build-key client-pc1 Generating a 1024 bit RSA private key .........++++++ ...............++++++ writing new private key to 'client-pc1.key' ----- You are about to be asked to enter information that will be incorporated into your certificate request. What you are about to enter is what is called a Distinguished Name or a DN. There are quite a few fields but you can leave some blank For some fields there will be a default value, If you enter '.', the field will be left blank. ----- Country Name (2 letter code) [CN]: State or Province Name (full name) [BeiJing]: Locality Name (eg, city) [BISHKEK]: Organization Name (eg, company) [BENET.Inc]: Organizational Unit Name (eg, section) []: Common Name (eg, your name or your server's hostname) []:client-pc1.benet.com Email Address [***adm@benet.com]: Please enter the following 'extra' attributes to be sent with your certificate request A challenge password []: An optional company name []: Using configuration from /soft_dir/open***-2.0.9/easy-rsa/openssl.cnf Check that the request matches the signature Signature ok The Subject's Distinguished Name is as follows countryName :PRINTABLE:'CN' stateOrProvinceName :PRINTABLE:'BeiJing' localityName :PRINTABLE:'BISHKEK' organizationName :PRINTABLE:'BENET.Inc' commonName :PRINTABLE:'client-pc1.benet.com' emailAddress :IA5STRING:'***adm@benet.com' Certificate is to be certified until Jul 12 06:10:23 2020 GMT (3650 days) Sign the certificate? [y/n]:y 1 out of 1 certificate requests certified, commit? [y/n]y Write out database with 1 new entries Data Base Updated |
2. 创建第 2 个服务配置文件
该配置文件用于建立“GW1 <----> PC1”隧道连接,将使用 tun1 设备、监听 UDP 1195 端口。
|
[root@gw1 ~]# vim /etc/open***/gw1_tun1.conf local 173.74.75.76 port 1195 //为第 2 条隧道开启新的 1195 端口监听服务 proto udp dev tun ca keys/ca.crt cert keys/gw1.crt key keys/gw1.key dh keys/dh1024.pem server 10.9.0.0 255.255.255.0 //设置第 2 条隧道的虚拟网络地址 ifconfig-pool-persist ipp.txt push "route 192.168.1.0 255.255.255.0" //为 PC1 添加到 LAN1 的路由 push "route 192.168.2.0 255.255.255.0" //为 PC1 添加到 LAN2 的路由 push "route 10.8.0.0 255.255.255.0" //为 PC1 添加到 GW2 的路由 push "dhcp-options DNS 202.106.0.20" client-to-client client-config-dir ccd keepalive 10 120 tls-auth keys/ta.key 0 cipher BF-CBC comp-lzo max-clients 10 user nobody group nobody persist-key persist-tun status open***-status-2.log //启用新的日志文件 log-append open***-2.log verb 3 mute 20 |
3. 建立用于 PC1 的 ccd 配置文件
|
[root@gw1 ~]# vim /etc/open***/ccd/client-pc1.benet.com ifconfig-push 10.9.0.2 10.9.0.1 |
4. 重新启动 Open××× 服务
重启 open*** 服务后应在 1194、1195 端口分别监听服务。
|
[root@gw1 ~]# service open*** restart 正在关闭open***: [确定] 正在启动 open***: [确定] [root@gw1 ~]# netstat -anp | grep open*** udp 0 0 173.74.75.76:1194 0.0.0.0:* 11793/open*** udp 0 0 173.74.75.76:1195 0.0.0.0:* 11810/open*** |
第二步、配置 Windows XP 客户机(PC1)——上海
1. 配置 IP 地址及 Internet 连接(略)
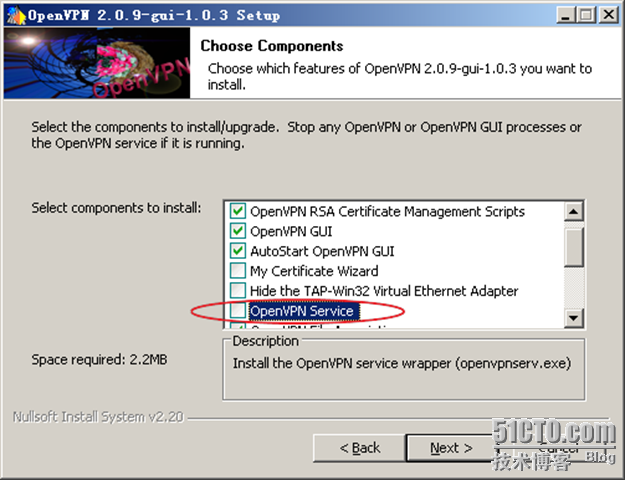
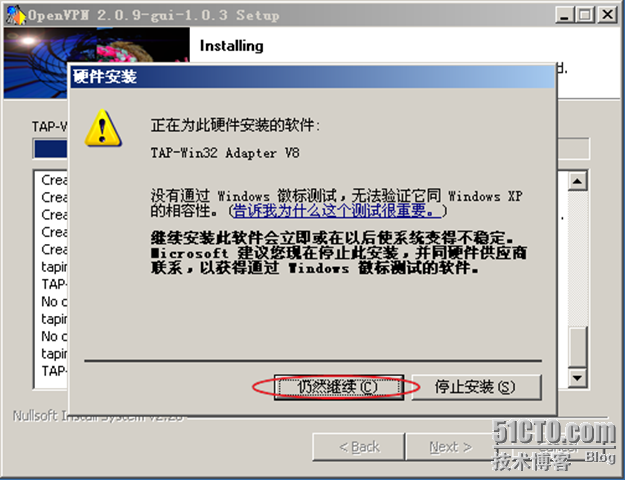
2. 安装 Open×××-GUI 客户端工具
双击下载的 open***-2.0.9-gui-1.0.3-install.exe文件,按照向 导提示安装 即可。若只 作 为Open×××客户端使用,安装时可以不勾选定制组件列表中的“Open××× Service”(如图所示)。
3. 下载证书和密钥文件
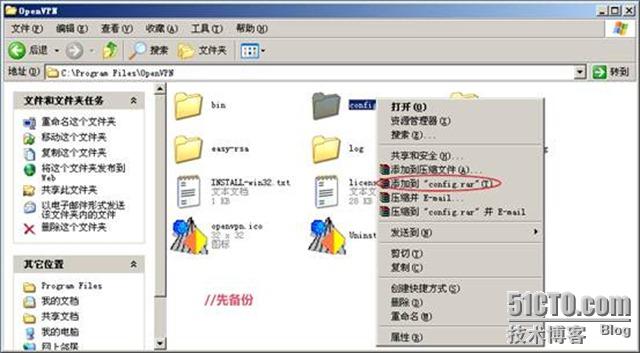
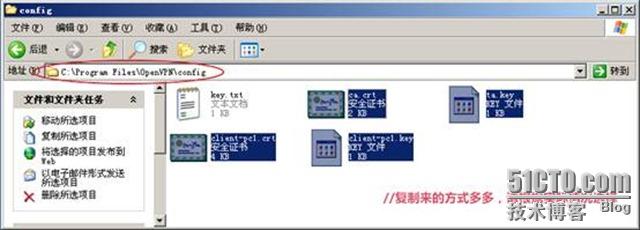
下载在GW1主服务器端创建的ca.crt、ta.key、client-pc1.key、client-pc1.crt 文件。
将下载的密钥等相关文件复制到Open×××配置文件目录下(默认为C:\ProgramFiles\Open×××\config\)。注意保留好备份。
4. 创建 PC1 用户端配置文件
使用 Windwos XP 系统自带的记事本工具创建客户端配置文件 client-pc1.o***,文件内容可以参考范例(C:\Program Files\Open×××\sample-config\client.o***)。
|
Microsoft Windows [版本 5.2.3790] (C) 版权所有 1985-2003 Microsoft Corp. C:\Documents and Settings\Administrator> notepad client-pc1.o*** client dev tun proto udp remote 173.74.75.76 1195 resolv-retry infinite nobind persist-key persist-tun ca ca.crt cert client-pc1.crt key client-pc1.key ns-cert-type server tls-auth ta.key 1 cipher BF-CBC comp-lzo verb 3 mute 20 |
将建好的配置文件保存到C:\Program Files\Open×××\config\文件夹下(如图所示)。
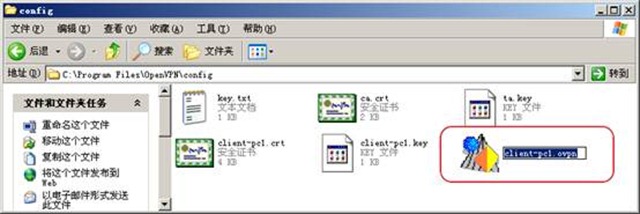
client-pc1.o*** 文件存放位置
5. 建立 Open××× 连接
方法一:在 Windows XP 任务栏右侧(系统托盘区)的 Open×××-GUI 图标上点击右键,
选择“Connect”,即可使用创建好的配置文件建立 ××× 连接
方法二:在创建好的 client-pc1.o*** 文件上点击右键,选择“Start Open××× on this config
file”即可。——用此方法可以查看建立连接的过程信息,适合用于调试/排错。
第三步、验证 SSL ××× 连接
1. GW1 服务器的 ××× 接口状态
GW1 主服务器将会新增接口 tun1,IP 地址为 10.9.0.1,点对点对端地址为 10.9.0.2
|
[root@gw1 ~]# ifconfig tun1 tun1 Link encap:UNSPEC HWaddr 00-00-00-00-00-00-00-00-00-00-00-00-00-00-00-00 inet addr:10.9.0.1 P-t-P:10.9.0.2 Mask:255.255.255.255 UP POINTOPOINT RUNNING NOARP MULTICAST MTU:1500 Metric:1 RX packets:0 errors:0 dropped:0 overruns:0 frame:0 TX packets:17 errors:0 dropped:0 overruns:0 carrier:0 collisions:0 txqueuelen:100 RX bytes:0 (0.0 b) TX bytes:840 (840.0 b) |
2. Windows XP 客户机 PC1 的 ××× 接口状态
使用 Open×××-GUI 连接成功以后,系统将会增加一个“TAP-Win32 Adapter V8”的本地连接,用户可以通过“开始 ---> 设置 ---> 网络连接”进行查看。
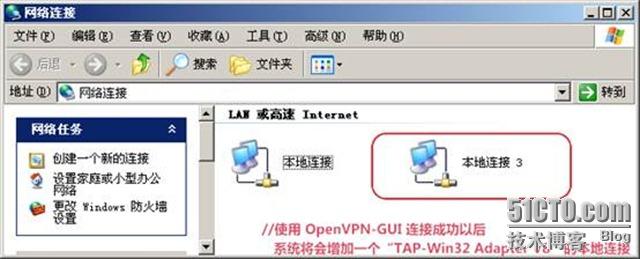
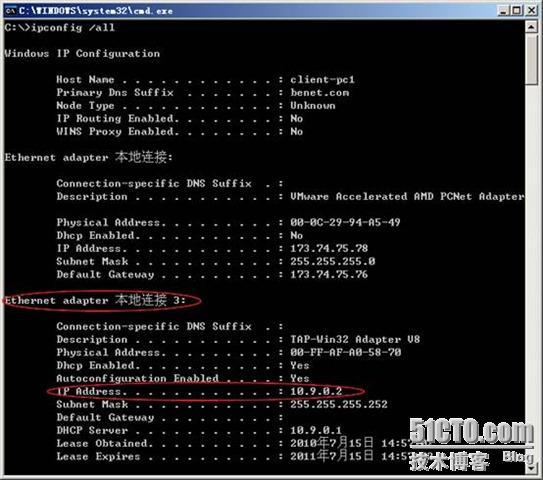
客户机 PC1 的 ××× 接口地址
3. 测试 PC1 与 GW1、GW2 之间的连接
1) 连接GW1(如图所示)
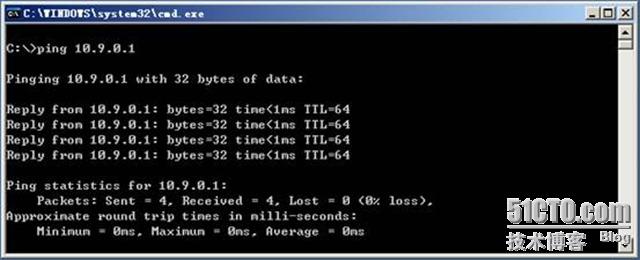
PC1 到 GW1 的 ping 测试
2) 连接GW2,使用ping测试(如图所示)
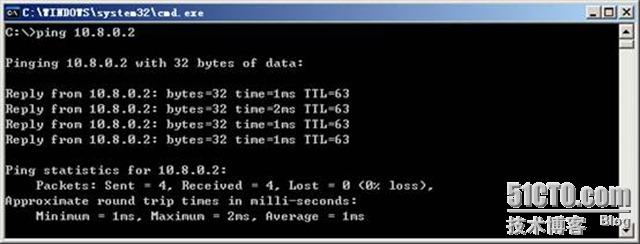
PC1 到 GW2 的 ping 测试
4. 测试 PC1 与 LAN1 中主机之间的连接
连接LAN1 中的主机,使用ping测试(如图1示)、tracert路由追踪(如图2示)。
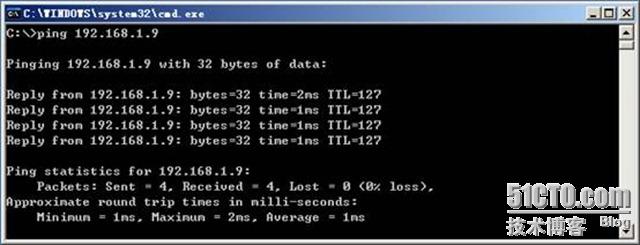
图1 PC1 到 LAN1 中主机的 ping 测试
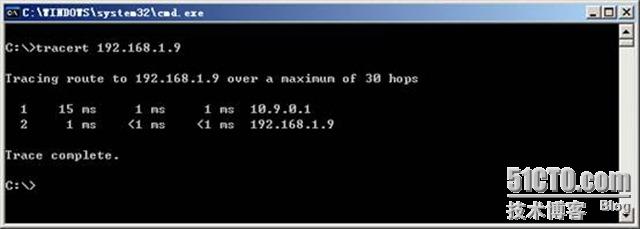
图2 PC1 到 LAN1 中主机的 tracert 路由追踪
5. 测试 PC1 与 LAN2 中主机之间的连接
连接LAN2 中的主机,使用ping测试(如图 8.10所示)、tracert路由追踪(如图所示)。

PC1 到 LAN2 中主机的 ping 测试
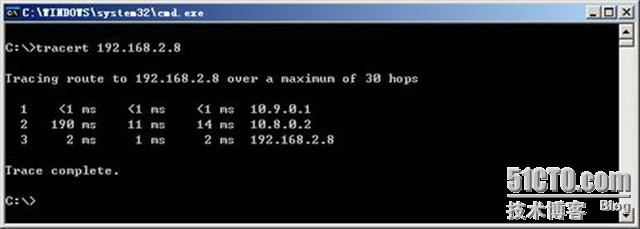
PC1 到 LAN2 中主机的 tracert 路由追踪
附:详细的PDF完整技术文档下载:http://down.51cto.com/data/102973
本文出自 “贾芸斐” 博客,请务必保留此出处http://jiayf.blog.51cto.com/1659430/349847
转载于:https://blog.51cto.com/ljl2013/1352347
基于Linux的 Open×××网络之网络架构应用实例相关推荐
- 记一次实验报告:基于Linux的中小型企业网络架构
本次实验报告为笔者的一门<Linux服务器配置与管理>课程期末实验报告,期末那一周花了挺多时间做的 首先来仔细看一下实验要求,实验要求挺多的 实验任务要求 案例目标 1.中小型企业网络架构 ...
- 基于Attention机制的轻量级网络架构以及代码实现
点击上方,选择星标或置顶,不定期资源大放送! 阅读大概需要10分钟 Follow小博主,每天更新前沿干货 导读 之前详细介绍了轻量级网络架构的开源项目,详情请看深度学习中的轻量级网络架构总结与代码实现 ...
- 基于SBA的5G核心网络架构详解
目录 5G核心网络架构 5G网络功能 5G核心网络消息传输 补充知识 NSSF网络切片选择功能: NSSAI网络切片选择辅助信息 5G核心网络架构 上图是非漫游时的5G架构参考模型,采用的是基于业务接 ...
- 基于 Linux 的文件操作 网络编程的最后一环
Linux下万物皆文件 在了解了客户端和服务器的函数调用之后,我们只需要了解下文件操作就能编写出属于自己的客户端和服务器了,还能让他们进行通信. 这个内容其实是很简单的,所以博主就不再做过多的讲解 打 ...
- 网络管理的任务包括linux,网络管理员的任务是阻止的10.152.8.0/21 一个基于Linux的防火墙的网络子网的默认端口上的所有出站SSH 连接。以下哪项规则集将完成这项任务?(单选题)...
_ (12分)现用质量分数为98%.密度为1.84 g?cm-3的浓硫酸来配制500mL 0.2mol/L的稀H2SO4.可供选择的仪器有:①玻 2016最新猴年5字春联清溪吟雅韵求下联 把5.6g的 ...
- 毕业论文开题报告 - 基于Linux的无线网络渗透测试研究
目录 开题报告填写要求 1.毕业论文综述(题目背景.研究意义及国内外相关研究情况) 1.1 题目背景 1.2研究意义 1.3现阶段相关研究情况 2.本课题研究的主要内容和拟采用的研究方案.研究方法或措 ...
- 安全自动化企业网络架构 (毕设分享)
一.前言: 前段时间完成了自己的毕设项目--安全自动化企业网络架构.总的来说,该项目是一个对自己的挑战,其中涉及到Kubernetes容器云的搭建以及安全加固,DevOps CI/CD部署容器化监控平 ...
- linux安全配置技术论文,基于linux平台的web安全技术研究apache安全大学论文.doc
基于linux平台的web安全技术研究apache安全大学论文 广州大学华软软件学院 --毕业论文 题目-Apache安全 学生姓名: 指导教师2015-5-10 摘 要 随着网络通信技术的不断发展, ...
- arm裸机与嵌入式linux驱动开发,如何编写基于ARM的裸机程序和基于Linux的驱动程序?...
在嵌入式开发中,ADC应用比较频繁,本文主要讲解ADC的基本原理以及如何编写基于ARM的裸机程序和基于Linux的驱动程序. ARM架构:Cortex-A9Linux内核:3.14 在讲述ADC之前, ...
最新文章
- Python记录-基础语法入门
- iOS更改AppIcon
- Java 并发/多线程教程(四)-并发模型
- 卫星发现一个重要信号:路上货车跑起来
- C#中委托的发展与匿名函数
- 2.1 Objective-C概述
- vue 倒计时 插件_vue中实现倒计时组件与毫秒效果
- jetson nano 系统镜像制作_2.Jetson Nano烧写系统镜像
- C语言连接PostgreSQL数据库
- Unity3d--第三人称摄像机常用控制
- 在Ubuntu上使用Netdata设置实时性能监控
- [Android O] [RK3399] -- Vendor Storage 功能探究
- Windows控制台基本操作命令
- FleaPHP 学习笔记2
- mantis问题状态
- Linux系统软件工程师/嵌入式Linux应用开发工程师 知识体系构建 500篇(持续更新)
- BEC 高级,成绩A。
- 用户6.5亿 墨迹天气难舍现金贷广告:合作方仅小米贷款
- 综述:目标检测2001-2021
- 什么叫金叉和死叉?什么叫macd二次死叉?