Openvswitch手册(4): Mirror
Openvswitch手册(4): Mirror
![]()
![]()
![]()
这一节我们来分析Mirror
Mirror就是配置一个bridge,将某些包发给指定的mirrored ports
对于包的选择:
- select_all,所有的包
- select_dst_port
- select_src_port
- select_vlan
对于指定的目的:
- output_port (SPAN)
- output_vlan (RSPAN)
Port mirroring on a Cisco Systems switch is generally referred to as Switched Port ANalyzer (SPAN) or Remote Switched Port ANalyzer (RSPAN)
(1) Configure Mirroring
root@XorPlus# ovs-vsctl --db=tcp:10.10.50.215:6633 -- set bridge br0 mirrors=@m -- --id=@te-1/1/1 get Port te-1/1/1 -- --id=@te-1/1/2 get Port te-1/1/2 -- --id=@te-1/1/3 get Port te-1/1/3 -- --id=@m create Mirror name=mymirror select-dst-port=@te-1/1/1,@te-1/1/2 select-src-port=@te-1/1/1,@te-1/1/2 output-port=@te-1/1/3 root@XorPlus#
In above configuration, user configure the te-1/1/1, te-1/1/2 and te-1/1/3 in the mirroring, in which the source port are te-1/1/1 and te-1/1/2 (including the ingress and egress), the output port (monitor port) is te-1/1/3.
The “select-dst-port” means some packet (in switch chip) will go-out from the specified port (egress).
The “select-src-port” means some packet enter the specified port (ingress).
(2) Delete the Mirroring
root@XorPlus# ovs-vsctl --db=tcp:10.10.50.215:6633 -- remove bridge br0 mirrors mymirror
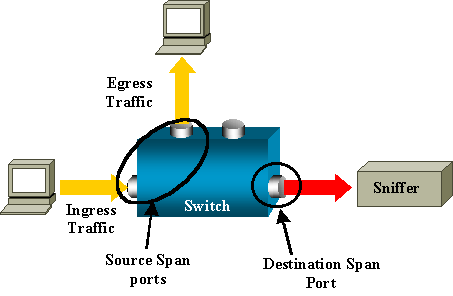
- Ingress traffic-Traffic that enters the switch.
- Egress traffic-Traffic that leaves the switch.
- Source (SPAN) port -A port that is monitored with use of the SPAN feature.
- Source (SPAN) VLAN -A VLAN whose traffic is monitored with use of the SPAN feature.
- Destination (SPAN) port -A port that monitors source ports, usually where a network analyzer is connected.
- Reflector Port -A port that copies packets onto an RSPAN VLAN.
- Local SPAN-The SPAN feature is local when the monitored ports are all located on the same switch as the destination port.
- Remote SPAN (RSPAN)-Some source ports are not located on the same switch as the destination port. RSPAN is an advanced feature that requires a special VLAN to carry the traffic that is monitored by SPAN between switches.
- Port-based SPAN (PSPAN)-The user specifies one or several source ports on the switch and one destination port.
- VLAN-based SPAN (VSPAN)-On a particular switch, the user can choose to monitor all the ports that belong to a particular VLAN in a single command.
RSPAN allows you to monitor source ports that are spread all over a switched network, not only locally on a switch with SPAN.
The functionality works exactly as a regular SPAN session. The traffic that is monitored by SPAN is not directly copied to the destination port, but flooded into a special RSPAN VLAN. The destination port can then be located anywhere in this RSPAN VLAN. There can even be several destination ports.
These are a few remarks on this design:
- S1 is called a source switch. Packets only enter the RSPAN VLAN in switches that are configured as RSPAN source. Currently, a switch can only be the source for one RSPAN session, which means that a source switch can only feed one RSPAN VLAN at a time.
- S2 and S3 are intermediate switches. They are not RSPAN sources and do not have destination ports. A switch can be intermediate for any number of RSPAN sessions.
- S4 and S5 are destination switches. Some of their ports are configured to be destination for an RSPAN session.
- You can see that RSPAN packets are flooded into the RSPAN VLAN. Even switches that are not on the path to a destination port, such as S2, receive the traffic for the RSPAN VLAN. You can find it useful to prune this VLAN on such S1-S2 links.
- In order to achieve the flooding, learning is disabled on the RSPAN VLAN.
- In order to prevent loops, the STP has been maintained on the RSPAN VLAN. Therefore, RSPAN cannot monitor Bridge Protocol Data Units (BPDUs).
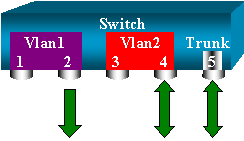
我们先来测试SPAN
我们按照下面的拓扑结构创建vswitch
![]()
$ sudo ovs-vsctl add-port helloworld first_br
$ sudo ovs-vsctl add-port helloworld second_br -- set Port second_br tag=110
$ sudo ovs-vsctl add-br helloworld1
$ sudo ovs-vsctl add-port helloworld1 second_if -- set Port second_if tag=110
$ sudo ovs-vsctl add-port helloworld1 third_br -- set Port third_br tag=110
$ sudo ovs-vsctl show
c24322e6-8453-402a-afaf-64757ef231e9
Bridge helloworld
Controller "tcp:16.158.165.102:6633"
is_connected: true
Port "vnet8"
Interface "vnet8"
Port first_br
Interface first_br
Port second_br
tag: 110
Interface second_br
Port "vnet10"
Interface "vnet10"
Port helloworld
Interface helloworld
type: internal
Port "vnet9"
Interface "vnet9"
Bridge "helloworld1"
Port second_if
tag: 110
Interface second_if
Port "helloworld1"
Interface "helloworld1"
type: internal
Port third_br
tag: 110
Interface third_br
ovs_version: "2.0.1"
然后我们在first_br上面mirror所有进出vnet8的包
$ sudo ovs-vsctl -- set bridge helloworld mirrors=@m -- --id=@vnet8 get Port vnet8 -- --id=@first_br get Port first_br -- --id=@m create Mirror name=mirrorvnet8 select-dst-port=@vnet8 select-src-port=@vnet8 output-port=@first_br
19ed2f51-3245-4d5b-8e6c-67ccbb7c7ebd
这时候我们监听first_if,并且从instance01里面ping 10.10.10.3,可以看到下面的效果
$ sudo tcpdump -n -i first_if icmp
tcpdump: WARNING: first_if: no IPv4 address assigned
tcpdump: verbose output suppressed, use -v or -vv for full protocol decode
listening on first_if, link-type EN10MB (Ethernet), capture size 65535 bytes
23:58:02.310198 IP 10.10.10.1 > 10.10.10.3: ICMP echo request, id 3200, seq 1, length 64
23:58:02.312447 IP 10.10.10.1 > 10.10.10.3: ICMP echo request, id 3200, seq 1, length 64
23:58:02.314314 IP 10.10.10.3 > 10.10.10.1: ICMP echo reply, id 3200, seq 1, length 64
23:58:03.311894 IP 10.10.10.1 > 10.10.10.3: ICMP echo request, id 3200, seq 2, length 64
23:58:03.312266 IP 10.10.10.3 > 10.10.10.1: ICMP echo reply, id 3200, seq 2, length 64
23:58:04.313522 IP 10.10.10.1 > 10.10.10.3: ICMP echo request, id 3200, seq 3, length 64
23:58:04.313739 IP 10.10.10.3 > 10.10.10.1: ICMP echo reply, id 3200, seq 3, length 64
23:58:05.314827 IP 10.10.10.1 > 10.10.10.3: ICMP echo request, id 3200, seq 4, length 64
23:58:05.314979 IP 10.10.10.3 > 10.10.10.1: ICMP echo reply, id 3200, seq 4, length 64
23:58:06.316870 IP 10.10.10.1 > 10.10.10.3: ICMP echo request, id 3200, seq 5, length 64
23:58:06.317156 IP 10.10.10.3 > 10.10.10.1: ICMP echo reply, id 3200, seq 5, length 64
23:58:07.318242 IP 10.10.10.1 > 10.10.10.3: ICMP echo request, id 3200, seq 6, length 64
23:58:07.318481 IP 10.10.10.3 > 10.10.10.1: ICMP echo reply, id 3200, seq 6, length 64
23:58:08.319579 IP 10.10.10.1 > 10.10.10.3: ICMP echo request, id 3200, seq 7, length 64
23:58:08.319802 IP 10.10.10.3 > 10.10.10.1: ICMP echo reply, id 3200, seq 7, length 64
然后我们来配置RSPAN
我们对进入vnet9的所有进出包,然而ouput到一个vlan 110
$ sudo ovs-vsctl -- set bridge helloworld mirrors=@m -- --id=@vnet9 get Port vnet9 -- --id=@m create Mirror name=mirrorvnet9 select-dst-port=@vnet9 select-src-port=@vnet9 output-vlan=110
cb361fa2-914d-494b-94ef-c625d194247c
在helloworld1中也要配置从110来的,都output到vlan 110
$ sudo ovs-vsctl -- set bridge helloworld1 mirrors=@m -- --id=@m create Mirror name=mirrorvlan select-vlan=110 output-vlan=110
cef13445-c6ea-45e7-bb9d-1a267b24c91c
disable mac address learning for vlan 110
$ sudo ovs-vsctl set bridge helloworld flood-vlans=110
$ sudo ovs-vsctl set bridge helloworld1 flood-vlans=110
这时候我们监听third_if,并且从instance02里面ping 10.10.10.3,可以看到下面的效果
$ sudo tcpdump -n -i third_if icmp
tcpdump: WARNING: third_if: no IPv4 address assigned
tcpdump: verbose output suppressed, use -v or -vv for full protocol decode
listening on third_if, link-type EN10MB (Ethernet), capture size 65535 bytes
00:24:38.089192 IP 10.10.10.2 > 10.10.10.3: ICMP echo request, id 2999, seq 1, length 64
00:24:38.090844 IP 10.10.10.2 > 10.10.10.3: ICMP echo request, id 2999, seq 1, length 64
00:24:38.093228 IP 10.10.10.3 > 10.10.10.2: ICMP echo reply, id 2999, seq 1, length 64
00:24:39.090506 IP 10.10.10.2 > 10.10.10.3: ICMP echo request, id 2999, seq 2, length 64
00:24:39.091024 IP 10.10.10.3 > 10.10.10.2: ICMP echo reply, id 2999, seq 2, length 64
00:24:40.091945 IP 10.10.10.2 > 10.10.10.3: ICMP echo request, id 2999, seq 3, length 64
00:24:40.092202 IP 10.10.10.3 > 10.10.10.2: ICMP echo reply, id 2999, seq 3, length 64
00:24:41.093826 IP 10.10.10.2 > 10.10.10.3: ICMP echo request, id 2999, seq 4, length 64
00:24:41.093917 IP 10.10.10.3 > 10.10.10.2: ICMP echo reply, id 2999, seq 4, length 64
00:24:42.095681 IP 10.10.10.2 > 10.10.10.3: ICMP echo request, id 2999, seq 5, length 64
00:24:42.095915 IP 10.10.10.3 > 10.10.10.2: ICMP echo reply, id 2999, seq 5, length 64
00:24:43.097414 IP 10.10.10.2 > 10.10.10.3: ICMP echo request, id 2999, seq 6, length 64
00:24:43.097586 IP 10.10.10.3 > 10.10.10.2: ICMP echo reply, id 2999, seq 6, length 64
转载于:https://www.cnblogs.com/fish001/articles/5646828.html
Openvswitch手册(4): Mirror相关推荐
- Openvswitch手册(5): VLAN and Bonding
我们这一节来看Port 一般来说一个Port就是一个Interface,当然也有一个Port对应多个Interface的情况,成为Bond VLAN Configuration Port的一个重要的方 ...
- 第17章- 5~8 钣金实体书架与刚体平台接触分析、材料弹塑性分析(网格控制、刚体接触设置,刚体只能作为接触的目标面、爆炸显示、载荷步设置、残余应力)
第17章- 5~8 钣金实体书架与刚体平台接触分析.材料弹塑性分析(网格控制.刚体接触设置,刚体只能作为接触的目标面.爆炸显示.载荷步设置.残余应力) 冬 泳 怪 鸽 2020-09-17 18:07 ...
- 虚拟机创建的50个步骤以及100个知识点(仅作为个人笔记使用)
网上大侠们分享的资料都非常好,就看你会不会用,如何使用,再次对本文所引用资料的作者表示感谢,如有侵权,请告知. 大致过程 参考资料 Icehouse 创建Instance代码分析 http://www ...
- R包之tm:文本挖掘包
本文参考文档: tm的使用指南 : http://mirror.bjtu.edu.cn/cran/web/packages/tm/vignettes/tm.pdf tm手册 : http://mirr ...
- 文本预处理学习(2)
R包之tm:文本挖掘包 原文地址: http://www.bagualu.net/wordpress/archives/6112 简介 安装 数据输入-文集(corpus) 数据输出 查看语料库(c ...
- openstack 逻辑构架真相
转载自:http://blog.csdn.net/u010305706/article/details/52206175 别以为真懂OpenStack!先别着急骂我,我也没有说我真懂Openstack ...
- OpenvSwitch完全使用手册
OpenvSwitch完全使用手册(一)-总览Overview 本文主要参考Overview of functionality and components以及Frequently Asked Que ...
- PlusWell Mirror使用手册
PlusWell Mirror 使用手册 公司名称:北京蓝科泰达科技有限公司 市场部 :北京市海淀区上地十街1号辉煌国际1号楼1804室 销售热线:010-51666191 Mail:Sale@Lan ...
- DataWorks 安装手册
2019独角兽企业重金招聘Python工程师标准>>> DataWorks 安装手册 tags: gsac [TOC] 1. 环境介绍 系统 : CentOS release 6.8 ...
最新文章
- How to list/dump dm thin pool metadata device?
- 实时获取ccd图像_薄膜瑕疵在线检测系统0.1mm检测精度_实时在线检测
- 电子商务平台支付接口开发原理及流程
- windows系统nexus3安装和配置
- unity 畸变_unity3d 几种镜头畸变
- Android 8.0学习(27)--- SystemUI(二)启动流程和初始化
- request.getAttribute()和request.getParameter()区别
- 解决:IE中不能自动选择UTF-8编码的解决方法
- Maven3生命周期和插件
- (译)SDL.NET Surfaces 相关介绍
- asp.net 操作Excel大全
- android 字符串 声波,识别成功率100%的声波配网,看完你也可以实现一个
- figtree需要在JAVA下运行吗,科学网—Inno setup 制作安装文件以编译FigTree为例 - 张金龙的博文...
- 【转】js高德地图图标合集
- 计算机水冷散热器原理,水冷散热器原理和作用是什么
- WIN7+LR11+IE8无法打开的问题解决方法
- 零基础学习CANoe Panel(13)—— 滑条(TrackBar )
- python入门第三课(初中生学Python)
- 360极速浏览器浏览网页字体模糊的解决方法
- jQuery根据ID删除元素
热门文章
- 【JavaScript】分享一个定时到网站上签到/签退的JS脚本
- 让子弹飞 | 院士深度解析Alphafold DB的未来影响
- endnote参考文献排版_如何用 EndNote 编辑适合投稿杂志的参考文献格式
- 计算机Excel怎么弄迷你图,教大家excel2016怎么添加迷你图
- python元组和字典的拆包
- tomcat执行shutdown报错Could not contact [localhost:8005] (base port [8005] and offset [0]). Tomcat may n
- 关于视频变速播放软件
- python朱庇特_新的朱庇特书
- Python:生成随机偏态分布
- c语言移位函数intrins,单片机C语言实现NOP 循环移位