分布式系统架构实战demo:SSM+Dubbo
对于传统的单一构架,也就是打成的war或者ear包部署在同一个Web容器里的构架,它虽然开发、测试、部署简单,但随着业务的不断发展,维护成本增加,可扩展性差,而且一台Tomcat的并发数在500左右,系统性能存在瓶颈。虽然互联网应用的系统性能瓶颈存在于每一个地方(数据库,网络等),先不考虑其他系统瓶颈,本文采用多Tomcat来解决一个Tomcat带来的瓶颈问题,那么多个Tomcat之间如何通信?答案是Dubbo。
为什么要使用Dubbo?两台服务器A、B,分别部署不同的应用a,b。当A服务器想要调用B服务器上应用b提供的函数或方法的时候,由于不在一个内存空间,不能直接调用,需要通过网络来表达调用的语义传达调用的数据。--RPC。 Dubbo是基于RPC的高性能和透明化的RPC远程服务调用方案。
Dubbo也是一个被国内互联网公司广泛使用的SOA(核心理念:对外提供服务)基础框架,说的直白点就是:一次开发出来的服务接口,相关服务都能调用。很像Java经典的特性:一次编译,到处运行。
开发环境:
Window 7 64;Eclipse-Jee-mars-2-win32-x86_64 ;Apache-Maven-3.3.9;Spring 4.1.3;Mybatis 3.2.7;Springmvc 4.1.3;Dubbo 2.5.3,开发工具和源码:http://pan.baidu.com/s/1pLdoe0r
源码博主也上传到了'码云'上:https://gitee.com/liugh_develop/ssm_dubbo
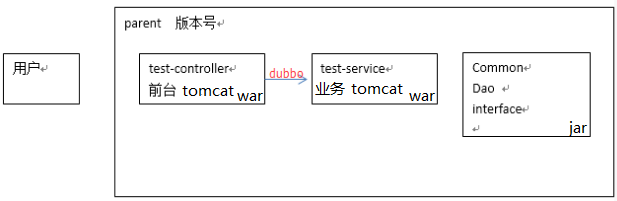
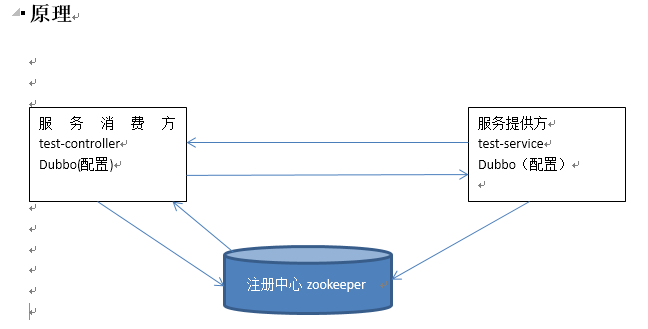
系统构架如下:
1.配置环境,创建项目工程
配置开发环境不再这里做赘述,可以参考:Eclipse+Tomcat+MAVEN+SVN项目完整环境搭建
需要注意的是本文所用JDK是1.7,Tomcat是7.0。
1.1 mysql安装
数据库环境搭建吐血推荐,博主在踩了很多坑之后总结的高效安装方法。一分钟快速安装MySQL,超简单。
Mysql链接工具Navicat安装后,打开Navicat,新建连接-->新建数据库Mysql-->双击进入数据库-->查询-->新建查询:
SET FOREIGN_KEY_CHECKS=0;DROP TABLE IF EXISTS `book`;
CREATE TABLE `book` (`book_id` varchar(100) NOT NULL COMMENT '图书ID',`book_name` varchar(100) DEFAULT NULL COMMENT '图书名称',`number` int(11) DEFAULT NULL COMMENT '馆藏数量',PRIMARY KEY (`book_id`)
) ENGINE=InnoDB DEFAULT CHARSET=utf8 COMMENT='图书表';INSERT INTO `book` VALUES ('1000', 'Java程序设计', '10');
INSERT INTO `book` VALUES ('1001', '数据结构', '10');
INSERT INTO `book` VALUES ('1002', '设计模式', '10');
INSERT INTO `book` VALUES ('1003', '编译原理', '10');
1.3 创建父工程和子工程,目录结构如下:
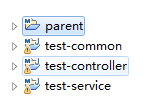
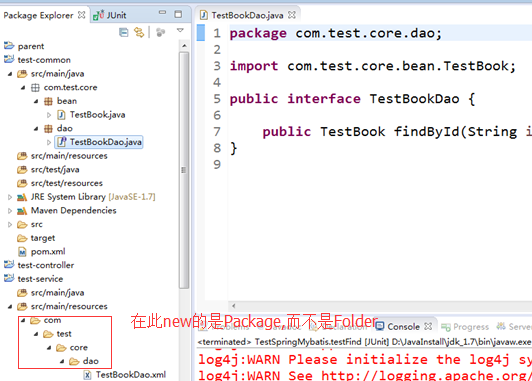
其中,parent是pom文件的父工程,common是jar包,里面存放interface,bean,dao等公用内容。
controller控制层和service业务层是war包,也就是各分为一个Tomcat。
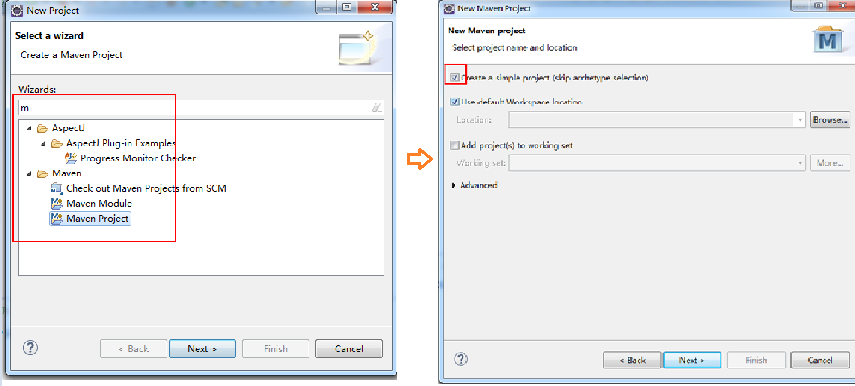
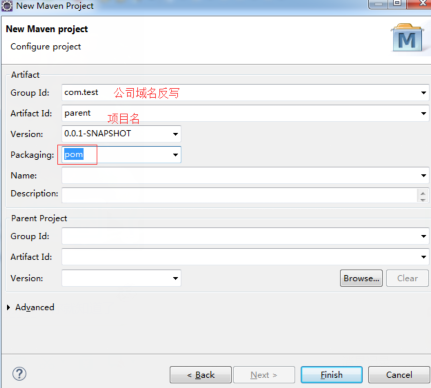
创建父工程:
创建common工程,在Packaging时选择jar:
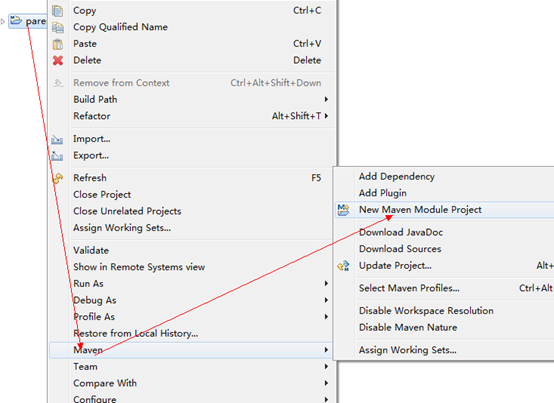
创建controller和service的步骤和common一样,不过Packaging选择war,完成后会出现以下报错:
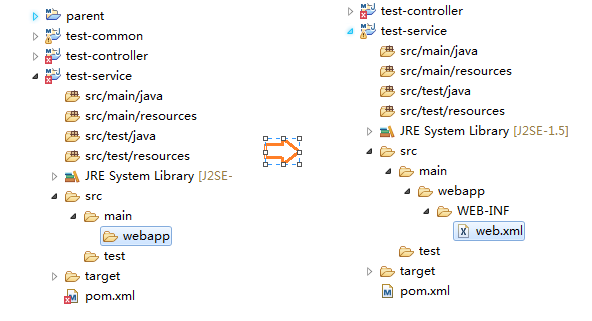
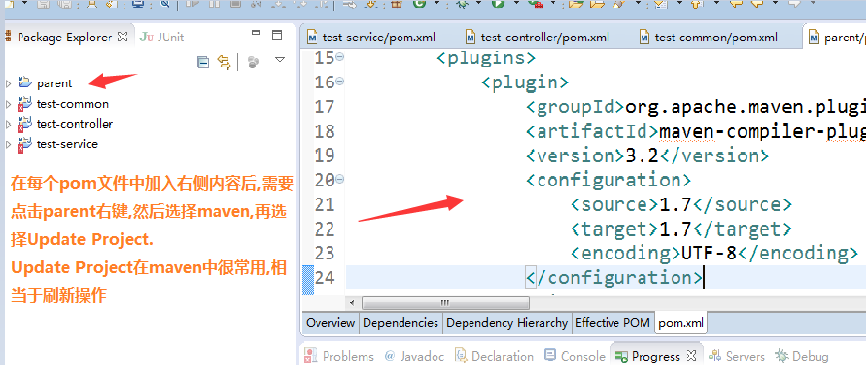
原因是webapp下没有WEB_INF文件夹和web.xml文件,自己创建web.xml,它内容在下文2.1中,复制粘贴即可。注意,此时的运行环境是jdk1.5,需要永久切换成jdk1.7(点buildPath切换1.7的运行环境,下回打开还是jdk1.5).所以在所有的pom文件中加入
<!-- jdk1.7 --><build><plugins><plugin><groupId>org.apache.maven.plugins</groupId><artifactId>maven-compiler-plugin</artifactId><version>3.2</version><configuration><source>1.7</source><target>1.7</target><encoding>UTF-8</encoding></configuration></plugin></plugins></build>
加入后会有以下报错,根据如下图片中步骤处理即可:
1.4 导入jar包。
parent项目pom.xml导入所有jar包的坐标,service和controller会依赖common,所以在common的pom文件中加入要引入的jar包。因为太长,此处省略源码,读者可以下载源码查看。
因为公用jar放在了common里,所以在controller和service的pom,xml文件中都加入common的依赖:
<!-- 依赖管理 --><dependencies><dependency><groupId>com.test</groupId><artifactId>test-common</artifactId><version>0.0.1-SNAPSHOT</version></dependency></dependencies>2.整合Spring+Mybatis
2.1 配置Spring监听器
一般会整合Spring+Mybatis放在业务逻辑层service。在service的web.xml中加入:
<?xml version="1.0" encoding="UTF-8"?>
<web-app version="2.5" xmlns="http://java.sun.com/xml/ns/javaee"xmlns:xsi="http://www.w3.org/2001/XMLSchema-instance"xsi:schemaLocation="http://java.sun.com/xml/ns/javaee http://java.sun.com/xml/ns/javaee/web-app_2_5.xsd"><!-- 上下文配置文件 --><context-param><param-name>contextConfigLocation</param-name><param-value>classpath:spring-context.xml</param-value></context-param><!-- 监听器 加载配置上下文配置文件--><listener><listener-class>org.springframework.web.context.ContextLoaderListener</listener-class></listener>
</web-app>
2.2 创建上下文配置文件: spring-context.xml
<beans xmlns="http://www.springframework.org/schema/beans"xmlns:xsi="http://www.w3.org/2001/XMLSchema-instance" xmlns:mvc="http://www.springframework.org/schema/mvc"xmlns:context="http://www.springframework.org/schema/context"xmlns:aop="http://www.springframework.org/schema/aop" xmlns:tx="http://www.springframework.org/schema/tx"xmlns:task="http://www.springframework.org/schema/task"xmlns:dubbo="http://code.alibabatech.com/schema/dubbo"xsi:schemaLocation="http://www.springframework.org/schema/beans http://www.springframework.org/schema/beans/spring-beans-4.0.xsd http://www.springframework.org/schema/mvc http://www.springframework.org/schema/mvc/spring-mvc-4.0.xsd http://www.springframework.org/schema/context http://www.springframework.org/schema/context/spring-context-4.0.xsd http://www.springframework.org/schema/aop http://www.springframework.org/schema/aop/spring-aop-4.0.xsd http://www.springframework.org/schema/tx http://www.springframework.org/schema/tx/spring-tx-4.0.xsdhttp://www.springframework.org/schema/taskhttp://www.springframework.org/schema/task/spring-task-4.0.xsdhttp://code.alibabatech.com/schema/dubbo http://code.alibabatech.com/schema/dubbo/dubbo.xsd"><!-- 数据源 、事务 、扫描、MYbatis、ActiveMQ、Freemarker、Redis、Solr。。。。。 --> <import resource="classpath:config/*.xml"/></beans>
2.3创建数据源和配置文件jdbc.xml:
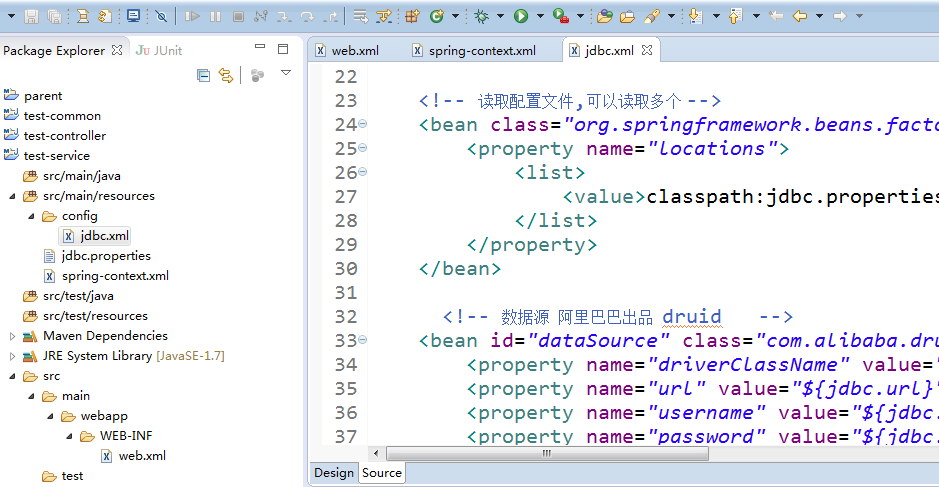
jdbc.xml中加入读取配置文件-->数据源-->事务管理-->Spring声明式事务管理配置:
<beans xmlns="http://www.springframework.org/schema/beans"xmlns:xsi="http://www.w3.org/2001/XMLSchema-instance" xmlns:mvc="http://www.springframework.org/schema/mvc"xmlns:context="http://www.springframework.org/schema/context"xmlns:aop="http://www.springframework.org/schema/aop" xmlns:tx="http://www.springframework.org/schema/tx"xmlns:task="http://www.springframework.org/schema/task"xmlns:dubbo="http://code.alibabatech.com/schema/dubbo"xsi:schemaLocation="http://www.springframework.org/schema/beans http://www.springframework.org/schema/beans/spring-beans-4.0.xsd http://www.springframework.org/schema/mvc http://www.springframework.org/schema/mvc/spring-mvc-4.0.xsd http://www.springframework.org/schema/context http://www.springframework.org/schema/context/spring-context-4.0.xsd http://www.springframework.org/schema/aop http://www.springframework.org/schema/aop/spring-aop-4.0.xsd http://www.springframework.org/schema/tx http://www.springframework.org/schema/tx/spring-tx-4.0.xsdhttp://www.springframework.org/schema/taskhttp://www.springframework.org/schema/task/spring-task-4.0.xsdhttp://code.alibabatech.com/schema/dubbo        http://code.alibabatech.com/schema/dubbo/dubbo.xsd"><!-- 读取配置文件,可以读取多个 --><bean class="org.springframework.beans.factory.config.PropertyPlaceholderConfigurer"><property name="locations"><list><value>classpath:jdbc.properties</value></list></property></bean><!-- 数据源  阿里巴巴出品  druid   --><bean id="dataSource" class="com.alibaba.druid.pool.DruidDataSource" destroy-method="close"><property name="driverClassName" value="com.mysql.jdbc.Driver" /><property name="url" value="${jdbc.url}" /><property name="username" value="${jdbc.username}" /><property name="password" value="${jdbc.password}" /><property name="initialSize" value="${jdbc.initialSize}"></property><property name="maxActive" value="${jdbc.maxActive}"></property><property name="minIdle" value="1"></property><property name="maxWait" value="30000"></property><property name="timeBetweenEvictionRunsMillis" value="60000"></property><property name="minEvictableIdleTimeMillis" value="300000"></property><property name="validationQuery" value="SELECT 1 "></property><property name="testWhileIdle" value="true"></property><property name="poolPreparedStatements" value="true"></property><property name="maxPoolPreparedStatementPerConnectionSize" value="20"></property><property name="filters" value="stat,slf4j" /><property name="proxyFilters"><list><ref bean="stat-filter" /><ref bean="log-filter" /></list></property></bean><bean id="log-filter" class="com.alibaba.druid.filter.logging.Slf4jLogFilter"><property name="resultSetLogEnabled" value="true" /><property name="statementExecutableSqlLogEnable" value="true" /></bean><bean id="stat-filter" class="com.alibaba.druid.filter.stat.StatFilter"><property name="slowSqlMillis" value="30000" /><property name="logSlowSql" value="true" /><property name="mergeSql" value="true" /></bean><!-- 事务管理--><bean id="transactionManager" class="org.springframework.jdbc.datasource.DataSourceTransactionManager"><property name="dataSource" ref="dataSource"/></bean><!-- 拦截器方式配置事物,方法命名记得要规范 --><tx:advice id="txAdvice" transaction-manager="transactionManager"><tx:attributes><tx:method name="select*" read-only="true" propagation="REQUIRED"/><tx:method name="find*" read-only="true" propagation="REQUIRED"/><tx:method name="query*" read-only="true" propagation="REQUIRED"/><tx:method name="get*" read-only="true" propagation="REQUIRED"/><tx:method name="search*" read-only="true" propagation="REQUIRED"/><tx:method name="is*" read-only="true" propagation="REQUIRED"/><tx:method name="save*" propagation="REQUIRED" rollback-for="Exception,RuntimeException"/><tx:method name="create*" propagation="REQUIRED" rollback-for="Exception,RuntimeException"/><tx:method name="update*" propagation="REQUIRED" rollback-for="Exception,RuntimeException"/><tx:method name="add*" propagation="REQUIRED" rollback-for="Exception,RuntimeException"/><tx:method name="delete*" propagation="REQUIRED" rollback-for="Exception,RuntimeException"/><tx:method name="execute*" propagation="REQUIRED" rollback-for="Exception,RuntimeException"/><tx:method name="remove*" propagation="REQUIRED" rollback-for="Exception,RuntimeException"/><tx:method name="put*" propagation="REQUIRED" rollback-for="Exception,RuntimeException"/><tx:method name="import*" propagation="REQUIRED" rollback-for="Exception,RuntimeException"/><tx:method name="submit*" propagation="REQUIRED" rollback-for="Exception,RuntimeException"/><tx:method name="cancel*" propagation="REQUIRED" rollback-for="Exception,RuntimeException"/><tx:method name="send*" propagation="REQUIRED" rollback-for="Exception,RuntimeException"/><tx:method name="edit*" propagation="REQUIRED" rollback-for="Exception,RuntimeException"/><tx:method name="handle*" propagation="REQUIRED" rollback-for="Exception,RuntimeException"/><tx:method name="close*" propagation="REQUIRED" rollback-for="Exception,RuntimeException"/><tx:method name="export*" propagation="REQUIRED" rollback-for="Exception,RuntimeException"/></tx:attributes></tx:advice><aop:config><aop:pointcut id="transactionPointcut"expression="execution(* com.test..*ServiceImpl.*(..))" /><aop:advisor pointcut-ref="transactionPointcut" advice-ref="txAdvice" /></aop:config>
</beans>
此处的Spring声明式事务管理配置是上一篇具体应用,有兴趣的可以深入理解下AOP: Spring AOP是什么?你都拿它做什么?
2.4 创建spring-common-context.xml自动扫描
<beans xmlns="http://www.springframework.org/schema/beans"xmlns:xsi="http://www.w3.org/2001/XMLSchema-instance" xmlns:mvc="http://www.springframework.org/schema/mvc"xmlns:context="http://www.springframework.org/schema/context"xmlns:aop="http://www.springframework.org/schema/aop" xmlns:tx="http://www.springframework.org/schema/tx"xmlns:task="http://www.springframework.org/schema/task"xmlns:dubbo="http://code.alibabatech.com/schema/dubbo"xsi:schemaLocation="http://www.springframework.org/schema/beans http://www.springframework.org/schema/beans/spring-beans-4.0.xsd http://www.springframework.org/schema/mvc http://www.springframework.org/schema/mvc/spring-mvc-4.0.xsd http://www.springframework.org/schema/context http://www.springframework.org/schema/context/spring-context-4.0.xsd http://www.springframework.org/schema/aop http://www.springframework.org/schema/aop/spring-aop-4.0.xsd http://www.springframework.org/schema/tx http://www.springframework.org/schema/tx/spring-tx-4.0.xsdhttp://www.springframework.org/schema/taskhttp://www.springframework.org/schema/task/spring-task-4.0.xsdhttp://code.alibabatech.com/schema/dubbo http://code.alibabatech.com/schema/dubbo/dubbo.xsd"><!-- 扫描 --><context:component-scan base-package="com.test.core.service"/></beans>
2.5 配置Mybatis
在config下创建mybatis.xml-->加入sqlSessionFactory 工厂-->接口的Mapper自动扫描方式:
<beans xmlns="http://www.springframework.org/schema/beans"xmlns:xsi="http://www.w3.org/2001/XMLSchema-instance" xmlns:mvc="http://www.springframework.org/schema/mvc"xmlns:context="http://www.springframework.org/schema/context"xmlns:aop="http://www.springframework.org/schema/aop" xmlns:tx="http://www.springframework.org/schema/tx"xmlns:task="http://www.springframework.org/schema/task"xmlns:dubbo="http://code.alibabatech.com/schema/dubbo"xsi:schemaLocation="http://www.springframework.org/schema/beans http://www.springframework.org/schema/beans/spring-beans-4.0.xsd http://www.springframework.org/schema/mvc http://www.springframework.org/schema/mvc/spring-mvc-4.0.xsd http://www.springframework.org/schema/context http://www.springframework.org/schema/context/spring-context-4.0.xsd http://www.springframework.org/schema/aop http://www.springframework.org/schema/aop/spring-aop-4.0.xsd http://www.springframework.org/schema/tx http://www.springframework.org/schema/tx/spring-tx-4.0.xsdhttp://www.springframework.org/schema/taskhttp://www.springframework.org/schema/task/spring-task-4.0.xsdhttp://code.alibabatech.com/schema/dubbo http://code.alibabatech.com/schema/dubbo/dubbo.xsd"><!-- sqlSessionFactory 工厂 --><bean class="org.mybatis.spring.SqlSessionFactoryBean"><!-- 数据源 --><property name="dataSource" ref="dataSource"/><!-- 配置Mybatis核心配置文件所在位置 --><property name="configLocation" value="classpath:mybatis-config.xml"/></bean><!-- 接口 Mapper 扫描方式 自动 --><!-- MapperScannerConfigurer会自动找sqlSessionFactory,所以不用注入了.自己干预也可以 --><bean class="org.mybatis.spring.mapper.MapperScannerConfigurer"><!-- 扫描的包 --><property name="basePackage" value="com.test.core.dao"/></bean></beans>
2.6 配置mybatis-config.xml
在src/main/resources下创建,并加入如下配置:
<?xml version="1.0" encoding="UTF-8" ?>
<!DOCTYPE configuration PUBLIC "-//mybatis.org//DTD Config 3.0//EN"
"http://mybatis.org/dtd/mybatis-3-config.dtd"><configuration><!-- 别名 --><typeAliases><package name="com.test.core.bean"/></typeAliases>
</configuration>
接着创建mapper目录如下:
2.7 测试spring+mybatis.
创建JavaBean的TestBook.java:
package com.test.core.bean;import java.io.Serializable;public class TestBook implements Serializable{private static final long serialVersionUID = 1L;String bookId;String bookName;Integer number;public String getBookId() {return bookId;}public void setBookId(String bookId) {this.bookId = bookId;}public String getBookName() {return bookName;}public void setBookName(String bookName) {this.bookName = bookName;}public Integer getNumber() {return number;}public void setNumber(Integer number) {this.number = number;}@Overridepublic String toString() {return "TestBean [bookId=" + bookId + ", bookName=" + bookName + ", number=" + number + "]";}
}
Dao接口的TestBookDao:
package com.test.core.dao;import com.test.core.bean.TestBook;public interface TestBookDao {public TestBook findById(String id);
}
Mapper文件:创建包-->加入TestBookDao.xml文件:
<?xml version="1.0" encoding="UTF-8" ?>
<!DOCTYPE mapper PUBLIC "-//mybatis.org//DTD Mapper 3.0//EN" "http://mybatis.org/dtd/mybatis-3-mapper.dtd"><mapper namespace="com.test.core.dao.TestBookDao"><!-- 查询 --><select id="findById" resultType="TestBook" parameterType="java.lang.String">select book_id bookId,book_name bookName,number from book where book_id= #{bookId}</select></mapper>
测试:
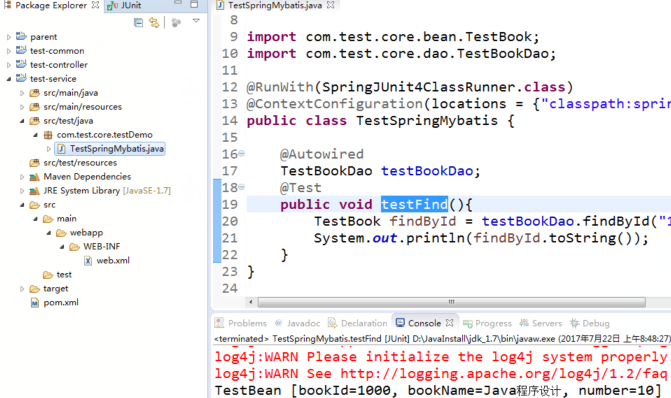
package com.test.core.testDemo;import org.junit.Test;
import org.junit.runner.RunWith;
import org.springframework.beans.factory.annotation.Autowired;
import org.springframework.test.context.ContextConfiguration;
import org.springframework.test.context.junit4.SpringJUnit4ClassRunner;import com.test.core.bean.TestBook;
import com.test.core.dao.TestBookDao;@RunWith(SpringJUnit4ClassRunner.class)
@ContextConfiguration(locations = {"classpath:spring-context.xml"})
public class TestSpringMybatis {@AutowiredTestBookDao testBookDao;@Testpublic void testFind(){TestBook findById = testBookDao.findById("1000");System.out.println(findById.toString());}
}
测试结果:
3.整合springmvc
整合SpringMVC一般放在controller层。
3.1 配置前端控制器DispatcherServlet
在子项目controller中找到web.xml文件,加入:
<?xml version="1.0" encoding="UTF-8"?>
<web-app version="2.5" xmlns="http://java.sun.com/xml/ns/javaee"xmlns:xsi="http://www.w3.org/2001/XMLSchema-instance"xsi:schemaLocation="http://java.sun.com/xml/ns/javaee http://java.sun.com/xml/ns/javaee/web-app_2_5.xsd"><!-- 前端控制器 --><servlet><servlet-name>controller</servlet-name><servlet-class>org.springframework.web.servlet.DispatcherServlet</servlet-class><init-param><!-- 默认找 WEB-INF/[servlet的名称]-servlet.xml --><param-name>contextConfigLocation</param-name><param-value>classpath:springmvc-controller.xml</param-value></init-param><load-on-startup>1</load-on-startup></servlet><servlet-mapping><!-- /  :拦截所有请求 (但不包括.jsp)   .js .png .css   (配置对静态资源放行)/* :拦截所有请求   真全拦截   (基本上不用)   *.do  : .do --><servlet-name>controller</servlet-name><url-pattern>/</url-pattern></servlet-mapping>
</web-app>
3.2 配置扫描包,前端控制器,处理器映射器,处理器适配器,视图解析器
在classpath的SpringMVC-controller.xml中:
<beans xmlns="http://www.springframework.org/schema/beans"xmlns:xsi="http://www.w3.org/2001/XMLSchema-instance" xmlns:mvc="http://www.springframework.org/schema/mvc"xmlns:context="http://www.springframework.org/schema/context"xmlns:aop="http://www.springframework.org/schema/aop" xmlns:tx="http://www.springframework.org/schema/tx"xmlns:task="http://www.springframework.org/schema/task"xmlns:dubbo="http://code.alibabatech.com/schema/dubbo"xsi:schemaLocation="http://www.springframework.org/schema/beans http://www.springframework.org/schema/beans/spring-beans-4.0.xsd http://www.springframework.org/schema/mvc http://www.springframework.org/schema/mvc/spring-mvc-4.0.xsd http://www.springframework.org/schema/context http://www.springframework.org/schema/context/spring-context-4.0.xsd http://www.springframework.org/schema/aop http://www.springframework.org/schema/aop/spring-aop-4.0.xsd http://www.springframework.org/schema/tx http://www.springframework.org/schema/tx/spring-tx-4.0.xsdhttp://www.springframework.org/schema/taskhttp://www.springframework.org/schema/task/spring-task-4.0.xsdhttp://code.alibabatech.com/schema/dubbo http://code.alibabatech.com/schema/dubbo/dubbo.xsd"><!-- 扫描 @Contr --> <context:component-scan base-package="com.test.core.controller" /><!-- 处理器 映射器 适配器 --><mvc:annotation-driven/><!-- 静态资源访问(不拦截此目录下的东西的访问) --><mvc:resources location="/WEB-INF/static/" mapping="/static/**" /><!-- 视图解释器 jsp --><bean id="jspViewResolver" class="org.springframework.web.servlet.view.InternalResourceViewResolver"><property name="prefix" value="/WEB-INF/controller/"/><property name="suffix" value=".jsp"/></bean></beans>
3.3 加入Log日志打印
在controller和service子项目的src/main/resources中创建log4j.properties加入:
log4j.rootLogger=info, stdout
log4j.appender.stdout=org.apache.log4j.ConsoleAppender
log4j.appender.stdout.layout=org.apache.log4j.PatternLayout
log4j.appender.stdout.layout.ConversionPattern=%d %p [%c] - %m%n
3.4 测试SpringMVC
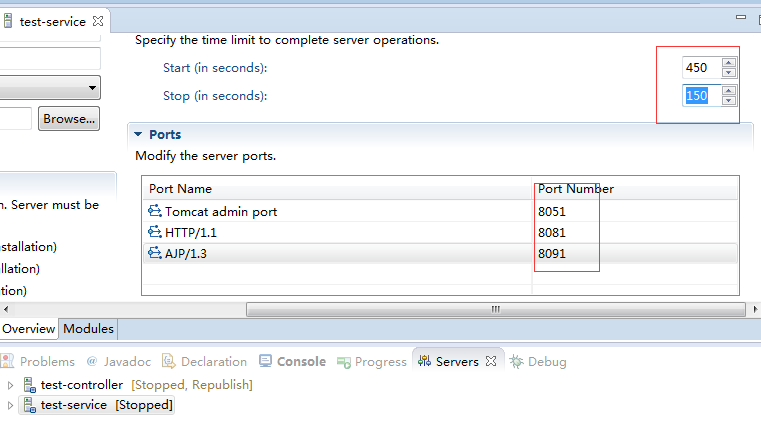
创建Tomcat:

配置service和controller的Tomcat:
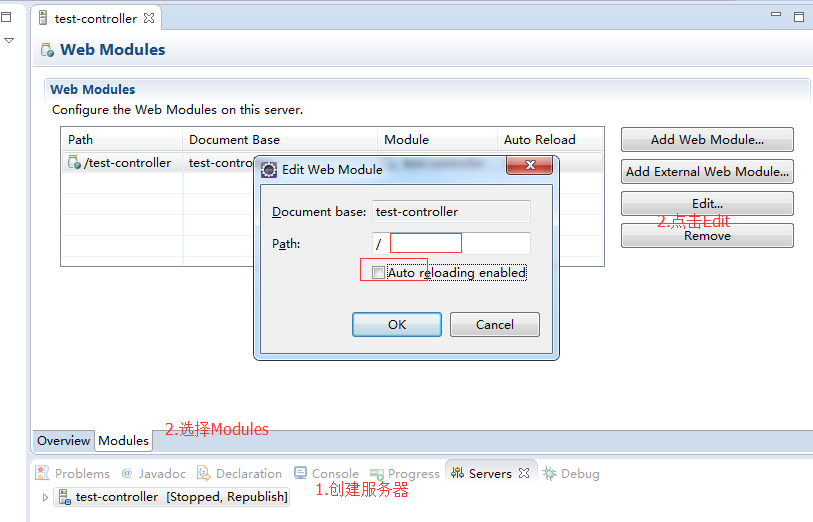
注意两个Tomcat端口号不要重复,且启动时间设置长点:
创建测试的controller和jsp:
package com.test.core.controller;import org.springframework.stereotype.Controller;
import org.springframework.web.bind.annotation.RequestMapping;@Controller
public class TestBookController {@RequestMapping(value="/index.do")public String index(){return "index";}
}
<%@ page language="java" contentType="text/html; charset=UTF-8"pageEncoding="UTF-8"%>
<!DOCTYPE html PUBLIC "-//W3C//DTD HTML 4.01 Transitional//EN" "http://www.w3.org/TR/html4/loose.dtd">
<html>
<head>
<meta http-equiv="Content-Type" content="text/html; charset=UTF-8">
<title>Insert title here</title>
</head>
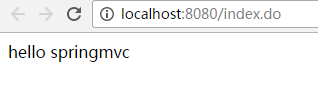
<body>hello springmvc
</body>
</html>在这里只用启动controller的Tomcat,并在浏览器中输入:http://localhost:8080/index.do
4.整合Dubbo
搭建Zookeeper本文不在赘述,为了方便,Dubbo将设置成直接从本地查找服务.
4.1搭建Dubbo服务提供方
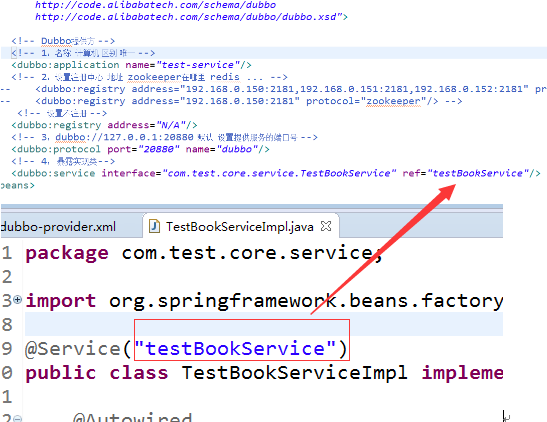
在test-service的config文件夹下创建dubbo-provider.xml:
<beans xmlns="http://www.springframework.org/schema/beans"xmlns:xsi="http://www.w3.org/2001/XMLSchema-instance" xmlns:mvc="http://www.springframework.org/schema/mvc"xmlns:context="http://www.springframework.org/schema/context"xmlns:aop="http://www.springframework.org/schema/aop" xmlns:tx="http://www.springframework.org/schema/tx"xmlns:task="http://www.springframework.org/schema/task"xmlns:dubbo="http://code.alibabatech.com/schema/dubbo"xsi:schemaLocation="http://www.springframework.org/schema/beans http://www.springframework.org/schema/beans/spring-beans-4.0.xsd http://www.springframework.org/schema/mvc http://www.springframework.org/schema/mvc/spring-mvc-4.0.xsd http://www.springframework.org/schema/context http://www.springframework.org/schema/context/spring-context-4.0.xsd http://www.springframework.org/schema/aop http://www.springframework.org/schema/aop/spring-aop-4.0.xsd http://www.springframework.org/schema/tx http://www.springframework.org/schema/tx/spring-tx-4.0.xsdhttp://www.springframework.org/schema/taskhttp://www.springframework.org/schema/task/spring-task-4.0.xsdhttp://code.alibabatech.com/schema/dubbo        http://code.alibabatech.com/schema/dubbo/dubbo.xsd"><!-- Dubbo提供方 --><!-- 1:名称  计算机 区别 唯一 --><dubbo:application name="test-service"/><!-- 2:设置注册中心  地址  zookeeper在哪里  redis ... -->
<!--     <dubbo:registry address="192.168.0.150:2181,192.168.0.151:2181,192.168.0.152:2181" protocol="zookeeper"/> -->
<!--     <dubbo:registry address="192.168.0.150:2181" protocol="zookeeper"/> --><!-- 设置不注册 --><dubbo:registry address="N/A"/><!-- 3:dubbo://127.0.0.1:20880  默认  设置提供服务的端口号 --><dubbo:protocol port="20880" name="dubbo"/><!-- 4: 暴露实现类--><dubbo:service interface="com.test.core.service.TestBookService" ref="testBookService"/><bean id="testBookService" class="com.test.core.service.TestBookServiceImpl" />
</beans>
Service的TestBookService接口(在common工程里创建)和TestBookServiceImpl实现类(这里只写实现类):
package com.test.core.service;import org.springframework.beans.factory.annotation.Autowired;
import org.springframework.stereotype.Service;import com.test.core.bean.TestBook;
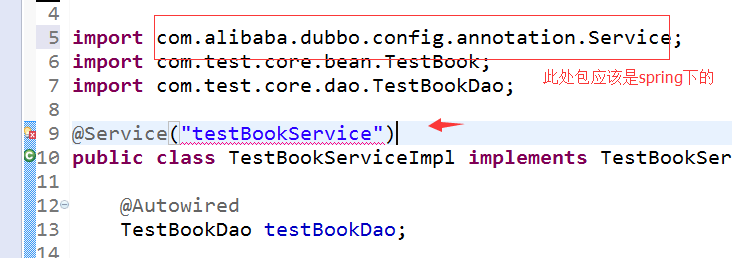
import com.test.core.dao.TestBookDao;@Service("testBookService")
public class TestBookServiceImpl implements TestBookService{@AutowiredTestBookDao testBookDao;public TestBook findById(String id) {return testBookDao.findById(id);}}
4.2 搭建服务消费方
在test-service项目的springmvc-controller.xml中加入:
<import resource="dubbo-consumer.xml"/>src/main/resources下创建dubbo-consumer.xml:
<beans xmlns="http://www.springframework.org/schema/beans"xmlns:xsi="http://www.w3.org/2001/XMLSchema-instance" xmlns:mvc="http://www.springframework.org/schema/mvc"xmlns:context="http://www.springframework.org/schema/context"xmlns:aop="http://www.springframework.org/schema/aop" xmlns:tx="http://www.springframework.org/schema/tx"xmlns:task="http://www.springframework.org/schema/task"xmlns:dubbo="http://code.alibabatech.com/schema/dubbo"xsi:schemaLocation="http://www.springframework.org/schema/beans http://www.springframework.org/schema/beans/spring-beans-4.0.xsd http://www.springframework.org/schema/mvc http://www.springframework.org/schema/mvc/spring-mvc-4.0.xsd http://www.springframework.org/schema/context http://www.springframework.org/schema/context/spring-context-4.0.xsd http://www.springframework.org/schema/aop http://www.springframework.org/schema/aop/spring-aop-4.0.xsd http://www.springframework.org/schema/tx http://www.springframework.org/schema/tx/spring-tx-4.0.xsdhttp://www.springframework.org/schema/taskhttp://www.springframework.org/schema/task/spring-task-4.0.xsdhttp://code.alibabatech.com/schema/dubbo        http://code.alibabatech.com/schema/dubbo/dubbo.xsd"><!-- Dubbo消费方 --><!-- 1:名称  计算机 区别 唯一 --><dubbo:application name="test-controller"/><dubbo:registry address="N/A" check="false"/><dubbo:reference interface="com.test.core.service.TestBookService" id="testBookService"url="dubbo://127.0.0.1:20880" /><!-- 全局设置 --><dubbo:consumer timeout="600000" check="false"/>
</beans>
controller内容如下:
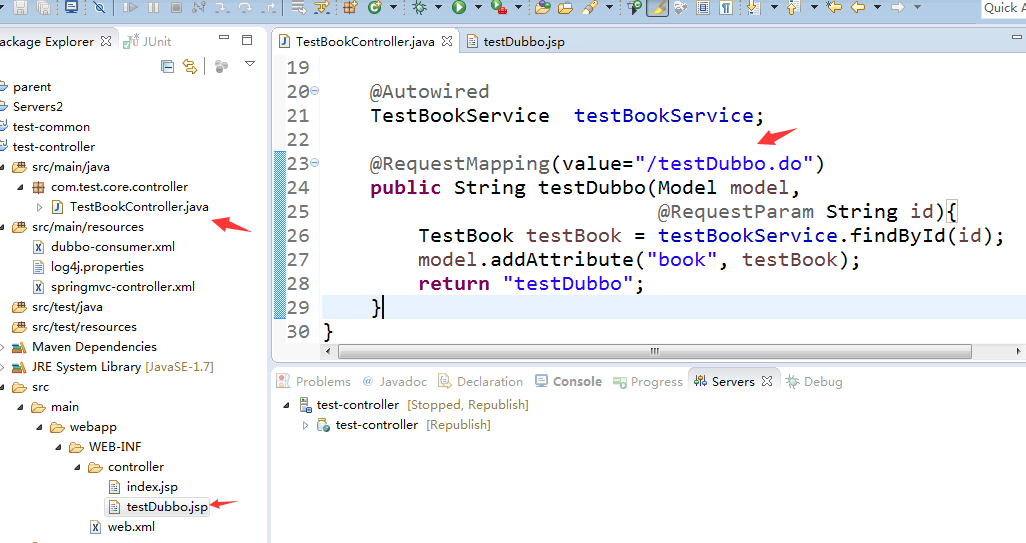
4.3 测试完整项目
在testDubbo.jsp的body中加入:${ requestScope.book}-->启动service的Tomcat-->启动controller的tomcat(这个必须在service启动之后才能启动,注意端口号不能重复)-->浏览器中输入http://localhost:8080/testDubbo.do?id=1000

5.项目中可能会遇到的问题:
5.1 Spring注解@service无法取别名
5.2 启动Tomcat时: cannot resolve reference to bean等找不到类的报错
在parent上右键-->Run as-->Maven clean
在parent上右键-->Maven-->Update Project
5.3 Dubbo的xml文件里有红叉
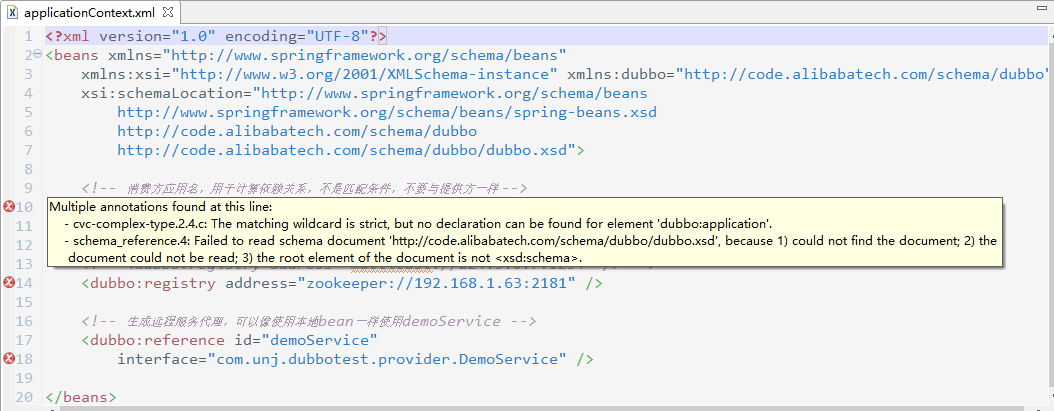
ref:使用dubbo时applicationContext.xml报错解决办法
5.4 jsp文件头报错
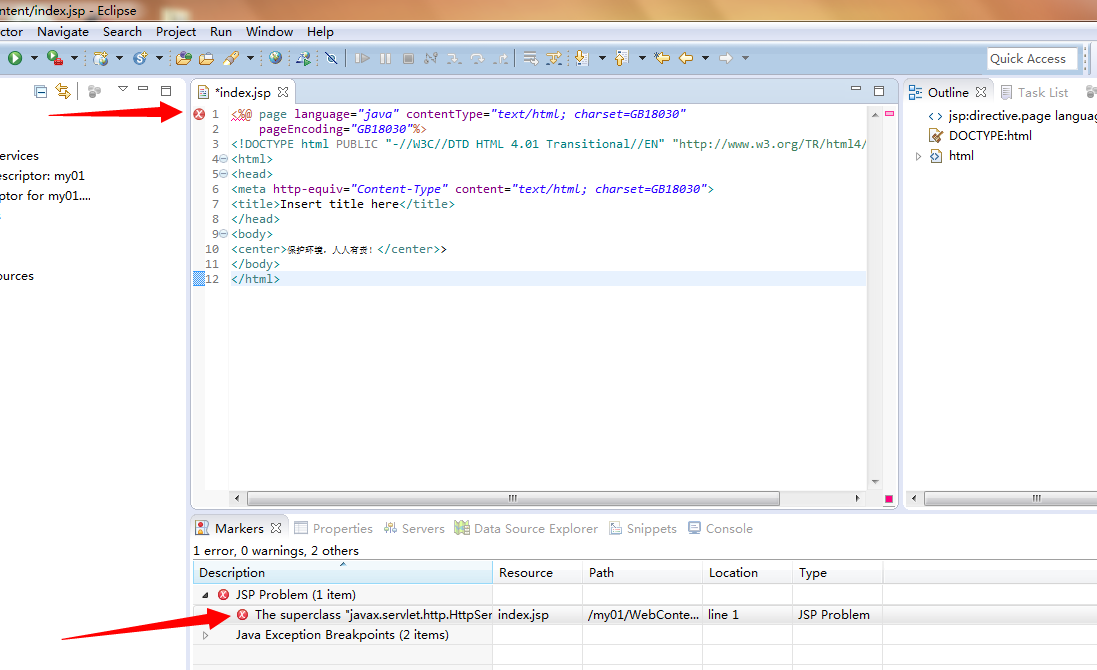
ref:新建的web项目的jsp页面报错的解决方法
分布式系统架构实战demo:SSM+Dubbo相关推荐
- dubbo 01.第一套:高并发大型电商详情页系统的大型高性能与高可用缓存架构实战视频教程...
传送门: 01.第一套:高并发大型电商详情页系统的大型高性能与高可用缓存架构实战视频教程 链接:https://pan.baidu.com/s/1mjUEaAO 密码:qvx5 08.第八套:基于Du ...
- 《大规模分布式系统架构与设计实战》
<大规模分布式系统架构与设计实战> 基本信息 作者: 彭渊 丛书名: 大数据技术丛书 出版社:机械工业出版社 ISBN:9787111455035 上架时间:2014-2-21 出版日期: ...
- 网约车项目白皮书和配套的分布式系统架构落地实战被某滴大牛总结
本书并没有过多渲染系统架构的理论知识,而是切切实实站在开发-线角度, 为各位读者诠释了大型网站在架构演变过程中出现一系列技术难题时的解决方案.本书首先从分布式服务案例开始介绍,重点为大家讲解了大规模服 ...
- 编程体系结构(09):分布式系统架构
本文源码:GitHub·点这里 || GitEE·点这里 一.基础概念 1.单服务 所有业务服务和应用组件部署在一台服务上,节省成本,这是单服务结构,适用于并发低,业务单一的场景. 2.集群模式 业务 ...
- 阿里巴巴中台战略思想与架构实战笔记
阿里巴巴中台战略思想与架构实战笔记 序言一 序言二 第一部分 引子 第1章 阿⾥巴巴集团中台战略引发的思考 1.1 阿⾥巴巴共享业务事业部的发展史 1.2 企业信息中心发展的症结 "烟囱式& ...
- 【系统设计】分布式系统架构设计
1.目录 到底什么是架构设计 系统架构的演化发展 架构设计形式与方法 架构的一些实践经验 总结回顾与作业实践 2.到底什么是架构设计 什么是架构(Architecture) 架构(Architectu ...
- 整理下.net分布式系统架构的思路
最近看到有部分招聘信息,要求应聘者说一下分布式系统架构的思路.今天早晨正好有些时间,我也把我们实际在.net方面网站架构的演化路线整理一下,只是我自己的一些想法,欢迎大家批评指正. 首先说明的是.ne ...
- 从Elasticsearch来看分布式系统架构设计,真是666~
欢迎关注方志朋的博客,回复"666"获面试宝典 分布式系统类型多,涉及面非常广,不同类型的系统有不同的特点,批量计算和实时计算就差别非常大.这篇文章中,重点会讨论下分布式数据系统的 ...
- SpringCloud与Docker微服务架构实战pdf
下载地址:网盘下载 作为一部帮助大家实现微服务架构落地的作品,<Spring Cloud与Docker微服务架构实战>覆盖了微服务理论.微服务开发框架(Spring Cloud)以及运行平 ...
最新文章
- 在Java中是如何定义和声明接口的?
- 嵌入式Linux开发环境的搭建
- 在Python中创建单例
- 判断checkbox是否选中并改变值
- python中文件路径格式_Python应用-临床路径格式转换
- C#——Ellipse(椭圆)类[继承Circle(圆)类][实现IComparable接口、IComparerrT接口]DEMO
- Web API--自定义异常结果的处理
- Uploadify3.2中文提示
- org.apache.tomcat.util.scan.StandardJarScanner找不到serializer.jar的问题
- html5清除手机页面缓存文件夹,WebView自动缓存-清除缓存
- Python案例:通过城市区域代码查询天气
- linux(ubuntu) 搭建java程序运行环境
- linux中probe函数中传递的参数来源
- U盘windows无法格式化的解决办法
- 《Redis设计与实现》学习笔记-单机数据库
- Matlab深度学习上手初探
- 多音效播放本地调试OK!打包到android播放不正常
- Shell脚本之免交互操作
- html中padding在ie8兼容性,怎么解决bootstrap在各版本IE浏览器中的兼容性问题?
- python支付程序源码_Python提取支付宝和微信支付二维码的示例代码