支付宝沙箱设置_设置自己的深度学习沙箱快速指南
支付宝沙箱设置
Like many data science enthusiasts I dove into this field by filling every spare minute learning the DS eco-system –namely Python, Jupyter, NumPy, Pandas, Scikit-learn, Matplotlib, and a dash of Seaborn. Together with the all powerful Unix tools –vi, less, sort, cut, grep, cat, tail, head, etc.– you have an incredibly productive framework to source, clean and analyze datasets, engineer features, run regression models, and build professional visuals. However, once your curiosity (or job) pulls you towards the “deep learning” end of the “machine learning” world, you will quickly discover –as I did– not even a high-end Macbook Pro will have enough muscle to run even the most basic convolutional neural net models (CNN for short). I figured this out quickly working through the fast.ai course by Jeremy Howard and Rachel Thomas. If you are like me and your data science training funding comes from your own pocket then I have an inexpensive, simple, yet powerful solution for you.
像许多数据科学爱好者一样,我会花很多时间学习DS生态系统,例如Python,Jupyter,NumPy,Pandas,Scikit-learn,Matplotlib和一些Seaborn,从而涉足这一领域。 连同所有强大的Unix工具(vi,更少,排序,剪切,grep,cat,tail,head等)一起,您将拥有一个非常有用的框架,可用于获取,清理和分析数据集,工程师功能,运行回归模型并进行构建专业的视觉效果。 但是,一旦您的好奇心(或工作)将您拉向“机器学习”世界的“深度学习”端,您将很快发现-就像我一样-甚至高端Macbook Pro都没有足够的肌肉来运行最基本的卷积神经网络模型(简称CNN)。 我通过Jeremy Howard和Rachel Thomas的fast.ai课程快速解决了这个问题。 如果您像我一样,并且您自己的数据科学培训经费来自您自己的口袋,那么我为您提供了一种便宜,简单但功能强大的解决方案。
Firstly, I admit I like running everything I can on my laptop. However, for some things my laptop just doesn’t cut it e.g. for my music composition hobby, I have a beefed up Intel i7 box in my basement that runs a music library server. But for training DL models an i7 and lots of RAM won’t do much for you. You need GPUs. And GPUs are expensive. But they’re not expense to rent. With the buffet table of cloud options now available in the marketplace my new MO has become, don’t buy, rent.
首先,我承认我喜欢在笔记本电脑上运行所有可以运行的东西。 但是,对于某些事情,我的笔记本电脑并没有削减它,例如,出于我的音乐创作爱好,我在地下室有一个功能强大的Intel i7盒子,可以运行音乐库服务器。 但是对于训练DL模型而言,i7和大量RAM并不会为您带来太大帮助。 您需要GPU。 而且GPU很昂贵。 但他们不是租金的开支。 随着市场上现在有可用的云计算自助餐表,我的新MO变成了( 不购买,租用) 。
Through a bit of Google’ing, and trial-and-error I setup a Jupyter based client-server sandbox using my Macbook Pro and Visual Studio Code as the client, and Jupyter server running on a high-end Linux instance on Google Cloud. The results? My DL model training now happens in seconds. On my Macbook Pro? Well, after 30 minutes running and the fan blazing away I killed the process. You get the picture?
通过一些Google的尝试和反复试验,我使用Macbook Pro和Visual Studio Code作为客户端,并在Google Cloud的高端Linux实例上运行的Jupyter服务器,设置了一个基于Jupyter的客户端-服务器沙箱。 结果? 我的DL模型训练现在只需几秒钟。 在我的Macbook Pro上? 好吧,经过30分钟的跑步,风扇燃烧了,我杀死了整个过程。 你明白了吗?
Note: This approach uses a full Linux server in the Google cloud. There are other paths that cost less e.g. Google Colab, and Kaggle Kernels. However, with this approach you gain configuration flexibility, a $300 credit (if used sparingly will last a while), and some experience with the Google Cloud Platform and using their command line interface.
注意: 此方法在Google云中使用完整的Linux服务器。 还有其他成本更低的路径,例如Google Colab和Kaggle Kernels。 但是,通过这种方法,您可以获得配置灵活性,300美元的信用额度(如果很少使用,将持续一段时间),以及一些使用Google Cloud Platform和使用其命令行界面的经验。
设定伺服器 (Setup Server)
创建GCP帐户并获得$ 300 (Create GCP account and get $300)
First step is to create an account on the Google Cloud Platform (GCP). I’m going to assume you’ve figured that out and are logged into to the GCP console. Next, check to ensure you got your $300 credit. In the top left corner click on the menu and select Billing → Overview. In the bottom right corner of the Overview you should see the Promotional credits balance. And it should be $300.
第一步是在Google Cloud Platform(GCP)上创建一个帐户。 我假设您已经解决了该问题并登录到GCP控制台。 接下来,检查以确保您获得$ 300的信用额度。 在左上角单击菜单,然后选择开票 → 总览 。 在概述的右下角,您应该看到促销信用余额。 应该是300美元。

创建您的VM服务器 (Create your VM server)
GCP now has a service for provisioning a VM server configured specifically for running Jupyter notebooks. Click on the GCP menu (top left corner) and scroll down to the ARTIFICIAL INTELLIGENCE section. Then select AI Platform → Notebooks.
GCP现在提供了一项服务,用于提供专门配置用于运行Jupyter笔记本的VM服务器。 点击GCP菜单(左上角),然后向下滚动至ARTIFICIAL INTELLIGENCE(人工智慧)部分。 然后选择AI Platform→笔记本 。
From the Notebook Instances screen select NEW INSTANCE at the top. This menu has many options including some beta and experimental choices. I am going with the PyTorch 1.4 option with one NVIDIA Tesla T4 GPU.
在“笔记本实例”屏幕上,选择顶部的“ 新建实例 ”。 此菜单有许多选项,包括一些beta和实验选项。 我将使用带有一个NVIDIA Tesla T4 GPU的PyTorch 1.4选项。
Next screen presents options. For this exercise I am going with the defaults. The Customize button allows you to add more disk space to your boot drive, add GPUs RAM, etc. The default costs $0.382 per hour. Google E2 instances are billed by the second after the first minute of usage. This default configuration will run 38.2 cents per hour. That’s 785 hours of free usage.
下一个屏幕显示选项。 对于本练习,我将使用默认值。 “ 自定义”按钮允许您向启动驱动器添加更多磁盘空间,添加GPU RAM等。默认每小时收费0.382美元。 Google E2实例在使用后的第一分钟后第二秒计费。 此默认配置将每小时运行38.2美分。 这是785小时的免费使用时间。
Once you click on Create, Google will take a couple minutes to provision your VM instance. When it’s complete you will see a screen like the following.
单击“ 创建”后, Google将需要几分钟来配置您的VM实例。 完成后,您将看到类似以下的屏幕。

You now have a fully functioning Jupyter Notebook with a powerful GPU to support DL model building. Click on OPEN JUPYTERLAB next to your Instance Name. A new tab will open in your browser and a Jupyter notebook will be opened. The interface is very straight forward. You can browse the file system, create a Git repository, or startup up a terminal session.
现在,您将拥有功能齐全的Jupyter Notebook和功能强大的GPU,以支持DL模型构建。 单击您的实例名称旁边的OPEN JUPYTERLAB 。 新的标签页将在您的浏览器中打开,并且Jupyter笔记本将被打开。 界面非常简单。 您可以浏览文件系统,创建Git存储库或启动终端会话。
At this stage you have a fully functioning, powerful DL sandbox. However, this is not a cost effective way to work. Your new VM instance is eating away at that $300 credit every second you have the instance running. I prefer to do all my data gathering, feature engineering, and initial regression work locally on my macbook. Then when I have my dataset cleaned and prepped and I am at the stage to try and fit a DL model I crank up my VM instance, connect, run my model, get my results, then shutdown the instance. To execute this workflow efficiently there’s a few more steps I will now walk through.
在此阶段,您将拥有一个功能全面,功能强大的DL沙箱。 但是,这不是一种经济有效的工作方式。 您的新VM实例每运行一秒钟,就可以得到$ 300的信用额。 我更喜欢在Macbook上本地进行所有数据收集,功能工程和初始回归工作。 然后,当我清理并准备好数据集后,正处于尝试安装DL模型的阶段,我启动了VM实例,连接,运行模型,获取结果,然后关闭实例。 为了有效地执行此工作流程,我现在将执行另外几个步骤。
停止并启动您的VM实例(在继续之前执行此步骤) (Stop and Start your VM Instance (DO THIS STEP BEFORE CONTINUING))
Go back to the Notebooks console and shutdown your instance.
返回Notebooks控制台并关闭实例。

Tip: Go to the Billing section and under Budgets & alerts create a Budget that will email you when you have reached $1 of usage.
提示:转到“结算”部分,在“ 预算和警报”下创建一个预算,当您的使用费达到1美元时,该电子邮件就会通过电子邮件发送给您。
配置VM实例以进行远程HTTP / HTTPS访问 (Configure VM Instance for Remote HTTP/HTTPS Access)
To open up remote access to your VM instance you need to do two things.
要打开对VM实例的远程访问,您需要做两件事。
Step 1. Open up HTTP access to your VM instance. From the main console menu, under the COMPUTE section, select Compute Engine → VM instances.
步骤1 。 打开对您的VM实例的HTTP访问。 在主控制台菜单中的COMPUTE部分下,选择Compute Engine→VM实例 。

Then click on your instance from the list. The details of your instance will be displayed. We need to make two changes here. Click on EDIT at the top, scroll down and check the two HTTP boxes in the Firewalls section, then scroll on to the bottom and click Save.
然后从列表中单击您的实例。 将显示您实例的详细信息。 我们需要在此处进行两项更改。 单击顶部的“ 编辑 ”,向下滚动并选中“防火墙”部分中的两个HTTP框,然后滚动到底部并单击“ 保存” 。
Step 2. Follow the menu below and then click CREATE FIREWALL RULE at the top of the Firewall console.
第二步 。 请遵循下面的菜单,然后单击防火墙控制台顶部的“创建防火墙规则 ”。
Input the noted fields in the following two screens.
在以下两个屏幕中输入注释的字段。
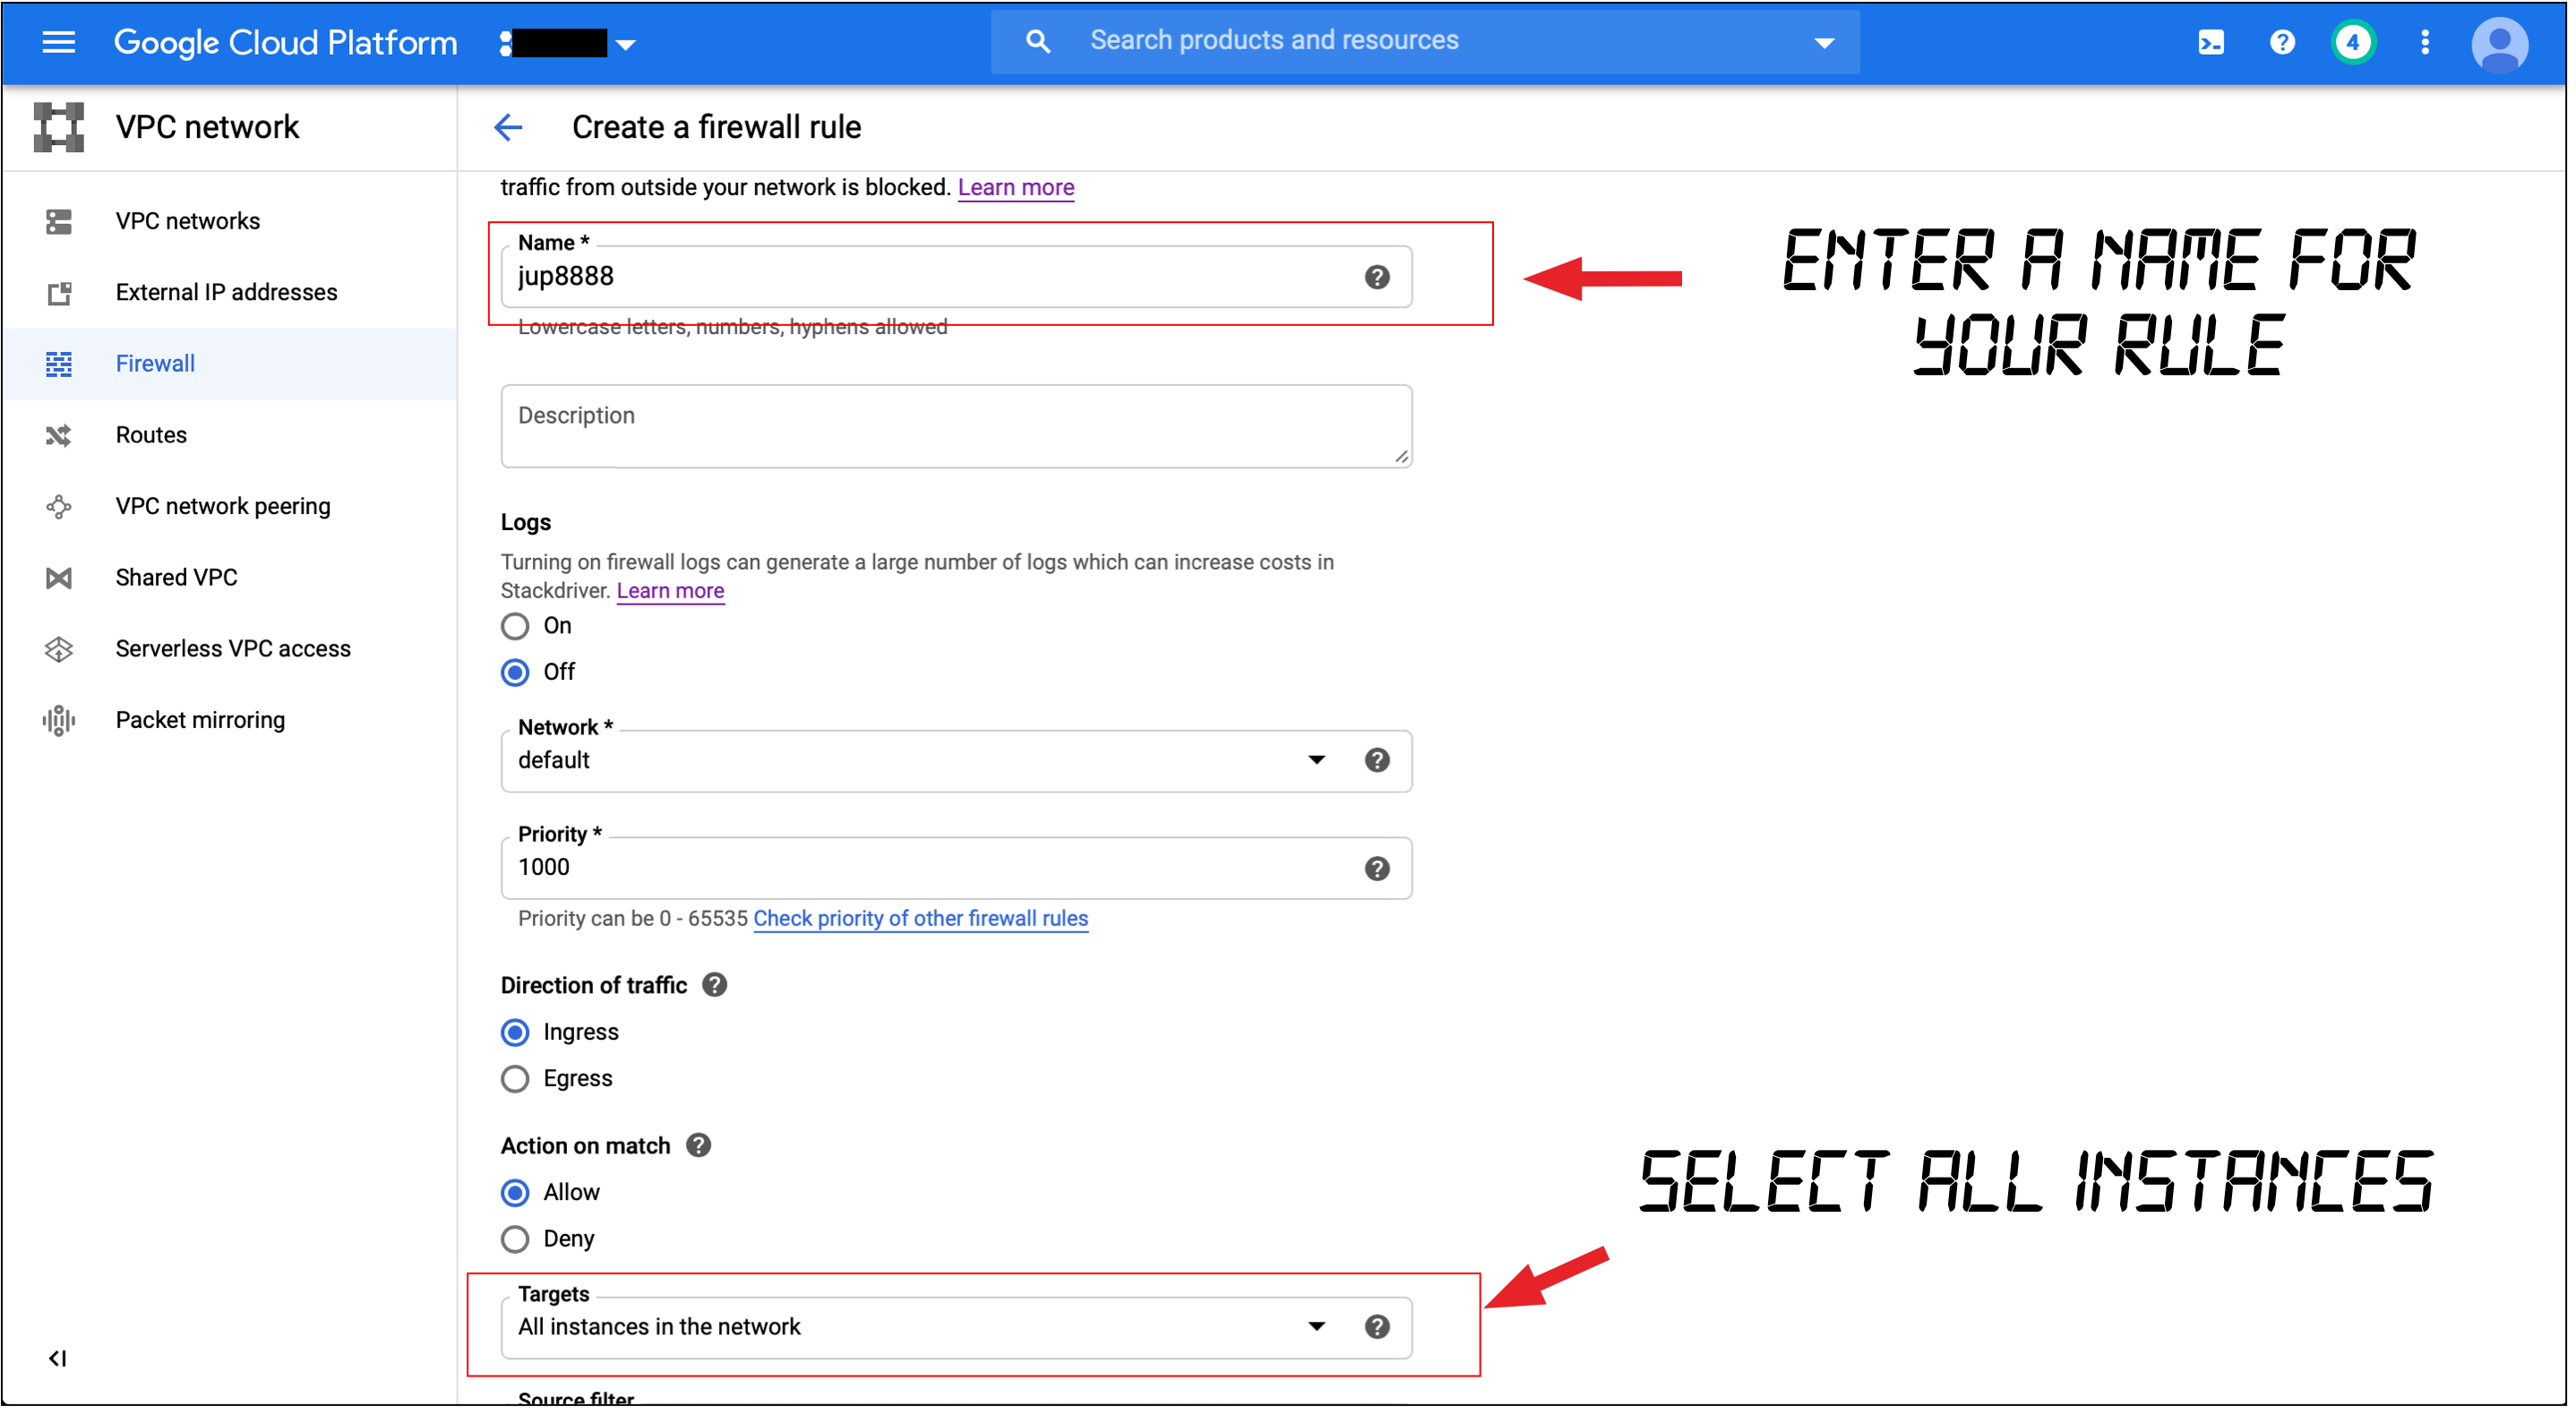
Your firewall rule should now be active. If it isn’t you will know in the next steps.
您的防火墙规则现在应该处于活动状态。 如果不是,您将在接下来的步骤中知道。
Step 3. Stop your VM Instance. Go back to the Notebooks console click the check box next to your instance and click on STOP.
步骤3.停止您的VM实例。 返回Notebooks控制台,单击实例旁边的复选框 ,然后单击STOP 。
使用Google Cloud SDK管理VM实例 (Managing VM Instance with Google Cloud SDK)
Step 1. First step is to install the SDK on you local computer. Here’s the Google instructions for downloading and installing their SDK for MacOS, Windows, and Linux. Make sure you follow all steps including putting the SDK in your PATH.
步骤1.第一步是在本地计算机上安装SDK。 这是 Google针对MacOS,Windows和Linux下载和安装其SDK的说明。 确保遵循所有步骤,包括将SDK放入PATH。
Step 2. Initialize the SDK by running the following command from a terminal.
步骤2.通过从终端运行以下命令来初始化SDK。
> gcloud init...> You must log in to continue. Would you like to log in (Y/n)?You will be prompted to log in. When you press Y and Return you will be redirected to a Google website to log into your account. Once you successfully log in you should be returned to your terminal session where you will be prompted to select a compute region.
系统将提示您登录。按Y键和Return键后,您将被重定向到Google网站以登录您的帐户。 成功登录后,应返回到终端会话,在该会话中将提示您选择计算区域。
> Do you want to configure a default Compute Region and Zone? (Y/n)?Select Y. In one of the earlier screen shots I suggested noting your instance name and the region in which it was created. Find that region in the list that is presented and enter its index number. Once that completes run the following command.
选择Y。 在较早的屏幕快照之一中,我建议注意您的实例名称和创建实例的区域。 在显示的列表中找到该区域,然后输入其索引号。 完成后,运行以下命令。
> gcloud config listYou should see something like the following in your terminal window.
您应该在终端窗口中看到类似以下的内容。
Step 3. Before we left our VM instance we shut it down. Let’s now start it back up using the SDK. Here’s the command. Replace inst_name with the name of your instance.
第三步 。 在离开VM实例之前,我们将其关闭。 现在开始使用SDK备份它。 这是命令。 将inst_name替换为实例的名称。
> gcloud compute instances start inst_nameNow let’s practice stopping the instance. Here’s the command.
现在让我们练习停止实例。 这是命令。
> gcloud compute instances stop inst_nameThis can take a couple minutes so just let it run. After the little spinner thing completes you should get this as a result.
这可能需要几分钟,因此只需运行它。 完成微调后,您应该得到此结果。
Once you see the …done then startup your instance again and let’s move on.
看到…完成后,再次启动实例,让我们继续。
Step 4. Time to connect to the instance and finish the server side setup. Enter the following command and replace inst_name with your instance.
步骤4.是时候连接到实例并完成服务器端设置了。 输入以下命令,并将inst_name替换为您的实例。
> gcloud compute ssh inst_nameYou will be prompted for a password. This is the account password you created initially. Next you will see a screen like the following.
系统将提示您输入密码。 这是您最初创建的帐户密码。 接下来,您将看到类似以下的屏幕。

Okay, we are almost there. Just a few configuration changes to Jupyter and then we will be able to connect with Visual Studio Code and run a model. Yeah!
原文:Hands-On Deep Learning Architectures with Python 协议:CC BY-NC-SA 4.0 译者:飞龙 本文来自[ApacheCN 深度学习 译文集] ... 天才少年稚晖君 | [保姆级教程]个人深度学习工作站配置指南 来源:https://zhuanlan.zhihu.com/p/336429888 0. 前言 工作原因一直想配置一台自己的深度学习工作站 ... 深度学习服务器装机指南(TITAN V显卡) 基本配置: 系统:ubuntu 16.04 显卡:TITAN V 安装xfce图形界面替换ubuntu自带界面 1.1离线安装 (1)通过apt-get ... 深度学习环境配置指南以YOLOV8 为例 简介 软件准备 部分安装难点 了解yolov8 准备yolov8运行的环境 跑一个例程 运行一个例程 Load a model 简介 实验室来了很多新同学,本 ... 小白深度学习入坑指南 小白深度学习入坑指南 写博客的初衷适合的人群 理论篇 说明 数学 CV ML DL 优化 实践篇 linux python 深度学习框架 框架学习 硬件配置 软件环境配置 常见的 ... 编译 | 庞佳 责编 | Leo 出品 | AI 科技大本营(公众号ID:rgznai100) AI 科技大本营按:本文编译自 Adrian Rosebrock 发表在 PyImageSearch 上 ... 导读:本期为 AI 简报 20210122 期,将为您带来 9 条相关新闻,新增论文推送,在文章底部,祝各位牛年大吉~ 本文一共 3700 字,通篇阅读结束需要 7~10 分钟 1. 保姆级教程:深度 ... 课程介绍 伴随人工智能时代的到来,深度学习技术也发挥着越来越重要作用,越来越多的技术人才开始投身入这一行业中,并希望发展成为一名深度学习算法工程师.然而,在实际的工程设计中,深度学习研发者总会面临着各 ... bert使用做文本分类 Most of the researchers submit their research papers to academic conference because its ...支付宝沙箱设置_设置自己的深度学习沙箱快速指南相关推荐
最新文章
热门文章