页面滚动时触发图片逐帧播放_如何在滚动效果上创建逐帧运动图像
页面滚动时触发图片逐帧播放
A step by step guide on how to create that dynamic image background you see everywhere.
有关如何创建随处可见的动态图像背景的逐步指南。
内容 (Content)
- Introduction介绍
- Result demo结果演示
- Prerequisite先决条件
- Step by step guide逐步指南
- Next step下一步
介绍 (Introduction)
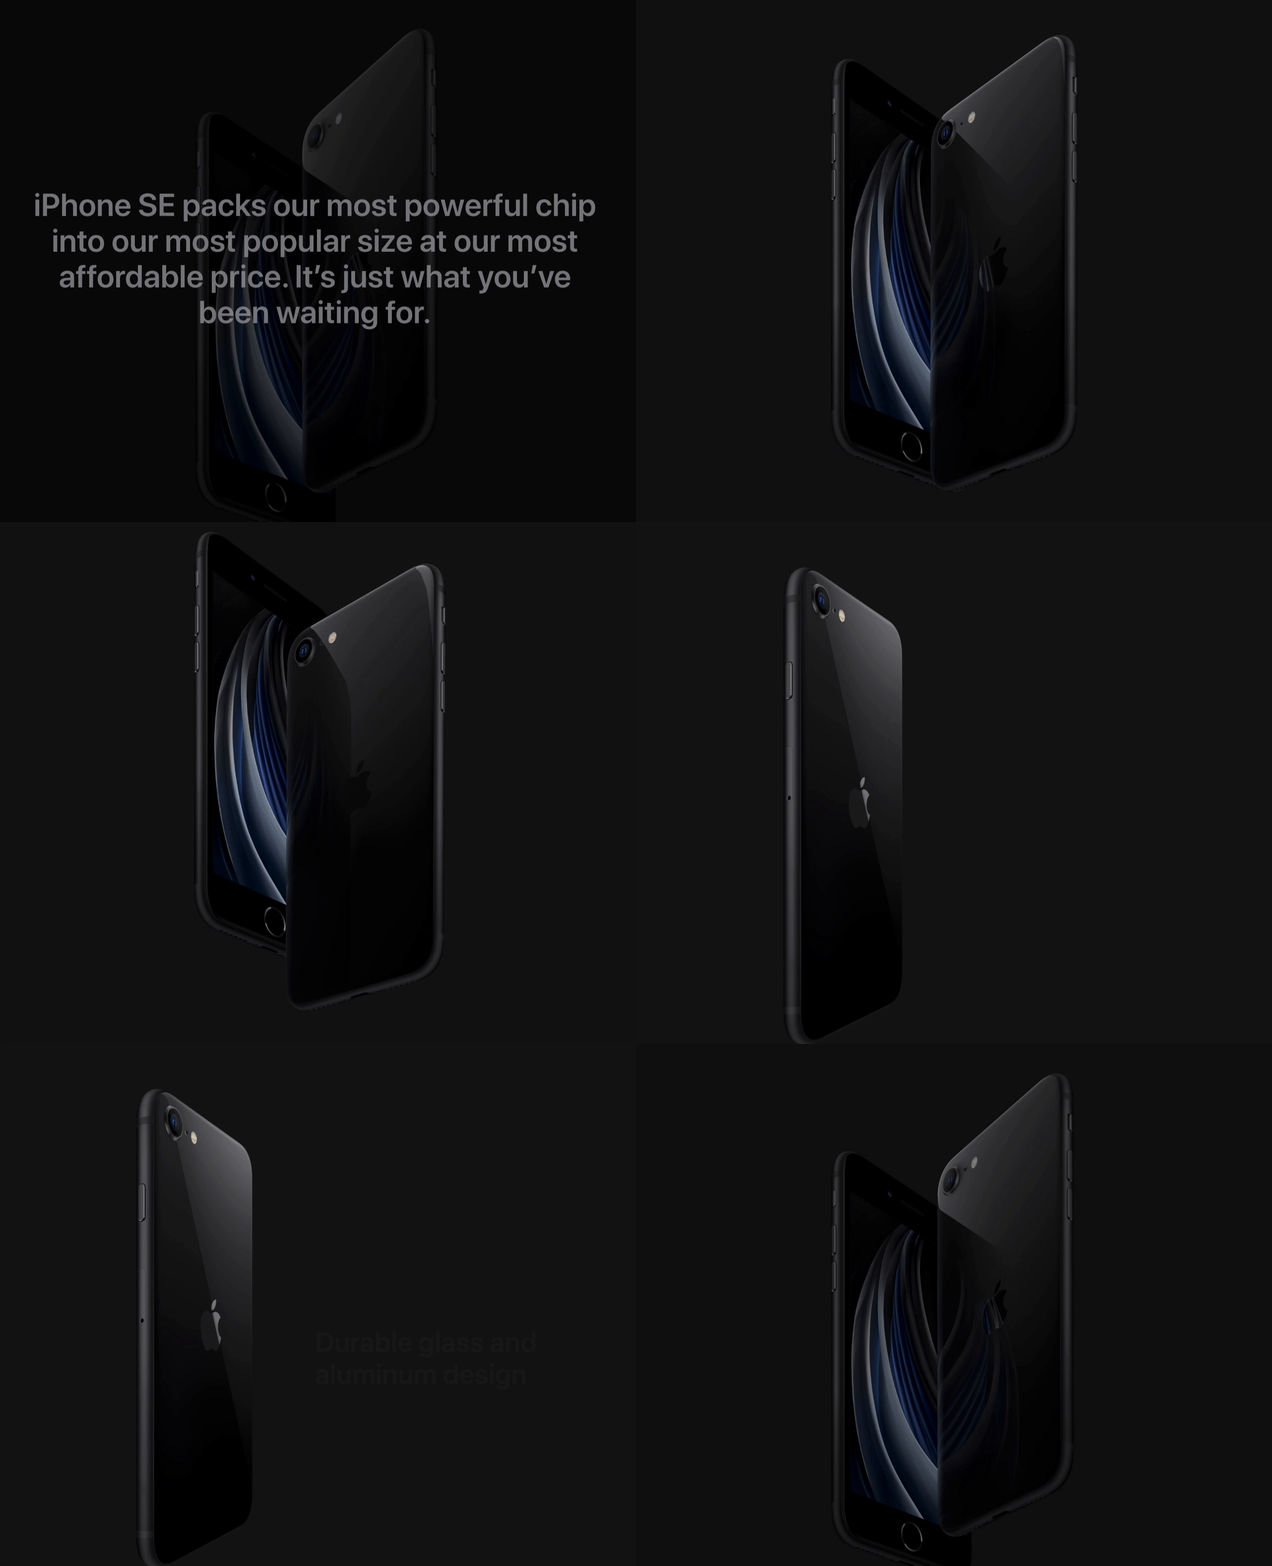
Moving an image on scroll is the new parallax for the frontend. In the old days, parallax was everywhere. But it rarer for new websites. Instead, we see a lot of moving image by scrolling pattern — for example, apple new iPhone SE website:
滚动移动图像是前端的新视差。 在过去,视差无处不在。 但这对于新网站来说很少见。 取而代之的是,我们通过滚动模式看到了很多动态图像,例如,苹果新的iPhone SE网站:

As you can see, the iPhone rotates frame by frame as you scroll down. In this tutorial, I will share my approach for reproducing such pattern.
如您所见,iPhone在向下滚动时会逐帧旋转。 在本教程中,我将分享重现这种模式的方法。
结果演示 (Result demo)

Codepen: https://codepen.io/josephwong2004/pen/wvKPGEO
Codepen: https ://codepen.io/josephwong2004/pen/wvKPGEO
先决条件 (Prerequisite)
Just basic knowledge in CSS and JS
只是CSS和JS的基础知识
逐步指南 (Step by step guide)
Step 1: Get some images
第1步:获取一些图片
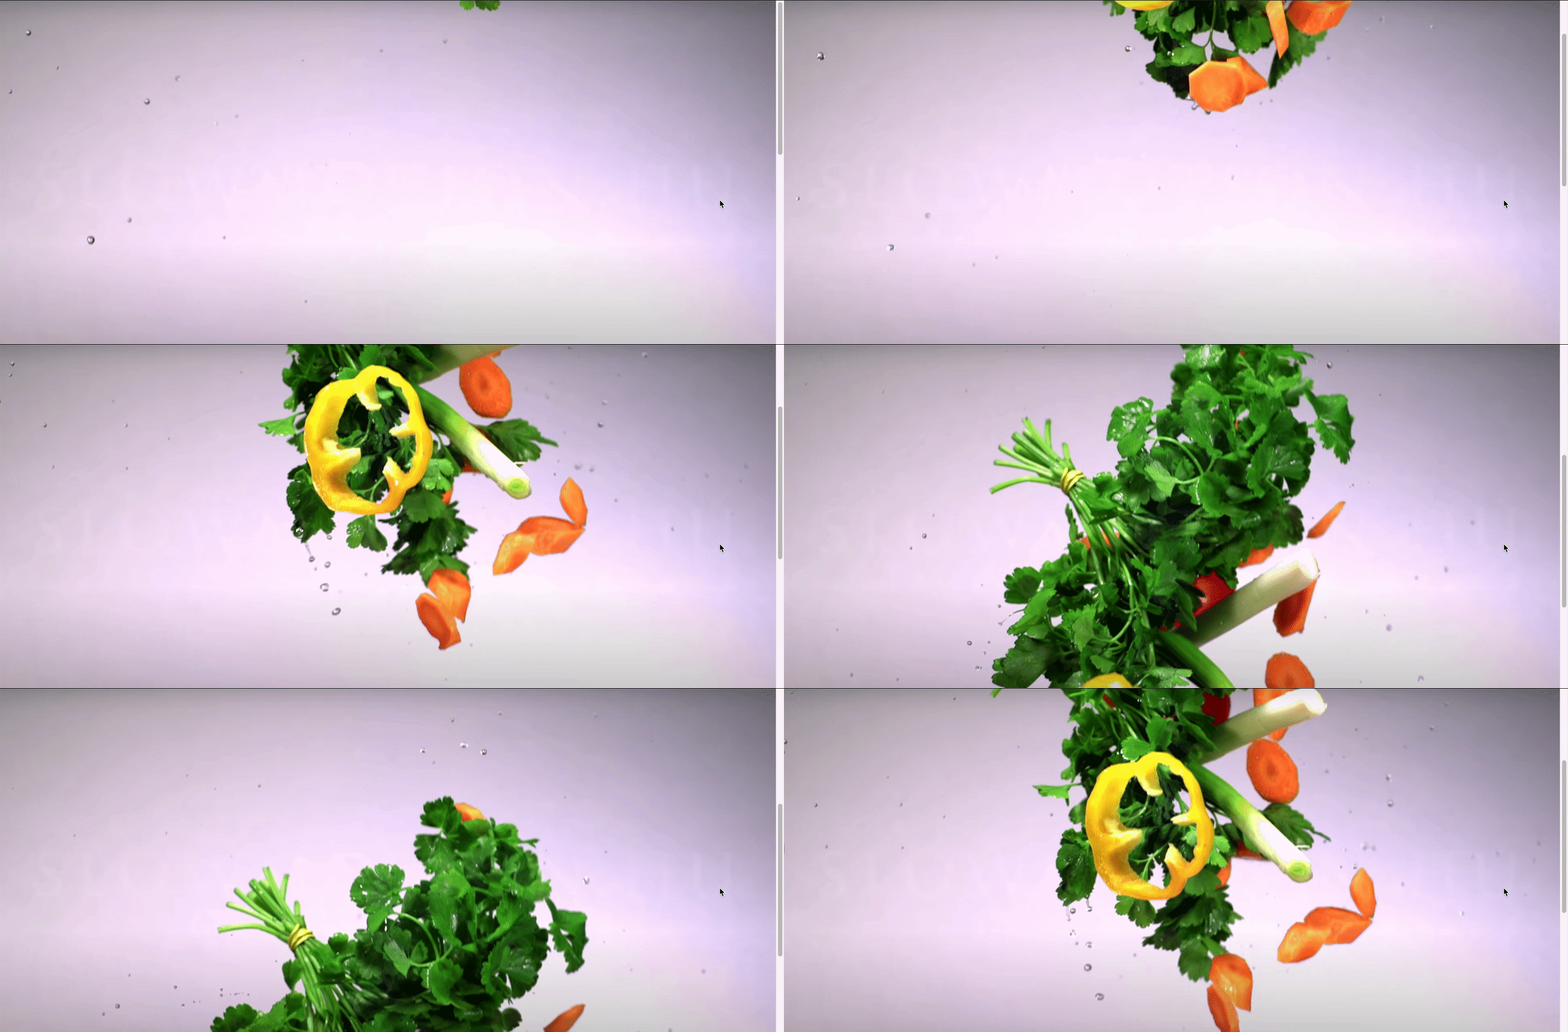
Okay, I guess you already figured it out. The “Moving image” is actually just a bunch of images with small differences, and played frame by frame like an animation. By mapping the scroll position to a corresponding image, we get an illusion of the object in the images itself is moving or rotating.
好的,我想您已经知道了。 “运动图像”实际上只是一堆差异很小的图像,并且像动画一样逐帧播放。 通过将滚动位置映射到相应的图像,我们得到图像本身在运动或旋转中的幻觉。
As you can see from the demo, I get some images for vegetable falling down (20 in total).
从演示中可以看到,我得到了一些蔬菜掉落的图像(总共20个)。
The images I am using is from this youtube video, I don’t own the images, only using it for tutorial purpose. Source:
我使用的图片来自此youtube视频,我不拥有图片,仅将其用于教学目的。 资源:
https://www.youtube.com/watch?v=8DsDH3JQ384
https://www.youtube.com/watch?v=8DsDH3JQ384
Step 2: Setup the basic
步骤2:设定基本
Let start building our “moving image” effect. The html is very simple:
让我们开始构建我们的“运动图像”效果。 html非常简单:
<div class='container'> <div class='image-container'></div></div>We will put the image in the ‘image-container’ class. For CSS:
我们将图像放在“图像容器”类中。 对于CSS:
body { margin: 0; font-family: 'Permanent Marker', cursive;}.container { position: relative; width: 100%; height: 1500px;.image-container { width: 100%; height: 0; padding-top: 45.347%; position: sticky; top: 0; background-size: cover; background-image: url('https://drive.google.com/uc?id=1vtaubItASKilyvb5sgQO7D7gjAQ7xo0i'); }}Now, most things there is pretty standard. I added a font for the overlay text later. For the image-container itself, we want it to be as large as the page width, and have a dynamic height. Unfortunately, we cannot do height: auto here, as our image-container doesn’t have any content, and the background-image doesn’t count. The container will always be 0px in height.
现在,大多数事情都是相当标准的。 稍后,我为叠加文字添加了一种字体。 对于图像容器本身,我们希望它与页面宽度一样大,并具有动态高度。 不幸的是,我们不能做height: auto这里height: auto ,因为我们的图像容器没有任何内容,并且背景图像也不计数。 容器的高度始终为0px。
In order to compensate that, instead, we use a padding-top with percentage. This percentage is not random, but the image height to width ratio (height /width * 100%). With that and background-size: cover, we have container that fill up the whole page.
为了补偿这一点,我们使用带有百分比的padding-top。 该百分比不是随机的,而是图像的高宽比(高/宽* 100%)。 通过那和background-size: cover ,我们有一个容器可以填满整个页面。
Step 3: Add scrolling effect
步骤3:添加滚动效果
With the background image set, let’s add some JS to our code to make it “move”.
设置好背景图像后,让我们在代码中添加一些JS,使其“移动”。
I have uploaded 20 images to google drive, and stored their links like so:
我已将20张图片上传到Google驱动器,并按以下方式存储了它们的链接:
// Images assetconst fruitImages = { 1:'https://drive.google.com/uc?id=1vtaubItASKilyvb5sgQO7D7gjAQ7xo0i', 2:'https://drive.google.com/uc?id=1FJNbSIMKRPBnGPienoYK1Qf8wIwQSdpR', 3:'https://drive.google.com/uc?id=1TODQyZgnCjDX2Slr0ll8g-ymIV8Yizkh', ....... (I am not going to copy everything here) 20:'https://drive.google.com/uc?id=1D7PBddCxxb6aRk43maJ_BXgQD-PRS6R7',}Tips:
提示:
The default google drive share link is something like:https://drive.google.com/open?id=1vtaubItASKilyvb5sgQO7D7gjAQ7xo0i
默认的Google驱动器共享链接类似于: https : //drive.google.com/open?id=1vtaubItASKilyvb5sgQO7D7gjAQ7xo0i
To use it in code, you need to replace the /open? with /uc?
要在代码中使用它,您需要替换/ open? / uc?
Each key represent one “frame” in our scroll animation. Next, let add our scrolling function:
每个键代表我们滚动动画中的一个“帧”。 接下来,让我们添加滚动功能:
// Global variable to control the scrolling behaviorconst step = 30; // For each 30px, change an imagefunction trackScrollPosition() { const y = window.scrollY; const label = Math.min(Math.floor(y/30) + 1, 20); const imageToUse = fruitImages[label]; // Change the background image $('.image-container').css('background-image', `url('${imageToUse}')`);}$(document).ready(()=>{ $(window).scroll(()=>{ trackScrollPosition(); })})I am using jquery here just for convenience. The logic is very simple, we are creating a keyframe animation, but instead of time, we use pixel as our basic unit to calculate when should the next frame appear.
我在这里使用jquery只是为了方便。 逻辑很简单,我们正在创建关键帧动画,但是我们使用像素作为基本单位来计算下一帧的显示时间,而不是时间。
We are interested in the current scrollY value, which indicate how far the user has scrolled. We also create a step variable for the min and max bound of each frame to display on screen. With step set to 30, assuming the user keep scrolling, each image will display for “30px” worth of scroll time.
我们对当前的scrollY值感兴趣,该值指示用户滚动了多远。 我们还为要在屏幕上显示的每帧的最小和最大范围创建一个step变量。 将step设置为30,假设用户继续滚动,则每个图像将显示“ 30px”的滚动时间。
Our onScroll function calculate which image to use for the current scrollY position, and then set the .image-container background-image property.
我们的onScroll函数计算要用于当前scrollY位置的图像,然后设置.image-container background-image属性。

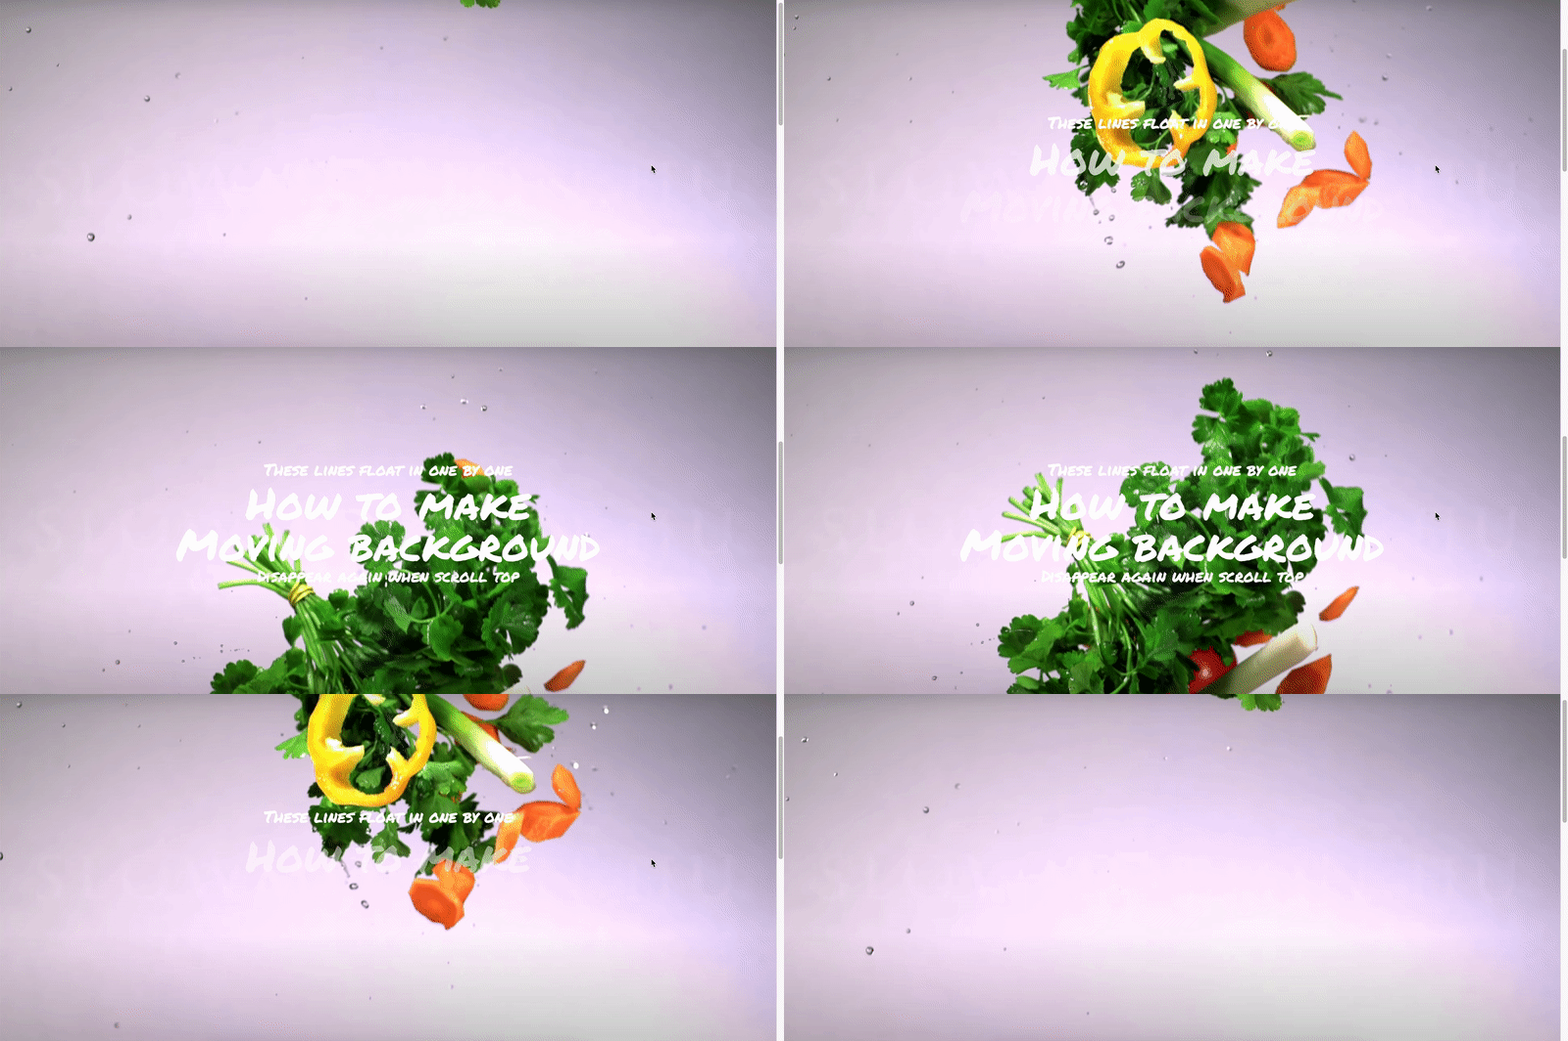
Let have a look as our result:
让我们看一下结果:

Pretty nice! Now let add the text as well.
挺棒的! 现在,还要添加文本。
Step 4: Add floating text
步骤4:添加浮动文本
In addition to the moving background, we also want some text floating on top of the image to convey our message.
除了运动的背景之外,我们还希望一些浮在图像上方的文本来传达我们的信息。
My approach for adding the text is also very simple (a.k.a. stupid). Since I have 20 “frames” for my image, I simply create another array to store the corresponding style of the text in each “frame”. (Using the same array would be better, but for tutorial purpose, I use a new array here)
我添加文本的方法也非常简单(又称愚蠢)。 由于我的图像有20个“框架”,因此我只需创建另一个数组即可在每个“框架”中存储文本的相应样式。 (使用相同的数组会更好,但是出于教学目的,我在这里使用了一个新数组)
But first thing first, let add some html and css first:
但是首先,让我们先添加一些html和CSS:
html:
HTML:
<div class='container'> <div class='image-container'></div> <div class='text-container'> <div class='subtitle' id='line1'>These lines float in one by one</div> <div class='title' id='line2'>How to make</div> <div class='title' id='line3'>Moving background</div> <div class='subtitle' id='line4'>Disappear again when scroll top</div> </div></div>css:
CSS:
.text-container { width: 100%; height: 100%; position: fixed; display: flex; flex-direction: column; justify-content: center; align-items: center; top: 0; color: white; .subtitle { opacity: 0; font-size: 30px; } .title { opacity: 0; font-size: 80px; margin: -20px 0; } }Now, let add the keyframe for the text style in an array:
现在,让我们在数组中添加文本样式的关键帧:
const textStyle = { 1: {opacity: 0, transform: '0px'}, 2: {opacity: 0, transform: '0px'}, 3: {opacity: 0, transform: '0px'}, 4: {opacity: 0, transform: '0px'}, 5: {opacity: .25, transform: '15px'}, 6: {opacity: .5, transform: '10px'}, 7: {opacity: .75, transform: '5px'}, 8: {opacity: 1, transform: '0px'}, ... 9 - 19are the same with 8 20: {opacity: 1, transform: '0px'}]Each text has 5 states:
每个文本有5种状态:
- Invisible, no transformation隐形,不变形
- 25% visible, transform down 15px可见25%,向下转换15像素
- 50% visible, transform down 10px可见50%,向下转换10像素
- 75% visible, transform down 5px可见75%,向下变换5像素
- Full visible, no transformation完全可见,无需变换
You can see for 1 to 4 frames, the text is invisible, and for 8–20 frames, the text is always visible. So our text stay there after scrolling certain amount.
您可以看到1到4帧,该文本是不可见的,而对于8–20帧,该文本始终是可见的。 因此,在滚动一定数量后,我们的文本会停留在该位置。
Let modify our trackScrollPosition function to update the text style as well:
让我们修改trackScrollPosition函数来更新文本样式:
function trackScrollPosition() { const y = window.scrollY; const label = Math.min(Math.floor(y/30) + 1, 20); const imageToUse = fruitImages[label]; // Change the background image $('.image-container').css('background-image', `url('${imageToUse}')`); // Change the text style const textStep = 2; const textStyleToUseLine1 = textStyle[label]; const textStyleToUseLine2 = textStyle[Math.min(Math.max(label - textStep, 1), 20)]; const textStyleToUseLine3 = textStyle[Math.min(Math.max(label - textStep * 2, 1),20)]; const textStyleToUseLine4 = textStyle[Math.min(Math.max(label - textStep * 3, 1),20)]; $('#line1').css({'opacity': textStyleToUseLine1.opacity, 'transform': `translateY(${textStyleToUseLine1.transform})`}); $('#line2').css({'opacity': textStyleToUseLine2.opacity, 'transform': `translateY(${textStyleToUseLine2.transform})`}); $('#line3').css({'opacity': textStyleToUseLine3.opacity, 'transform': `translateY(${textStyleToUseLine3.transform})`}); $('#line4').css({'opacity': textStyleToUseLine4.opacity, 'transform': `translateY(${textStyleToUseLine4.transform})`});}We have 4 lines of text, and we want them to display one by one. Their style is basically the same. So we simply use a textStep to add some “delay” for each line.
我们有4行文字,我们希望它们一一显示。 他们的风格基本相同。 因此,我们只需使用textStep为每行添加一些“延迟”。
This bring you back to our starting demo:
这使您回到我们的初始演示:

And that’s it! If you like you can go further and create even more “frame”, but the concept is the same.
就是这样! 如果愿意,可以走得更远,创建更多的“框架”,但是概念是相同的。
下一步 (Next step)
Obviously, the hardest thing here is getting the images you need, not the coding part. Unlike parallax, not every image work. And your result depends highly on the quality of your image.
显然,这里最难的是获取所需图像,而不是编码部分。 与视差不同,并非每个图像都能工作。 而您的结果在很大程度上取决于图像的质量。
I guess one thing to remember is the image also take time to load, in real life application, you probably want to wait for all the image to load first, or else when you scroll, the image is still loading and there will be white area below your “half-loaded” image.
我想要记住的一件事是图像也需要花费一些时间才能加载,在现实生活中,您可能要等待所有图像都首先加载,否则在滚动时图像仍会加载并且会有白色区域在“半载”图片下方。
And make no mistake, this tutorial is not meant to be the “best” solution for this problem, just my solution to it. If you have a better way to do so, feel free to leave a comment!
毫无疑问,本教程并不意味着是该问题的“最佳”解决方案,而仅仅是我的解决方案。 如果您有更好的方法,请随时发表评论!
翻译自: https://levelup.gitconnected.com/how-to-create-frame-by-frame-moving-image-on-scroll-effect-30ce577c63c2
页面滚动时触发图片逐帧播放
http://www.taodudu.cc/news/show-893985.html
相关文章:
- 1812:网格_指导设计:网格的历史
- python 投资组合_成功投资组合的提示
- 屏幕广播系统_如何设计系统,而不是屏幕
- Futura:从纳粹主义到月球-甚至更远
- 爬取淘宝定价需要多久时间_如何对设计工作进行定价—停止收取时间并专注于价值
- 昆虫繁殖_“专为昆虫而生” –好奇!
- 字母框如何影响UI内容的理解
- hashmap 从头到尾_如何从头到尾设计一个简单的复古徽标
- 极端原理_为极端而设计
- ux和ui_从UI切换到UX设计
- vsco_VSCO重新设计:更直观,更简化的界面
- css版式_第2部分:使版式具有响应能力,并为以后的版本奠定基础
- 怎么实现页面友好跳转_如何实现软,友好和一致的UI设计
- lightroom预设使用_在Lightroom中使用全景图增强照片游戏
- 用户体验改善案例_优化用户体验案例研究的五种方法
- flo file_Flo菜单简介:可扩展的拇指友好型移动导航
- 什么是设计模式_什么是设计?
- 成年人的样子是什么样子_不只是看样子
- 谷歌maps菜单语言设置_Google Maps:拯救未来之路— UX案例研究
- 视觉设计师跟平面设计_使设计具有视觉吸引力
- 设计模式 日志系统设计_模式:我们设计系统的故事
- 提升UI技能的5个步骤
- 一致性设计,而不是一致性
- 长语音识别体验_如何为语音体验写作
- 定义设计系统
- swift自行车品牌介绍_品牌101:简介
- flutter 透明度动画_Flutter中的动画填充+不透明度动画✨
- vba交付图表设计_您是在为交付目的而“设计”吗?
- window程序设计学会_是时候我们学会设计合适的饼图了
- 培训师 每小时多少钱_每个产品设计师需要了解的品牌知识
页面滚动时触发图片逐帧播放_如何在滚动效果上创建逐帧运动图像相关推荐
- php如何监听页面滚动,html5中在元素滚动条在滚动时触发的事件onscroll
实例 元素滚动时执行 JavaScript 定义和用法 onscroll 事件在元素滚动条在滚动时触发. 提示: 使用 CSS overflow 样式属性来创建元素的滚动条. 浏览器支持 语法 HTM ...
- universal image loader在listview/gridview中滚动时重复加载图片的问题及解决方法
universal image loader在listview/gridview中滚动时重复加载图片的问题及解决方法 参考文章: (1)universal image loader在listview/ ...
- 【自己的整理】页面滚动时触发动画特效 wow.js + Animate.css
在页面添加初始动画特效 在页面添加初始动画特效的时候无意接触到wow.js 这个动画库配合Animate.css可以按照模板快速创建动画效果,虽然动画效果就像ppt里面的动画效果一样... 环境设置 ...
- 页面滚动时触发动画特效 wow.js + Animate.css
在页面添加初始动画特效 在页面添加初始动画特效的时候无意接触到wow.js 这个动画库配合Animate.css可以按照模板快速创建动画效果,虽然动画效果就像ppt里面的动画效果一样... 环境设置 ...
- vue悬浮导航实现内容滚动时,导航跟随选中,点击导航滚动到相应位置,
<template><div><div class="goods_navBg" ref="navHeader">模拟悬浮导航 ...
- 如何实现上传多个图片并依次展示_微信如何一次性发送上传多张图片的方法介绍...
我们使用微信发送图片给朋友或者上传朋友圈时,会显示最多只能一次发送9张照片.有时这样会显得非常麻烦,会打乱我们上传图片的排列顺序.那么我们该如何一次性上传9张以上的图片呢?下面来看看小编带来的详细方法 ...
- python爬取视频自动播放_如何在IPython笔记本上自动播放声音?
在你笔记本的顶端from IPython.display import Audio sound_file = './sound/beep.wav' sound_file 应该指向服务器上的文件,或者可 ...
- html 下拉到一定位置,浏览器向下滚动到一定位置继续滚动时,侧边导航固定在页面顶部,再滚动到一定位置时页面再向下滚动侧边导航不再固定。这种效果怎么实现呢...
1.浏览器向下滚动到一定位置继续滚动时,侧边导航固定在页面顶部,再滚动到一定位置时页面再向下滚动侧边导航不再固定.页面向上滚动到一定位置继续滚动时,侧边导航保持在原来位置.这种效果怎么实现呢 2.. ...
- javascript鼠标双击时触发事件大全
javascript事件列表解说 事件 浏览器支持 解说 一般事件 onclick IE3.N2 鼠标点击时触发此事件 ondblclick IE4.N4 鼠标双击时触发此事件 onmousedown ...
最新文章
- priorityqueue 的 add和offer方法有区别吗_日常在家安吉白茶应该如何去保存?城市与农村存放的方法有区别吗...
- tp5 引入 没有命名空间的类库的方法(以微信支付SDK为例)
- 微信小程序——账号及开发工具
- OpenHub框架–下一个有趣的功能
- 2017.9.5 postgresql加密函数的使用
- Transformer靠什么得以闯入CV界秒杀CNN?
- ContextLoader,ContextLoaderListener解读
- python判断天数_python判断输入日期是该年的第几天
- android点赞动画仿twritter,【点赞动画仿抖音】Android 自定义view动画--酷炫点赞动画...
- iphone之使用讯飞语音sdk实现语音识别功能
- CentOS7下安装PostgresSQL9.4.4
- Android客户端和服务器端数据交互的第四种方法
- 如何使用ssh工具便于远程管理
- win7 64位系统下载
- Axure RP9授权码(亲测有效)
- DAS,NAS,SAN 三种存储技术比较
- FME cad中地块图形与图形标注信息的连接(空间关系连接)
- Cocos2d-x 3.1.1 学习日志16--A星算法(A*搜索算法)学问
- php 递归无限极分类和层级展示(适用于权限管理和分类管理功能)
- 首批小程序出炉,小游戏?
热门文章
- 如何通过windows控制linux,如何从Windows远程控制Linux | MOS86
- activity 生命周期_如何理解安卓activity的生命周期(on-create篇)?
- 记录一下Junit测试MongoDB,获取MongoTemplate
- 异常:没有找到本地方法库,java.lang.UnsatisfiedLinkError: no trsbean in java.library.path
- CocoaPods安装和使用及问题:Setting up CocoaPods master repo
- Android SlidingMenu插件的使用
- .net生成文字图片
- java任务poer_java-Powermock-模拟超级方法调用
- c语言 指针 pdf,深入理解c指针 PDF扫描版[33MB]
- 2019年3月未来教育计算机二级题库,2019年3月计算机二Access考试操作模拟试题001...
