Datawhale组队学习-NLP新闻文本分类-TASK06
Task6 基于深度学习的文本分类3
基于深度学习的文本分类
学习目标
- 了解Transformer的原理和基于预训练语言模型(Bert)的词表示
- 学会Bert的使用,具体包括pretrain和finetune
文本表示方法Part4
Transformer原理
Transformer是在"Attention is All You Need"中提出的,模型的编码部分是一组编码器的堆叠(论文中依次堆叠六个编码器),模型的解码部分是由相同数量的解码器的堆叠。
![]()
我们重点关注编码部分。他们结构完全相同,但是并不共享参数,每一个编码器都可以拆解成两部分。在对输入序列做词的向量化之后,它们首先流过一个self-attention层,该层帮助编码器在它编码单词的时候能够看到输入序列中的其他单词。self-attention的输出流向一个前向网络(Feed Forward Neural Network),每个输入位置对应的前向网络是独立互不干扰的。最后将输出传入下一个编码器。
![]()
这里能看到Transformer的一个关键特性,每个位置的词仅仅流过它自己的编码器路径。在self-attention层中,这些路径两两之间是相互依赖的。前向网络层则没有这些依赖性,但这些路径在流经前向网络时可以并行执行。
Self-Attention中使用多头机制,使得不同的attention heads所关注的的部分不同。
![]()
编码"it"时,一个attention head集中于"the animal",另一个head集中于“tired”,某种意义上讲,模型对“it”的表达合成了的“animal”和“tired”两者。
对于自注意力的详细计算,欢迎大家参考Jay Alammar关于Transformer的博客,这里不再展开。
除此之外,为了使模型保持单词的语序,模型中添加了位置编码向量。如下图所示,每行对应一个向量的位置编码。因此,第一行将是我们要添加到输入序列中第一个单词的嵌入的向量。每行包含512个值—每个值都在1到-1之间。因为左侧是用sine函数生成,右侧是用cosine生成,所以可以观察到中间显著的分隔。
![]()
编码器结构中值得提出注意的一个细节是,在每个子层中(Self-attention, FFNN),都有残差连接,并且紧跟着layer-normalization。如果我们可视化向量和LayerNorm操作,将如下所示:
![]()
基于预训练语言模型的词表示
基于预训练语言模型的词表示由于可以建模上下文信息,进而解决传统静态词向量不能建模“一词多义”语言现象的问题。最早提出的ELMo基于两个单向LSTM,将从左到右和从右到左两个方向的隐藏层向量表示拼接学习上下文词嵌入。而GPT用Transformer代替LSTM作为编码器,首先进行了语言模型预训练,然后在下游任务微调模型参数。但GPT由于仅使用了单向语言模型,因此难以建模上下文信息。为了解决以上问题,研究者们提出了BERT,BERT模型结构如下图所示,它是一个基于Transformer的多层Encoder,通过执行一系列预训练,进而得到深层的上下文表示。
![]()
ELMo论文题目中Deep是指双向双层LSTM,而更关键的在于context。传统方法生成的单词映射表的形式,即先为每个单词生成一个静态的词向量,之后这个单词的表示就被固定住了,不会跟着上下文的变化而做出改变。事实上,由于一词多义的语言现象,静态词向量是有很大的弊端的。以bank为例,如果训练语料的足够大,事先学好的词向量中混杂着所有的语义。而当下游应用时,即使在新句子中,bank的上下文里包含money等词,我们基本可以确定bank是“银行”的语义而不是在其他上下文中的“河床”的语义,但是由于静态词向量不能跟随上下文而进行变化,所以bank的表示中还是混杂着多种语义。为了解决这一问题,ELMo首先进行了语言模型预训练,然后在下游任务中动态调整Word Embedding,因此最后输出的词表示能够充分表达单词在上下文中的特定语义,进而解决一词多义的问题。
GPT来自于openai,是一种生成式预训练模型。GPT 除了将ELMo中的LSTM替换为Transformer 的Encoder外,更开创了NLP界基于预训练-微调的新范式。尽管GPT采用的也是和ELMo相同的两阶段模式,但GPT在第一个阶段并没有采取ELMo中使用两个单向双层LSTM拼接的结构,而是采用基于自回归式的单向语言模型。
Google在NAACL 2018发表的论文中提出了BERT,与GPT相同,BERT也采用了预训练-微调这一两阶段模式。但在模型结构方面,BERT采用了ELMO的范式,即使用双向语言模型代替GPT中的单向语言模型,但是BERT的作者认为ELMo使用两个单向语言模型拼接的方式太粗暴,因此在第一阶段的预训练过程中,BERT提出掩码语言模型,即类似完形填空的方式,通过上下文来预测单词本身,而不是从右到左或从左到右建模,这允许模型能够自由地编码每个层中来自两个方向的信息。而为了学习句子的词序关系,BERT将Transformer中的三角函数位置表示替换为可学习的参数,其次为了区别单句和双句输入,BERT还引入了句子类型表征。BERT的输入如图所示。此外,为了充分学习句子间的关系,BERT提出了下一个句子预测任务。具体来说,在训练时,句子对中的第二个句子有50%来自与原有的连续句子,而其余50%的句子则是通过在其他句子中随机采样。同时,消融实验也证明,这一预训练任务对句间关系判断任务具有很大的贡献。除了模型结构不同之外,BERT在预训练时使用的无标签数据规模要比GPT大的多。
![]()
在第二阶段,与GPT相同,BERT也使用Fine-Tuning模式来微调下游任务。如下图所示,BERT与GPT不同,它极大的减少了改造下游任务的要求,只需在BERT模型的基础上,通过额外添加Linear分类器,就可以完成下游任务。具体来说,对于句间关系判断任务,与GPT类似,只需在句子之间加个分隔符,然后在两端分别加上起始和终止符号。在进行输出时,只需把句子的起始符号[CLS]在BERT最后一层中对应的位置接一个Softmax+Linear分类层即可;对于单句分类问题,也与GPT类似,只需要在句子两段分别增加起始和终止符号,输出部分和句间关系判断任务保持一致即可;对于问答任务,由于需要输出答案在给定段落的起始和终止位置,因此需要先将问题和段落按照句间关系判断任务构造输入,输出只需要在BERT最后一层中第二个句子,即段落的每个单词对应的位置上分别接判断起始和终止位置的分类器;最后,对于NLP中的序列标注问题,输入与单句分类任务一致,不同的是在BERT最后一层中每个单词对应的位置上接分类器即可。
![]()
更重要的是,BERT开启了NLP领域“预训练-微调”这种两阶段的全新范式。在第一阶段首先在海量无标注文本上预训练一个双向语言模型,这里特别值得注意的是,将Transformer作为特征提取器在解决并行性和长距离依赖问题上都要领先于传统的RNN或者CNN,通过预训练的方式,可以将训练数据中的词法、句法、语法知识以网络参数的形式提炼到模型当中,在第二阶段使用下游任务的数据Fine-tuning不同层数的BERT模型参数,或者把BERT当作特征提取器生成BERT Embedding,作为新特征引入下游任务。这种两阶段的全新范式尽管是来自于计算机视觉领域,但是在自然语言处理领域一直没有得到很好的运用,而BERT作为近些年NLP突破性进展的集大成者,最大的亮点可以说不仅在于模型性能好,并且几乎所有NLP任务都可以很方便地基于BERT进行改造,进而将预训练学到的语言学知识引入下游任务,进一步提升模型的性能。
基于Bert的文本分类
Bert Pretrain
预训练过程使用了Google基于Tensorflow发布的BERT源代码。首先从原始文本中创建训练数据,由于本次比赛的数据都是ID,这里重新建立了词表,并且建立了基于空格的分词器。
class WhitespaceTokenizer(object):"""WhitespaceTokenizer with vocab."""def __init__(self, vocab_file):self.vocab = load_vocab(vocab_file)self.inv_vocab = {v: k for k, v in self.vocab.items()}def tokenize(self, text):split_tokens = whitespace_tokenize(text)output_tokens = []for token in split_tokens:if token in self.vocab:output_tokens.append(token)else:output_tokens.append("[UNK]")return output_tokensdef convert_tokens_to_ids(self, tokens):return convert_by_vocab(self.vocab, tokens)def convert_ids_to_tokens(self, ids):return convert_by_vocab(self.inv_vocab, ids)
预训练由于去除了NSP预训练任务,因此将文档处理多个最大长度为256的段,如果最后一个段的长度小于256/2则丢弃。每一个段执行按照BERT原文中执行掩码语言模型,然后处理成tfrecord格式。
def create_segments_from_document(document, max_segment_length):"""Split single document to segments according to max_segment_length."""assert len(document) == 1document = document[0]document_len = len(document)index = list(range(0, document_len, max_segment_length))other_len = document_len % max_segment_lengthif other_len > max_segment_length / 2:index.append(document_len)segments = []for i in range(len(index) - 1):segment = document[index[i]: index[i+1]]segments.append(segment)return segments
在预训练过程中,也只执行掩码语言模型任务,因此不再计算下一句预测任务的loss。
(masked_lm_loss, masked_lm_example_loss, masked_lm_log_probs) = get_masked_lm_output(bert_config, model.get_sequence_output(), model.get_embedding_table(),masked_lm_positions, masked_lm_ids, masked_lm_weights)total_loss = masked_lm_loss
为了适配句子的长度,以及减小模型的训练时间,我们采取了BERT-mini模型,详细配置如下。
{"hidden_size": 256,"hidden_act": "gelu","initializer_range": 0.02,"vocab_size": 5981,"hidden_dropout_prob": 0.1,"num_attention_heads": 4,"type_vocab_size": 2,"max_position_embeddings": 256,"num_hidden_layers": 4,"intermediate_size": 1024,"attention_probs_dropout_prob": 0.1
}
由于我们的整体框架使用Pytorch,因此需要将最后一个检查点转换成Pytorch的权重。
def convert_tf_checkpoint_to_pytorch(tf_checkpoint_path, bert_config_file, pytorch_dump_path):# Initialise PyTorch modelconfig = BertConfig.from_json_file(bert_config_file)print("Building PyTorch model from configuration: {}".format(str(config)))model = BertForPreTraining(config)# Load weights from tf checkpointload_tf_weights_in_bert(model, config, tf_checkpoint_path)# Save pytorch-modelprint("Save PyTorch model to {}".format(pytorch_dump_path))torch.save(model.state_dict(), pytorch_dump_path)
预训练消耗的资源较大,硬件条件不允许的情况下建议直接下载开源的模型
Bert Finetune
![]()
微调将最后一层的第一个token即[CLS]的隐藏向量作为句子的表示,然后输入到softmax层进行分类。
sequence_output, pooled_output = \self.bert(input_ids=input_ids, token_type_ids=token_type_ids)if self.pooled:reps = pooled_output
else:reps = sequence_output[:, 0, :]  # sen_num x 256if self.training:reps = self.dropout(reps)
本章小结
本章介绍了Bert的原理和使用,具体包括pretrain和finetune两部分。
本章作业
- 完成Bert Pretrain和Finetune的过程
- 阅读Bert官方文档,找到相关参数进行调参
简化版bert的学习
A Visual Notebook to Using BERT for the First TIme.ipynb
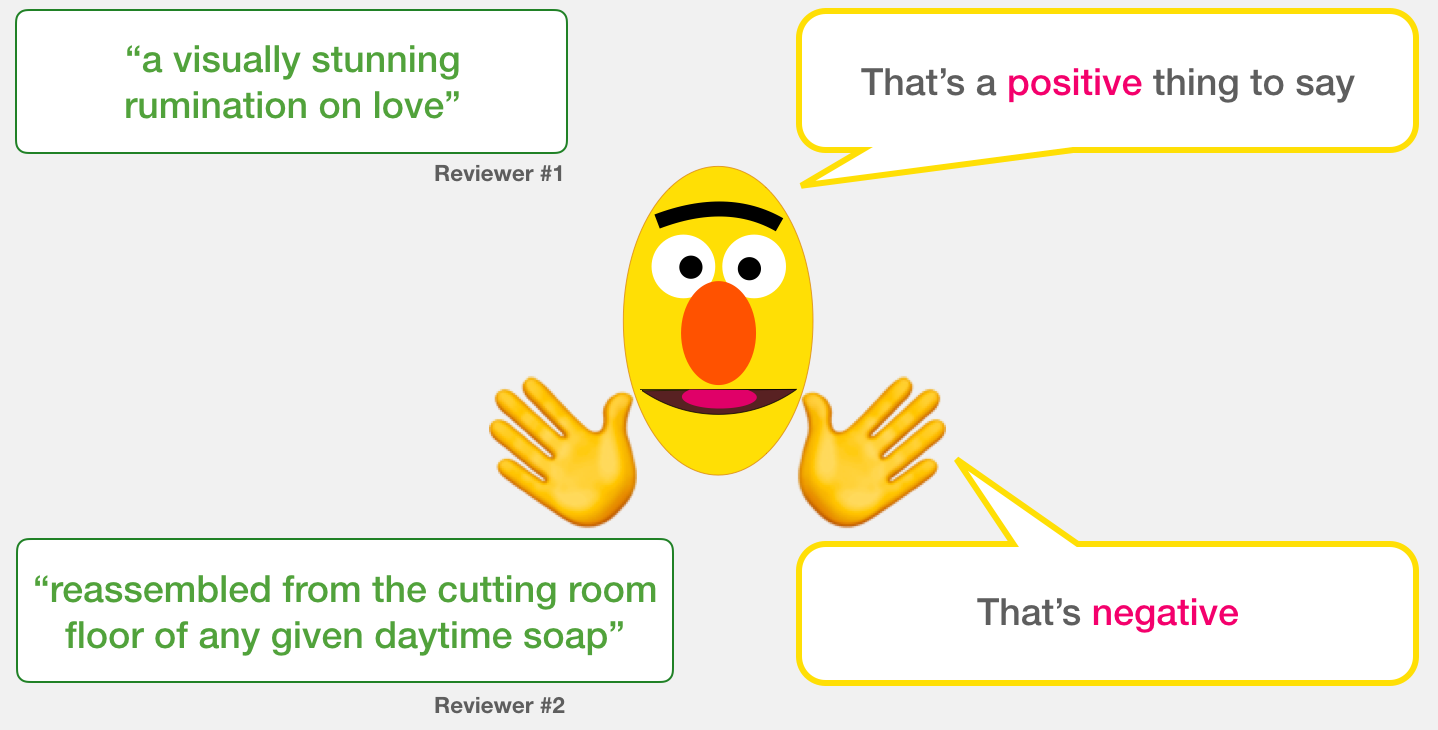
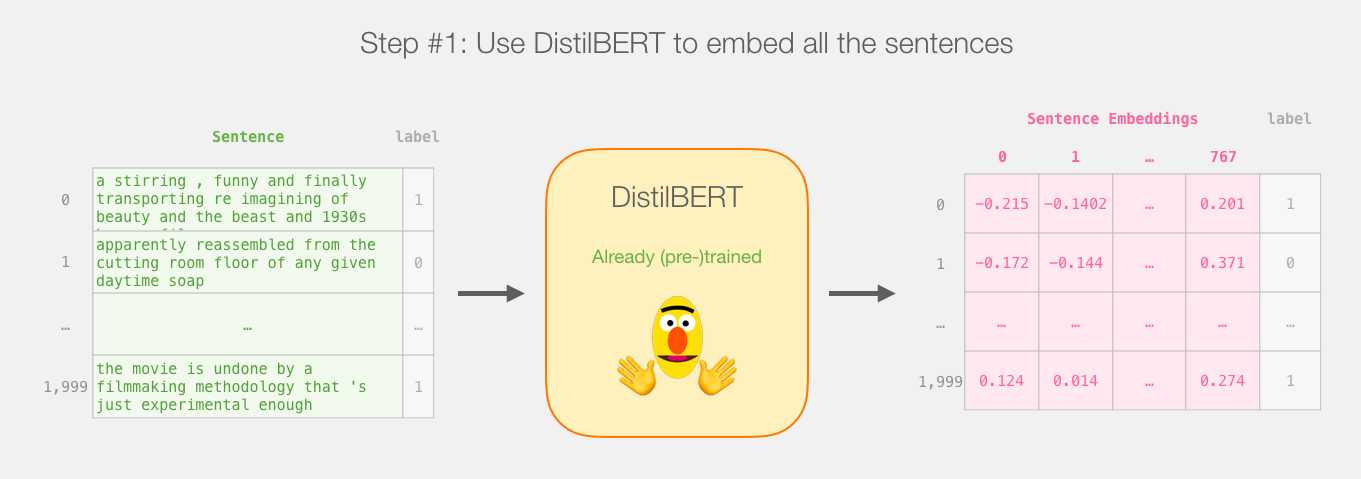
In this notebook, we will use pre-trained deep learning model to process some text. We will then use the output of that model to classify the text. The text is a list of sentences from film reviews. And we will calssify each sentence as either speaking “positively” about its subject of “negatively”.
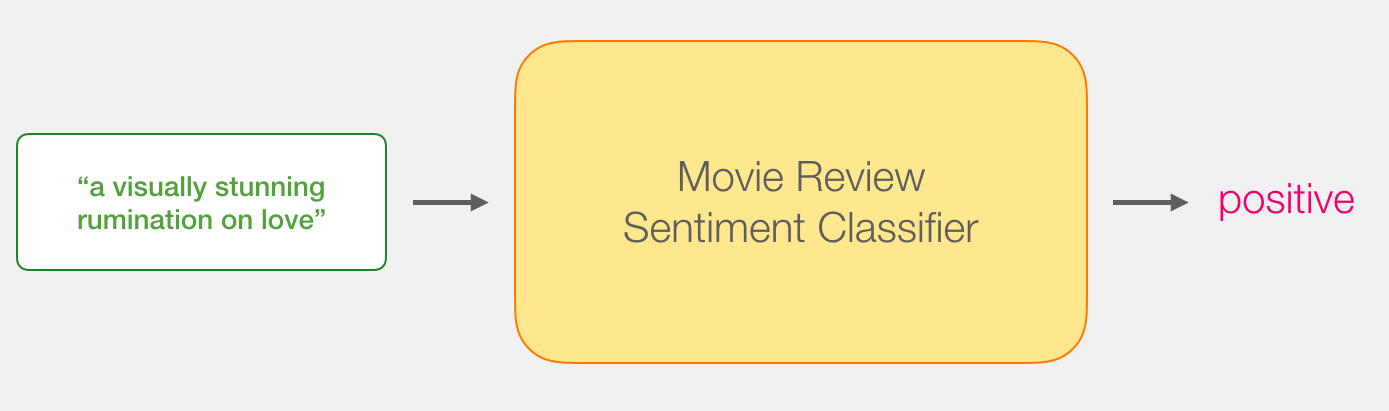
Models: Sentence Sentiment Classification
Our goal is to create a model that takes a sentence (just like the ones in our dataset) and produces either 1 (indicating the sentence carries a positive sentiment) or a 0 (indicating the sentence carries a negative sentiment). We can think of it as looking like this:
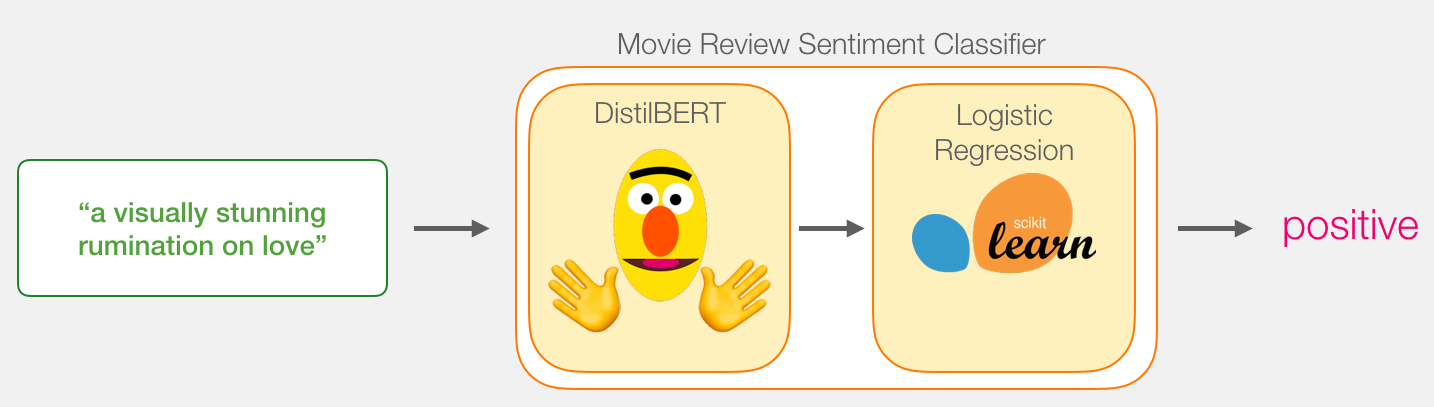
Under the hood, the model is actually made up of two model.
- DistilBERT processes the sentence and passes along some information it extracted from it on to the next model. DistilBERT is a smaller version of BERT developed and open sourced by the team at HuggingFace. It’s a lighter and faster version of BERT that roughly matches its performance.
- The next model, a basic Logistic Regression model from scikit learn will take in the result of DistilBERT’s processing, and classify the sentence as either positive or negative (1 or 0, respectively).
The data we pass between the two models is a vector of size 768. We can think of this of vector as an embedding for the sentence that we can use for classification.
Dataset
The dataset we will use in this example is SST2, which contains sentences from movie reviews, each labeled as either positive (has the value 1) or negative (has the value 0):
| sentence | label |
|---|---|
| a stirring , funny and finally transporting re imagining of beauty and the beast and 1930s horror films | 1 |
| apparently reassembled from the cutting room floor of any given daytime soap | 0 |
| they presume their audience won't sit still for a sociology lesson | 0 |
| this is a visually stunning rumination on love , memory , history and the war between art and commerce | 1 |
| jonathan parker 's bartleby should have been the be all end all of the modern office anomie films | 1 |
Installing the transformers library
Let’s start by installing the huggingface transformers library so we can load our deep learning NLP model.
import numpy as np
import pandas as pd
from sklearn.model_selection import train_test_split
from sklearn.linear_model import LogisticRegression
from sklearn.model_selection import GridSearchCV
from sklearn.model_selection import cross_val_score
import torch
import transformers as ppb
import warnings
warnings.filterwarnings('ignore')
Importing the dataset
We’ll use pandas to read the dataset and load it into a dataframe.
df = pd.read_csv('train.tsv', delimiter='\t', header=None)
For performance reasons, we’ll only use 2,000 sentences from the dataset
batch_1 = df[:2000]
We can ask pandas how many sentences are labeled as “positive” (value 1) and how many are labeled “negative” (having the value 0)
batch_1[1].value_counts()
batch_1.head()
Loading the Pre-trained BERT model
Let’s now load a pre-trained BERT model.
model_class, tokenizer_class, pretrained_weights = (ppb.DistilBertModel, ppb.DistilBertTokenizer, 'distilbert-base-uncased')model_class
# For DistilBERT:
model_class, tokenizer_class, pretrained_weights = (ppb.DistilBertModel, ppb.DistilBertTokenizer, 'distilbert-base-uncased')## Want BERT instead of distilBERT? Uncomment the following line:
#model_class, tokenizer_class, pretrained_weights = (ppb.BertModel, ppb.BertTokenizer, 'bert-base-uncased')# Load pretrained model/tokenizer
tokenizer = tokenizer_class.from_pretrained(pretrained_weights)
model = model_class.from_pretrained(pretrained_weights)
Right now, the variable model holds a pretrained distilBERT model – a version of BERT that is smaller, but much faster and requiring a lot less memory.
Model #1: Preparing the Dataset
Before we can hand our sentences to BERT, we need to so some minimal processing to put them in the format it requires.
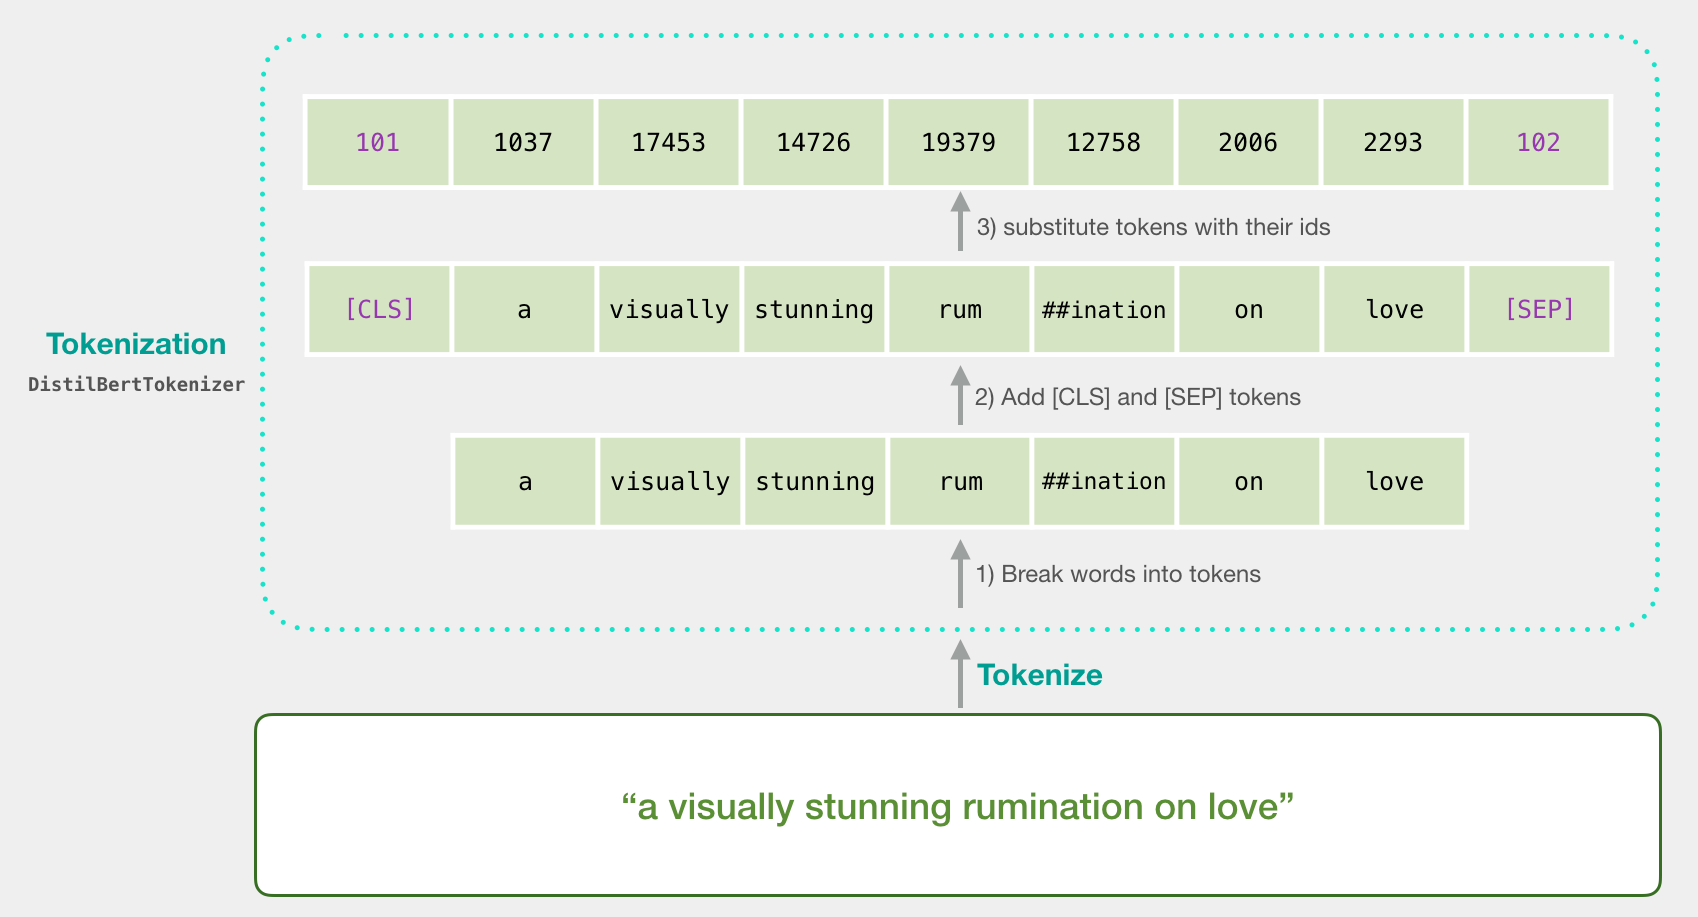
Tokenization
Our first step is to tokenize the sentences – break them up into word and subwords in the format BERT is comfortable with.
tokenized = batch_1[0].apply((lambda x: tokenizer.encode(x, add_special_tokens=True)))
tokenized.values
Padding
After tokenization, tokenized is a list of sentences – each sentences is represented as a list of tokens. We want BERT to process our examples all at once (as one batch). It’s just faster that way. For that reason, we need to pad all lists to the same size, so we can represent the input as one 2-d array, rather than a list of lists (of different lengths).
max_len = 0
for i in tokenized.values:if len(i) > max_len:max_len = len(i)padded = np.array([i + [0]*(max_len-len(i)) for i in tokenized.values])np.array(padded).shape
Masking
If we directly send padded to BERT, that would slightly confuse it. We need to create another variable to tell it to ignore (mask) the padding we’ve added when it’s processing its input. That’s what attention_mask is:
attention_mask = np.where(padded != 0, 1, 0)
attention_mask.shape
Model #1: And Now, Deep Learning!
Now that we have our model and inputs ready, let’s run our model!
The model() function runs our sentences through BERT. The results of the processing will be returned into last_hidden_states.
input_ids = torch.tensor(padded)
attention_mask = torch.tensor(attention_mask)with torch.no_grad():last_hidden_states = model(input_ids, attention_mask=attention_mask)
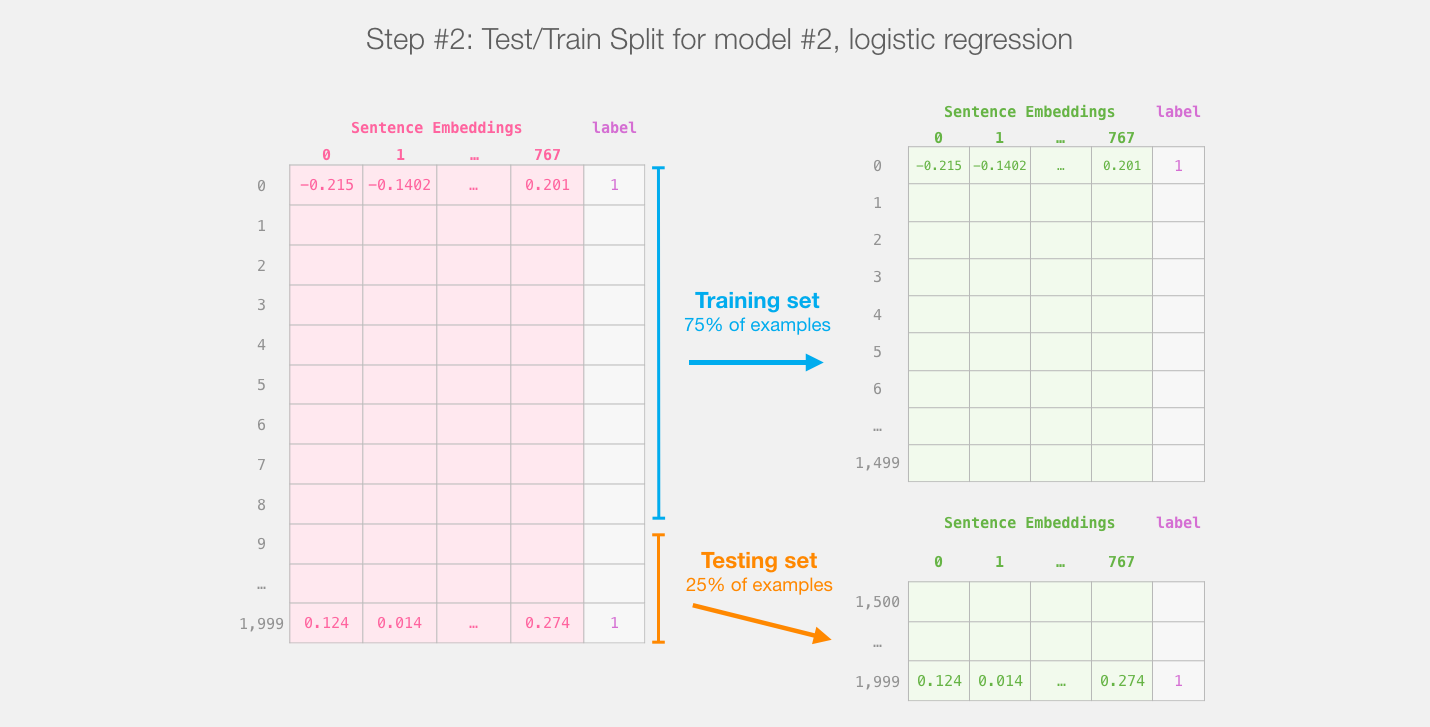
Model #2: Train/Test Split
Let’s now split our datset into a training set and testing set (even though we’re using 2,000 sentences from the SST2 training set).
train_features, test_features, train_labels, test_labels = train_test_split(features, labels)
[Bonus] Grid Search for Parameters
We can dive into Logistic regression directly with the Scikit Learn default parameters, but sometimes it’s worth searching for the best value of the C parameter, which determines regularization strength.
# parameters = {'C': np.linspace(0.0001, 100, 20)}
# grid_search = GridSearchCV(LogisticRegression(), parameters)
# grid_search.fit(train_features, train_labels)# print('best parameters: ', grid_search.best_params_)
# print('best scrores: ', grid_search.best_score_)
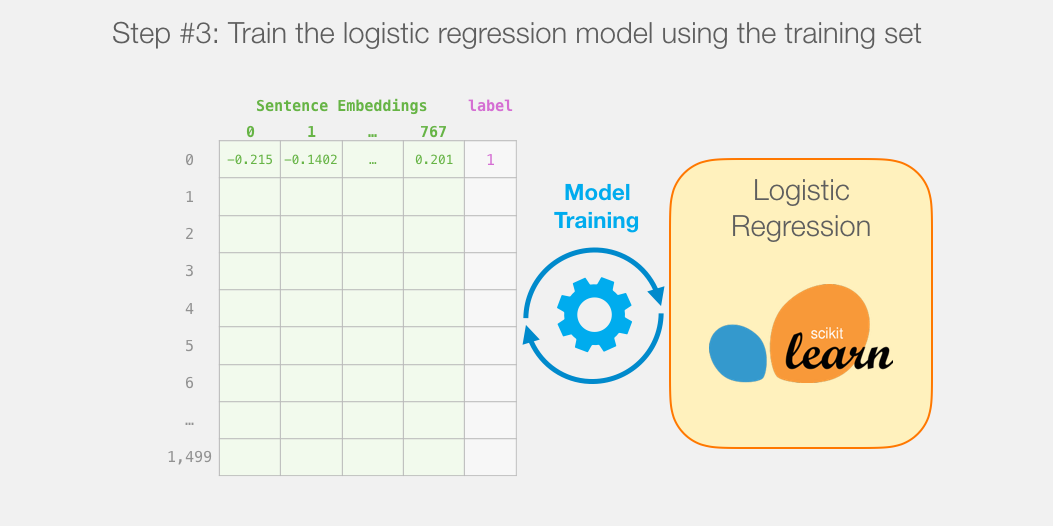
We now train the LogisticRegression model. If you’ve chosen to do the gridsearch, you can plug the value of C into the model declaration (e.g. LogisticRegression(C=5.2)).
lr_clf = LogisticRegression()
lr_clf.fit(train_features, train_labels)
Evaluating Model #2
So how well does our model do in classifying sentences? One way is to check the accuracy against the testing dataset:
lr_clf.score(test_features, test_labels)
How good is this score? What can we compare it against? Let’s first look at a dummy classifier:
from sklearn.dummy import DummyClassifier
clf = DummyClassifier()scores = cross_val_score(clf, train_features, train_labels)
print("Dummy classifier score: %0.3f (+/- %0.2f)" % (scores.mean(), scores.std() * 2))
So our model clearly does better than a dummy classifier. But how does it compare against the best models?
Proper SST2 scores
For reference, the highest accuracy score for this dataset is currently 96.8. DistilBERT can be trained to improve its score on this task – a process called fine-tuning which updates BERT’s weights to make it achieve a better performance in this sentence classification task (which we can call the downstream task). The fine-tuned DistilBERT turns out to achieve an accuracy score of 90.7. The full size BERT model achieves 94.9.
And that’s it! That’s a good first contact with BERT. The next step would be to head over to the documentation and try your hand at fine-tuning. You can also go back and switch from distilBERT to BERT and see how that works.
Datawhale组队学习-NLP新闻文本分类-TASK06相关推荐
- Datawhale组队学习-NLP新闻文本分类-TASK05
Task5 基于深度学习的文本分类2 在上一章节,我们通过FastText快速实现了基于深度学习的文本分类模型,但是这个模型并不是最优的.在本章我们将继续深入. 基于深度学习的文本分类 本章将继续学习 ...
- Datawhale组队学习NLP之transformer Task 01
Datawhale组队学习NLP之transformer Task 01 Transformers在NLP中的兴起 一.自然语言处理(Natural Language Processing, NLP) ...
- Task01——零基础入门NLP - 新闻文本分类之赛题理解
本篇目标 首先本篇文章会对赛题进行介绍以及个人对赛题的理解,带大家接触NLP的预处理.模型构建和模型训练等知识点. 赛题介绍 赛题名称:零基础入门NLP - 新闻文本分类 赛题任务:赛题以自然语言处理 ...
- Datawhale组队学习NLP之transformer Task03 BERT
Datawhale组队学习NLP之transformer Task03 BERT 前言 一.句子分类 二.模型架构 1.模型输入 2.模型输出 三.词嵌入(扩展) 1.词嵌入 2.语境问题 三.BER ...
- 【初学者入门】零基础入门NLP - 新闻文本分类
序言 从今天开始入门学习NLP,虽然有点晚,但是我觉得任何时候都值得开始,尤其是面对你去感兴趣的事情.今天的任务是 [零基础入门NLP - 新闻文本分类],这是天池大赛中的入门级算法比赛,入口链接请自 ...
- 零基础入门NLP - 新闻文本分类
本文是对阿里云新人竞赛中的"零基础入门NLP - 新闻文本分类"解体过程进行的记录,目前仅使用了textCNN模型进行预测,后续还会考虑使用LSTM进行对比. 赛题数据 赛题以新闻 ...
- 零基础入门NLP - 新闻文本分类,正式赛第一名方案分享
零基础入门NLP - 新闻文本分类,正式赛第一名方案分享:https://mp.weixin.qq.com/s/7WpZUqdlItBToLYuRLm44g
- 天池零基础入门NLP - 新闻文本分类Top1方案的bert4torch复现
天池有些长期比赛可以练习玩玩(还可以继续提交),于是试了下简单的新闻文本分类任务,Top1的解决方案思路是"预训练+fgm+交叉验证模型融合",代码是基于bert4keras的,本 ...
- 【nlp】天池学习赛-新闻文本分类-深度学习1
目录 1.FastText 1.1.FastText网络结构 1.2.基于fastText的文本分类 2.word2vec训练词向量及使用 2.1.用jieba对语料进行分词处理 2.2.用LineS ...
最新文章
- 张高兴的 Windows 10 IoT 开发笔记:FM 电台模块 KT0803L
- django html文本编辑器,django xadmin 集成DjangoUeditor富文本编辑器
- PyTorch项目使用TensorboardX进行训练可视化
- react 哲学_细聊Concent amp; Recoil , 探索react数据流的新开发模式
- vb还是python强大-VB强大还是python强大
- 物联网与互联网物联网与互联网物联网与互联网物联网与互联网物联网与互联网物联网与互联网物联网与互联网物联网与互联网物联网与互联网物联网与互联网物联网与互联网物联网与互联网物联网与互联网物联网与互联网物联
- 初次Blender建模遇到的问题与解决方法
- php strpos ctf,CTF php代码审计 strpos()函数漏洞 XXE漏洞xinclude()
- LSTM - 长短期记忆网络
- LeetCode | 347. Top K Frequent Elements
- Tensorflow Dataset API 入门
- 几时几分几秒怎么写_几分几秒怎么写
- 【Go语言学习】安装与配置
- 本地项目的一个git仓库损坏如何恢复
- markdown插入图片的几个办法
- 一步一步在 Windows 10 用 visual studio 2019 编译 zmqpp 4.2.0 版
- A Simple but Effective Pluggable Entity Lookup Table for Pre-trained Language Models翻译
- 【031】基于51单片机的超声波倒车雷达系统(带温度显示补偿)Proteus仿真设计
- 一种在C语言中用 System V ucontext 实现的协程切换
- Camera Daemon