fastlane 项目管理_在fastlane上获取您的android项目
fastlane 项目管理
As the title implies, this piece is about automating your Android development workflow with fastlane.
顾名思义,这是关于使用fastlane自动化您的Android开发工作流程。
You may be thinking, “But, uh, automation is something generic and applies to almost anything you can think of, especially in building software. So can you be a bit more accurate?”
您可能会想,“但是,自动化是通用的,几乎适用于您能想到的任何事物,尤其是在构建软件时。 那么您能更准确一点吗?”
Well, what I’m actually referring to are the following:
好吧,我实际上指的是以下内容:
- Use build variants to indicate whether your app is running on test or production endpoints使用构建变体指示您的应用程序是在测试端点还是在生产端点上运行
- Assign a signing configuration for each variant为每个变体分配签名配置
- Automate versioning with a versioning scheme and tools使用版本控制方案和工具自动执行版本控制
- Use fastlane to run tests; build and distribute our app via Firebase App Distribution使用fastlane运行测试; 通过Firebase App Distribution构建和分发我们的应用程序
Unfortunately, the last part will only be available for Mac OS and Unix users only due to the fact that fastlane doesn’t officially support Windows OS yet.
不幸的是,由于fastlane尚未正式支持Windows OS,所以最后一部分仅对Mac OS和Unix用户可用。
构建变体 (Build Variants)
Build variants are a powerful feature of Android that allows us to have different configurations for our builds. Build variants are composed of build types in combination with flavors. I suggest reading more on build variants, if you haven’t already.
Build变体是Android的强大功能,可让我们为自己的构建使用不同的配置。 构建变体由结合风味的构建类型组成。 我建议您有关构建变体的信息 ,如果您还没有的话。
My experience with Android has shown me that for a streamlined development environment, you need at least four build variants, unless otherwise specified by the business — e.g., premium and free application versions. The build variants we’re going for are the following:
我在Android上的经验表明,对于精简的开发环境,除非业务另有规定,否则您至少需要四个构建变体,例如,高级版本和免费应用程序版本。 我们要使用的构建变体如下:
developmentDebug: For our day to day developmentdevelopmentDebug:用于我们的日常开发productionDebug: For extreme (or not so extreme) cases where we need to check on a bug with production dataproductionDebug:对于极端(或不太极端)的情况,我们需要使用生产数据检查错误developmentRelease: This variant will be distributed to our QA team through Firebase Crashlytics. It’ll be a replica of our Play Store version — apart from the fact it’ll be using our test servers.developmentRelease:此变体将通过Firebase Crashlytics分发给我们的质量检查小组。 它将是我们的Play商店版本的副本-除了它将使用我们的测试服务器之外。productionRelease: Play Store versionproductionRelease:Play商店版本
Additionally, each build variant will have its own unique applicationId, meaning you’ll be able to have all four build variants installed on your device at the same time as different applications. To identify which is which, I’ll show you how to change their names, which can also be applied to having different launcher icons as well.
此外,每个构建变体将具有其自己唯一的applicationId ,这意味着您将能够同时将所有四个构建变体与不同的应用程序安装在设备上。 为了确定是哪个,我将向您展示如何更改其名称,也可以将其更改为具有不同的启动器图标。
构建类型 (Build types)
When we create a new Android project, we get two build types by default, debug and release. If you check your app module’s build.grade, the debug is omitted.
当我们创建一个新的Android项目时,默认情况下会获得两种构建类型,即debug 然后release 。 如果检查应用程序模块的build.grade ,则将省略调试。
buildTypes {release {minifyEnabled falseproguardFiles getDefaultProguardFile('proguard-android-optimize.txt'), 'proguard-rules.pro'}}But if you check the build variants that can be found under View > Tool Windows and select the Active Build Variant drop-down, you’ll see two variants. Android provides the debug build type by default.
但是,如果您检查可以在“视图”>“工具窗口”下找到的构建变体,然后选择“活动构建变体”下拉菜单,则会看到两个变体。 Android默认提供debug构建类型。

I like being verbose, so for starters, we’ll explicitly define the debug build type in our Gradle file. Your files should look like the following:
我喜欢冗长,因此对于初学者来说,我们将在Gradle文件中显式定义debug构建类型。 您的文件应如下所示:
buildTypes {debug {applicationIdSuffix ".debug"debuggable true}release {minifyEnabled falseproguardFiles getDefaultProguardFile('proguard-android-optimize.txt'), 'proguard-rules.pro'}}At line 4, we have also provided an applicationIdSuffix. So our debug build will be suffixed with .debug, meaning if our app ID is, for example, com.example.myapp, the debug build will be com.example.myapp.debug.
在第4行,我们还提供了applicationIdSuffix 。 因此,我们的debug版本将以.debug为后缀,这意味着如果我们的应用程序ID为com.example.myapp ,则调试版本将为com.example.myapp.debug 。
建立风味 (Build flavors)
Build flavors are (optional) siblings to build types. We’ll use two flavors reflecting our servers: development and production. So head back to your app’s build Gradle, and add the following before the buildTypes block (order is important here) we added earlier.
构建风格是(可选)构建类型的同级。 我们将使用两种反映我们服务器的方式: development和production 。 因此,请回到您应用的build Gradle,并在我们之前添加的buildTypes块(此处的顺序很重要)之前添加以下内容。
flavorDimensions "server"productFlavors {development {dimension "server"applicationIdSuffix ".development"versionNameSuffix "-development"}production {dimension "server"}}At line 1, we define a new dimension, server, and this is used as the dimension of our development and production flavors. We also define applicationIdSuffix for the flavors.
在第1行,我们定义了一个新维度server ,它被用作我们development和production版本的维度。 我们还为口味定义了applicationIdSuffix 。
Next, Perform a Gradle sync, and check the build variants again. You should be looking at something like this:
接下来,执行Gradle同步,然后再次检查构建版本。 您应该看这样的东西:

应用名称 (App name)
Now that we got our build variants set, it’d be convenient if we got a slightly different name for each variant. So go ahead and add three new string-resource files (right click > New > Android Resource File), one for each additional variant. We’ll use the main source set for our productionRelease variant. You select the variant from the Source set drop-down in the presented dialog, as below:
现在我们已经设置了构建变体,如果每个变体的名称略有不同,这将很方便。 因此,继续添加三个新的字符串资源文件(右键单击>新建> Android资源文件),每个其他变体文件一个。 我们将对productionRelease变体使用主要源集。 在显示的对话框中,从“源集”下拉列表中选择变体,如下所示:
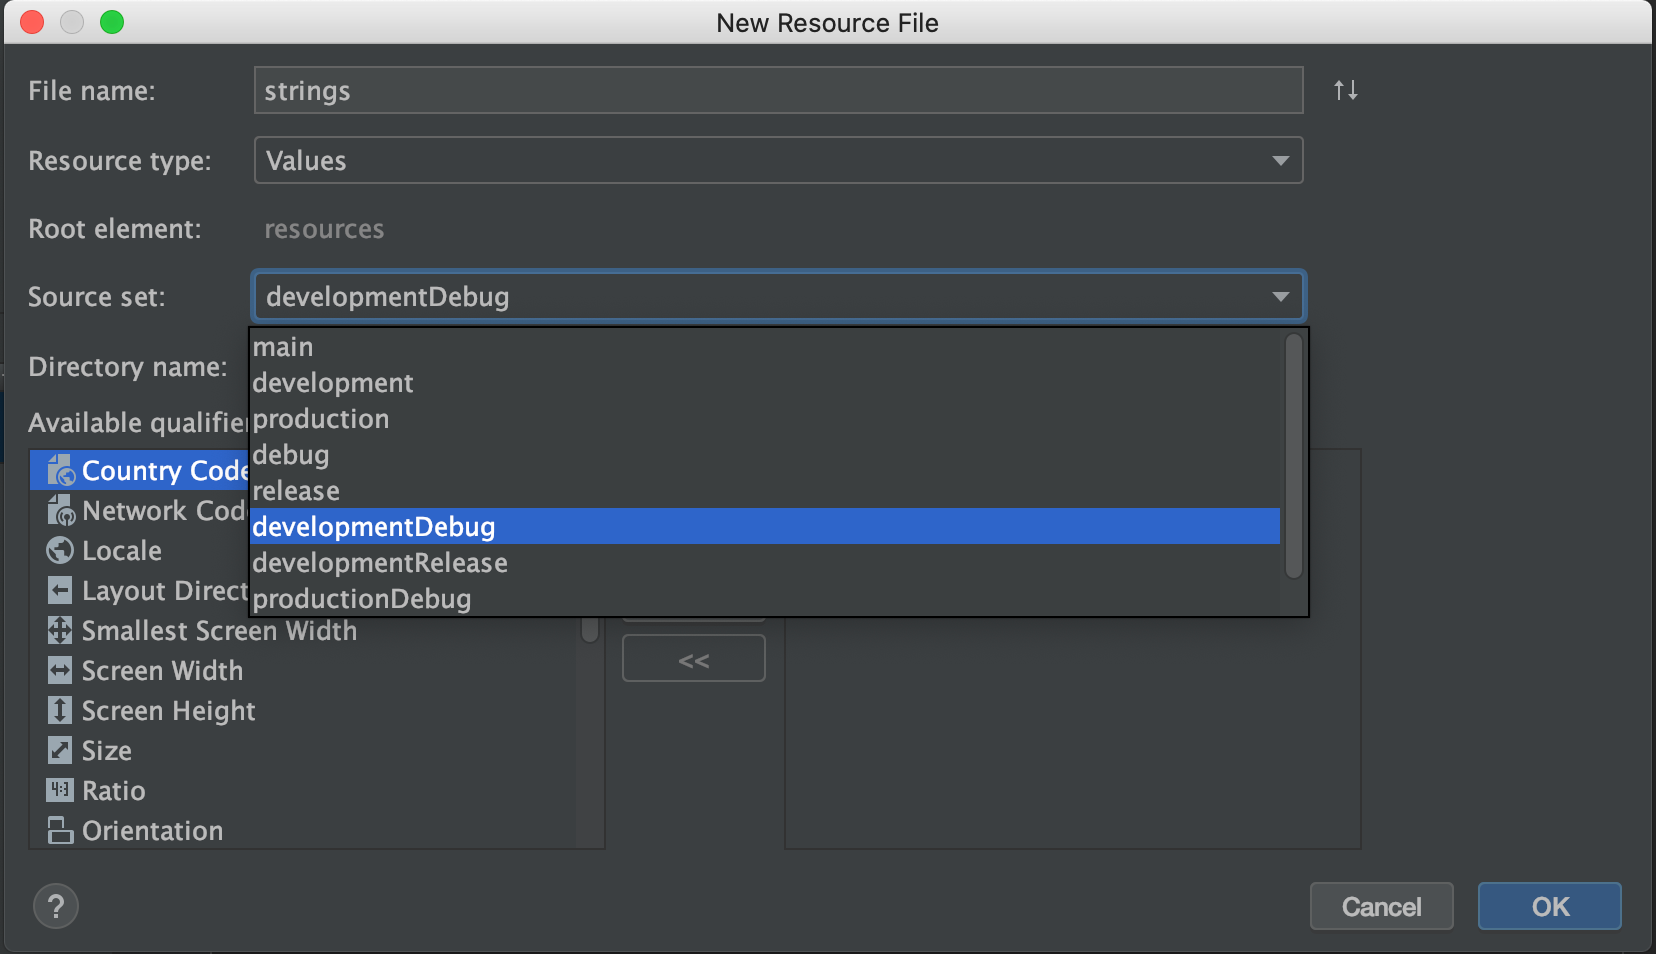
This operation will create the appropriate source set and add the newly created strings.xml into each of them.
此操作将创建适当的源集,并将新创建的strings.xml添加到每个源集中。
签名配置 (Signing Configuration)
Before the build and distribution phases, it’s important we have our signing automated as well. In order to do so, we’ll use property files that’ll hold the information about the keystore filepath, the keystore password, the key alias, and the key password. The format of the file will be the following.
在构建和分发阶段之前,同样重要的是我们还要使签名自动化。 为此,我们将使用属性文件来保存有关密钥库文件路径,密钥库密码,密钥别名和密钥密码的信息。 文件的格式如下。
Warning: Don’t add these files in your Git, especially if you decide to keep your Play Store certificate as well.
警告:请勿在您的Git中添加这些文件,尤其是如果您决定同时保留Play商店证书时。
storeFile=keystores/beta.keystore
storePassword=storePassword
keyAlias=beta
keyPassword=keyPassword
We only need to sign our releaseDevelopment variant, which will be delivered to our testing team through Firebase App Distribution. Now similar to the versioning part, we need a function to parse the signing properties in these files.
我们只需要签署我们的releaseDevelopment变体,该变体将通过Firebase App Distribution交付给我们的测试团队。 现在类似于版本控制部分,我们需要一个函数来解析这些文件中的签名属性。
def getSigningProperties(def filepath) {if (!filepath) {throw new GradleException("Signing properties filepath cannot be empty.")}def keystorePropertiesFile = project.file(filepath)def keystoreProperties = new Properties()def streamtry {stream = new FileInputStream(keystorePropertiesFile)keystoreProperties.load(stream)} catch(FileNotFoundException ignore) {throw new GradleException("Signing properties file not found.")}assert keystoreProperties['keyAlias'] != nullassert keystoreProperties['keyPassword'] != nullassert keystoreProperties['storeFile'] != nullassert keystoreProperties['storePassword'] != nullreturn keystoreProperties
}
In order to use the this, we need to define a new signing config. Still in your Gradle file, inside the Android block, add the following signingConfigs block.
为了使用this,我们需要定义一个新的签名配置。 仍在Android块内的Gradle文件中,添加以下signingConfigs块。
signingConfigs {firebase {def properties = getSigningProperties('firebase.signing.properties')keyAlias properties['keyAlias']keyPassword properties['keyPassword']storeFile file(properties['storeFile'])storePassword properties['storePassword']}
}
Last, update the release build type with the following:
最后,使用以下命令更新发行版本类型:
release {minifyEnabled falseproguardFiles getDefaultProguardFile('proguard-android.txt'), 'proguard-rules.pro'productFlavors.development.signingConfig signingConfigs.firebase
}
At line 4, we explicitly set the Frebase signing config to be used for the developmentRelease variant.
在第4行,我们显式设置Frebase签名配置以用于developmentRelease变体。
版本控制 (Versioning)
Android versioning is really simple, but it’s not automated at all. In order to update your versionCode and versionName, you have to edit your app’s build.gradle and set the desired values. The fact this task has to be done by a human — again and again — makes it error prone. For the sake of this example, the versioning scheme is major.minor.patch for the version name and and an incremental build number for the version code.
Android版本控制确实很简单,但它根本不是自动化的。 为了更新您的versionCode和versionName ,您必须编辑应用程序的build.gradle并设置所需的值。 这项任务必须由人类来一次又一次地完成,这一事实使它容易出错。 就本例而言,版本控制方案的版本名称为major.minor.patch ,版本代码的增量内部版本号。
Open your build Gradle file, and add the following functions below the dependencies block:
打开您的构建Gradle文件,并在依赖关系块下面添加以下功能:
def readVersion() {def versionFile = new File(project.rootDir, 'version.properties')def version = new Properties()def streamtry {stream = new FileInputStream(versionFile)version.load(stream)} catch (FileNotFoundException ignore) {} finally {if (stream != null) stream.close()}if (!version['major']) version['major'] = "1"if (!version['minor']) version['minor'] = "0"if (!version['patch']) version['patch'] = "0"if (!version['code']) version['code'] = "1"return version
}def readVersionName() {def version = readVersion()return "${version['major']}.${version['minor']}.${version['patch']}"
}def readVersionCode() {def version = readVersion()def code = version['code'] as intreturn code
}
In brief, readVersion will try to open the version.properties file, located in the root directory, and read the major, minor, fix, and code properties that’ll be in it. If the file doesn’t exist or if the properties aren’t there, it defaults to major=1, minor=0, patch=0, and code=1. The result of the readVersion is used in readVersionName and readVersionCode.
简而言之, readVersion将尝试打开位于根目录中的version.properties文件,并读取其中的主要,次要,修订和代码属性。 如果文件不存在或属性不存在,则默认为major = 1,minor = 0,patch = 0和code = 1。 readVersion的结果用于readVersionName和readVersionCode 。
Now go ahead and update your versionCode and versionName properties. In the default configuration, replace their values to match the following:
现在继续更新您的versionCode和versionName属性。 在默认配置中,替换其值以匹配以下内容:
defaultConfig {applicationId "com.example.hackernews"minSdkVersion 21targetSdkVersion 29versionCode readVersionCode()versionName readVersionName()testInstrumentationRunner "androidx.test.runner.AndroidJUnitRunner"
}
OK, so far we can read our version name and code from the version properties, but in order to automate the update of it, we need to be able to write. Add the following function as well:
好的,到目前为止,我们可以从版本属性中读取我们的版本名称和代码,但是为了自动进行更新,我们需要能够编写。 也添加以下功能:
def incrementVersionNumber(def type = "build") {def versionFile = new File(project.rootDir, 'version.properties')def version = readVersion()def major = version['major'] as intdef minor = version['minor'] as intdef patch = version['patch'] as intdef build = version['build'] as intif (type == 'major') {major++minor = 0patch = 0} else if (type == 'minor') {minor++patch = 0}else if (type == 'patch') {patch++}build++version['major'] = major.toString()version['minor'] = minor.toString()version['patch'] = patch.toString()version['build'] = build.toString()def stream = new FileOutputStream(versionFile)try {version.store(stream, null)} finally {stream.close()}return major + "." + minor
}task doMajorVersionIncrement {doLast {println "Incrementing major version..."incrementVersionNumber('major')}
}task doMinorVersionIncrement {doLast {println "Incrementing minor version..."incrementVersionNumber('minor')}
}task doPatchVersionIncrement {doLast {println "Incrementing patch version..."incrementVersionNumber('patch')}
}task doBuildNumberIncrement {doLast {println "Incrementing build number..."incrementVersionNumber('build')}
}
The code provided here declares a function, incrementBuildVersion, that given an argument, will increment the appropriate property and save it to our file. In addition, we wrap this function into four Gradle tasks so we can use it via the terminal.
此处提供的代码声明了一个incrementBuildVersion函数incrementBuildVersion ,该函数给出了一个参数,将增加适当的属性并将其保存到我们的文件中。 另外,我们将此函数包装到四个Gradle任务中,因此可以通过终端使用它。
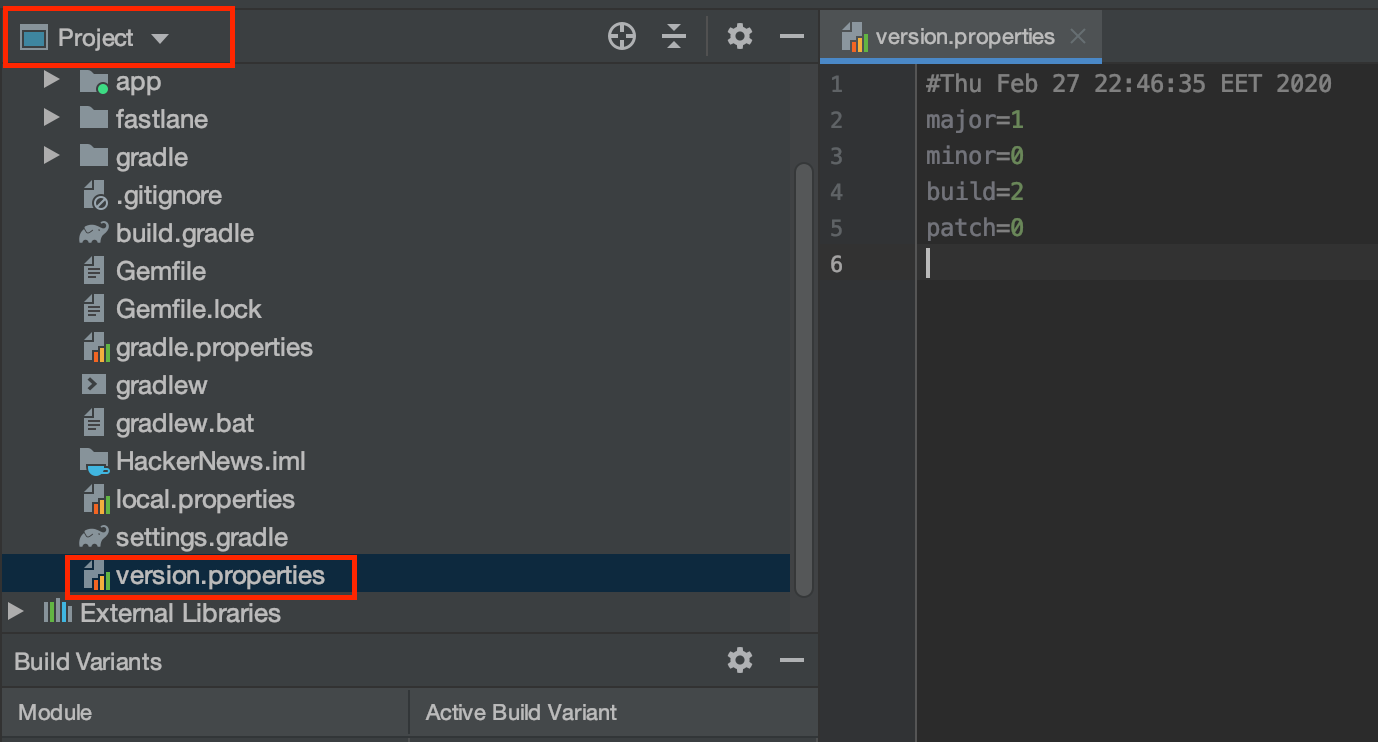
Opening a terminal and typing ./gradlew doBuildNumberIncrement will trigger the latter task to run, which, in turn, will call incrementBuildVersion. Switch to Project View, and you’ll see the newly created file.
打开终端窗口并输入./gradlew doBuildNumberIncrement将触发后任务运行,这反过来,将调用incrementBuildVersion 。 切换到项目视图,您将看到新创建的文件。
测试,构建和分发 (Test, Build, and Distribute)
快车道 (fastlane)
fastlane is an open-source automation tool that, as it says on its website, “handles tedious tasks so you don’t have to.” Due to the fact it was originally developed for automation of several tasks in iOS and Mac OS apps, fastlane comes with basic functionality for Android. As a compensation to that is the fact its API is open and you can write your own code.
fastlane是一种开源自动化工具,正如其在其网站上所述,“可以处理繁琐的任务,因此您不必这样做。” 由于它最初是为在iOS和Mac OS应用程序中自动执行多个任务而开发的,因此fastlane具有Android的基本功能。 作为补偿,事实是它的API是开放的,您可以编写自己的代码。
There are several ways to install fastlane — I’ll go with the universal one. fastlane is a gem (that means it is written in Ruby, thus Ruby is your one and only dependency). So open a terminal type sudo gem install fastlane -NV, and hit enter. To check if everything is OK with your installation, type fastlane — version, and you should see the path of the executable and the version.
有多种安装fastlane的方法-我将使用通用方法。 fastlane是一颗宝石(这意味着它是用Ruby编写的,因此Ruby是您唯一的依赖项)。 因此,打开终端类型的sudo gem install fastlane -NV ,然后按Enter。 要检查安装是否一切正常,请键入fastlane — version ,您应该看到可执行文件和版本的路径。
Last, we need to initialise fastlane for our project. To do so, all you have to do is cd to/your/project/directory, type fastlane init, and hit enter. fastlane will ask you some questions — you might as well skip all of them. We’ll write our own lanes.
最后,我们需要为我们的项目初始化Fastlane。 为此,您需要执行的所有操作是cd to/your/project/directory ,键入fastlane init ,然后按Enter。 fastlane会问您一些问题-您最好跳过所有问题。 我们将编写自己的通道。
Firebase应用分发 (Firebase App Distribution)
But before writing our own lanes, there’s one more thing. Actually two. The first is the Firebase CLI, which can be installed by typing curl -sL https://firebase.tools | bash and entering it into your terminal.
但是在编写自己的通道之前,还有一件事。 实际上是两个。 第一个是Firebase CLI,可以通过键入curl -sL https://firebase.tools | bash进行安装curl -sL https://firebase.tools | bash curl -sL https://firebase.tools | bash并将其输入您的终端。
Next, we need to install the Firebase plugin, so move to your project’s directory and type fastlane add_plugin firebase_app_distribution, and hit enter.
接下来,我们需要安装Firebase插件,因此移至您项目的目录并键入fastlane add_plugin firebase_app_distribution ,然后按Enter键。
Still in your terminal, type firebase login. It’ll open your default browser and require you to log into your account. We’re almost there.
仍在终端中,输入firebase login 。 它将打开您的默认浏览器,并要求您登录帐户。 我们快到了。
In addition to being logged in, you must have a project and your app set in the Firebase console. If you haven’t already, now is a good time. We’ll need that app ID in the distribution step.
除了登录外,您还必须在Firebase控制台中设置一个项目和您的应用程序。 如果您还没有,现在是个好时机。 在分发步骤中,我们将需要该应用程序ID。
For CI/CD builds, you should use firebase login:ci, which will return a refresh token that you can later use in firebase_app_distribution action.
对于CI / CD构建,您应该使用firebase login:ci ,它将返回刷新令牌,您稍后可以在firebase_app_distribution action使用它。
测试,构建和分发 (Test, build, and distribute)
Finally, we’re there. Let’s write our lane and distribute our app. Open you Fastfile, and replace its content to match the following:
最后,我们到了。 让我们来编写我们的通道并分发我们的应用程序。 打开您的Fastfile,并替换其内容以匹配以下内容:
# This file contains the fastlane.tools configuration
# You can find the documentation at https://docs.fastlane.tools
#
# For a list of all available actions, check out
#
#     https://docs.fastlane.tools/actions
#
# For a list of all available plugins, check out
#
#     https://docs.fastlane.tools/plugins/available-plugins
## Uncomment the line if you want fastlane to automatically update itself
# update_fastlanedefault_platform(:android)platform :android dodesc "Runs all the tests"lane :test dogradle(task: "test",flavor: "Development",build_type: "Release")enddesc "Submit a new build to firebase app distribution"desc "Usage:"desc "fastlane firebase"desc "Params:"desc "versionChange:\"minor|major|patch\" to explicitly increase version"desc "notes:\"Release notes about the build\""desc "branch:\"branch_name\" If specified will commit version.properties file and push it to track remote branch"lane :firebase do |options|if (options[:versionChange]=='major')gradle(task: "doMajorVersionIncrement")elsif (options[:versionChange]=='minor')gradle(task: "doMinorVersionIncrement")elsif (options[:versionChange]=='patch')gradle(task: "doPatchVersionIncrement")elsegradle(task: "doBuildNumberIncrement")endgradle(task: "assemble",flavor: "Development",build_type: "Release")notes = options[:notes] || changelog_from_git_commits(commits_count: 1, merge_commit_filtering: "exclude_merges")firebase_app_distribution(app: ENV["FIREBASE_APP_ID"],release_notes: notes,firebase_cli_path: '/usr/local/bin/firebase')if (options[:branch])git_commit(path: "version.properties", message: "chore: Update version.properties")push_to_git_remote(local_branch: "develop",remote_branch: "develop",tags: false)endendend
Now let me explain a bit about what we’ve created. Start by opening a terminal into your project’s directory and typing fastlane lanes. You should see something like the following:
现在让我解释一下我们所创建的内容。 首先在项目目录中打开终端,然后输入fastlane lanes 。 您应该看到类似以下的内容:
--------- android-------------- fastlane android testRuns all the tests----- fastlane android firebaseSubmit a new build to firebase app distributionUsage:fastlane firebaseParams:versionChange:"minor|major|patch" to explicitly increase versionnotes:"Release notes about the build"branch:"branch_name" If specified will commit version.properties file and push it to track remote branchI have emphasised the two parts we’re interested at. These are our two lanes — with the first being our lane for running our tests. If we type fastlane test, we’ll see our app being built and our tests will run eventually.
我已经强调了我们感兴趣的两个部分。 这是我们的两条通道-第一条是用于运行测试的通道。 如果输入fastlane test ,我们将看到我们的应用程序正在构建,并且我们的测试将最终运行。
If our tests execute without any error, we get a iphone相机原理 One of the questions I get asked most often via my contact form is how to get access to t ... 今天我们来试一下如何从gitHub上拉取一个项目并且运行起来,话不多说,我们直接开搞可好 1.首先我们先获取到项目地址(此处我以自己的项目地址作为示例) 我们选择红圈处的clone or downlo ... 4月份GitHub上最热门的Java开源项目排行已经出炉啦,本月的榜单都被Spring相关的项目占领了,一起来看看上榜详情吧! 1. spring-boot-demo https://github.c ... 以下是小海收集的常用Github上比较优秀的项目,希望对大家日常开发有所帮助. 在此感谢小海做出的贡献!!! Type LibDescription LibLocation Android Sli ... 使用kotlin和Java混合开发Android项目爬坑记录 不定期将开发过程中遇到的问题添加在此处,加深记忆. 主要内容包括但不限于java与kotlin语言的一些区别,以及在使用android-s ... Xcode + cocoapods + jenkins + fastlane + git + 蒲公英自动化打包 上传 构建自动化步骤为: 1. Xcode 有Xcode 内部提供的打包命令来打包完成代 ... "法拉第袋" 英文名为Faraday bag 移动设备是动态系统,在提取和分析电子数据证据时会给取证人员带来很多挑战.来自不同制造商的不同型号的手机的数量的快速增加使得难以开发用于 ... 要访问Windows 10上的任何文件或文件夹,你必须具有相应的权限.遗憾的是,如果你没有编辑某些文件和文件夹的权限,则可能会出现某些问题,这时你必须对该文件夹或文件取得所有权. 要想取得某个文件夹的 ... 问题 我有一个Java应用程序,我从控制台运行,然后控制台执行另一个Java进程.我想获得该子进程的线程/堆转储. 在Unix上,我可以做akill -3 但是在Windows AFAIK上获取线程转 ... 数据口径 Ever wish you could get the latest issue of your favorite magazine on your Kindle? Or wish you ...fastlane.tools finished successfully
fastlane 项目管理_在fastlane上获取您的android项目相关推荐
最新文章
热门文章