pvs-stdio ue4_使用PVS-Studio for C#在GitLab中分析合并请求
pvs-stdio ue4
Do you like GitLab and don't like bugs? Do you want to improve the quality of your source code? Then you've come to the right place. Today we will tell you how to configure the PVS-Studio C# analyzer for checking merge requests. Enjoy the reading and have a nice unicorn mood.
您喜欢GitLab,又不喜欢bug吗? 您是否要提高源代码的质量? 然后您来对地方了。 今天,我们将告诉您如何配置PVS-Studio C#分析器以检查合并请求。 享受阅读,并拥有良好的独角兽心情。
PVS-Studio is a tool designed to detect errors and potential vulnerabilities in the source code of programs, written in C, C++, C#, and Java. Works in 64-bit systems on Windows, Linux and macOS. Can analyze the code meant for 32-bit, 64-bit and embedded ARM platforms. PVS-Studio是一种工具,旨在检测用C,C ++,C#和Java编写的程序源代码中的错误和潜在漏洞。 在Windows,Linux和macOS上的64位系统上运行。 可以分析用于32位,64位和嵌入式ARM平台的代码。
By the way, we've released PVS-Studio 7.08, which was full of new sapid features. For example:
顺便说一句,我们发布了PVS-Studio 7.08,其中充满了新的轻松功能 。 例如:
- C# analyzer under Linux and macOS;
Linux和macOS下的C#分析器; - plugin for Rider;
Rider插件; - new mode for checking a list of files.
用于检查文件列表的新模式。
检查文件列表的方式 (Mode of checking a list of files)
Previously, in order to check certain files, one had to pass .xml to the analyzer with a list of files. But since this is not very convenient, we have added the ability to pass .txt, which makes life much simpler.
以前,为了检查某些文件,必须将.xml和文件列表传递给分析器。 但是由于这不是很方便,所以我们增加了传递.txt的功能,这使工作变得更加简单。
To check certain files, specify the --sourceFiles (-f) flag and pass .txt with the list of files. It looks like this:
要检查某些文件,请指定--sourceFiles ( -f )标志,并将.txt与文件列表一起传递。 看起来像这样:
pvs-studio-dotnet -t path/to/solution.sln -f fileList.txt -o project.jsonIf you are interested in configuring checks of commits or pull requests, you can also do this using this mode. The difference will be in getting a list of files for analysis and will depend on which systems you are using.
如果您对配置提交或拉取请求的检查感兴趣,也可以使用此模式进行。 区别在于获取要分析的文件列表,这取决于您使用的系统。
检查合并请求的原理 (Principle of checking merge requests)
The main point of checking is to make sure that problems detected by the analyzer do not make it into the master branch when merging. We also don't want to analyze the entire project every time. Moreover, when merging branches, we have a list of changed files. Therefore, I suggest adding a merge request check.
检查的重点是确保合并时分析器检测到的问题不会使其进入master分支。 我们也不想每次都分析整个项目。 此外,合并分支时,我们具有已更改文件的列表。 因此,我建议添加合并请求检查。
This is how a merge request looks like before introducing a static analyzer:
这是在引入静态分析器之前合并请求的样子:
In other words, all errors in the changes branch will get to the master branch. Since we wouldn't like this, we add the analysis, and now the scheme looks as follows:
换句话说, changes分支中的所有错误都将到达master分支。 由于我们不愿意这样做,因此我们添加了分析,现在该方案如下所示:

We analyze changes2 and, if there are no errors, we accept the merge request, otherwise reject it.
我们分析changes2 ,如果没有错误,我们接受合并请求,否则拒绝合并请求。
By the way, if you are interested in analyzing commits and pull requests for C/C++, you are welcome to read about it here.
顺便说一句,如果您有兴趣分析C / C ++的提交和提取请求,欢迎在此处阅读。
亚搏体育app (GitLab)
GitLab is an open source DevOps lifecycle web tool that provides a code repository management system for Git with its own wiki, bug tracking system, CI/CD pipeline, and other features. GitLab是一个开放源代码的DevOps生命周期网络工具,它为Git提供了一个代码仓库管理系统,它具有自己的Wiki,错误跟踪系统,CI / CD管道和其他功能。
Before you start implementing the merge request analysis, you need to register and upload your project. If you do not know how to do this, then I suggest an article by my colleague.
在开始实施合并请求分析之前,需要注册并上传项目。 如果您不知道该怎么做,那么我建议我的同事写一篇文章 。
注意 (Note)
. One of the possible ways to configure the environment is described below. The point is to show the steps for configuring the environment needed for analyzing and running the analyzer. In your case, it may be better to separate the stages of environment preparation (adding repositories, installing the analyzer) and analysis. For example, preparing Docker instances with the necessary environment and their usage, or some other method.
。 下面介绍配置环境的一种可能方式。 关键是要显示配置分析和运行分析仪所需的环境的步骤。 在您的情况下,最好将环境准备阶段(添加存储库,安装分析仪)和分析阶段分开。 例如,使用必要的环境及其用法或其他方法来准备Docker实例。
In order to get a better understanding of what is going to happen next, I suggest taking a look at the following scheme:
为了更好地了解下一步将发生的情况,我建议看一下以下方案:

The analyzer needs .NET Core SDK 3 for proper operation from which the necessary dependencies for the analyzer will be installed. Adding Microsoft repositories for various Linux distributions is described in the relevant document.
分析仪需要.NET Core SDK 3才能正常运行,从中将安装分析仪所需的依赖关系。 相关文档中介绍了为各种Linux发行版添加Microsoft存储库。
To install PVS-Studio via the package manager, you will also need to add PVS-Studio repositories. Adding repositories for various distributions is described in more detail in the relevant section of the documentation.
要通过程序包管理器安装PVS-Studio,您还需要添加PVS-Studio存储库。 在文档的相关部分中详细介绍了为各种发行版添加存储库。
The analyzer needs a license key to operate. You can get a trial license on the analyzer download page.
分析仪需要许可证密钥才能操作。 您可以在分析仪下载页面上获得试用许可证。
注意 (Note)
. Please note that the described operating mode (merge requests analysis) requires an Enterprise license. Therefore, if you would like to try this mode of operation, don't forget to specify that you need an Enterprise license in the "Message" field.
。 请注意,所描述的操作模式(合并请求分析)需要企业许可证。 因此,如果您想尝试这种操作模式,请不要忘记在“消息”字段中指定需要企业许可证。
If a merge request occurs, we only need to analyze the list of changed files, otherwise we analyze all files. After the analysis, we need to convert the logs to the format we need.
如果发生合并请求,我们仅需要分析已更改文件的列表,否则我们将分析所有文件。 分析之后,我们需要将日志转换为所需的格式。
Now, with the algorithm in front of your eyes, you can proceed to writing the script. To do this, we need to change the .gitlab-ci.yml file or, if there is no such file, create one. To create it, click on the name of your project -> Set up CI/CD.
现在,有了这个算法,您就可以继续编写脚本了。 为此,我们需要更改.gitlab-ci.yml文件,或者,如果没有这样的文件,请创建一个。 要创建它,请单击项目名称-> 设置CI / CD 。
Now we are ready to write the script. Let's first write the code that will install the analyzer and enter the license:
现在我们可以编写脚本了。 首先,让我们编写将安装分析仪并输入许可证的代码:
before_script:- apt-get update && apt-get -y install wget gnupg - apt-get -y install git- wget https://packages.microsoft.com/config/debian/10/
packages-microsoft-prod.deb -O packages-microsoft-prod.deb- dpkg -i packages-microsoft-prod.deb- apt-get update- apt-get install apt-transport-https- apt-get update- wget -q -O - https://files.viva64.com/etc/pubkey.txt | apt-key add -- wget -O /etc/apt/sources.list.d/viva64.list
https://files.viva64.com/etc/viva64.list- apt-get update- apt-get -y install pvs-studio-dotnet- pvs-studio-analyzer credentials $PVS_NAME $PVS_KEY- dotnet restore "$CI_PROJECT_DIR"/Test/Test.sln
Since installation and activation must occur before all other scripts, we use a special before_script label. Let me be clear on this fragment.
由于安装和激活必须在所有其他脚本之前进行,因此我们使用特殊的before_script标签。 让我澄清一下这个片段。
Preparation for the analyzer installation:
分析仪安装的准备工作:
- wget https://packages.microsoft.com/config/debian/10/
packages-microsoft-prod.deb -O packages-microsoft-prod.deb- dpkg -i packages-microsoft-prod.deb- apt-get update- apt-get install apt-transport-https- apt-get update
Adding PVS-Studio repositories and the analyzer:
添加PVS-Studio存储库和分析器:
- wget -q -O - https://files.viva64.com/etc/pubkey.txt | apt-key add -- wget -O /etc/apt/sources.list.d/viva64.list
https://files.viva64.com/etc/viva64.list- apt-get update- apt-get -y install pvs-studio-dotnet
License activation:
许可证激活:
- pvs-studio-analyzer credentials $PVS_NAME $PVS_KEY$PVS_NAME — user name. $ PVS_NAME —用户名。 $PVS_KEY — product key. $ PVS_KEY —产品密钥。
Restoration of project dependencies, where $CI_PROJECT_DIR is the full path to the project directory:
恢复项目依赖关系,其中$ CI_PROJECT_DIR是项目目录的完整路径:
- dotnet restore "$CI_PROJECT_DIR"/Path/To/Solution.slnFor correct analysis, the project must be successfully built, and its dependencies must be restored (for example, the necessary NuGet packages must be loaded).
为了进行正确的分析,必须成功构建项目,并且必须还原其依赖项(例如,必须加载必要的NuGet程序包)。
You can set environment variables containing license information by clicking on Setting, and then on CI / CD.
您可以通过单击设置 ,然后单击CI / CD来设置包含许可证信息的环境变量。

In the opening window, find the item Variables, click Expand on the right and add variables. The result should be the following:
在打开的窗口中,找到“ 变量 ”项,单击右侧的“ 扩展 ”并添加变量。 结果应为以下内容:

Now we can proceed to the analysis. First, we will add a script for full analysis. In the -t flag, we pass the path to solution, and in the -o flag, we write the path to the file where the analysis results will be written. Also the return code is of interest for us here. In this case, we'd like the analysis to continue when an exit code signals that warnings were issued during the analysis. Here's how this fragment looks like:
现在我们可以进行分析了。 首先,我们将添加一个脚本进行全面分析。 在-t标志中,我们将路径传递到解决方案,在-o标志中,我们将路径写入将要写入分析结果的文件。 在这里,返回码也是我们感兴趣的。 在这种情况下,当退出代码发出在分析过程中发出警告时,我们希望分析继续进行。 以下是该片段的外观:
job:script:- exit_code=0- pvs-studio-dotnet -t "$CI_PROJECT_DIR"/Test/Test.sln -o
PVS-Studio.json || exit_code=$?- exit_code=$((($exit_code & 8)/8))- if [[ $exit_code == 1 ]]; then exit 1; else exit 0; fi
Exit codes work as bit masks. For example, if warnings were issued as a result of the analysis, the exit code will be equal to 8. If the license expires within a month, the exit code will be 4. If errors were found during the analysis, and the license expires within a month, both values will be written to the exit code: the numbers add up and we get the final exit code — 8+4=12. Thus, by checking the corresponding bits, you can get information about various states during analysis. Exit codes are described in more detail in the section "Pvs-studio-dotnet exit codes (Linux / macOS)"of the document "Analyzing Visual Studio / MSBuild / .NET Core projects from the command line using PVS-Studio".
退出代码用作位掩码。 例如,如果由于分析而发出警告,则退出代码将等于8。如果许可证在一个月内到期,则退出代码将为4。如果在分析过程中发现错误,并且许可证到期在一个月内,这两个值都将被写入退出代码:数字加起来,我们得到最终的退出代码-8 + 4 = 12。 因此,通过检查相应的位,您可以获得有关分析期间各种状态的信息。 退出代码在文档“ 使用PVS-Studio从命令行分析Visual Studio / MSBuild / .NET Core项目 ”的“ Pvs-studio-dotnet退出代码(Linux / macOS)”部分中有更详细的描述。
In this case, we are interested in all exit codes where 8 appears.
在这种情况下,我们对出现8的所有退出代码都感兴趣。
- exit_code=$((($exit_code & 8)/8))We get 1 when the exit code has the bit we are interested in set, otherwise we get 0.
当退出代码具有我们感兴趣的位时,我们得到1,否则,我们得到0。
Now it is time to add the analysis of the merge request. Before doing this, let's get some space for the script. We want it to be executed only when a merge request occurs. This looks as follows:
现在是时候添加对合并请求的分析了。 在执行此操作之前,让我们获得一些用于脚本的空间。 我们希望仅在合并请求发生时执行它。 如下所示:
merge:script:only:- merge_requestsLet's move on to the script itself. I stumbled upon the issue that the virtual machine knows nothing about origin/master. So we'll lend it a hand:
让我们继续脚本本身。 我偶然发现了虚拟机对origin / master不了解的问题。 因此,我们将助您一臂之力:
- git fetch originNow we get the difference between branches and save the result to a txt file:
现在我们得到分支之间的区别,并将结果保存到txt文件中:
- git diff --name-only origin/master $CI_COMMIT_SHA > pvs-fl.txtWhere $CI_COMMIT_SHA is the hash of the last commit.
其中$ CI_COMMIT_SH A是最后一次提交的哈希。
Next, we run analysis of the list of files by using the -f flag. We pass the previously received .txt file to it. By analogy with the full analysis, we check out the exit codes:
接下来,我们使用-f标志对文件列表进行分析。 我们将先前收到的.txt文件传递给它。 与全面分析类似,我们检查退出代码:
- exit_code=0- pvs-studio-dotnet -t "$CI_PROJECT_DIR"/Test/Test.sln -f
pvs-fl.txt -o PVS-Studio.json || exit_code=$?- exit_code=$((($exit_code & 8)/8))- if [[ $exit_code == 1 ]]; then exit 1; else exit 0; fi
Full script for checking merge request will look like this:
用于检查合并请求的完整脚本如下所示:
merge:script:- git fetch origin- git diff --name-only origin/master $CI_COMMIT_SHA > pvs-fl.txt- exit_code=0- pvs-studio-dotnet -t "$CI_PROJECT_DIR"/Test/Test.sln -f
pvs-fl.txt -o PVS-Studio.json || exit_code=$?- exit_code=$((($exit_code & 8)/8))- if [[ $exit_code == 1 ]]; then exit 1; else exit 0; fionly:- merge_requests
It only remains to add the log conversion after all the scripts have worked. We use the after_script label and the plog-converter utility:
在所有脚本都工作之后,仅需添加日志转换。 我们使用after_script标签和plog-converter实用程序:
after_script:- plog-converter -t html -o eLog ./PVS-Studio.jsonThe plog-converter utility is an open source project that is used to convert the analyzer error report into various forms, such as HTML. For a more detailed description of the utility, see the section "Plog Converter Utility" in the relevant documentation section.
plog-converter实用程序是一个开源项目,用于将分析器错误报告转换为各种形式,例如HTML。 有关实用程序的详细说明,请参阅相关文档部分中的“ Plog Converter实用程序” 部分 。
By the way, if you'd like to conveniently work with a .json report locally from the IDE, then I recommend our plugin for IDE Rider. For more information about its use, see the special document.
顺便说一句,如果您想方便地从IDE本地处理.json报告,那么我推荐我们的IDE Rider 插件 。 有关其使用的更多信息,请参见特殊文档 。
For convenience, here is the entire.gitlab-ci.yml:
为了方便起见,以下是整个.gitlab-ci.yml :
image: debianbefore_script:- apt-get update && apt-get -y install wget gnupg - apt-get -y install git- wget https://packages.microsoft.com/config/debian/10/
packages-microsoft-prod.deb -O packages-microsoft-prod.deb- dpkg -i packages-microsoft-prod.deb- apt-get update- apt-get install apt-transport-https- apt-get update- wget -q -O - https://files.viva64.com/etc/pubkey.txt | apt-key add -- wget -O /etc/apt/sources.list.d/viva64.list
https://files.viva64.com/etc/viva64.list- apt-get update- apt-get -y install pvs-studio-dotnet- pvs-studio-analyzer credentials $PVS_NAME $PVS_KEY- dotnet restore "$CI_PROJECT_DIR"/Test/Test.slnmerge:script:- git fetch origin- git diff --name-only origin/master $CI_COMMIT_SHA > pvs-fl.txt- exit_code=0- pvs-studio-dotnet -t "$CI_PROJECT_DIR"/Test/Test.sln -f
pvs-fl.txt -o PVS-Studio.json || exit_code=$?- exit_code=$((($exit_code & 8)/8))- if [[ $exit_code == 1 ]]; then exit 1; else exit 0; fionly:- merge_requestsjob:script:- exit_code=0- pvs-studio-dotnet -t "$CI_PROJECT_DIR"/Test/Test.sln -o
PVS-Studio.json || exit_code=$?- exit_code=$((($exit_code & 8)/8))- if [[ $exit_code == 1 ]]; then exit 1; else exit 0; fiafter_script:- plog-converter -t html -o eLog ./PVS-Studio.json
As soon as we've added everything to the file, click on Commit changes. To make sure that everything is correct, go to CI/CD — > Pipelines -> Running. It opens the virtual machine window at the end of which should be the following:
将所有内容添加到文件后,点击提交更改 。 为确保一切正确,请转到CI / CD- > 管道 -> 运行 。 它将打开虚拟机窗口,其末尾应为以下内容:
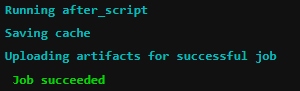
Once you get Job succeeded — it's ok, profit. Now you can test what you've done.
一旦获得Job成功 ,就可以了,赢利。 现在,您可以测试已完成的工作。
工作实例 (Examples of working)
As an example, we will create a simple project (in master) that will contain several files. After that, we will change only one file in another branch and try to make a merge request.
作为示例,我们将创建一个简单的项目(在master中 ),其中将包含多个文件。 之后,我们将只更改另一个分支中的一个文件,并尝试发出合并请求。
Let's look at two cases: when the modified file contains an error, and when it doesn't. First, we'll consider an example with an error.
让我们看两种情况:修改后的文件包含错误,什么时候不包含错误。 首先,我们将考虑一个带有错误的示例。
Let's say there is a Program.cs file in the master branch that doesn't contain errors, and in another branch the developer added erroneous code and wants to make a merge request. What kind of mistake they made is not so important, the main thing is that it is there. For example, they forgot the throw operator (yes, people make such mistakes):
假设在master分支中有一个Program.cs文件,其中不包含错误,而在另一个分支中,开发人员添加了错误的代码并希望发出合并请求。 他们犯了什么样的错误并不重要,主要的是它在那里。 例如,他们忘记了throw操作符(是的, 人们犯了这样的错误 ):
void MyAwesomeMethod(String name)
{if (name == null)new ArgumentNullException(....);// do something....
}
Let's look at the analysis result for the example with an error. Also, to make sure that only one file was analyzed, I added the -r flag to the pvs-studio-dotnet command line:
让我们看一下示例的分析结果是否有错误。 另外,为确保仅分析了一个文件,我在pvs-studio-dotnet命令行中添加了-r标志:
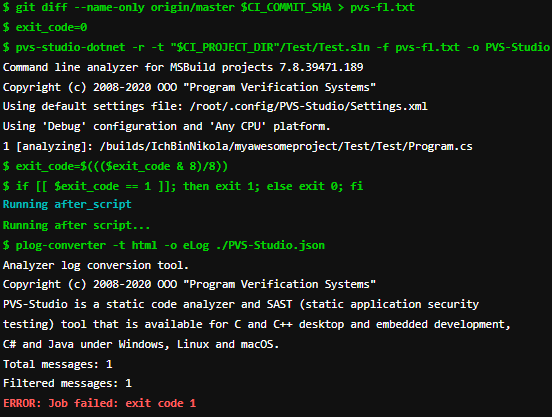
As we can see, the analyzer found an error and didn't allow merging branches.
如我们所见,分析器发现了一个错误,并且不允许合并分支。
Now let's check the example without an error. Fixed code:
现在让我们检查示例,没有错误。 固定代码:
void MyAwesomeMethod(String name)
{if (name == null)throw new ArgumentNullException(....);// do something....
}
Analysis results of merge request:
合并请求的分析结果:
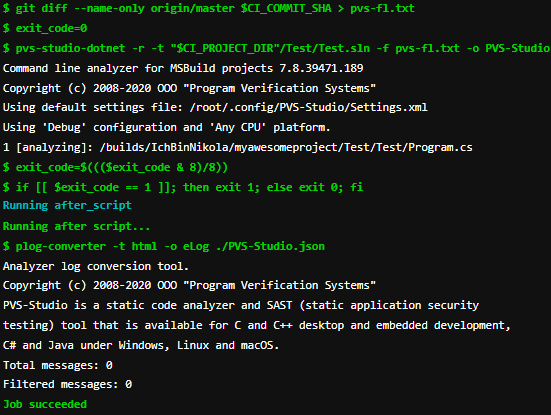
As we can see, no errors were found, and the task was completed successfully, which is what we wanted to check.
如我们所见,没有发现错误,并且任务已成功完成,这就是我们要检查的内容。
结论 (Conclusion)
Filtering out bad code before merging branches is very convenient and pleasant. So if you are using CI/CD, try embedding a static analyzer to check it. Especially since it can be done very simply.
在合并分支之前过滤掉错误的代码非常方便和愉快。 因此,如果您使用的是CI / CD,请尝试嵌入静态分析器进行检查。 特别是因为它可以非常简单地完成。
Thank you for your attention.
感谢您的关注。
翻译自: https://habr.com/en/company/pvs-studio/blog/512294/
pvs-stdio ue4
pvs-stdio ue4_使用PVS-Studio for C#在GitLab中分析合并请求相关推荐
- Android Studio中有没有类似于Eclipse中的ctrl+2+L的快捷键? \Android Studio快捷键之代码提示...
问:Android Studio中有没有类似于Eclipse中的ctrl+2+L的快捷键? 答:有,as中的快捷键是Ctrl+Alt+V AndroidStudio和Eclipse常用快捷键对比 功能 ...
- Android studio 微信APP之Fragment中使用ReclerView
Android studio 微信APP之Fragment中使用ReclerView 如题,本次实验的内容就是在已经创建好的微信程序的首页处,在fragment控件中增加ReclerView控件,实现 ...
- android studio有时候r.id找不到,Android Studio:R.id.editText中的错误
Im新的Android Studio和Android开发.所以我按照developer.android.com给出的教程,我在这一行中有一个错误:EditText editText = (EditTe ...
- [贝聊科技]使用Android Studio和MAT进行内存泄漏分析
1.Java内存分配策略 Java 程序运行时的内存分配策略有三种:静态分配.栈式分配和堆式分配.对应的存储区域如下: 静态存储区(方法区):主要存放静态数据.全局 static 数据和常量.这块内存 ...
- Android Studio安装教程及安装中出现问题的解决办法
Android Studio安装教程及安装中出现问题的解决办法 Android Studio安装教程: 安装网址: AndroidDevtools下载:https://developer.androi ...
- 在 Visual Studio 的解决方案资源管理器中隐藏一些文件
项目文件中有一些属性几乎是专门为 IDE 而准备的,不过考虑到 .NET 生态的开发者多数都使用 Visual Studio,所以基本上也只有 Visual Studio 对这些特性支持的最全面.(才 ...
- AI Studio : 利用Paddle框架中的极简框架识别MNIST
简 介: ※通过测试网络上的这个极简的Paddle识别MNIST程序,也就是使用了一个非常简单的线性回归网络,初步熟悉了Paddle下的网络架构方式.对于如果从numpy到Paddle的tensor转 ...
- 在Visual Studio 2019(VS2019)中使用GIT进行代码控制
1. 打开团队资源管理器Team Explorer 打开Visual Studio并转到菜单Team Explorer => Manage Connections => Manage Co ...
- 扩展Visual Studio 2010服务器资源管理器中的SharePoint结点
Visual Studio 2010最大的卖点就是可扩展性.这样就可以借助.NET社区的力量基于VS构建出许多有用的工具.本文中我们将展示如何扩展VS2010的服务器资源管理器,在其中的SharePo ...
最新文章
- 复旦计算机学院徐老师,复旦大学信息科学与技术学院徐跃东副研究员到课题组访问交流...
- 商汤招股书详解:40名教授250+博士3593位工程师,AI收入亚洲第一,一年15亿研发工资支出...
- kafka实战最佳经验,阿里又现海王!某程序员同时约两个女生十一出游
- PHP下socket编程
- jmeter(五)几种不同的content-type方式
- usleep延时0.毫秒_LabVIEW从0到1系列视频培训_第4讲全集_操作例程说明
- 你遇到的面试官是「伯乐」吗?
- rstudio 修改代码间距_第一章 R和RStudio
- MFC 教程【8_MFC的进程和线程 】
- (素材源码)猫猫学IOS(十九)UI之QQ好友列表
- 一款网页游戏外挂开发-数据抓包
- GPRS使用AT指令发短信拨号
- 香帅的北大金融学课笔记3 -- 投资银行
- socket编程 error: storage size of ‘sockAddr’ isn’t known
- 学一点Wi-Fi:DPP(WiFi Easy Connect)
- 豌豆荚PC端版本WanDouJia_2.80.1.7144_homepage.exe
- 5个Libra协会成员加入,这家创业公司凭什么与Facebook 竞争?
- n个人排名,允许并列名次,共有多少种排名结果?
- 前端实现生成带有样式的excel表格 Node和浏览器读写Excel文件探究实践
- 元宇宙行业风云突变 华尔街大鳄开始布局