Notification使用详解之三:通过服务更新进度通知在Activity中监听服务进度
为什么80%的码农都做不了架构师?>>> 
上次我们讲到如何实现一个可更新的进度通知,实现的方式是启动一个线程模拟一个下载任务,然后根据任务进度向UI线程消息队列发送进度消息,UI线 程根据进度消息更新通知的UI界面。可是在实际应用中,我们一般会将上传、下载等比较耗时的后台任务以服务的形式运行,更新进度通知也是交由后台服务来完 成的。 不过有的时候,除了在通知里面显示进度信息,我们也要在Activity中显示当前进度,很多下载系统都有这样的功能,例如Android自带浏览器的下 载系统、QQ浏览器的下载系统等等。那么如何实现这一功能呢?实现方式有很多,我们今天先来介绍其中的一种:在Activity中主动监听服务的进度。
具体的思路是:让Activity与后台服务绑定,通过中间对象Binder的实例操作后台服务,获取进度信息和服务的状态以及在必要的时候停止服务。
关于服务的生命周期,如果有些朋友们不太熟悉的话,可以去查阅相关资料;如果以后有时间,我可能也会总结一些与服务相关的知识。
为了让大家对这个过程更清晰一些,在上代码之前,我们先来看看几个截图:

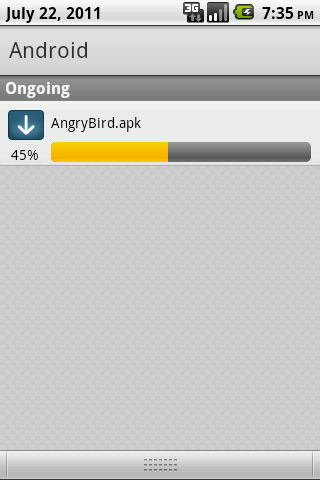


整个过程如上图所示:在我们点击开始按钮后,下载任务开始运行,同事更新通知上的进度,当前Activity也从后台服务获取进度信息,显示到按钮下方;当我们点击通知后,跳转到下载管理界面,在这里我们也从后台服务获取进度,还可以做取消任务等操作。
了解了整个过程的情况后,我们就来分析一下具体的代码实现。
首先是/res/main.xml布局文件:
- <?xml version="1.0" encoding="utf-8"?>
- <LinearLayout xmlns:android="http://schemas.android.com/apk/res/android"
- android:orientation="vertical"
- android:layout_width="fill_parent"
- android:layout_height="fill_parent">
- <Button
- android:layout_width="fill_parent"
- android:layout_height="wrap_content"
- android:text="start"
- android:onClick="start"/>
- <TextView
- android:id="@+id/text"
- android:layout_width="fill_parent"
- android:layout_height="wrap_content"
- android:gravity="center"/>
- </LinearLayout>
其中Button是用来启动服务的,TextView是用来显示进度信息的。
然后再在看一下MainActivity.java的代码:
- package com.scott.notification;
- import android.app.Activity;
- import android.content.ComponentName;
- import android.content.Context;
- import android.content.Intent;
- import android.content.ServiceConnection;
- import android.os.Bundle;
- import android.os.Handler;
- import android.os.IBinder;
- import android.os.Message;
- import android.view.View;
- import android.widget.TextView;
- public class MainActivity extends Activity {
- private DownloadService.DownloadBinder binder;
- private TextView text;
- private boolean binded;
- private Handler handler = new Handler() {
- public void handleMessage(android.os.Message msg) {
- int progress = msg.arg1;
- text.setText("downloading..." + progress + "%");
- };
- };
- private ServiceConnection conn = new ServiceConnection() {
- @Override
- public void onServiceConnected(ComponentName name, IBinder service) {
- binder = (DownloadService.DownloadBinder) service;
- binded = true;
- // 开始下载
- binder.start();
- // 监听进度信息
- listenProgress();
- }
- @Override
- public void onServiceDisconnected(ComponentName name) {
- }
- };
- @Override
- public void onCreate(Bundle savedInstanceState) {
- super.onCreate(savedInstanceState);
- setContentView(R.layout.main);
- text = (TextView) findViewById(R.id.text);
- }
- @Override
- protected void onDestroy() {
- super.onDestroy();
- if (binded) {
- unbindService(conn);
- }
- }
- public void start(View view) {
- if (binded) {
- binder.start();
- listenProgress();
- return;
- }
- Intent intent = new Intent(this, DownloadService.class);
- startService(intent); //如果先调用startService,则在多个服务绑定对象调用unbindService后服务仍不会被销毁
- bindService(intent, conn, Context.BIND_AUTO_CREATE);
- }
- /**
- * 监听进度
- */
- private void listenProgress() {
- new Thread() {
- public void run() {
- while (!binder.isCancelled() && binder.getProgress() <= 100) {
- int progress = binder.getProgress();
- Message msg = handler.obtainMessage();
- msg.arg1 = progress;
- handler.sendMessage(msg);
- if (progress == 100) {
- break;
- }
- try {
- Thread.sleep(200);
- } catch (InterruptedException e) {
- e.printStackTrace();
- }
- }
- };
- }.start();
- }
- }
我们可以看到,当点击开始按钮后,以bindService的方式绑定服务,用获取到的DownloadService.DownloadBinder实例启动服务,并在Activity中启动一个线程监听服务的进度信息,及时的显示到按钮下方。
服务类DownloadService.java代码如下:
- package com.scott.notification;
- import android.app.Notification;
- import android.app.NotificationManager;
- import android.app.PendingIntent;
- import android.app.Service;
- import android.content.Context;
- import android.content.Intent;
- import android.os.Binder;
- import android.os.Handler;
- import android.os.IBinder;
- import android.os.Message;
- import android.widget.RemoteViews;
- public class DownloadService extends Service {
- private static final int NOTIFY_ID = 0;
- private boolean cancelled;
- private int progress;
- private Context mContext = this;
- private NotificationManager mNotificationManager;
- private Notification mNotification;
- private DownloadBinder binder = new DownloadBinder();
- private Handler handler = new Handler() {
- public void handleMessage(android.os.Message msg) {
- switch (msg.what) {
- case 1:
- int rate = msg.arg1;
- if (rate < 100) {
- // 更新进度
- RemoteViews contentView = mNotification.contentView;
- contentView.setTextViewText(R.id.rate, rate + "%");
- contentView.setProgressBar(R.id.progress, 100, rate, false);
- } else {
- // 下载完毕后变换通知形式
- mNotification.flags = Notification.FLAG_AUTO_CANCEL;
- mNotification.contentView = null;
- Intent intent = new Intent(mContext, FileMgrActivity.class);
- // 告知已完成
- intent.putExtra("completed", "yes");
- //更新参数,注意flags要使用FLAG_UPDATE_CURRENT
- PendingIntent contentIntent = PendingIntent.getActivity(mContext, 0, intent, PendingIntent.FLAG_UPDATE_CURRENT);
- mNotification.setLatestEventInfo(mContext, "下载完成", "文件已下载完毕", contentIntent);
- stopSelf();//停掉服务自身
- }
- // 最后别忘了通知一下,否则不会更新
- mNotificationManager.notify(NOTIFY_ID, mNotification);
- break;
- case 0:
- // 取消通知
- mNotificationManager.cancel(NOTIFY_ID);
- break;
- }
- };
- };
- @Override
- public void onCreate() {
- super.onCreate();
- mNotificationManager = (NotificationManager) getSystemService(android.content.Context.NOTIFICATION_SERVICE);
- }
- @Override
- public IBinder onBind(Intent intent) {
- // 返回自定义的DownloadBinder实例
- return binder;
- }
- @Override
- public void onDestroy() {
- super.onDestroy();
- cancelled = true; // 取消下载线程
- }
- /**
- * 创建通知
- */
- private void setUpNotification() {
- int icon = R.drawable.down;
- CharSequence tickerText = "开始下载";
- long when = System.currentTimeMillis();
- mNotification = new Notification(icon, tickerText, when);
- // 放置在"正在运行"栏目中
- mNotification.flags = Notification.FLAG_ONGOING_EVENT;
- RemoteViews contentView = new RemoteViews(mContext.getPackageName(), R.layout.download_notification_layout);
- contentView.setTextViewText(R.id.fileName, "AngryBird.apk");
- // 指定个性化视图
- mNotification.contentView = contentView;
- Intent intent = new Intent(this, FileMgrActivity.class);
- PendingIntent contentIntent = PendingIntent.getActivity(mContext, 0, intent, PendingIntent.FLAG_UPDATE_CURRENT);
- // 指定内容意图
- mNotification.contentIntent = contentIntent;
- mNotificationManager.notify(NOTIFY_ID, mNotification);
- }
- /**
- * 下载模块
- */
- private void startDownload() {
- cancelled = false;
- int rate = 0;
- while (!cancelled && rate < 100) {
- try {
- // 模拟下载进度
- Thread.sleep(500);
- rate = rate + 5;
- } catch (InterruptedException e) {
- e.printStackTrace();
- }
- Message msg = handler.obtainMessage();
- msg.what = 1;
- msg.arg1 = rate;
- handler.sendMessage(msg);
- this.progress = rate;
- }
- if (cancelled) {
- Message msg = handler.obtainMessage();
- msg.what = 0;
- handler.sendMessage(msg);
- }
- }
- /**
- * DownloadBinder中定义了一些实用的方法
- *
- * @author user
- *
- */
- public class DownloadBinder extends Binder {
- /**
- * 开始下载
- */
- public void start() {
- //将进度归零
- progress = 0;
- //创建通知
- setUpNotification();
- new Thread() {
- public void run() {
- //下载
- startDownload();
- };
- }.start();
- }
- /**
- * 获取进度
- *
- * @return
- */
- public int getProgress() {
- return progress;
- }
- /**
- * 取消下载
- */
- public void cancel() {
- cancelled = true;
- }
- /**
- * 是否已被取消
- *
- * @return
- */
- public boolean isCancelled() {
- return cancelled;
- }
- }
- }
我们看到,在服务中有个DownloadBinder类,它继承自Binder,定义了一系列方法,获取服务状态以及操作当前服务,刚才我们在 MainActivity中获取的就是这个类的实例。最后,不要忘了在AndroidManifest.xml中配置该服务。关于进度通知的布局文件/res/layout/download_notification_layout.xml,在这里就不需贴出了,朋友们可以参考一下Notification使用详解之二中进度通知布局的具体代码。
下面我们来介绍一下FileMgrActivity,它就是点击通知之后跳转到的界面,布局文件/res/filemgr.xml如下:
- <?xml version="1.0" encoding="utf-8"?>
- <LinearLayout xmlns:android="http://schemas.android.com/apk/res/android"
- android:orientation="vertical"
- android:layout_width="fill_parent"
- android:layout_height="fill_parent">
- <ProgressBar
- android:id="@+id/progress"
- style="?android:attr/progressBarStyleHorizontal"
- android:layout_width="fill_parent"
- android:layout_height="wrap_content"
- android:max="100"
- android:progress="0"/>
- <Button
- android:id="@+id/cancel"
- android:layout_width="fill_parent"
- android:layout_height="wrap_content"
- android:text="cancel"
- android:onClick="cancel"/>
- </LinearLayout>
我们来看一下FileMgrActivity.java具体的代码:
- package com.scott.notification;
- import android.app.Activity;
- import android.content.ComponentName;
- import android.content.Context;
- import android.content.Intent;
- import android.content.ServiceConnection;
- import android.os.Bundle;
- import android.os.Handler;
- import android.os.IBinder;
- import android.os.Message;
- import android.view.View;
- import android.widget.Button;
- import android.widget.ProgressBar;
- public class FileMgrActivity extends Activity {
- private DownloadService.DownloadBinder binder;
- private ProgressBar progressBar;
- private Button cancel;
- private boolean binded;
- private Handler handler = new Handler() {
- public void handleMessage(android.os.Message msg) {
- int progress = msg.arg1;
- progressBar.setProgress(progress);
- if (progress == 100) {
- cancel.setEnabled(false);
- }
- };
- };
- private ServiceConnection conn = new ServiceConnection() {
- @Override
- public void onServiceConnected(ComponentName name, IBinder service) {
- binder = (DownloadService.DownloadBinder) service;
- //监听进度信息
- listenProgress();
- }
- @Override
- public void onServiceDisconnected(ComponentName name) {
- }
- };
- @Override
- public void onCreate(Bundle savedInstanceState) {
- super.onCreate(savedInstanceState);
- setContentView(R.layout.filemgr);
- progressBar = (ProgressBar) findViewById(R.id.progress);
- cancel = (Button) findViewById(R.id.cancel);
- if ("yes".equals(getIntent().getStringExtra("completed"))) {
- //如果已完成,则不需再绑定service
- progressBar.setProgress(100);
- cancel.setEnabled(false);
- } else {
- //绑定service
- Intent intent = new Intent(this, DownloadService.class);
- bindService(intent, conn, Context.BIND_AUTO_CREATE);
- binded = true;
- }
- }
- @Override
- protected void onDestroy() {
- super.onDestroy();
- //如果是绑定状态,则取消绑定
- if (binded) {
- unbindService(conn);
- }
- }
- public void cancel(View view) {
- //取消下载
- binder.cancel();
- }
- /**
- * 监听进度信息
- */
- private void listenProgress() {
- new Thread() {
- public void run() {
- while (!binder.isCancelled() && binder.getProgress() <= 100) {
- int progress = binder.getProgress();
- Message msg = handler.obtainMessage();
- msg.arg1 = progress;
- handler.sendMessage(msg);
- try {
- Thread.sleep(200);
- } catch (InterruptedException e) {
- e.printStackTrace();
- }
- }
- };
- }.start();
- }
- }
我们发现,它和MainActivity实现方式很相似,恩,他们都是通过和服务绑定后获取到的Binder对象来跟服务通信的,都是主动和服务打招呼来获取信息和控制服务的。
这两个Activity和一个Service似乎像是复杂的男女关系,两个男人同时喜欢一个女人,都通过自己的手段试图从那个女人获取爱情,两个男人都很主动,那个女人显得很被动。
以上就是今天的全部内容,也许朋友们会有疑问,能不能让Service主动告知Activity当前的进度信息呢?答案是可以。下一次,我就会和大家分享一下,如何变Service为主动方,让一个女人脚踏两只船的方式。
转载于:https://my.oschina.net/mzhs/blog/179771
Notification使用详解之三:通过服务更新进度通知在Activity中监听服务进度相关推荐
- oracle监听服务无法启动不了,关于ORACLE监听服务无法启动的问题
今天电脑拿回家,启动oracle数据库的监听服务时发现无法启动.给出的错误提示是说,这个服务启动了又停止了,不知道是为什么.因为在学校的时候用是没有问题的.我想应该是因为ip的是问题.在网上查了一下: ...
- ASP.NET Core真实管道详解[2]:Server是如何完成针对请求的监听、接收与响应的【上】
Server是ASP .NET Core管道的第一个节点,负责完整请求的监听和接收,最终对请求的响应同样也由它完成.Server是我们对所有实现了IServer接口的所有类型以及对应对象的统称,如下面 ...
- Notification使用详解之四:由后台服务向Activity发送进度信息
上次讲到了如何在Activity中监听后台服务的进度信息,实现的方式是让Activity与后台服务绑定,通过中间对象Binder的实例操作后台服务.从效果上来讲,这种方式是可行的,不过这种实现有个缺点 ...
- win7 oracle启动监听,win7系统oracle监听服务无法打开的解决方法
无论谁在使用电脑的时候都可能会发现oracle监听服务无法打开的问题,oracle监听服务无法打开让用户们很苦恼,这是怎么回事呢,oracle监听服务无法打开有什么简便的处理方式呢,其实只要依照1.如 ...
- oracle 监听服务启动后停止
发现Oracle 监听服务启动后刷新又停止了,导致这种问题的有几种可能情况: 1.listener服务不正常,因此需要重建这个服务 方法一 :修改注册表 1>进入dos窗口,手工启动listen ...
- 【Google Play】App Bundle 使用详解 ( 简介 | 应用内更新 | 即时更新 | 灵活更新 )
Google Play 上架完整流程 系列文章目录 [Google Play]创建 Google 开发者账号 ( 注册邮箱账号 | 创建开发者账号 ) [Google Play]创建并设置应用 ( 访 ...
- Fragment详解之三——管理Fragment(1)
前言:follow your heart,be your own king 相关文章: 1.<Fragment详解之一--概述> 2.<Fragment详解之二--基本使用方法> ...
- 一致性协议raft详解(四):raft在工程实践中的优化
一致性协议raft详解(四):raft在工程实践中的优化 前言 性能优化 client对raft集群的读写 参考链接 前言 有关一致性协议的资料网上有很多,当然错误也有很多.笔者在学习的过程中走了不少 ...
- Vue watch监听详解,一篇文章彻底搞懂Vue2/Vue3中的watch监听
watch监听在vue2和vue3中的用法详解(全) Vue2中的watch用法 Vue3中的watch用法 首先写一个vue页面 <template><div><h1& ...
最新文章
- Java 多线程概述
- TZOJ 4621 Grammar(STL模拟)
- POJ 2386 Lake Counting
- 快速排序和快速选择(quickSort and quickSelect)算法
- 获得BootstrapTable行号index
- c语言printf输出中文报错,printf输出中文后还带有数字是怎么回事?
- [Java] 蓝桥杯ALGO-145 算法训练 4-1打印下述图形
- 蒙特卡洛粒子滤波定位算法_序列蒙特卡洛(SMC)与粒子滤波
- C++中的void类型
- 【Axure原型分享】会议管理原型模板
- android应用图标在哪修改器,手机应用图标修改器app
- 阿里云P10技术专家褚霸:我是一个程序员
- App Extension应用扩展
- An exception has been thrown during the rendering of a template
- Win10系统中耳机插入前后面板均没有声音
- 学习Python的Django执行python manage.py startapp myApp创建应用出现的问题
- Application的启动流程
- 如何解决Error running ‘Tomcat 8.5.45‘: port out of range:-1
- SIM卡的密码PIN与PUK密码PIN
- Spring AOP动态代理