上传图片方法大全 [网摘]
1.最简单的单文件上传(没花头)
效果图:
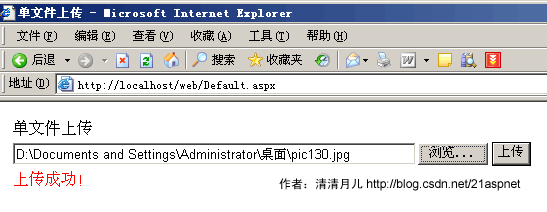
说明:这是最基本的文件上传,在asp.net1.x中没有这个FileUpload控件,只有html的上传控件,那时候要把html控件转化为服务器控件,很不好用。其实所有文件上传的美丽效果都是从这个FileUpload控件衍生,第一个例子虽然简单却是根本。
后台代码:
using System;
using System.Data;
using System.Configuration;
using System.Collections;
using System.Web;
using System.Web.Security;
using System.Web.UI;
using System.Web.UI.WebControls;
using System.Web.UI.WebControls.WebParts;
using System.Web.UI.HtmlControls;
public partial class _Default : System.Web.UI.Page
{
protected void Page_Load(object sender, EventArgs e)
{
}
protected void bt_upload_Click(object sender, EventArgs e)
{
try
{
if (FileUpload1.PostedFile.FileName == "")
{
this.lb_info.Text = "请选择文件!";
}
else
{
string filepath = FileUpload1.PostedFile.FileName;
string filename = filepath.Substring(filepath.LastIndexOf("\\") + 1);
string serverpath = Server.MapPath("images/") + filename;
FileUpload1.PostedFile.SaveAs(serverpath);
this.lb_info.Text = "上传成功!";
}
}
catch (Exception ex)
{
this.lb_info.Text = "上传发生错误!原因是:" + ex.ToString();
}
}
}
前台代码:
<table style="width: 343px">
<tr>
<td style="width: 100px">
单文件上传</td>
<td style="width: 100px">
</td>
</tr>
<tr>
<td style="width: 100px">
<asp:FileUpload ID="FileUpload1" runat="server" Width="475px" />
</td>
<td style="width: 100px">
<asp:Button ID="bt_upload" runat="server" OnClick="bt_upload_Click" Text="上传" /></td>
</tr>
<tr>
<td style="width: 100px; height: 21px;">
<asp:Label ID="lb_info" runat="server" ForeColor="Red" Width="183px"></asp:Label></td>
<td style="width: 100px; height: 21px">
</td>
</tr>
</table>
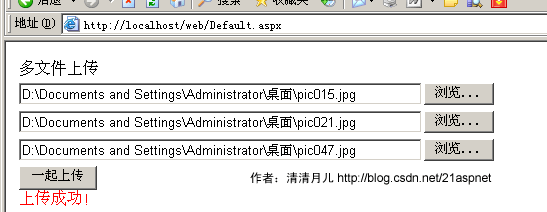
2.多文件上传
效果图:
后台代码:
using System;
using System.Data;
using System.Configuration;
using System.Collections;
using System.Web;
using System.Web.Security;
using System.Web.UI;
using System.Web.UI.WebControls;
using System.Web.UI.WebControls.WebParts;
using System.Web.UI.HtmlControls;
public partial class _Default : System.Web.UI.Page
{
protected void Page_Load(object sender, EventArgs e)
{
}
protected void bt_upload_Click(object sender, EventArgs e)
{
if ((FileUpload1.PostedFile.FileName == "" && FileUpload2.PostedFile.FileName == "")&&FileUpload3.PostedFile.FileName == "")
{
this.lb_info.Text = "请选择文件!";
}
else
{
HttpFileCollection myfiles = Request.Files;
for (int i = 0; i < myfiles.Count; i++)
{
HttpPostedFile mypost = myfiles[i];
try
{
if (mypost.ContentLength > 0)
{
string filepath = mypost.FileName;
string filename = filepath.Substring(filepath.LastIndexOf("\\") + 1);
string serverpath = Server.MapPath("images/") + filename;
mypost.SaveAs(serverpath);
this.lb_info.Text = "上传成功!";
}
}
catch (Exception error)
{
this.lb_info.Text = "上传发生错误!原因:" + error.ToString();
}
}
}
}
}
前台代码:
<%@ Page Language="C#" AutoEventWireup="true" CodeFile="Default.aspx.cs" Inherits="_Default" %>
<!DOCTYPE html PUBLIC "-//W3C//DTD XHTML 1.0 Transitional//EN" "http://www.w3.org/TR/xhtml1/DTD/xhtml1-transitional.dtd">
<html xmlns="http://www.w3.org/1999/xhtml" >
<head runat="server">
<title>多文件上传 清清月儿http://blog.csdn.net/21aspnet/</title>
</head>
<body>
<form id="form1" runat="server">
<div>
<table style="width: 343px">
<tr>
<td style="width: 100px">
多文件上传</td>
<td style="width: 100px">
</td>
</tr>
<tr>
<td style="width: 100px">
<asp:FileUpload ID="FileUpload1" runat="server" Width="475px" />
</td>
<td style="width: 100px">
</td>
</tr>
<tr>
<td style="width: 100px">
<asp:FileUpload ID="FileUpload2" runat="server" Width="475px" /></td>
<td style="width: 100px">
</td>
</tr>
<tr>
<td style="width: 100px">
<asp:FileUpload ID="FileUpload3" runat="server" Width="475px" /></td>
<td style="width: 100px">
</td>
</tr>
<tr>
<td style="width: 100px">
<asp:Button ID="bt_upload" runat="server" OnClick="bt_upload_Click" Text="一起上传" />
<asp:Label ID="lb_info" runat="server" ForeColor="Red" Width="183px"></asp:Label></td>
<td style="width: 100px">
</td>
</tr>
</table>
</div>
</form>
</body>
</html>
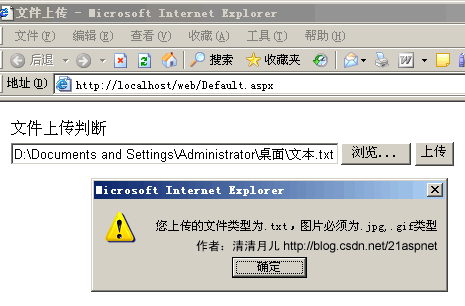
3.客户端检查上传文件类型(以上传图片为例)
效果图:
后台代码和1.最简单的单文件上传一样;
前台代码:
<%@ Page Language="C#" AutoEventWireup="true" CodeFile="Default.aspx.cs" Inherits="_Default" %>
<!DOCTYPE html PUBLIC "-//W3C//DTD XHTML 1.0 Transitional//EN" "http://www.w3.org/TR/xhtml1/DTD/xhtml1-transitional.dtd">
<html xmlns="http://www.w3.org/1999/xhtml" >
<head runat="server">
<title>清清月儿 http://blog.csdn.net/21aspnet</title>
<script language="javascript">
function Check_FileType()
{
var str=document.getElementById("FileUpload1").value;
var pos = str.lastIndexOf(".");
var lastname = str.substring(pos,str.length)
if (lastname.toLowerCase()!=".jpg" && lastname.toLowerCase()!=".gif")
{
alert("您上传的文件类型为"+lastname+",图片必须为.jpg,.gif类型");
return false;
}
else
{
return true;
}
}
</script>
</head>
<body>
<form id="form1" runat="server">
<div>
<table style="width: 343px">
<tr>
<td style="width: 104px">
文件上传判断</td>
<td style="width: 100px">
</td>
</tr>
<tr>
<td style="width: 104px">
<asp:FileUpload ID="FileUpload1" runat="server" Width="400px" />
</td>
<td style="width: 100px">
<asp:Button ID="bt_upload" runat="server" OnClick="bt_upload_Click" Text="上传" OnClientClick="return Check_FileType()"/></td>
</tr>
<tr>
<td style="width: 104px; height: 21px;">
<asp:Label ID="lb_info" runat="server" ForeColor="Red" Width="183px"></asp:Label></td>
<td style="width: 100px; height: 21px">
</td>
</tr>
</table>
</div>
</form>
</body>
</html>
说明:点击上传时先触发客户端事件Check_FileType;
4.服务器端检查上传文件类型(以上传图片为例)
效果图:

后台代码:
using System;
using System.Data;
using System.Configuration;
using System.Collections;
using System.Web;
using System.Web.Security;
using System.Web.UI;
using System.Web.UI.WebControls;
using System.Web.UI.WebControls.WebParts;
using System.Web.UI.HtmlControls;
public partial class _Default : System.Web.UI.Page
{
protected void Page_Load(object sender, EventArgs e)
{
}
protected void bt_upload_Click(object sender, EventArgs e)
{
try
{
if (FileUpload1.PostedFile.FileName == "")
{
this.lb_info.Text = "请选择文件!";
}
else
{
string filepath = FileUpload1.PostedFile.FileName;
if (IsAllowedExtension(FileUpload1) == true)
{
string filename = filepath.Substring(filepath.LastIndexOf("\\") + 1);
string serverpath = Server.MapPath("images/") + filename;
FileUpload1.PostedFile.SaveAs(serverpath);
this.lb_info.Text = "上传成功!";
}
else
{
this.lb_info.Text = "请上传图片";
}
}
}
catch (Exception error)
{
this.lb_info.Text = "上传发生错误!原因:" + error.ToString();
}
}
public static bool IsAllowedExtension(FileUpload hifile)
{
string strOldFilePath = "", strExtension = "";
string[] arrExtension = { ".gif", ".jpg", ".jpeg", ".bmp", ".png" };
if (hifile.PostedFile.FileName != string.Empty)
{
strOldFilePath = hifile.PostedFile.FileName;
strExtension = strOldFilePath.Substring(strOldFilePath.LastIndexOf("."));
for (int i = 0; i < arrExtension.Length; i++)
{
if (strExtension.Equals(arrExtension[i]))
{
return true;
}
}
}
return false;
}
}
5.服务器端检查上传文件类型(可以检测真正文件名)
其实方法4并不好,因为用户可以把XXX.txt伪装为XXX.jpg。
效果图: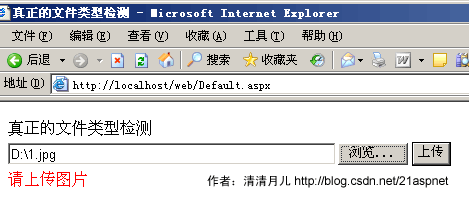
后台代码:
using System;
using System.Data;
using System.Configuration;
using System.Collections;
using System.Web;
using System.Web.Security;
using System.Web.UI;
using System.Web.UI.WebControls;
using System.Web.UI.WebControls.WebParts;
using System.Web.UI.HtmlControls;
public partial class _Default : System.Web.UI.Page
{
//清清月儿 http://blog.csdn.net/21aspnet
protected void Page_Load(object sender, EventArgs e)
{
}
protected void bt_upload_Click(object sender, EventArgs e)
{
try
{
if (FileUpload1.PostedFile.FileName == "")
{
this.lb_info.Text = "请选择文件!";
}
else
{
string filepath = FileUpload1.PostedFile.FileName;
if (IsAllowedExtension(FileUpload1) == true)
{
string filename = filepath.Substring(filepath.LastIndexOf("\\") + 1);
string serverpath = Server.MapPath("images/") + filename;
FileUpload1.PostedFile.SaveAs(serverpath);
this.lb_info.Text = "上传成功!";
}
else
{
this.lb_info.Text = "请上传图片";
}
}
}
catch (Exception error)
{
this.lb_info.Text = "上传发生错误!原因:" + error.ToString();
}
}
public static bool IsAllowedExtension(FileUpload hifile)
{
System.IO.FileStream fs = new System.IO.FileStream(hifile.PostedFile.FileName, System.IO.FileMode.Open, System.IO.FileAccess.Read);
System.IO.BinaryReader r = new System.IO.BinaryReader(fs);
string fileclass = "";
byte buffer;
try
{
buffer = r.ReadByte();
fileclass = buffer.ToString();
buffer = r.ReadByte();
fileclass += buffer.ToString();
}
catch
{
}
r.Close();
fs.Close();
if (fileclass == "255216" || fileclass == "7173")//说明255216是jpg;7173是gif;6677是BMP,13780是PNG;7790是exe,8297是rar
{
return true;
}
else
{
return false;
}
}
}
6.上传文件文件名唯一性处理(时间戳+SessionID)
效果图:
说明:年月日时分秒+临时session+原文件名 如果大家怕还会重复可以加GUID
后台代码:
try
{
if (FileUpload1.PostedFile.FileName == "")
{
this.lb_info.Text = "请选择文件!";
}
else
{
string filepath = FileUpload1.PostedFile.FileName;
string filename = filepath.Substring(filepath.LastIndexOf("\\") + 1);
string serverpath = Server.MapPath("images/") + System.DateTime.Now.ToString("yyy-MM-dd-hh-mm-ss") + Session.SessionID + filename;
FileUpload1.PostedFile.SaveAs(serverpath);
this.lb_info.Text = "上传成功!";
}
}
catch (Exception error)
{
this.lb_info.Text = "上传发生错误!原因:" + error.ToString();
}
注:GUID的方法:Guid myGuid=Guid.NewGuid();
7.上传图片生成等比例缩略图
效果图:
缩略图代码:
ImageThumbnail.cs
using System;
using System.IO;
using System.Drawing;
using System.Drawing.Imaging;
public class ImageThumbnail
{
public Image ResourceImage;
private int ImageWidth;
private int ImageHeight;
public string ErrorMessage;
public ImageThumbnail(string ImageFileName)
{
ResourceImage = Image.FromFile(ImageFileName);
ErrorMessage = "";
}
public bool ThumbnailCallback()
{
return false;
}
// 方法1,按大小
public bool ReducedImage(int Width, int Height, string targetFilePath)
{
try
{
Image ReducedImage;
Image.GetThumbnailImageAbort callb = new Image.GetThumbnailImageAbort(ThumbnailCallback);
ReducedImage = ResourceImage.GetThumbnailImage(Width, Height, callb, IntPtr.Zero);
ReducedImage.Save(@targetFilePath, ImageFormat.Jpeg);
ReducedImage.Dispose();
return true;
}
catch (Exception e)
{
ErrorMessage = e.Message;
return false;
}
}
// 方法2,按百分比 缩小60% Percent为0.6 targetFilePath为目标路径
public bool ReducedImage(double Percent, string targetFilePath)
{
try
{
Image ReducedImage;
Image.GetThumbnailImageAbort callb = new Image.GetThumbnailImageAbort(ThumbnailCallback);
ImageWidth = Convert.ToInt32(ResourceImage.Width * Percent);
ImageHeight = (ResourceImage.Height)*ImageWidth/ ResourceImage.Width;//等比例缩放
ReducedImage = ResourceImage.GetThumbnailImage(ImageWidth, ImageHeight, callb, IntPtr.Zero);
ReducedImage.Save(@targetFilePath, ImageFormat.Jpeg);
ReducedImage.Dispose();
return true;
}
catch (Exception e)
{
ErrorMessage = e.Message;
return false;
}
}
}
后台代码:
using System;
using System.Data;
using System.Configuration;
using System.Collections;
using System.Web;
using System.Web.Security;
using System.Web.UI;
using System.Web.UI.WebControls;
using System.Web.UI.WebControls.WebParts;
using System.Web.UI.HtmlControls;
public partial class _Default : System.Web.UI.Page
{
protected void Page_Load(object sender, EventArgs e)
{
}
protected void bt_upload_Click(object sender, EventArgs e)
{
try
{
if (FileUpload1.PostedFile.FileName == "")
{
this.lb_info.Text = "请选择文件!";
}
else
{
string filepath = FileUpload1.PostedFile.FileName;
string filename = filepath.Substring(filepath.LastIndexOf("\\") + 1);
string serverpath1 = Server.MapPath("images/") + filename;
string serverpath2 = Server.MapPath("images/") + System.DateTime.Now.ToString("yyy-MM-dd-hh-mm-ss") + Session.SessionID + filename;
FileUpload1.PostedFile.SaveAs(serverpath1);
ImageThumbnail img = new ImageThumbnail(filepath);
img.ReducedImage(0.4, serverpath2);//0.4表示缩小40%
this.lb_info.Text = "上传成功!";
}
}
catch (Exception error)
{
this.lb_info.Text = "上传发生错误!原因:" + error.ToString();
}
}
}
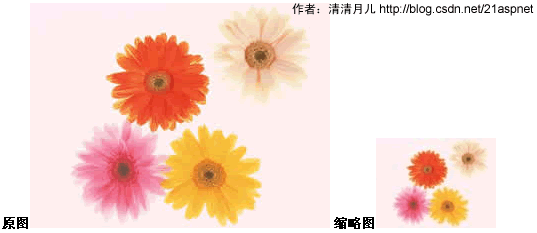
8.上传图片加水印(文字水印,图片水印,文字+图片水印)
效果图:
原图
水印
给图片加水印以后(注意右上角+正下方)

代码:
DrawImg.cs 出自http://www.codeproject.com/csharp/watermark.asp
using System;
using System.Drawing;
using System.Drawing.Imaging;
using System.Drawing.Drawing2D;
public class DrawImg
{
private string WorkingDirectory = string.Empty ; //路径
private string ImageName = string.Empty; //被处理的图片
private string ImageWater = string.Empty; //水印图片
private string FontString = string.Empty; //水印文字
enum DealType{NONE,WaterImage,WaterFont,DoubleDo}; //枚举命令
private DealType dealtype;
public DrawImg()
{}
public string PublicWorkingDirectory
{
get
{
return WorkingDirectory;
}
set
{
WorkingDirectory = value;
}
}
public string PublicImageName
{
get
{
return ImageName;
}
set
{
ImageName = value;
}
}
public string PublicImageWater
{
get
{
return ImageWater;
}
set //设置了水印图片的话说明是要水印图片效果的
{
dealtype = DealType.WaterImage;
ImageWater = value;
}
}
public string PublicFontString
{
get
{
return FontString;
}
set //设置了水印文字的话说明是要水印文字效果的
{
dealtype = DealType.WaterFont;
FontString = value;
}
}
public void DealImage()
{
IsDouble();
switch( dealtype )
{
case DealType.WaterFont: WriteFont(); break;
case DealType.WaterImage: WriteImg(); break;
case DealType.DoubleDo: WriteFontAndImg(); break;
}
}
private void IsDouble()
{
if(ImageWater+""!="" && FontString+""!="")
{
dealtype = DealType.DoubleDo;
}
}
private void WriteFont()
{
//set a working directory
//string WorkingDirectory = @"C:\Watermark_src\WaterPic";
//define a string of text to use as the Copyright message
//string Copyright = "Copyright ?2002 - AP Photo/David Zalubowski";
//create a image object containing the photograph to watermark
Image imgPhoto = Image.FromFile(WorkingDirectory + ImageName);
int phWidth = imgPhoto.Width;
int phHeight = imgPhoto.Height;
//create a Bitmap the Size of the original photograph
Bitmap bmPhoto = new Bitmap(phWidth, phHeight, PixelFormat.Format24bppRgb);
bmPhoto.SetResolution(imgPhoto.HorizontalResolution, imgPhoto.VerticalResolution);
//load the Bitmap into a Graphics object
Graphics grPhoto = Graphics.FromImage(bmPhoto);
//------------------------------------------------------------
//Step #1 - Insert Copyright message
//------------------------------------------------------------
//Set the rendering quality for this Graphics object
grPhoto.SmoothingMode = SmoothingMode.AntiAlias;
//Draws the photo Image object at original size to the graphics object.
grPhoto.DrawImage(
imgPhoto, // Photo Image object
new Rectangle(0, 0, phWidth, phHeight), // Rectangle structure
0, // x-coordinate of the portion of the source image to draw.
0, // y-coordinate of the portion of the source image to draw.
phWidth, // Width of the portion of the source image to draw.
phHeight, // Height of the portion of the source image to draw.
GraphicsUnit.Pixel); // Units of measure
//-------------------------------------------------------
//to maximize the size of the Copyright message we will
//test multiple Font sizes to determine the largest posible
//font we can use for the width of the Photograph
//define an array of point sizes you would like to consider as possiblities
//-------------------------------------------------------
int[] sizes = new int[]{16,14,12,10,8,6,4};
Font crFont = null;
SizeF crSize = new SizeF();
//Loop through the defined sizes checking the length of the Copyright string
//If its length in pixles is less then the image width choose this Font size.
for (int i=0 ;i<7; i++)
{
//set a Font object to Arial (i)pt, Bold
//crFont = new Font("arial", sizes[i], FontStyle.Bold);
crFont = new Font("arial",sizes[i],FontStyle.Bold);
//Measure the Copyright string in this Font
crSize = grPhoto.MeasureString(FontString, crFont);
if((ushort)crSize.Width < (ushort)phWidth)
break;
}
//Since all photographs will have varying heights, determine a
//position 5% from the bottom of the image
int yPixlesFromBottom = (int)(phHeight *.05);
//Now that we have a point size use the Copyrights string height
//to determine a y-coordinate to draw the string of the photograph
float yPosFromBottom = ((phHeight - yPixlesFromBottom)-(crSize.Height/2));
//Determine its x-coordinate by calculating the center of the width of the image
float xCenterOfImg = (phWidth/2);
//Define the text layout by setting the text alignment to centered
StringFormat StrFormat = new StringFormat();
StrFormat.Alignment = StringAlignment.Center;
//define a Brush which is semi trasparent black (Alpha set to 153)
SolidBrush semiTransBrush2 = new SolidBrush(Color.FromArgb(153, 0, 0, 0));
//Draw the Copyright string
grPhoto.DrawString(FontString, //string of text
crFont, //font
semiTransBrush2, //Brush
new PointF(xCenterOfImg+1,yPosFromBottom+1), //Position
StrFormat);
//define a Brush which is semi trasparent white (Alpha set to 153)
SolidBrush semiTransBrush = new SolidBrush(Color.FromArgb(153, 255, 255, 255));
//Draw the Copyright string a second time to create a shadow effect
//Make sure to move this text 1 pixel to the right and down 1 pixel
grPhoto.DrawString(FontString, //string of text
crFont, //font
semiTransBrush, //Brush
new PointF(xCenterOfImg,yPosFromBottom), //Position
StrFormat);
imgPhoto = bmPhoto;
grPhoto.Dispose();
//save new image to file system.
imgPhoto.Save(WorkingDirectory + ImageName + "_finally.jpg", ImageFormat.Jpeg);
imgPhoto.Dispose();
//Text alignment
}
private void WriteImg()
{
//set a working directory
//string WorkingDirectory = @"C:\Watermark_src\WaterPic";
//create a image object containing the photograph to watermark
Image imgPhoto = Image.FromFile(WorkingDirectory + ImageName);
int phWidth = imgPhoto.Width;
int phHeight = imgPhoto.Height;
//create a Bitmap the Size of the original photograph
Bitmap bmPhoto = new Bitmap(phWidth, phHeight, PixelFormat.Format24bppRgb);
bmPhoto.SetResolution(imgPhoto.HorizontalResolution, imgPhoto.VerticalResolution);
//load the Bitmap into a Graphics object
Graphics grPhoto = Graphics.FromImage(bmPhoto);
//create a image object containing the watermark
Image imgWatermark = new Bitmap(WorkingDirectory + ImageWater);
int wmWidth = imgWatermark.Width;
int wmHeight = imgWatermark.Height;
//Set the rendering quality for this Graphics object
grPhoto.SmoothingMode = SmoothingMode.AntiAlias;
//Draws the photo Image object at original size to the graphics object.
grPhoto.DrawImage(
imgPhoto, // Photo Image object
new Rectangle(0, 0, phWidth, phHeight), // Rectangle structure
0, // x-coordinate of the portion of the source image to draw.
0, // y-coordinate of the portion of the source image to draw.
phWidth, // Width of the portion of the source image to draw.
phHeight, // Height of the portion of the source image to draw.
GraphicsUnit.Pixel); // Units of measure
//------------------------------------------------------------
//Step #2 - Insert Watermark image
//------------------------------------------------------------
//Create a Bitmap based on the previously modified photograph Bitmap
Bitmap bmWatermark = new Bitmap(bmPhoto);
bmWatermark.SetResolution(imgPhoto.HorizontalResolution, imgPhoto.VerticalResolution);
//Load this Bitmap into a new Graphic Object
Graphics grWatermark = Graphics.FromImage(bmWatermark);
//To achieve a transulcent watermark we will apply (2) color
//manipulations by defineing a ImageAttributes object and
//seting (2) of its properties.
ImageAttributes imageAttributes = new ImageAttributes();
//The first step in manipulating the watermark image is to replace
//the background color with one that is trasparent (Alpha=0, R=0, G=0, B=0)
//to do this we will use a Colormap and use this to define a RemapTable
ColorMap colorMap = new ColorMap();
//My watermark was defined with a background of 100% Green this will
//be the color we search for and replace with transparency
colorMap.OldColor = Color.FromArgb(255, 0, 255, 0);
colorMap.NewColor = Color.FromArgb(0, 0, 0, 0);
ColorMap[] remapTable = {colorMap};
imageAttributes.SetRemapTable(remapTable, ColorAdjustType.Bitmap);
//The second color manipulation is used to change the opacity of the
//watermark. This is done by applying a 5x5 matrix that contains the
//coordinates for the RGBA space. By setting the 3rd row and 3rd column
//to 0.3f we achive a level of opacity
float[][] colorMatrixElements = {
new float[] {1.0f, 0.0f, 0.0f, 0.0f, 0.0f},
new float[] {0.0f, 1.0f, 0.0f, 0.0f, 0.0f},
new float[] {0.0f, 0.0f, 1.0f, 0.0f, 0.0f},
new float[] {0.0f, 0.0f, 0.0f, 0.3f, 0.0f},
new float[] {0.0f, 0.0f, 0.0f, 0.0f, 1.0f}};
ColorMatrix wmColorMatrix = new ColorMatrix(colorMatrixElements);
imageAttributes.SetColorMatrix(wmColorMatrix, ColorMatrixFlag.Default,
ColorAdjustType.Bitmap);
//For this example we will place the watermark in the upper right
//hand corner of the photograph. offset down 10 pixels and to the
//left 10 pixles
int xPosOfWm = ((phWidth - wmWidth)-10);
int yPosOfWm = 10;
grWatermark.DrawImage(imgWatermark,
new Rectangle(xPosOfWm,yPosOfWm,wmWidth,wmHeight), //Set the detination Position
0, // x-coordinate of the portion of the source image to draw.
0, // y-coordinate of the portion of the source image to draw.
wmWidth, // Watermark Width
wmHeight, // Watermark Height
GraphicsUnit.Pixel, // Unit of measurment
imageAttributes); //ImageAttributes Object
//Replace the original photgraphs bitmap with the new Bitmap
imgPhoto = bmWatermark;
grPhoto.Dispose();
grWatermark.Dispose();
//save new image to file system.
imgPhoto.Save(WorkingDirectory + ImageName +"_finally.jpg", ImageFormat.Jpeg);
imgPhoto.Dispose();
imgWatermark.Dispose();
}
private void WriteFontAndImg()
{
//create a image object containing the photograph to watermark
Image imgPhoto = Image.FromFile(WorkingDirectory + ImageName);
int phWidth = imgPhoto.Width;
int phHeight = imgPhoto.Height;
//create a Bitmap the Size of the original photograph
Bitmap bmPhoto = new Bitmap(phWidth, phHeight, PixelFormat.Format24bppRgb);
bmPhoto.SetResolution(imgPhoto.HorizontalResolution, imgPhoto.VerticalResolution);
//load the Bitmap into a Graphics object
Graphics grPhoto = Graphics.FromImage(bmPhoto);
//create a image object containing the watermark
Image imgWatermark = new Bitmap(WorkingDirectory + ImageWater);
int wmWidth = imgWatermark.Width;
int wmHeight = imgWatermark.Height;
//------------------------------------------------------------
//Step #1 - Insert Copyright message
//------------------------------------------------------------
//Set the rendering quality for this Graphics object
grPhoto.SmoothingMode = SmoothingMode.AntiAlias;
//Draws the photo Image object at original size to the graphics object.
grPhoto.DrawImage(
imgPhoto, // Photo Image object
new Rectangle(0, 0, phWidth, phHeight), // Rectangle structure
0, // x-coordinate of the portion of the source image to draw.
0, // y-coordinate of the portion of the source image to draw.
phWidth, // Width of the portion of the source image to draw.
phHeight, // Height of the portion of the source image to draw.
GraphicsUnit.Pixel); // Units of measure
//-------------------------------------------------------
//to maximize the size of the Copyright message we will
//test multiple Font sizes to determine the largest posible
//font we can use for the width of the Photograph
//define an array of point sizes you would like to consider as possiblities
//-------------------------------------------------------
int[] sizes = new int[]{16,14,12,10,8,6,4};//这里可以修改文字
Font crFont = null;
SizeF crSize = new SizeF();
//Loop through the defined sizes checking the length of the Copyright string
//If its length in pixles is less then the image width choose this Font size.
for (int i=0 ;i<7; i++)
{
//set a Font object to Arial (i)pt, Bold
crFont = new Font("arial", sizes[i], FontStyle.Bold);
//Measure the Copyright string in this Font
crSize = grPhoto.MeasureString(FontString, crFont);
if((ushort)crSize.Width < (ushort)phWidth)
break;
}
//Since all photographs will have varying heights, determine a
//position 5% from the bottom of the image
int yPixlesFromBottom = (int)(phHeight *.05);
//Now that we have a point size use the Copyrights string height
//to determine a y-coordinate to draw the string of the photograph
float yPosFromBottom = ((phHeight - yPixlesFromBottom)-(crSize.Height/2));
//Determine its x-coordinate by calculating the center of the width of the image
float xCenterOfImg = (phWidth/2);
//Define the text layout by setting the text alignment to centered
StringFormat StrFormat = new StringFormat();
StrFormat.Alignment = StringAlignment.Center;
//define a Brush which is semi trasparent black (Alpha set to 153)
SolidBrush semiTransBrush2 = new SolidBrush(Color.FromArgb(153, 0, 0, 0));
//Draw the Copyright string
grPhoto.DrawString(FontString, //string of text
crFont, //font
semiTransBrush2, //Brush
new PointF(xCenterOfImg+1,yPosFromBottom+1), //Position
StrFormat);
//define a Brush which is semi trasparent white (Alpha set to 153)
SolidBrush semiTransBrush = new SolidBrush(Color.FromArgb(153, 255, 255, 255));
//Draw the Copyright string a second time to create a shadow effect
//Make sure to move this text 1 pixel to the right and down 1 pixel
grPhoto.DrawString(FontString, //string of text
crFont, //font
semiTransBrush, //Brush
new PointF(xCenterOfImg,yPosFromBottom), //Position
StrFormat); //Text alignment
//------------------------------------------------------------
//Step #2 - Insert Watermark image
//------------------------------------------------------------
//Create a Bitmap based on the previously modified photograph Bitmap
Bitmap bmWatermark = new Bitmap(bmPhoto);
bmWatermark.SetResolution(imgPhoto.HorizontalResolution, imgPhoto.VerticalResolution);
//Load this Bitmap into a new Graphic Object
Graphics grWatermark = Graphics.FromImage(bmWatermark);
//To achieve a transulcent watermark we will apply (2) color
//manipulations by defineing a ImageAttributes object and
//seting (2) of its properties.
ImageAttributes imageAttributes = new ImageAttributes();
//The first step in manipulating the watermark image is to replace
//the background color with one that is trasparent (Alpha=0, R=0, G=0, B=0)
//to do this we will use a Colormap and use this to define a RemapTable
ColorMap colorMap = new ColorMap();
//My watermark was defined with a background of 100% Green this will
//be the color we search for and replace with transparency
colorMap.OldColor = Color.FromArgb(255, 0, 255, 0);
colorMap.NewColor = Color.FromArgb(0, 0, 0, 0);
ColorMap[] remapTable = {colorMap};
imageAttributes.SetRemapTable(remapTable, ColorAdjustType.Bitmap);
//The second color manipulation is used to change the opacity of the
//watermark. This is done by applying a 5x5 matrix that contains the
//coordinates for the RGBA space. By setting the 3rd row and 3rd column
//to 0.3f we achive a level of opacity
float[][] colorMatrixElements = {
new float[] {1.0f, 0.0f, 0.0f, 0.0f, 0.0f},
new float[] {0.0f, 1.0f, 0.0f, 0.0f, 0.0f},
new float[] {0.0f, 0.0f, 1.0f, 0.0f, 0.0f},
new float[] {0.0f, 0.0f, 0.0f, 0.3f, 0.0f},
new float[] {0.0f, 0.0f, 0.0f, 0.0f, 1.0f}};
ColorMatrix wmColorMatrix = new ColorMatrix(colorMatrixElements);
imageAttributes.SetColorMatrix(wmColorMatrix, ColorMatrixFlag.Default,
ColorAdjustType.Bitmap);
//For this example we will place the watermark in the upper right
//hand corner of the photograph. offset down 10 pixels and to the
//left 10 pixles
int xPosOfWm = ((phWidth - wmWidth)-10);
int yPosOfWm = 10;
grWatermark.DrawImage(imgWatermark,
new Rectangle(xPosOfWm,yPosOfWm,wmWidth,wmHeight), //Set the detination Position
0, // x-coordinate of the portion of the source image to draw.
0, // y-coordinate of the portion of the source image to draw.
wmWidth, // Watermark Width
wmHeight, // Watermark Height
GraphicsUnit.Pixel, // Unit of measurment
imageAttributes); //ImageAttributes Object
//Replace the original photgraphs bitmap with the new Bitmap
imgPhoto = bmWatermark;
grPhoto.Dispose();
grWatermark.Dispose();
//save new image to file system.
imgPhoto.Save(WorkingDirectory + ImageName +"_finally.jpg", ImageFormat.Jpeg);
imgPhoto.Dispose();
imgWatermark.Dispose();
}
}
//水印图片加水印文字
// ReDrawImg img = new ReDrawImg();
// img .PublicWorkingDirectory = @"C:\Watermark_src\WaterPic\";
// img .PublicImageName = "watermark_photo.jpg";
// img .PublicImageWater = "watermark.bmp";
// img .PublicFontString = "清清月儿";
// img .DealImage();
//水印文字
ReDrawImg img = new ReDrawImg();
img .PublicWorkingDirectory = @"C:\Watermark_src\WaterPic\";
img .PublicImageName = "watermark_photo.jpg";
img .PublicFontString = @"清清月儿";
img .DealImage();
//水印图片
// ReDrawImg img = new ReDrawImg();
// img .PublicWorkingDirectory = @"C:\Watermark_src\WaterPic\";
// img .PublicImageName = "watermark_photo.jpg";
// img .PublicImageWater = "watermark.bmp";
// img .DealImage();
后台代码:
using System;
using System.Data;
using System.Configuration;
using System.Collections;
using System.Web;
using System.Web.Security;
using System.Web.UI;
using System.Web.UI.WebControls;
using System.Web.UI.WebControls.WebParts;
using System.Web.UI.HtmlControls;
public partial class _Default : System.Web.UI.Page
{
protected void Page_Load(object sender, EventArgs e)
{
}
protected void bt_upload_Click(object sender, EventArgs e)
{
try
{
if (FileUpload1.PostedFile.FileName == "")
{
this.lb_info.Text = "请选择文件!";
}
else
{
string filepath = FileUpload1.PostedFile.FileName;
string filename = filepath.Substring(filepath.LastIndexOf("\\") + 1);
HttpPostedFile UpFile = FileUpload1.PostedFile;//获取上传图片对象
int filelength = UpFile.ContentLength;//获取上传图片的大小(字节大小)
if (CheckBytes(filelength)==true)
{
// string serverpath1 = Server.MapPath("images/") + filename;
string serverpath2 = Server.MapPath("images/") + System.DateTime.Now.ToString("yyy-MM-dd-hh-mm-ss") + Session.SessionID + filename;
string newname = System.DateTime.Now.ToString("yyy-MM-dd-hh-mm-ss") + Session.SessionID + filename;//上传到指定文件夹后的图片的新名称 FileUpload1.PostedFile.SaveAs(serverpath2);
//ImageThumbnail img = new ImageThumbnail(filepath);
//img.ReducedImage(0.4, serverpath2);
DrawImg img = new DrawImg();
img.PublicWorkingDirectory = Server.MapPath("images/");
// img.PublicImageName = filename;//作者的例子是上传图片已经存在要上传到的文件夹里
img.PublicImageName =newname;//自己要上传的文件一般不会存在要上传到的文件夹里。这里获取上传成功后的图片文件名称。
img.PublicFontString = "http://blog.csdn.net/21aspnet";
img.PublicImageWater = "yyy.jpg";
img.DealImage();
this.lb_info.Text = "上传成功!";
GC.Collect();//释放进程,否则删不掉图片文件
File.Delete(serverpath);
}
else
{
this.lb_info.Text = "图片大小不能大于2M!";
}
}
}
catch (Exception error)
{
this.lb_info.Text = "上传发生错误!原因:" + error.ToString();
}
}
public bool CheckBytes(int FileLength)//限制图片大小
{
bool Result = true;
int Length = 2097152;//2M
if (FileLength > Length)
{
Result = false;
}
return Result;
}
}
原帖地址:http://blog.csdn.net/21aspnet/archive/2007/04/01/1548696.aspx
转载于:https://www.cnblogs.com/kingjiong/archive/2008/01/13/1037084.html
上传图片方法大全 [网摘]相关推荐
- 突破网管的局域网网络限制方法大全
突破网管的局域网网络限制方法大全 一.网站相关 引用: 1.限制: 不能访问网站,网络游戏(比如联众)不能玩,这类限制一般是限制了欲访问网站的IP地址. 2.突破: 对于这类限制很容易突破,用普通的H ...
- 网摘精灵的超级使用方法
网摘精灵的超级使用方法 1保证你已经拥有了网摘精灵软件. http://www.wangjianran.com/wangzhaijingling/ 到这里下载 2http://d.baidu.com ...
- 最好的网站宣传方法:网摘精灵
最好的网站宣传方法:网摘精灵 网摘精灵 软件名称:网摘精灵 软件语言:简体中文 当前版本:1.0 适用平台:windows 9x/windows me/windows 2000/windows xp/ ...
- 最新可用分享网摘网址大全
分享网址 挖客网 - 挖出最新.最具价值资讯!奇客发现 有趣新鲜 --diglog.com在线密码管理 -- 一键登录 密码管理好帮手 -- 豌豆网宝盒网聚焦网民关注热点话题,爆料,微视频,奇闻异事, ...
- 网站流量提升-网站推广方法大全
原文:http://www.cotrun.net/blog/910.html 1.论坛推广 这里所说的论坛推广绝对不是在论坛里一个一个版贴广告,也不是将网站地址加在签名里然后疯狂刷屏,那样既耗费精力而 ...
- 网站推广方法大全(2008迎奥运版)
网站推广方法大全(2008迎奥运版) 2008年北京奥运快开始了.在普天同庆的日子里,在全世界上下一片欢喜声中,笔者在思考,怎么能让站长们也欢喜一下呢?让站长们最欢喜的事情,就是流量暴涨.最头疼的事情 ...
- 什么是 博客 BLOG 什么是 网摘
什么是博客(BLOG)? 2004年最热门的互联网词汇之一--博客及其发展简史 (网络营销教学网站 www.wm23.com 2005-01-03) "什么是博客"成为2004年各 ...
- 网摘精灵教程:网摘自动提交工具。
网摘精灵教程:网摘自动提交工具. 尊敬的站长:你好. 我们注意到您的网站放置了很多网摘提交代码. 你希望通过提交网摘来获取流量,对吗? 靠这种原始的手工提交,效率很低,对吗? 如果有一种网摘提交工具自 ...
- 网摘精灵教程:网站流量爆涨的时空隧道
网摘精灵教程:网站流量爆涨的时空隧道 花费很大心血做了个网站,却没有什么人知道,网站价值不能体现出来,是不是很郁闷?好东西不被人了解和认可,是不是很沮丧? 酒香也怕巷子深.网站做出来了还不够,还要告诉 ...
- IT 巡检内容、方法大全
IT 巡检内容.方法大全 目 录 1. 概述 2. 巡检维度 3. 巡检内容 4. 巡检方法 5. 常用命令.常见问题和解决方法 6. 附录 1 词汇表 7. 附录 2 参考资料 1. ...
最新文章
- 数据统计之日增用户统计
- 解表化饮什么意思_为什么有人动不动就一身汗,有人再热也不出汗?中医告诉真实原因...
- 无需u盘和光盘安装linux
- 世界顶级AI大神综述深度学习
- 使用StringWriter和StringReader的好处
- python学习-类(类方法、实例方法、静态方法)
- UnitTest in .NET 系列文章目录
- Coursera自动驾驶课程第14讲:Linear and Nonlinear Kalman Filters
- String与Date、Timestamp互转
- RDLC报表上下标实现
- myeclipse中配置maven
- G面经prepare: BuyGoods
- java rfid 写入_怎么使用java来读取外接RFID数据
- mysql mysql.sock_MySQL下mysql.sock丢失问题的解决[ubuntu, linux, mysqld.sock]
- 《壁纸 - 大全精选手机壁纸》EULA条款协议
- 22. 关于定时任务指定的时间间隔内没有完成任务的处理
- 回归评价指标:MAE、MSE、RMSE、MAPE和R-Squared
- 家有妙招:教你一个在淘宝买东西打折的好方法
- 在线生成favorite ico的网站
- 证明四元数表示旋转的过程实部为0,虚部为罗德里格斯公式结果
热门文章
- SQL Server执行大文件SQL脚本
- Android更新主线程UI的两种方式handler与runOnUiThread()
- 如何打开SAR 文件
- 谢谢有你【我与51CTO一“七”成长】
- ADO.NET的DataAdapter对象的方法
- Citrix XenDesktop VS Vmware View (上)-你必须懂得
- biztalk中常用调试方法
- 简易RAM的C++实现
- dubbo-Instantiation of bean failed; nested exception is java.lang.ExceptionInInitializerError
- 深入理解Java的反射与动态代理