Finding distance between two curves
http://answers.opencv.org/question/129819/finding-distance-between-two-curves/

{
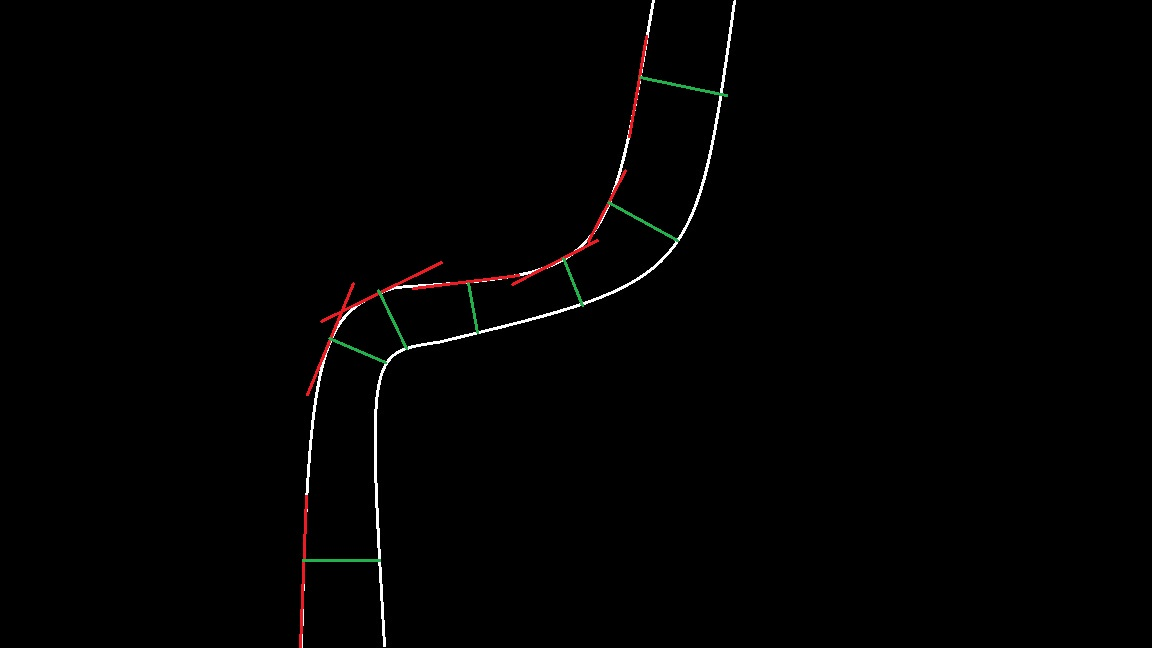
Mat img=imread("14878460214049233.jpg",IMREAD_GRAYSCALE);
imshow("test",img);
threshold(img,img,200,255,CV_THRESH_BINARY); // to delete some noise
imshow("test", img);
Mat labels;
connectedComponents(img,labels,8,CV_16U);
Mat result(img.size(),CV_32FC1,Scalar::all(0));
for (int i = 0; i <= 1; i++)
{
Mat mask1 = labels == 1+i;
Mat mask2 = labels == 1+(1-i);
Mat masknot;
bitwise_not(mask1,masknot);
imshow("masknot", masknot);
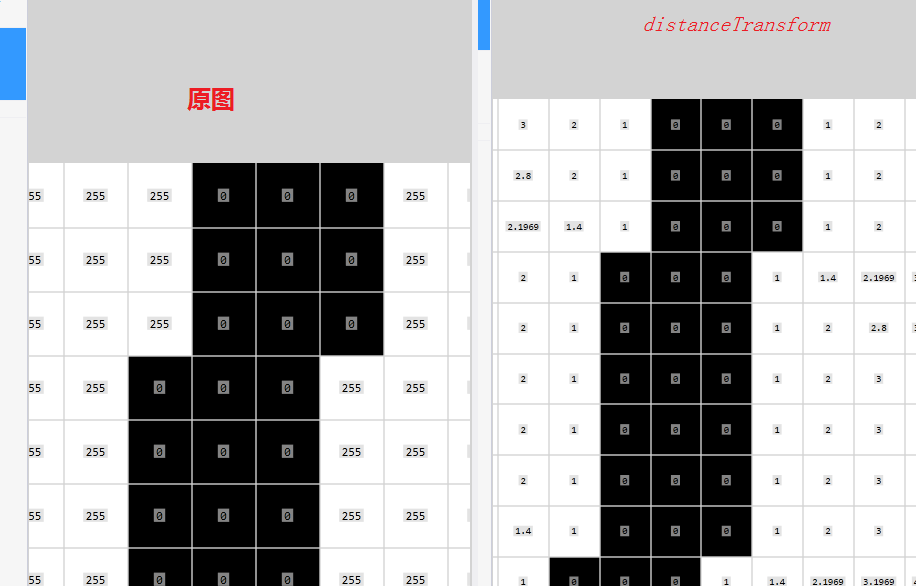
Mat dist;
distanceTransform(masknot,dist, DIST_L2,5,CV_8U);
imshow("distance float", dist/255);
dist.copyTo(result,mask2);
}
imshow("distance 1",result);
FileStorage fs("distCtr.yml",FileStorage::WRITE);
fs<<"Image"<<result;
fs.release();
waitKey();
SparseMat ms(result);
SparseMatConstIterator_<float> it = ms.begin<float>(),it_end = ms.end<float>();
Mat lig(result.rows,1,CV_8U,Scalar::all(0));
for (; it != it_end; it ++)
{
// print element indices and the element value
const SparseMat::Node* n = it.node();
if (lig.at<uchar>(n->idx[0])==0)
{
cout<< "("<<n->idx[0]<<","<<n->idx[1]<<") = " <<it.value<float>()<<"\t";
lig.at<uchar>(n->idx[0])=1;
}
}
return 0;
}
| int cv::connectedComponents | ( | InputArray | image, |
| OutputArray | labels, | ||
| int |
connectivity = 8,
|
||
| int |
ltype = CV_32S
|
||
| ) |
computes the connected components labeled image of boolean image
image with 4 or 8 way connectivity - returns N, the total number of labels [0, N-1] where 0 represents the background label. ltype specifies the output label image type, an important consideration based on the total number of labels or alternatively the total number of pixels in the source image.
- Parameters
-
image the 8-bit single-channel image to be labeled labels destination labeled image connectivity 8 or 4 for 8-way or 4-way connectivity respectively ltype output image label type. Currently CV_32S and CV_16U are supported.
#include "opencv2/imgproc.hpp"
#include "opencv2/imgcodecs.hpp"
#include "opencv2/highgui.hpp"
#include <iostream>
using namespace cv;
using namespace std;
Mat img;
int threshval = 100;
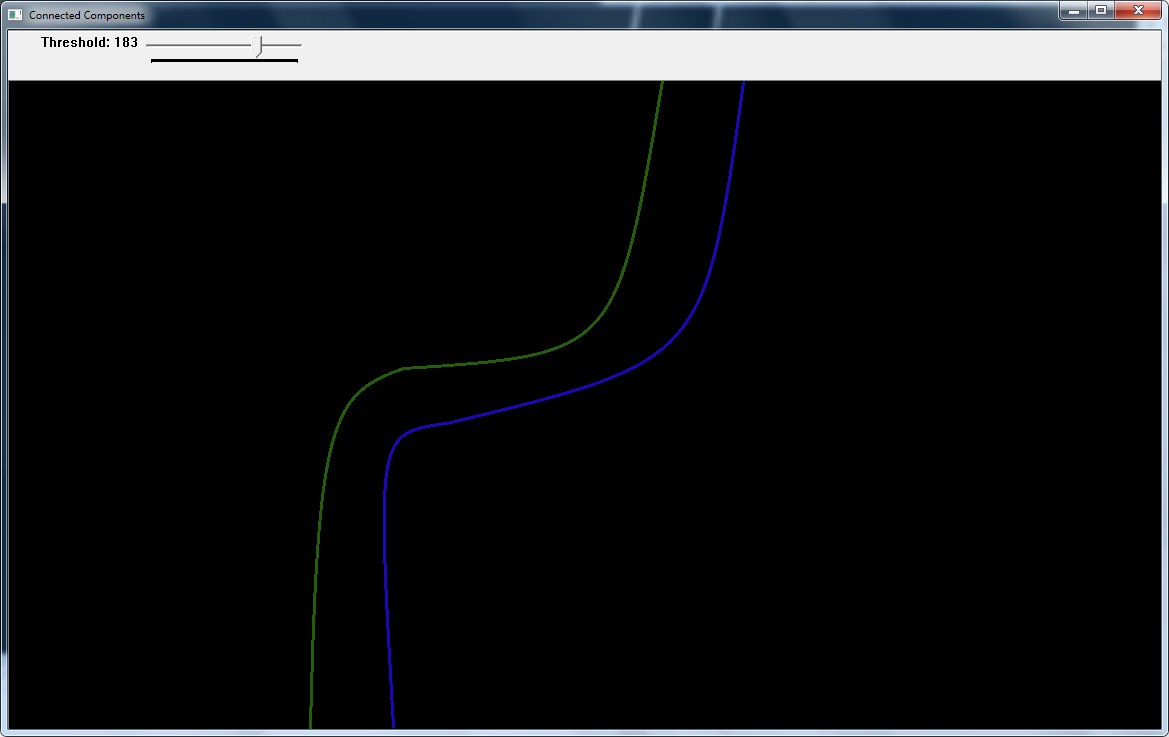
static void on_trackbar(int, void*)
{
Mat bw = threshval < 128 ? (img < threshval) : (img > threshval);
Mat labelImage(img.size(), CV_32S);
int nLabels = connectedComponents(bw, labelImage, 8);
std::vector<Vec3b> colors(nLabels);
colors[0] = Vec3b(0, 0, 0);//background
for(int label = 1; label < nLabels; ++label){
colors[label] = Vec3b( (rand()&255), (rand()&255), (rand()&255) );
}
Mat dst(img.size(), CV_8UC3);
for(int r = 0; r < dst.rows; ++r){
for(int c = 0; c < dst.cols; ++c){
int label = labelImage.at<int>(r, c);
Vec3b &pixel = dst.at<Vec3b>(r, c);
pixel = colors[label];
}
}
imshow( "Connected Components", dst );
}
static void help()
{
cout << "\n This program demonstrates connected components and use of the trackbar\n"
"Usage: \n"
" ./connected_components <image(../data/stuff.jpg as default)>\n"
"The image is converted to grayscale and displayed, another image has a trackbar\n"
"that controls thresholding and thereby the extracted contours which are drawn in color\n";
}
const char* keys =
{
"{help h||}{@image|../data/stuff.jpg|image for converting to a grayscale}"
};
int main( int argc, const char** argv )
{
CommandLineParser parser(argc, argv, keys);
if (parser.has("help"))
{
help();
return 0;
}
string inputImage ="twolines.jpg";
img = imread(inputImage.c_str(), 0);
if(img.empty())
{
cout << "Could not read input image file: " << inputImage << endl;
return -1;
}
namedWindow( "Image", 1 );
imshow( "Image", img );
namedWindow( "Connected Components", 1 );
createTrackbar( "Threshold", "Connected Components", &threshval, 255, on_trackbar );
on_trackbar(threshval, 0);
waitKey(0);
return 0;
}
....
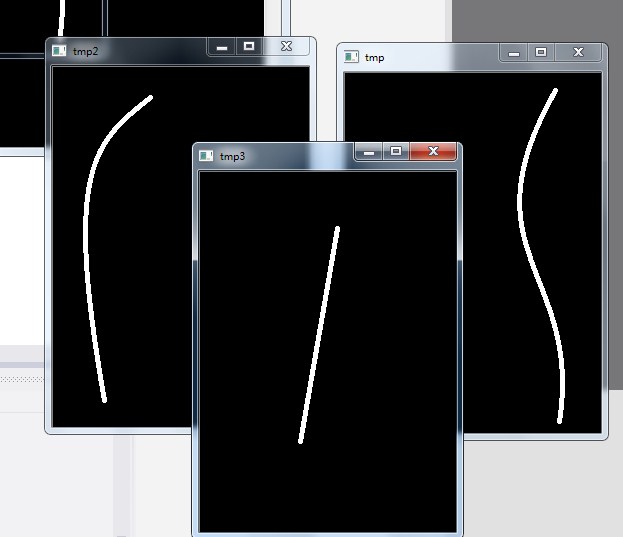
Mat tmp = labels == 1;
Mat tmp2 = labels == 2;
Mat tmp3 = labels == 3;
• CV_8S - 8-bit signed integers ( -128..127 )
• CV_16U - 16-bit unsigned integers ( 0..65535 )
• CV_16S - 16-bit signed integers ( -32768..32767 )
• CV_32S - 32-bit signed integers ( -2147483648..2147483647 )
• CV_32F - 32-bit floating-point numbers ( -FLT_MAX..FLT_MAX, INF, NAN )
• CV_64F - 64-bit floating-point numbers ( -DBL_MAX..DBL_MAX, INF, NAN )
{
Mat mask1 = labels == 1+i;
Mat mask2 = labels == 1+(1-i);
Mat masknot;
bitwise_not(mask1,masknot);
imshow("masknot", masknot);
Mat dist;
distanceTransform(masknot,dist, DIST_L2,5,CV_8U);
imshow("distance float", dist/255);
dist.copyTo(result,mask2);
}
SparseMatConstIterator_<float> it = ms.begin<float>(),it_end = ms.end<float>();
Mat lig(result.rows,1,CV_8U,Scalar::all(0));
for (; it != it_end; it ++)
{
// print element indices and the element value
const SparseMat::Node* n = it.node();
if (lig.at<uchar>(n->idx[0])==0)
{
cout<< "("<<n->idx[0]<<","<<n->idx[1]<<") = " <<it.value<float>()<<"\t";
lig.at<uchar>(n->idx[0])=1;
}
}
目前方向:图像拼接融合、图像识别 联系方式:jsxyhelu@foxmail.com
Finding distance between two curves相关推荐
- 使用cmake宝葫芦炼化Opencv第一丹
大家还记得西游记里银角大王的那个宝葫芦吗?大圣也被收服进去炼化过.而cmake牌宝葫芦就是把开源的代码适配成您VS法宝调用的dll链接库文件.Cmake处理后可以导入VS平台批量编译,再也不用担心代码 ...
- Unity声音 Sound (圣典篇)
原址:http://game.ceeger.com/Manual/Sound.html Audio Listener 音频侦听器 The Audio Listener acts as a microp ...
- 快速离散fr%C3%A9chet距离
A man is walking a dog on a leash: the man can move on one curve, the dog on the other; both may var ...
- 使用HTML5的Canvas和raycasting创建一个伪3D游戏(part1)
使用HTML5的Canvas和raycasting创建一个伪3D游戏(part1) 刚来这找到一篇好文,自己翻译了下:(原文:http://dev.opera.com/articles/view/cr ...
- Bear and Finding Criminals (模拟)
Bear and Finding Criminals There are n cities in Bearland, num ...
- Google谷歌通过地址计算两地距离 HOW TO CALCULATE DRIVING DISTANCE BETWEEN 2 LOCATIONS
1. 通过经纬度,计算直线距离 <script type="text/javascript" src="http://maps.google.com/maps/ap ...
- 曲线相似度衡量——曲线距离计算Fréchet distance详解与python计算
弗朗明歇距离(Fréchet distance)论文可以参考: 理论推导 Eiter, Thomas, and Heikki Mannila. "Computing discrete Fré ...
- 牛客网暑期ACM多校训练营(第三场) J Distance to Work 计算几何求圆与多边形相交面积模板...
链接:https://www.nowcoder.com/acm/contest/141/J 来源:牛客网 Eddy has graduated from college. Currently, he ...
- NSGA 2 学习笔记 -- crowding distance
NSGA-II基于Pareto占优关系对种群中的个体分级,在每一级中计算每个个体在种群中的密度指标,根据占优关系和密度指标对种群中全部个体排序,然后选择相对较好的个体进入下一代迭代循环.常用的密度指标 ...
- Wasserstein distance vs Dynamic Time Warping
这篇博客同时在我的wordpress上发布 In my internship with UCSF Neuroscape lab, I was faced with an important quest ...
最新文章
- win7设置java环境变量_win7下JAVA环境变量配置方法
- c语言 10以内加法,求助 给小学生出题,自己选加减乘除 做10题 10以内的数 然后统计分...
- u-boot移植第三弹——移植2013.10u-boot到RealARM210 cortex-A8开发板(支持moviNAND_Fusing_Tool_v2.0)
- NLTK的图形化语料文本下载器downloader
- ActiveMQ反序列化漏洞(CVE-2015-5254)复现
- 大数据在各个行业的应用_大数据的应用领域有哪些
- 2、使用Keras构建回归模型
- NB-IOT之一个完整的BC95 UDP从开机到数据发送接收过程
- 仿京东商城源码java_Java+SSM实现类似京东的3C电子商城系统
- ASP.NET网络版进销存管理系统源码【源码免费分享】
- 用matlab读pcap文件,libpcap读取本地pcap文件
- 无需编码 9款优秀的数据地图可视化工具平台
- filter grok 判断_logstash grok使用案例
- SangforAC(深信服)Web单点登录
- 3_1 操作系统定义、分类及功能【包含linux操作系统基础知识】
- 用ESP8266实现 手机控制车库门开关
- 微信小程序真机调试常见问题汇总
- 出国留学考试指导大全:托福85分是个坎儿
- 大数据在地理信息系统的应用
- 一些kaldi常用的术语和命令(二)