RRT路径规划算法在二维仿真环境中的应用 -- Python代码实现
在上一节中,介绍了 RRT 算法的原理,这一节将一步步实现 RRT 路径规划算法在二维环境中的路径规划,来进一步加深对 RRT 算法的理解。
二维环境的搭建
我们将搭建下图所示的二维环境,绿色点为起点(0,0),红色点为目标点(15, 12),黑色的圆表示障碍物。
![]()
实现上述环境的代码如下:
start = [0, 0]      # 起点
goal = [15, 12]     # 终点# 障碍物 (x, y, radiu)
obstacle_list = [(3, 3, 1.5),(12, 2, 3),(3, 9, 2),(9, 11, 2)
]
plt.axis([-2, 18, -2, 15])
for (ox, oy, size) in obstacle_list:plt.plot(ox, oy, "ok", ms=30 * size)plt.plot(start[0], start[1], "og")plt.plot(goal[0], goal[1], "or")
plt.show()
plt.pause(0.01)
RRT 路径规划算法
算法初始化
class RRT:# 初始化def __init__(self, obstacle_list, # 障碍物rand_area, # 采样的区域expand_dis=2.0, # 步长goal_sample_rate=10, # 目标采样率max_iter=200): # 最大迭代次数self.start = Noneself.goal = Noneself.min_rand = rand_area[0]self.max_rand = rand_area[1]self.expand_dis = expand_disself.goal_sample_rate = goal_sample_rateself.max_iter = max_iterself.obstacle_list = obstacle_listself.node_list = None路径规划
将起点和终点结点化,方便计算该结点到起点的路径距离以及后面的路径回溯。
def rrt_planning(self, start, goal, animation=True):self.start = Node(start[0], start[1])self.goal = Node(goal[0], goal[1])self.node_list[self.start]path = None结点化的代码如下:
class Node: def __init__(self, x, y):self.x = xself.y = yself.cost = 0.0self.parent = None开始在环境中循环采样点,在此有一个小的采样技巧,为了使 RRT 树能朝着目标点的方向生长,在采样时,以一定的概率采样目标点。
rnd = self.sample() # 在环境中随机采样点采样函数如下:
def sample(self):if random.randint(0, 100) > self.goal_sample_rate:rnd = [random.uniform(self.min_rand, self.max_rand), random.uniform(self.min_rand, self.max_rand)]else:rnd = [self.goal.x, self.goal.y]return rnd从结点树中找到距离采样点最近的结点。
n_ind = self.get_nearest_list_index(self.node_list, rnd)
nearest_node = self.node_list[n_ind]
def get_nearest_list_index(nodes, rnd):""" 计算树中距离采样点距离最近的结点 """d_list = [(node.x - rnd[0]) ** 2 + (node.y - rnd[1]) ** 2 for node in nodes]min_index = d_list.index(min(d_list))return min_index生成新的下一个结点。在找到树中距离采样点最近的结点后,可以计算两个结点的连线和水平的方向的角度,再根据步长的大小,即可计算出下一个树结点的位置。
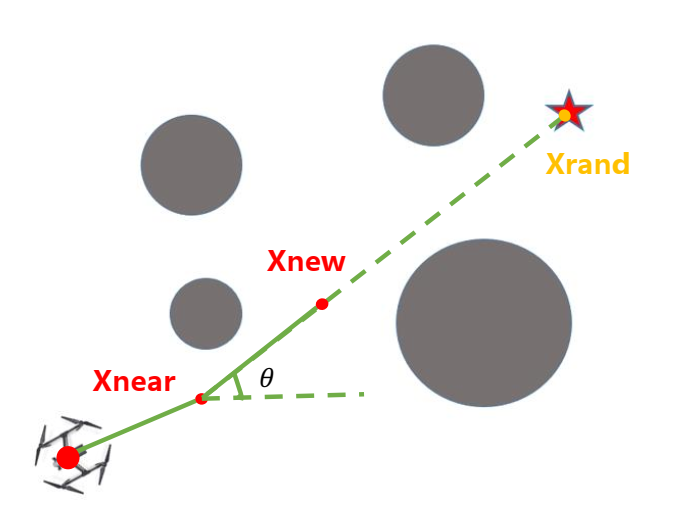
theta = math.atan2(rnd[1] - nearest_node.y, rnd[0] - nearest_node.x)
new_node = self.get_new_node(theta, n_ind, nearest_node)
def get_new_node(self, theta, n_ind, nearest_node):""" 计算新结点 """new_node = copy.deepcopy(nearest_node)new_node.x += self.expand_dis * math.cos(theta)new_node.y += self.expand_dis * math.sin(theta)new_node.cost += self.expand_disnew_node.parent = n_indreturn new_node检测碰撞。检测新生成的结点的路径是否会与障碍物碰撞
no_collision = self.check_segment_collision(new_node.x, new_node.y, nearest_node.x, nearest_node.y)其中检测碰撞的函数如下:
def check_segment_collision(self, x1, y1, x2, y2):for (ox, oy, radius) in self.obstacle_list:dd = self.distance_squared_point_to_segment(np.array([x1, y1]),np.array([x2, y2]),np.array([ox, oy]))if dd <= radius ** 2:return Falsereturn True其中
distance_squared_point_to_segment()函数的功能为:求点到线段的最短距离,代码如下:def distance_squared_point_to_segment(v, w, p):""" 计算线段 vw 和 点 p 之间的最短距离"""if np.array_equal(v, w): # 点 v 和 点 w 重合的情况return (p - v).dot(p - v)l2 = (w - v).dot(w - v) # 线段 vw 长度的平方t = max(0, min(1, (p - v).dot(w - v) / l2))projection = v + t * (w - v)return (p - projection).dot(p - projection)
如果没有与障碍物发生碰撞,则将新结点加入到树中,并绘制新结点以及生长的新枝干。再判断新结点是否是目标点的邻接结点。
if no_collision:self.node_list.append(new_node)# 一步一绘制if animation:self.draw_graph(new_node, path)# 判断新结点是否临近目标点if self.is_near_goal(new_node):if self.check_segment_collision(new_node.x, new_node.y,self.goal.x, self.goal.y):last_index = len(self.node_list) - 1path = self.get_final_course(last_index) # 回溯路径path_length = self.get_path_len(path) # 计算路径的长度print("当前的路径长度为:{}".format(path_length))if animation:self.draw_graph(new_node, path)return path其中,
is_near_goal()是判断新结点是否邻近目标点的函数,其代码如下:def is_near_goal(self, node):d = self.line_cost(node, self.goal)if d < self.expand_dis:return Truereturn Falseline_cost()函数是如果新生成的结点邻近目标结点的情况下,该结点到目标结点之间的距离。其代码如下:def line_cost(node1, node2):return math.sqrt((node1.x - node2.x) ** 2 + (node1.y - node2.y) ** 2)get_final_course()是获取最终从起点到终点的路径的函数。其代码如下:def get_final_course(self, last_index):""" 回溯路径 """path = [[self.goal.x, self.goal.y]]while self.node_list[last_index].parent is not None:node = self.node_list[last_index]path.append([node.x, node.y])last_index = node.parentpath.append([self.start.x, self.start.y])return pathget_path_len()是求取路径的总长度的函数,其代码如下:def get_path_len(path):""" 计算路径的长度 """path_length = 0for i in range(1, len(path)):node1_x = path[i][0]node1_y = path[i][1]node2_x = path[i - 1][0]node2_y = path[i - 1][1]path_length += math.sqrt((node1_x - node2_x) ** 2 + (node1_y - node2_y) ** 2)return path_lengthdraw_graph()为绘制地图以及结点路径等函数,使之可视化。其代码如下:def draw_graph(self, rnd=None, path=None):plt.clf()# 绘制新的结点if rnd is not None:plt.plot(rnd.x, rnd.y, '^k')# 绘制路径for node in self.node_list:if node.parent is not None:if node.x or node.y is not None:plt.plot([node.x, self.node_list[node.parent].x],[node.y, self.node_list[node.parent].y],'-g')# 绘制障碍物for (ox, oy, size) in self.obstacle_list:plt.plot(ox, oy, "ok", ms=30 * size)# 绘制起点、终点plt.plot(self.start.x, self.start.y, "og")plt.plot(self.goal.x, self.goal.y, "or")# 绘制路径if path is not None:plt.plot([x for (x, y) in path], [y for (x, y) in path], '-r')# 绘制图的设置plt.axis([-2, 18, -2, 15])plt.grid(True)plt.pause(0.01)
最终运行结果如下:
![]()
完整代码如下:
import random
import math
import copy
import timeimport matplotlib.pyplot as plt
import numpy as npclass RRT:# 初始化def __init__(self,obstacle_list,         # 障碍物rand_area,             # 采样的区域expand_dis=2.0,        # 步长goal_sample_rate=10,   # 目标采样率max_iter=200):         # 最大迭代次数self.start = Noneself.goal = Noneself.min_rand = rand_area[0]self.max_rand = rand_area[1]self.expand_dis = expand_disself.goal_sample_rate = goal_sample_rateself.max_iter = max_iterself.obstacle_list = obstacle_listself.node_list = Nonedef rrt_planning(self, start, goal, animation=True):self.start = Node(start[0], start[1])self.goal = Node(goal[0], goal[1])self.node_list = [self.start]path = Nonefor i in range(self.max_iter):# 1. 在环境中随机采样点rnd = self.sample()# 2. 找到结点树中距离采样点最近的结点n_ind = self.get_nearest_list_index(self.node_list, rnd)nearest_node = self.node_list[n_ind]# 3. 在采样点的方向生长一个步长,得到下一个树的结点。theta = math.atan2(rnd[1] - nearest_node.y, rnd[0] - nearest_node.x)new_node = self.get_new_node(theta, n_ind, nearest_node)# 4. 检测碰撞,检测到新生成的结点的路径是否会与障碍物碰撞no_collision = self.check_segment_collision(new_node.x, new_node.y, nearest_node.x, nearest_node.y)if no_collision:self.node_list.append(new_node)# 一步一绘制if animation:time.sleep(1)self.draw_graph(new_node, path)# 判断新结点是否临近目标点if self.is_near_goal(new_node):if self.check_segment_collision(new_node.x, new_node.y,self.goal.x, self.goal.y):last_index = len(self.node_list) - 1path = self.get_final_course(last_index)        # 回溯路径path_length = self.get_path_len(path)           # 计算路径的长度print("当前的路径长度为:{}".format(path_length))if animation:self.draw_graph(new_node, path)return pathdef sample(self):""" 在环境中采样点的函数,以一定的概率采样目标点 """if random.randint(0, 100) > self.goal_sample_rate:rnd = [random.uniform(self.min_rand, self.max_rand),random.uniform(self.min_rand, self.max_rand)]else:rnd = [self.goal.x, self.goal.y]return rnd@staticmethoddef get_nearest_list_index(nodes, rnd):""" 计算树中距离采样点距离最近的结点 """d_list = [(node.x - rnd[0]) ** 2 + (node.y - rnd[1]) ** 2for node in nodes]min_index = d_list.index(min(d_list))return min_indexdef get_new_node(self, theta, n_ind, nearest_node):""" 计算新结点 """new_node = copy.deepcopy(nearest_node)new_node.x += self.expand_dis * math.cos(theta)new_node.y += self.expand_dis * math.sin(theta)new_node.cost += self.expand_disnew_node.parent = n_indreturn new_nodedef check_segment_collision(self, x1, y1, x2, y2):""" 检测碰撞 """for (ox, oy, radius) in self.obstacle_list:dd = self.distance_squared_point_to_segment(np.array([x1, y1]),np.array([x2, y2]),np.array([ox, oy]))if dd <= radius ** 2:return Falsereturn True@staticmethoddef distance_squared_point_to_segment(v, w, p):""" 计算线段 vw 和 点 p 之间的最短距离"""if np.array_equal(v, w):    # 点 v 和 点 w 重合的情况return (p - v).dot(p - v)l2 = (w - v).dot(w - v)     # 线段 vw 长度的平方t = max(0, min(1, (p - v).dot(w - v) / l2))projection = v + t * (w - v)return (p - projection).dot(p - projection)def draw_graph(self, rnd=None, path=None):plt.clf()# 绘制新的结点if rnd is not None:plt.plot(rnd.x, rnd.y, '^k')# 绘制路径for node in self.node_list:if node.parent is not None:if node.x or node.y is not None:plt.plot([node.x, self.node_list[node.parent].x],[node.y, self.node_list[node.parent].y],'-g')# 绘制起点、终点plt.plot(self.start.x, self.start.y, "og")plt.plot(self.goal.x, self.goal.y, "or")# 绘制障碍物for (ox, oy, size) in self.obstacle_list:plt.plot(ox, oy, "ok", ms=30 * size)# 绘制路径if path is not None:plt.plot([x for (x, y) in path], [y for (x, y) in path], '-r')# 绘制图的设置plt.axis([-2, 18, -2, 15])plt.grid(True)plt.pause(0.01)def is_near_goal(self, node):d = self.line_cost(node, self.goal)if d < self.expand_dis:return Truereturn False@staticmethoddef line_cost(node1, node2):return math.sqrt((node1.x - node2.x) ** 2 + (node1.y - node2.y) ** 2)def get_final_course(self, last_index):""" 回溯路径 """path = [[self.goal.x, self.goal.y]]while self.node_list[last_index].parent is not None:node = self.node_list[last_index]path.append([node.x, node.y])last_index = node.parentpath.append([self.start.x, self.start.y])return path@staticmethoddef get_path_len(path):""" 计算路径的长度 """path_length = 0for i in range(1, len(path)):node1_x = path[i][0]node1_y = path[i][1]node2_x = path[i - 1][0]node2_y = path[i - 1][1]path_length += math.sqrt((node1_x - node2_x) ** 2 + (node1_y - node2_y) ** 2)return path_lengthclass Node:def __init__(self, x, y):self.x = xself.y = yself.cost = 0.0self.parent = Nonedef main():print('Start RRT planning!')show_animation = Truestart = [0, 0]goal = [15, 12]# 障碍物 (x, y, radius)obstacle_list = [(3, 3, 1.5),(12, 2, 3),(3, 9, 2),(9, 11, 2)]rrt = RRT(rand_area=[-2, 18], obstacle_list=obstacle_list, max_iter=200)path = rrt.rrt_planning(start=[0, 0], goal=[15, 12], animation=show_animation)print('Done!')if show_animation and path:plt.show()if __name__ == '__main__':main()
我是火山&飘雪。如果本文对您有帮助,记得在下方点赞哟!也欢迎在下方评论区留言交流,谢谢!
RRT路径规划算法在二维仿真环境中的应用 -- Python代码实现相关推荐
- Dijkstra 路径规划算法在二维仿真环境中的应用 -- Python代码实现
在上一节中,介绍了 Dijkstra 算法的原理以及在图中的应用,这一节将一步步实现 Dijkstra 路径规划算法在二维环境中的路径规划,来进一步加深对 Dijkstra 算法的理解. 所需要用到的 ...
- RRT* 算法原理以及在二维仿真环境中的实现 -- Python代码实现
RRT* 算法是在 RRT 的基础上做出了一些改进,主要改进的点有两点: 新结点生成后,优化其父结点. 在生成新结点 new_node 后,首先设置一个搜索区域的半径,搜索该区域中的树结点,并计算其中 ...
- RRT路径规划算法(matlab实现)
基于快速扩展随机树(RRT / rapidly exploring random tree)的路径规划算法,通过对状态空间中的采样点进行碰撞检测,避免了对空间的建模,能够有效地解决高维空间和复杂约束的 ...
- doa的matlab算法,基于MATLAB的DOA估计算法的二维仿真建模
基本描述: DOA算法使用T形或L形天线接收微波信号,计算到达角,然后对二维坐标建模. 要解决的问题: 实际环境中存在多个相干源(例如多径效应,信号反射等),并给出了最佳DOA估计算法. 功能描述: ...
- RRT路径规划算法详细C#
RRT是通过随机节点进行路径规划的(寻找的路径不是最优路径) 我们先设置 障碍物(黑色),起点(绿色点),终点(红色点) 图一 因为是通过节点进行寻找路径,先设置下节点的属性 父节点pre,节点位置d ...
- 【路径规划】 Optimal Trajectory Generation in Frenet阅读记录 (附python代码实例)
参考与前言 2010年,论文 Optimal Trajectory Generation for Dynamic Street Scenarios in a Frenet Frame 地址:https ...
- 自动驾驶路径规划——基于概率采样的路径规划算法(RRT、RRT*)
目录 1. RRT算法背景 1.1 RRT算法核心思想 1.2 RRT算法优缺点 2. 经典RRT算法 2.1 RRT算法流程 2.2 RRT伪代码 3. 基于目标概率采样 4. RRT*算法 4.1 ...
- 基于群智能的路径规划算法(三)------遗传算法
本系列文章主要记录学习基于群智能的路径规划算法过程中的一些关键知识点,并按照理解对其进行描述和进行相关思考. 主要学习资料是来自 小黎的Ally 的 <第2期课程-基于群智能的三维路 ...
- 基于群智能的路径规划算法(四)------人工蜂群算法
本系列文章主要记录学习基于群智能的路径规划算法过程中的一些关键知识点,并按照理解对其进行描述和进行相关思考. 主要学习资料是来自 小黎的Ally 的 <第2期课程-基于群智能的三维路 ...
最新文章
- linux服务器环境要求,在Linux服务器中配置node环境
- Windows下一个比较完美的线程池实现
- 弹性和瞬态故障处理库Polly介绍
- unserialize用法
- mysql索引统计信息更新_MySQL索引统计信息更新相关的参数
- postgre SQL 中的 触发器 (实例应用,如何备份更新之前的差分数据)
- 布丰投针试验的仿真和误差估计
- Html+Js 3D 龙卷风
- 怎么打开系统服务器,Win10怎么打开系统服务管理器 Win10打开系统服务管理器操作方法...
- allure报告本地执行,显示趋势图
- JavaScript实现在线MD5、SHA、AES、Rabit 、RC4、TripleDES Ripemd160 加密解密工具-toolfk程序员在线工具网
- 公共数据库挖掘第一步-GEO数据库下载表达谱数据和生存数据
- bigemap地图下载器 好用吗?
- 使用Java 2D绘制黑白太极图案
- MongoDB——MongoDB的日常维护
- 计算机技术专业面试英语翻译,面试英文翻译:你为什么选择这个专业
- 使用Pyecharts进行奥运会可视化分析!
- java毕业生设计大学生网络创业就业管理系统计算机源码+系统+mysql+调试部署+lw
- CentOS服务器的加固方案
- JVM内存分析工具JProfiler的简单使用