ios 日志系统 lumberjack
为什么80%的码农都做不了架构师?>>> 
For our very first blog entry, we’re going to introduce one of our favorite tools for debugging iOS applications, and that’s a logging framework known as Lumberjack. If you’ve used NSLog thus far to debug or provide trace statements for your applications, you are in for a treat.
We’ll walk you through adding Lumberjack to your XCode project one step at a time, but feel free to take a detour and check Lumberjack out at https://github.com/robbiehanson/CocoaLumberjack.
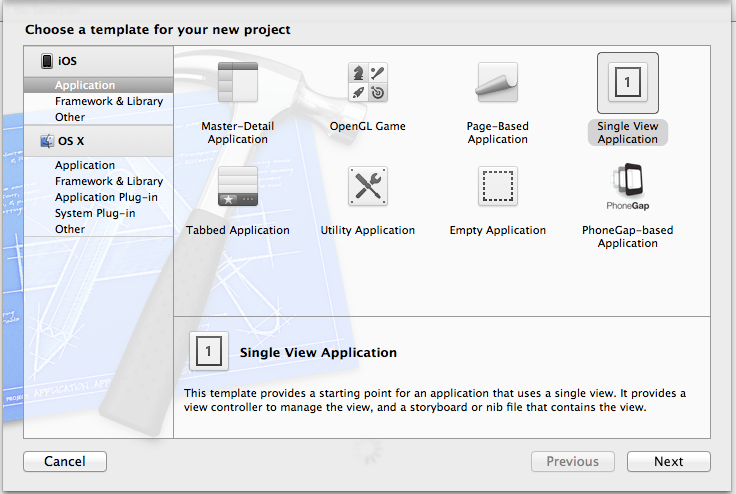
We’ll assume that you have little experience with XCode projects, but you should at least have XCode installed and should have familiarity with using the File menu to create a new project. So go ahead and do that now, and create a Single View Application:
For your project options, if you don’t have an Organization Name or Company Identifier, you can easily make something up here. Once you are ready to start your real application, you’ll want to put some additional thought here. Of course we’ve used our LLC name, but you can use Example Company and com.example. if you like. For the Product Name something like lumberjackExample will suffice, and of course you will want to Use Storyboards and Use Automatic Reference Counting (unless you don’t want to use them).

And finally, find a parent folder where you want to create your project folder. We’re going to put everything under blogging, and XCode will create a folder underneath called lumberjackExample. Although you see Create local git repository for this project checked in the dialog below, we actually unchecked it because at the end of this tutorial you will be able to download the entire example project (actually you don’t have to wait until the end) from GitHub. Until you start using GitHub to store your projects, we recommend you leave it checked.

Whew, all that work and we haven’t even gotten to the good part yet. Before we go further with XCode, let’s go ahead and download Lumberjack and add it to our project. First, go to the GitHub for Lumberjack in your browser: https://github.com/robbiehanson/CocoaLumberjack, and then hit the Zip button.

This is going to download a zipped-up version of the framework into your Downloads folder. Click on the zipfile, let your Mac uncompress it, and you will find a folder called CocoaLumberjack-master in your Downloads directory. There are three directories inside (well, at least there were three at the time of this writing), and only one of them is worth our interest at this point: Lumberjack.
Now, with the Finder window open showing you the Lumberjack folder, and with your XCode project in sight next to it, drag and drop that Lumberjack folder into the XCode project, in the left-hand pane where your project files are displayed. We prefer to create a group called 3rdParty Libraries and place everything under there, but for this example, just drag and drop under the lumberjackExample folder. XCode is going to bring up a dialog, and its important to get these right:

You definitely want Copy items into destination group’s folder (if needed) selected, and you probably want Create groups for any added folders, and you definitely want to add the files to the lumberjackExample target.
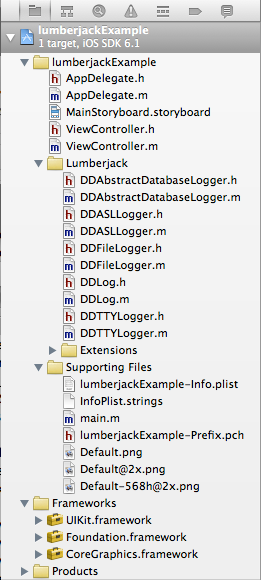
Now, you’ll see that the files have been added to your project:
You can even go ahead and build the application (under the Product menu, choose Build). Of course, it won’t do anything just yet, and we need to add a few helper files to make our life easier.
We’re going to create some nice macros to help us out while logging, so go ahead and create a new file calling Logging.h. To create a simple header file, when presented with the bewildering options of types of files, choose iOS C and C++ files, and then Header file. Note that when you are prompted to indicate the location to save the file, XCode puts you in the project directory, which contains your .xcodeproj file as well as another folder named after your project, in this case lumberjackExample. If you are lazy you can save the header file right in the top-level project folder, but purists might frown, so go ahead and and double-click on the lumberjackExample folder and save it there. Remember to name it Logging.h, and since this is a header file you do not have to add it to a target.

Now, find the file in your project explorer (the left-hand pane), and let’s add a bit of code to it:
|
1
2
3
4
5
6
7
8
9
10
|
#ifndef lumberjackExample_Logging_h
#define lumberjackExample_Logging_h
#import "DDLog.h"
#define ENTRY_LOG DDLogVerbose(@"%s ENTRY ", __PRETTY_FUNCTION__);
#define EXIT_LOG DDLogVerbose(@"%s EXIT ", __PRETTY_FUNCTION__);
#define ERROR_EXIT_LOG DDLogError(@"%s ERROR EXIT", __PRETTY_FUNCTION__);
#endif
|
Okay, that looks good, and we’ll use it in a moment, but let’s take a look at our AppDelegate.m class and configure Lumberjack. If you’ve never written an iOS application before, there is a lot to learn for sure, but for the sake of this tutorial, let’s look at only a couple of methods in the application delegate. Again, the point of this tutorial isn’t to teach you everything you need to know about iOS development, but to provide you with a tool to debug as you begin to explore.
Before we dive into the AppDelegate methods, we’re going to add a property to the application delegate which is a reference to a file-based logger we’re going to create. Before the @implementation AppDelegate line, add the following:
|
1
2
3
4
5
|
@interfaceAppDelegate()
@property(strong,nonatomic) DDFileLogger* fileLogger;
@end
|
If you’re not familiar with this syntax, don’t worry, it will become more clear later on.
The first method we are going to add code to is
|
1
2
3
4
5
|
- (BOOL)application:(UIApplication *)application didFinishLaunchingWithOptions:(NSDictionary*)launchOptions
{
// Override point for customization after application launch.
returnYES;
}
|
This is the method that is called by iOS when your application has launched. It’s a great place to bootstrap third-party frameworks (which we consider Lumberjack to be), so let’s do just that:
|
1
2
3
4
5
6
7
8
9
10
11
12
|
- (BOOL)application:(UIApplication *)application didFinishLaunchingWithOptions:(NSDictionary*)launchOptions
{
// Lumberjack
[DDLog addLogger:[DDTTYLogger sharedInstance]];
self.fileLogger = [[DDFileLogger alloc] init];
self.fileLogger.rollingFrequency = 60 * 60 * 24;// 1 hour rolling
self.fileLogger.logFileManager.maximumNumberOfLogFiles = 7;
self.fileLogger.maximumFileSize = 384 * 1024;// 384K
[self.fileLogger setLogFormatter:[[DDLogFileFormatterDefault alloc]init]];
[DDLog addLogger:self.fileLogger];
returnYES;
}
|
Now, you’re first question might be, gee, did I really need all that code for logging? And the answer is no, you didn’t, but with this code not only did you get a logger that logs to the console (that first line, [DDLog addLogger:[DDTTYLogger sharedInstance]];), but you also got one that logs to a file (which in future posts we’ll show you how to mail that file to yourself, how handy is that?), and more the file logger does all sorts of nice things like rolls once an hour, manages the maximum number of log files, the maximum file size of the logs, etc. There are oodles of options available, and we suggest you read the Lumberjack site in Github for details.
If you tried to compile the application right now (you tried that didn’t you), it will probably fail, unless you were clever enough to go ahead and add the proper import statements in your AppDelegate.m. You can either add them there, or if you plan on using logging in a lot of files, go ahead and add them to your .pch (precompiled header) file and the compiler will automatically include it in all other source code modules. Our .pch contains:
|
1
2
3
|
#import "DDTTYLogger.h"
#import "DDFileLogger.h"
#import "Logging.h"
|
Our application is still boring, and doesn’t even log anything yet! Now, let’s add some logging statements. Try replacing the method -(void)applicationDidEnterBackground:(UIApplication *)application with the following:
|
1
2
3
4
5
|
- (void)applicationDidEnterBackground:(UIApplication *)application
{
ENTRY_LOG;
EXIT_LOG;
}
|

Oh boy, the compiler complains straight away with nonsense about use of an undeclared identifier called ddLogLevel. You would think this is all becoming more trouble than its worth, but au contraire. ddLogLevel is what allows use to have different log levels set for different modules (.m files). This is incredibly useful, particularly when you have debugged and isolated a given module and you no longer want it generating logs, even during debug mode. On a per-file basis you can set these levels. But first we need to set it altogether, so back to the top of our AppDelegate.h file, and add the following code between the @interface and @implementationblocks in AppDelegate.m:
|
1
2
3
4
5
|
#ifdef DEBUG
staticconstintddLogLevel = LOG_LEVEL_VERBOSE;
#else
staticconstintddLogLevel = LOG_LEVEL_ERROR;
#endif
|
This is pretty straightforward – if you are compiling a debug load, turn the log level to verbose, otherwise, turn it to error. The default log levels in Lumberjack are Verbose, Info, Warn, and Error. When Verbose is enabled you’ll get all four levels; when Info is enabled you’ll get Info, Warn, Error, and so on and so forth. See https://github.com/robbiehanson/CocoaLumberjack/wiki/CustomLogLevels for more details on the levels, how to customize (we at iAchieved.it have never used the customization facility, the four levels has suited us just fine!).
Now, try running the application either on your phone or in the simulator. If you’ve done everything correctly thus far, you’ll still see a bunch of nothing. What kind of tutorial is this any way? Well, we only added logs to the applicationDidEnterBackground method, so to see anything, we’ll have to send the app to the background! Do so by hitting the Home button on either your device or simulator. You should have seen the XCode log output window show you some goods!

Now, you’ve got a good grasp of what’s possible with Lumberjack, and remember that ENTRY_LOG and EXIT_LOG are just macros to add at the beginning and end of your methods. To really get cooking you’d add a variety of statements to your code, like:
|
1
2
3
4
5
6
7
8
|
DDLogVerbose(@"Starting up application...");
// Perform some actions
for(inti = 1; i < 5; i++) {
DDLogInfo(@"Performing startup action %d", i);
}
DDLogVerbose(@"Startup actions complete");
|
Note that the DDLog statements can use positional argument placeholders like %@ and %d.
Our output (we added this to the didFinishLaunchingWithOptions: method):
2013-02-10 23:15:53:618 lumberjackExample[28210:c07] Starting up application...
2013-02-10 23:15:53:618 lumberjackExample[28210:c07] Performing startup action 1
2013-02-10 23:15:53:618 lumberjackExample[28210:c07] Performing startup action 2
2013-02-10 23:15:53:618 lumberjackExample[28210:c07] Performing startup action 3
2013-02-10 23:15:53:618 lumberjackExample[28210:c07] Performing startup action 4
2013-02-10 23:15:53:618 lumberjackExample[28210:c07] Startup actions complete
Well, that’s all the time we have for this tutorial, and we’ve just scratched the surface. Our next tutorial will be how to add and manage multiple schemes and build configurations to aid in managing the various types of builds (debug vs. release), etc.
The final project code can be downloaded from GitHub at https://github.com/iachievedit/lumberjackExample.
转载于:https://my.oschina.net/junfrost/blog/141913
ios 日志系统 lumberjack相关推荐
- go使用zap + lumberjack重构项目的日志系统
[工作随笔]重构项目的日志系统 原先公司的go项目是采用之前一个大哥自己开发的一个log包,来实现各种日志的打印监控,对于和很多的场景支持和日志分割都做的不太好,所以在近期有空的时候对老的日志系统进行 ...
- 使用XLog、Spring-Boot、And-Design-Pro搭建日志系统
一.前言:移动端为什么要三方日志系统 日志系统用于记录用户行为和数据以及崩溃时的线程调用栈,以帮助程序员解决问题,优化用户体验. iOS系统就有自带Crash收集应用程序"ReportCra ...
- 微信 日志服务器 并发大,微信高性能线上日志系统xlog剖析
微信高性能线上日志系统xlog剖析 做移动开发的同学经常会遇到一个头疼的问题,就是当用户反馈一些问题,又比较冷僻难以复现的时候(不是Crash),常常就会陷入一筹莫展的境地.因此,很多人就研发了相关的 ...
- 客户端log日志系统
背景 我们在开发过程中出现了个别bug,而我们往往很难定位到问题所在,这个不仅仅局限于移动端,只是移动端不容易定位问题.我们常见的实现方式可能是, 1. 创建一个带队列的线程. 2. 把要上报的数据抛 ...
- 搭建Android日志系统 美团点评大前端Logan入门指南
目录 前言 总览 快速开始 下载官方源码 使用IDEA打开Logan Server项目 使用Docker下载MySQL镜像并启动容器 运行Logan Server 修改db.properties 修改 ...
- cocos2dx lua 日志系统
在实际开发过程中,代码日志是必不可少的系统,尤其是在线上版本中,对于查找问题相当有帮助.但是cocos2dx lua的代码日志是基于lua的print打印,只写在console中,不会长久保存.怎么办 ...
- panic 苹果aop_iPhone重启故障 iOS日志分析
iPhone重启故障 iOS日志分析 Panic Full文件里面记录了iPhone重启原因,根据对日志数据的分析,我们能得到一些故障信息,以此判断出是哪个硬件导致的问题. 进入手机设置 – 通用-隐 ...
- iOS日志记录和异常捕获
日志记录 iOS日志记录当前文件的堆栈.类名.函数名.行号及文件路径等信息 NSArray *array = [NSThread callStackSymbols]; NSLog(@"堆栈信 ...
- 美团高性能终端实时日志系统建设实践
你是否经常遇到线上需要日志排查问题但迟迟联系不上用户上报日志的情况?或者是否经常陷入由于存储空间不足而导致日志写不进去的囧境?本文介绍了美团是如何从0到1搭建高性能终端实时日志系统,从此彻底解决日志丢 ...
最新文章
- java 泛型 窜讲
- 适用于芯片验证工程师的atom插件列表
- 排序算法的总结——Java实现
- 区块链中的基础数据结构
- java 中public 类
- 三菱PLC编程软件Work2的FB块加密后的解密方法
- Windows Ubuntu,软件推荐,小技巧总结,免费内网穿透方案
- Python微信爬虫_00
- 全国省市区三级数据库sql
- cleanmymac x激活码免费下载激活及使用教程
- java读取文件效率优化_java 读文件 性能
- 教你快速将多个TXT文档合并成一个
- PHP字符串函数strrchr(查找指定字符在字符串中的最后一次出现)
- 简单的扫描工具NTscan
- 高通下载模式9008
- 融云集成一个聊天室页面(vue版本)
- 使用Outlook 2007待办事项栏
- 小试牛刀:使用EasyPaintToolSAI来制作动漫图片
- 计算机网络atm功能,自考计算机网络实用技术考核知识点之ATM原理
- .o .a .lo .la