软件测试过程与方法_第4章 4.3单元JUnit的单元测试
软件测试过程与方法_第4章 4.3单元JUnit的单元测试
- 简单测试
- 创建JUnit的过程
- 代码
- 独立的测试
- 4.3.4参数化运行器
- 输出结果
- 4.3.5 测试参数化_属性注入
- 属性注入输出结果
- 4.3.6 测试集
- 实现代码
- 测试代码
- 测试结果
- 两个用例公用测试代码(套包测试)
- 测试结果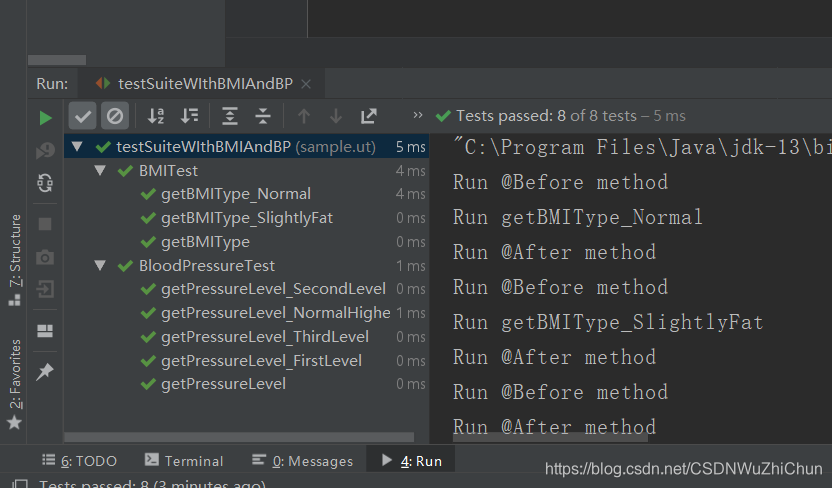
- 分类测试
简单测试
创建JUnit的过程
![]()
![]()
![]()
代码
package sample.ut;import org.junit.After;
import org.junit.Before;
import org.junit.Test;import static org.junit.Assert.*;/*** @description* @Author wuzhichun* @date 2020/3/25 21:38*/public class BMITest {BMI testObj;//被测类@Beforepublic void setUp() throws Exception {}@Afterpublic void tearDown() throws Exception {}@Testpublic void getBMIType() {//创建被测对象testObj = new BMI(45.0, 1.6);//调用测试方法String actual = testObj.getBMIType();//校验测试结果String expect = "偏瘦";assertTrue(expect == actual);}
}
独立的测试
package sample.ut;import org.junit.*;import static org.junit.Assert.*;/*** @description* @Author wuzhichun* @date 2020/3/25 21:38*/public class BMITest {BMI testObj;//被测类@Beforepublic void setUp() throws Exception {testObj = new BMI();System.out.println("Run @Before method");}@Afterpublic void tearDown() throws Exception {testObj = null;System.out.println("Run @After method");}@BeforeClasspublic static void prepareEnvironment(){System.out.println("Run @BeforeClass method");}@AfterClasspublic static void RestoreEnvironment(){System.out.println("RUn @AfterClass method");}@Testpublic void getBMIType() {//创建被测对象
//        testObj = new BMI(45.0, 1.6);testObj.setParams(45.0, 1.6);//调用测试方法String actual = testObj.getBMIType();//校验测试结果String expect = "偏瘦";assertTrue(expect == actual);}@Testpublic void getBMIType_Normal() {System.out.println("Run getBMIType_Normal");testObj.setParams(55.0, 1.6);assertTrue(testObj.getBMIType() == "正常");}@Testpublic void getBMIType_SlightlyFat() {System.out.println("Run getBMIType_SlightlyFat");testObj.setParams(68.0, 1.6);assertTrue(testObj.getBMIType() == "偏胖");}}
4.3.4参数化运行器
参数化运行器
org.junit.runners.Parameterized
测试数据准备构造器注入: 用带参数的构造函数获取数据集
属性注入: 用属性指定获取数据集
package sample.ut;import org.junit.After;
import org.junit.Before;
import org.junit.Test;
import org.junit.runner.RunWith;
import org.junit.runners.Parameterized;import java.util.Arrays;
import java.util.Collection;
import static org.junit.Assert.*;/*** @description* @Author wuzhichun* @date 2020/3/26 9:15*/// 1.指定参数化运行器@RunWith(Parameterized.class)public class BMITestParam {BMI testObj;//1.定义属性,作为参数private double weight;//体重private double height;//身高private String expected;//预期输出//2.定义嗲参数的构造方法,传输数据public BMITestParam(double w, double h, String exp){this.weight = w;this.height = h;this.expected = exp;}//3.准备测试数据集@Parameterized.Parameters(name = "{index}:getBMIType[{0},{1}] = [{2}]")public static Collection testDataset(){return Arrays.asList(new Object[][]{{45.0,1.6,"偏瘦"},{55.0,1.6,"正常"},{68.0,1.6, "偏胖"},{80.0,1.6, "肥胖"}});}@Beforepublic void setUp() throws Exception {testObj = new BMI(weight, height);}@Afterpublic void tearDown() throws Exception {testObj = null;}@Testpublic void getBMIType() {assertTrue(testObj.getBMIType() == expected);}
}
输出结果
![]()
4.3.5 测试参数化_属性注入
1.指定参数化运行器
2.准备测试数据(属性注入)2.1. 定义参数:定义公有变量,用于保存输入和预期输出
2.2.引入参数: 指定每个属性为参数
2.3.准备测试数据:定义一个特殊方法
package sample.ut;import org.junit.After;
import org.junit.Before;
import org.junit.Test;
import org.junit.runner.RunWith;
import org.junit.runners.Parameterized;import java.util.Arrays;
import java.util.Collection;import static org.junit.Assert.*;/*** @description* @Author wuzhichun* @date 2020/3/26 9:52*///指定参数化运行器\@RunWith(Parameterized.class)public class BMITestParam2 {//定义属性@Parameterized.Parameter(0)public double weight;//体重@Parameterized.Parameter(1)public double height; //身高@Parameterized.Parameter(2)public String expected;//预期分类//准备测试数据集@Parameterized.Parameterspublic static Collection testDataset(){return Arrays.asList(new Object[][]{{45.0,1.6,"偏瘦"},{55.0,1.6,"正常"},{68.0,1.6,"偏胖"},{80.0,1.6,"肥胖"}});}//定义被测类BMI testObj;@Beforepublic void setUp() throws Exception {testObj = new BMI(weight, height);}@Afterpublic void tearDown() throws Exception {testObj = null;}@Testpublic void getBMIType() {assertTrue(testObj.getBMIType() == expected);}
}
属性注入输出结果
![]()
4.3.6 测试集
实例:血压计算(BloodPressure)
![]()
测试套包运行器
org.junit.runners.Suite
![]()
实现代码
package sample.ut;/*** @description:根据血压值判断血压分级* @Author :wuzhichun* @date :2020年3月26日10:58:59*/
public class BloodPressure {int systolicPressure;// 收缩压int diatolicPressure;// 舒张压// Getter and Setterpublic int getSystolicPressure() {return systolicPressure;}public void setSystolicPressure(int systolicPressure) {this.systolicPressure = systolicPressure;}public int getDiatolicPressure() {return diatolicPressure;}public void setDiatolicPressure(int diatolicPressure) {this.diatolicPressure = diatolicPressure;}// 设置收缩压和舒张压public void setParams(int sysPressure, int diaPressure){systolicPressure = sysPressure;diatolicPressure = diaPressure;}// Constructionpublic BloodPressure(){systolicPressure = 0;diatolicPressure = 0;}public BloodPressure(int sysPressure, int diaPressure){systolicPressure = sysPressure;diatolicPressure = diaPressure;}// 根据血压值判断所属血压分级public String getPressureLevel(){String level = "";if(systolicPressure<120 && diatolicPressure<80){level = "正常";}else if( (systolicPressure>=120 && systolicPressure<=139) && (diatolicPressure>=80 && diatolicPressure<=89)){level = "正常高值";}else if( (systolicPressure>=140 && systolicPressure<=159) || (diatolicPressure>=90 && diatolicPressure<=99)){level = "1级高血压";}else if( (systolicPressure>=160 && systolicPressure<=179) || (diatolicPressure>=100 && diatolicPressure<=109)){level = "2级高血压";}else if( (systolicPressure>=180) || (diatolicPressure>=110)){level = "3级高血压";}else{level = "异常值";}return level;}
}
测试代码
package sample.ut;import org.junit.After;
import org.junit.Before;
import org.junit.Test;import static org.junit.Assert.*;/*** @description* @Author wuzhichun* @date 2020/3/26 10:59*/public class BloodPressureTest {//定义被测类BloodPressure testObj;@Beforepublic void setUp() throws Exception {testObj = new BloodPressure();}@Afterpublic void tearDown() throws Exception {testObj = null;}@Testpublic void getPressureLevel() {testObj.setParams(100,70);assertTrue(testObj.getPressureLevel() == "正常");}@Testpublic void getPressureLevel_NormalHigher() {testObj.setParams(130,85);assertTrue(testObj.getPressureLevel() == "正常高值");}@Testpublic void getPressureLevel_FirstLevel() {testObj.setParams(150,95);assertTrue(testObj.getPressureLevel() == "1级高血压");}@Testpublic void getPressureLevel_SecondLevel() {testObj.setParams(170,105);assertTrue(testObj.getPressureLevel() == "2级高血压");}@Testpublic void getPressureLevel_ThirdLevel() {testObj.setParams(190,120);assertTrue(testObj.getPressureLevel() == "3级高血压");}
}
测试结果
![]()
两个用例公用测试代码(套包测试)
package sample.ut;import org.junit.runner.RunWith;
import org.junit.runners.Suite;import static org.junit.Assert.*;/*** @description* @Author wuzhichun* @date 2020/3/26 11:06*///指定运行器,指定要加入的测试类@RunWith(Suite.class)@Suite.SuiteClasses({BMITest.class, BloodPressureTest.class})public class testSuiteWIthBMIAndBP {}
测试结果
分类测试
基本步骤
1.创建新的测试类,并配置该测试类
2.修改已有测试类,定义具有特定分类的方法
![]()
import org.junit.experimental.categories.Categories;
import org.junit.runner.RunWith;
import org.junit.runners.Suite;
import sample.ut.BMITest;
import sample.ut.BVTTest;
import sample.ut.BloodPressureTest;
import sample.ut.EPTest;/*** @description* @Author wuzhichun* @date 2020/3/26 11:56*///指定运行器//设置要执行的测试特性//设置候选测试集@RunWith(Categories.class)@Categories.IncludeCategory({BVTTest.class})@Suite.SuiteClasses({BMITest.class, BloodPressureTest.class})public class CategoryTest {}
软件测试过程与方法_第4章 4.3单元JUnit的单元测试相关推荐
- 软件测试过程与方法_第4章单元测试4.2代码
第4章单元测试代码 方案一 方案二 方案三 方案一 方案一:通过main函数,从外部输入体重和身高,创建被测对象,调用被测方法,结果输出到屏幕 package sample.ut;import jav ...
- 软件测试过程与方法_第2单元
软件测试过程与方法_第2单元 第2单元 节内小测 2.1视频小测 2.2视频小测 2.3小测 第2单元测试 第2单元 节内小测 2.1视频小测 如果要对一个三角形程序进行测试用例设计,三角形程序的功能 ...
- 软件测试过程与方法_第3单元
软件测试过程与方法_第3单元 第3单元 小节测试 3.1决策表测试 3.2组合测试 视频小测 3.2小测试 单元测试 第3周单元测试 第3单元 小节测试 3.1决策表测试 3.1决策表方法在以下哪种情 ...
- 软件测试过程与方法_第1周小测试
软件测试过程与方法_第1周小测试 <软件测试过程与方法>作业 第一题:单项选择题(每小题5分,共60分) 三.判断题(每小题5分,共40分) <软件测试过程与方法>作业 第一题 ...
- 软件测试过程与方法(1):单元测试,集成测试,确认测试
软件测试过程 软件测试从测试计划编写到测试实施,需要经过一系列的过程.这些测试按软件从编写到交付的各个阶段的先后顺序可分为以下5个阶段: 单元测试 集成测试 确认(有效性)测试 系统测试 验收(用户) ...
- 软件测试过程与方法(2):系统测试,验收测试
系统测试 系统测试的定义 计算机软件在开发完毕投入运行前还应与系统中其他部分如硬件系统.数据信息等集成在一起,进行一系列系统集成再进行系统测试(System Testing),以保证各组成部分在真实的 ...
- 管家婆辉煌版软件的使用方法_管家婆软件进销存的使用方法,管家婆软件使用教程_双全科技...
管家婆进销存软件包含进货管理.库存管理.销售管理.采购管理等四大部分.软件主要包括,入库单,出库单,库存查询,进货单,销售 单及基础信息管理.今天,我们就来讲究管家婆软件进销存的使用方法,管家婆软件使 ...
- inventor软件绘制百叶窗方法_三维工厂设计该使用什么软件?
背景简介 OpenPlant Modeler (以下简称OPM)是一款精确.快捷的三维工厂设计软件.它通过数据信息的交互提高项目团队的协同能力,通过遵循ISO 15926标准,应用i-model技术, ...
- C语言程序设计 现代设计方法_第8章代码、练习题及编程题答案
程序 8.1 reverse.c 程序 数列反向 第一个关于数组的程序要求用户录入一串数,然后按反向顺序输出这些数: Enter 10 numbers: 34 82 49 102 7 94 23 11 ...
最新文章
- redis 双写一致性 看一篇成高手系列1
- 数据库路由中间件MyCat - 使用篇(2)
- 金融风控实战——信贷业务架构与业务分析
- 什么是超融合数据中心网络?
- 手动调用cx-table.focus和a.focus方法的效果比较
- python 3.6.5编译安装_Linux系统安装Python3.6.5
- LG-Transformer:全局和局部建模Transformer结构新作
- 2020运动相机推荐_2020年优秀户外运动相机推荐
- 更改git提交显示的用户名
- 计算机网络(自顶向下方法)-网络层
- Linux16T以上硬盘分区,centos 2T以上硬盘 或者大于超过16T分区和格式化
- mysqlpump备份工具简单使用
- js主要是用来向html页面中,javascript是用来干什么的?
- Intel 英特尔CPU带字母
- 程序员跳槽一次到底能涨多少?今天带你见识下跳槽天花板
- APP下载量全面概述,含统计方法
- 【短期】未来学习目标
- 第②波 | 纯福利,无套路资源分享~
- 金山云冲刺港股拟双重主要上市:年营收90亿 为雷军力挺项目
- 90 岁程序员:他的压缩算法改变了世界!