实战六:手把手教你用TensorFlow进行手写数字识别
手把手教你用TensorFlow进行手写数字识别
github下载地址
目录
手写体数字MNIST数据集介绍
MNIST Softmax网络介绍
实战MNIST Softmax网络
MNIST CNN网络介绍
实战MNIST CNN网络
一、MNIST数据集介绍
1.MNIST数据集
MNIST是一套手写体数字的图像数据集,包括60000个训练样例和10000个测试样例,由纽约大学的Yann LeCun等人维护。
more info:http://yann.lecun.com/exdb/mnist/
2.MNIST手写体数字介绍
MNIST图像数据集使用形如[28,28]的二阶数组来表示每个手写体数字,数组中的每个元素对应一个像素点,即每张图像大小固定为28x28像素
![]()
MNIST数据集中的图像都是256阶灰度图,即灰度值0表示白色(背景),255表示黑色(前景),使用取值为[0,255]的uint8数据了诶下表示图像。为了加速训练,我们需要做数据规范化,将灰度值缩放为[0,1]的float32数据类型
![]()
由于每张图像的尺寸都是28x28像素,为了方便连续存储,我们可以将形如[28,28]的二阶数组“摊平”成形如[784,]的一阶数组,可以表示256256…*256 = 256^784张不同的图像。
但这些图像并非每一张都代表有效的手写体数字,其中绝大部分都是如下的噪声图:
![]()
3.下载和读取MNIST数据集
a.使用tf.contrib.learn模块加载MNIST数据集
一个曾广泛使用的方法,但如今已经被废弃的(deprecated)方法:
import tensorflow as tf
from tensorflow.examples.tutorials.mnist import input_data# 导入数据
mnist = input_data.read_data_sets("./data/")
WARNING:tensorflow:From <ipython-input-1-b58ad473ad85>:5: read_data_sets (from tensorflow.contrib.learn.python.learn.datasets.mnist) is deprecated and will be removed in a future version.
Instructions for updating:
Please use alternatives such as official/mnist/dataset.py from tensorflow/models.
WARNING:tensorflow:From D:\software\Anaconda\workplace\lib\site-packages\tensorflow\contrib\learn\python\learn\datasets\mnist.py:260: maybe_download (from tensorflow.contrib.learn.python.learn.datasets.base) is deprecated and will be removed in a future version.
Instructions for updating:
Please write your own downloading logic.
WARNING:tensorflow:From D:\software\Anaconda\workplace\lib\site-packages\tensorflow\contrib\learn\python\learn\datasets\mnist.py:262: extract_images (from tensorflow.contrib.learn.python.learn.datasets.mnist) is deprecated and will be removed in a future version.
Instructions for updating:
Please use tf.data to implement this functionality.
Extracting ./data/train-images-idx3-ubyte.gz
WARNING:tensorflow:From D:\software\Anaconda\workplace\lib\site-packages\tensorflow\contrib\learn\python\learn\datasets\mnist.py:267: extract_labels (from tensorflow.contrib.learn.python.learn.datasets.mnist) is deprecated and will be removed in a future version.
Instructions for updating:
Please use tf.data to implement this functionality.
Extracting ./data/train-labels-idx1-ubyte.gz
Extracting ./data/t10k-images-idx3-ubyte.gz
Extracting ./data/t10k-labels-idx1-ubyte.gz
WARNING:tensorflow:From D:\software\Anaconda\workplace\lib\site-packages\tensorflow\contrib\learn\python\learn\datasets\mnist.py:290: DataSet.__init__ (from tensorflow.contrib.learn.python.learn.datasets.mnist) is deprecated and will be removed in a future version.
Instructions for updating:
Please use alternatives such as official/mnist/dataset.py from tensorflow/models.
因为,tf.contrib.learn整个模型均已被废弃了
b.使用Keras加载MNIST数据集
tf.kera.datasets.mnist.load_data(path=‘mnist.npz’)
from keras.datasets import mnist
path = "D:\\mnist data\mnist.npz"
(x_train,y_train),(x_test,y_test) = mnist.load_data(path)
Using TensorFlow backend.
# 查看mnist data的维度
print(x_train.shape,y_train.shape)
print(x_test.shape,y_test.shape)
(60000, 28, 28) (60000,)
(10000, 28, 28) (10000,)
# 查看数据
print(x_train[0])
print(y_train[0])
[[  0   0   0   0   0   0   0   0   0   0   0   0   0   0   0   0   0   00   0   0   0   0   0   0   0   0   0][  0   0   0   0   0   0   0   0   0   0   0   0   0   0   0   0   0   00   0   0   0   0   0   0   0   0   0][  0   0   0   0   0   0   0   0   0   0   0   0   0   0   0   0   0   00   0   0   0   0   0   0   0   0   0][  0   0   0   0   0   0   0   0   0   0   0   0   0   0   0   0   0   00   0   0   0   0   0   0   0   0   0][  0   0   0   0   0   0   0   0   0   0   0   0   0   0   0   0   0   00   0   0   0   0   0   0   0   0   0][  0   0   0   0   0   0   0   0   0   0   0   0   3  18  18  18 126 136175  26 166 255 247 127   0   0   0   0][  0   0   0   0   0   0   0   0  30  36  94 154 170 253 253 253 253 253225 172 253 242 195  64   0   0   0   0][  0   0   0   0   0   0   0  49 238 253 253 253 253 253 253 253 253 25193  82  82  56  39   0   0   0   0   0][  0   0   0   0   0   0   0  18 219 253 253 253 253 253 198 182 247 2410   0   0   0   0   0   0   0   0   0][  0   0   0   0   0   0   0   0  80 156 107 253 253 205  11   0  43 1540   0   0   0   0   0   0   0   0   0][  0   0   0   0   0   0   0   0   0  14   1 154 253  90   0   0   0   00   0   0   0   0   0   0   0   0   0][  0   0   0   0   0   0   0   0   0   0   0 139 253 190   2   0   0   00   0   0   0   0   0   0   0   0   0][  0   0   0   0   0   0   0   0   0   0   0  11 190 253  70   0   0   00   0   0   0   0   0   0   0   0   0][  0   0   0   0   0   0   0   0   0   0   0   0  35 241 225 160 108   10   0   0   0   0   0   0   0   0   0][  0   0   0   0   0   0   0   0   0   0   0   0   0  81 240 253 253 11925   0   0   0   0   0   0   0   0   0][  0   0   0   0   0   0   0   0   0   0   0   0   0   0  45 186 253 253150  27   0   0   0   0   0   0   0   0][  0   0   0   0   0   0   0   0   0   0   0   0   0   0   0  16  93 252253 187   0   0   0   0   0   0   0   0][  0   0   0   0   0   0   0   0   0   0   0   0   0   0   0   0   0 249253 249  64   0   0   0   0   0   0   0][  0   0   0   0   0   0   0   0   0   0   0   0   0   0  46 130 183 253253 207   2   0   0   0   0   0   0   0][  0   0   0   0   0   0   0   0   0   0   0   0  39 148 229 253 253 253250 182   0   0   0   0   0   0   0   0][  0   0   0   0   0   0   0   0   0   0  24 114 221 253 253 253 253 20178   0   0   0   0   0   0   0   0   0][  0   0   0   0   0   0   0   0  23  66 213 253 253 253 253 198  81   20   0   0   0   0   0   0   0   0   0][  0   0   0   0   0   0  18 171 219 253 253 253 253 195  80   9   0   00   0   0   0   0   0   0   0   0   0][  0   0   0   0  55 172 226 253 253 253 253 244 133  11   0   0   0   00   0   0   0   0   0   0   0   0   0][  0   0   0   0 136 253 253 253 212 135 132  16   0   0   0   0   0   00   0   0   0   0   0   0   0   0   0][  0   0   0   0   0   0   0   0   0   0   0   0   0   0   0   0   0   00   0   0   0   0   0   0   0   0   0][  0   0   0   0   0   0   0   0   0   0   0   0   0   0   0   0   0   00   0   0   0   0   0   0   0   0   0][  0   0   0   0   0   0   0   0   0   0   0   0   0   0   0   0   0   00   0   0   0   0   0   0   0   0   0]]
5
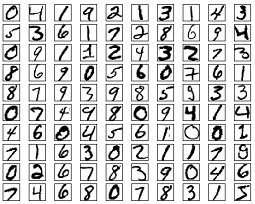
4.MNIST数据集 样例可视化
import matplotlib.pyplot as pltfig = plt.figure()
for i in range(15):plt.subplot(3,5,i+1) # 绘制前15个手写体数字,以三行5列子图形式展示plt.tight_layout # 自动适配子图尺寸plt.imshow(x_train[i],cmap="Greys") # 使用灰色显示像素灰度值plt.title("Label:{}".format(y_train[i])) # 设置标签为子图标题plt.xticks([]) # 删除x轴标记plt.yticks([]) # 删除y轴标记
二、MNIST Softmax网络介绍
1.前置知识
a.感知机模型
![]()
b.神经网络
![]()
c.线性不可分
![]()
d.激活函数(Activation Function)
![]()
e.全连接层(fully connected layers,FC)
![]()
2.MNIST Softmax网络
将表示手写数字的形如[784]的一维向量作为输入;中间定义2层512个神经元隐藏层,具备一定的模型复杂度,足以识别手写体数字;最后定义1层10个神经元的全连接层,用于输出10个不同类别的“概率”。
![]()
三、实战MNIST Softmax网络
![]()
1.加载MNIST数据集
from keras.datasets import mnist
path = "D:\\mnist data\mnist.npz"(x_train,y_train),(x_test,y_test) = mnist.load_data(path)
print(x_train.shape,type(x_train))
print(y_train.shape,type(y_train))
print(x_test.shape,type(x_test))
print(y_test.shape,type(y_test))
(60000, 28, 28) <class 'numpy.ndarray'>
(60000,) <class 'numpy.ndarray'>
(10000, 28, 28) <class 'numpy.ndarray'>
(10000,) <class 'numpy.ndarray'>
2.数据规范化
# 将图像本身从[28,28]转换为[784,]
X_train = x_train.reshape(60000,784)
X_test = x_test.reshape(10000,784)print(X_train.shape,type(X_train))
print(X_test.shape,type(X_test))
(60000, 784) <class 'numpy.ndarray'>
(10000, 784) <class 'numpy.ndarray'>
# 将数据类型转换为float32,然后将其归一化处理
X_train = X_train.astype("float32")
X_test = X_test.astype("float32")
# 数据归一化
X_train /= 255
X_test /= 255
# 查看数据
print(X_train[0])
print(y_train[0])
3.统计训练数据中各标签的数量
import numpy as np
import matplotlib.pyplot as pltlabel,count = np.unique(y_train,return_counts=True)
print(label,count)
[0 1 2 3 4 5 6 7 8 9] [5923 6742 5958 6131 5842 5421 5918 6265 5851 5949]
fig = plt.figure()
plt.bar(label,count,width=0.7,align="center")
plt.title("Label Distribution")
plt.xlabel("Label")
plt.ylabel("Count")
plt.xticks(label)
plt.ylim(0,7500)for a,b in zip(label,count):plt.text(a,b,"%d" %b,ha="center",va="bottom",fontsize=10)plt.show()
![]()
4.one-hot 编码
a.几种编码方式的对比
| Binary | Gray code | One-hot |
|---|---|---|
| 000 | 000 | 00000001 |
| 001 | 001 | 00000010 |
| 010 | 011 | 00000100 |
| 011 | 010 | 00001000 |
| 100 | 110 | 00010000 |
| 101 | 111 | 00100000 |
| 110 | 101 | 01000000 |
| 111 | 100 | 10000000 |
b.对标签数据进行one-hot编码
from keras.utils import np_utilsn_classes = 10
print("Shape before one-hot encoding:",y_train.shape)
Y_train = np_utils.to_categorical(y_train,n_classes)
Y_test = np_utils.to_categorical(y_test,n_classes)
print("Shape after one-hot encoding:",Y_train.shape)
Shape before one-hot encoding: (60000,)
Shape after one-hot encoding: (60000, 10)
# 具体查看一下数据
print(y_train[0])
print(Y_train[0])
5
[0. 0. 0. 0. 0. 1. 0. 0. 0. 0.]
5.使用Keras sequential model来实现神经网络
a.定义模型 softmax网络层
from keras.models import Sequential
from keras.layers.core import Dense,Activationmodel = Sequential()model.add(Dense(512,input_shape=(784,)))
model.add(Activation("relu"))model.add(Dense(512))
model.add(Activation("relu"))model.add(Dense(10))
model.add(Activation("softmax"))
WARNING:tensorflow:From D:\software\Anaconda\workplace\lib\site-packages\tensorflow\python\framework\op_def_library.py:263: colocate_with (from tensorflow.python.framework.ops) is deprecated and will be removed in a future version.
Instructions for updating:
Colocations handled automatically by placer.
b.编译模型
model.compile()
compile(optimizer, loss=None, metrics=None, loss_weights=None, sample_weight_mode=None, weighted_metrics=None, target_tensors=None)
# loss:categorical_crossentropy 损失器采用交叉熵损失函数
# metrics:accuracy 衡量指标采用准确率
# optimizer:adam 优化器采用adam,结合AdaGrad和RMSProp两种优化算法的优点
model.compile(loss="categorical_crossentropy",metrics=["accuracy"],optimizer="adam")
c.训练模型,并将指标保存到history中
model.fit()
fit(x=None, y=None, batch_size=None, epochs=1, verbose=1, callbacks=None, validation_split=0.0, validation_data=None, shuffle=True, class_weight=None, sample_weight=None, initial_epoch=0, steps_per_epoch=None, validation_steps=None)
history = model.fit(X_train,Y_train,batch_size=128,epochs=5,verbose=2,validation_data=(X_test,Y_test))
WARNING:tensorflow:From D:\software\Anaconda\workplace\lib\site-packages\tensorflow\python\ops\math_ops.py:3066: to_int32 (from tensorflow.python.ops.math_ops) is deprecated and will be removed in a future version.
Instructions for updating:
Use tf.cast instead.
Train on 60000 samples, validate on 10000 samples
Epoch 1/5- 5s - loss: 0.2158 - acc: 0.9371 - val_loss: 0.1152 - val_acc: 0.9637
Epoch 2/5- 5s - loss: 0.0815 - acc: 0.9745 - val_loss: 0.0856 - val_acc: 0.9727
Epoch 3/5- 6s - loss: 0.0505 - acc: 0.9841 - val_loss: 0.0762 - val_acc: 0.9758
Epoch 4/5- 6s - loss: 0.0361 - acc: 0.9882 - val_loss: 0.0672 - val_acc: 0.9782
Epoch 5/5- 5s - loss: 0.0263 - acc: 0.9916 - val_loss: 0.0772 - val_acc: 0.9772
d.可视化指标
fig = plt.figure()plt.subplot(2,1,1)
plt.plot(history.history["acc"])
plt.plot(history.history["val_acc"])
plt.title("Model Accuracy")
plt.xlabel("epoch")
plt.ylabel("accuracy")
plt.legend(["train","test"],loc="lower right")plt.subplot(2,1,2)
plt.plot(history.history["loss"])
plt.plot(history.history["val_loss"])
plt.title("Model loss")
plt.xlabel("epoch")
plt.ylabel("loss")
plt.legend(["train","test"],loc="upper right")
plt.tight_layout()plt.show()
![]()
e.保存模型
model.save()
You can use model.save(filepath) to save a Keras model into a single HDF5 file which will contain:
- the architecture of the model, allowing to re-create the model
- the weights of the model
- the training configuration (loss, optimizer)
- the state of the optimizer, allowing to resume training exactly where you left off.
You can then use keras.models.load_model(filepath) to reinstantiate your model. load_model will also take care of compiling the model using the saved training configuration (unless the model was never compiled in the first place).
import os
import tensorflow.gfile as gfilesave_dir = "./model/"if gfile.Exists(save_dir):gfile.DeleteRecursively(save_dir)
gfile.MakeDirs(save_dir)model_name = "keras_mnist.h5"
model_path = os.path.join(save_dir,model_name)
model.save(model_path)
print("Saved trained model at %s" % model_path)
Saved trained model at ./model/keras_mnist.h5
f.加载模型
from keras.models import load_modelmnist_model = load_model(model_path)
g.统计模型在测试集上的分类结果
loss_and_metrics = mnist_model.evaluate(X_test,Y_test,verbose=2)print("Test Loss:{}".format(loss_and_metrics[0]))
print("Test Accuracy:{}%".format(loss_and_metrics[1]*100))predicted_classes = mnist_model.predict_classes(X_test)correct_indices = np.nonzero(predicted_classes == y_test)[0]
incorrect_indices = np.nonzero(predicted_classes != y_test)[0]
print("Classified correctly count: {}".format(len(correct_indices)))
print("Classified incorrectly count: {}".format(len(incorrect_indices)))
Test Loss:0.07715968866588664
Test Accuracy:97.72%
Classified correctly count: 9772
Classified incorrectly count: 228
四、MNIST CNN网络介绍
1.CNN简介
![]()
2.卷积
![]()
3.卷积层(Convolutional Layer,conv)
![]()
4.池化层(Pooling)
![]()
5.Dropout层
![]()
6.Flatten
![]()
五、实战MNIST CNN网络
MNIST CNN示意图
![]()
1.加载MNIST数据集
from keras.datasets import mnist
path = "D:\mnist data\mnist.npz"(x_train,y_train),(x_test,y_test) = mnist.load_data(path)print(x_train.shape,type(x_train))
print(y_train.shape,type(y_train))
print(x_test.shape,type(x_test))
print(y_test.shape,type(y_test))
(60000, 28, 28) <class 'numpy.ndarray'>
(60000,) <class 'numpy.ndarray'>
(10000, 28, 28) <class 'numpy.ndarray'>
(10000,) <class 'numpy.ndarray'>
2.数据处理:规范化
channels_last corresponds to inputs with shape (batch, height, width, channels) while channels_first corresponds to inputs with shape (batch, channels, height, width).
It defaults to the image_data_format value found in your Keras config file at ~/.keras/keras.json. If you never set it, then it will be channels_last.
from keras import backend as Kimg_rows,img_cols = 28,28if K.image_data_format() == "channels_first":x_train = x_train.reshape(x_train.shape[0],1,img_rows,img_cols)x_test = x_test.reshape(x_test.shape[0],1,img_rows,img_cols)input_shape = (1,img_rows,img_cols)
else:x_train = x_train.reshape(x_train.shape[0],img_rows,img_cols,1)x_test = x_test.reshape(x_test.shape[0],img_rows,img_cols,1)input_shape = (img_rows,img_cols,1)print(x_train.shape,type(x_train))
print(x_test.shape,type(x_test))
(60000, 28, 28, 1) <class 'numpy.ndarray'>
(10000, 28, 28, 1) <class 'numpy.ndarray'>
# 将数据类型转换为float32
X_train = x_train.astype("float32")
X_test = x_test.astype("float32")
# 数据归一化
X_train /= 255
X_test /= 255
3.统计训练数据中各标签数量
import numpy as np
import matplotlib.pyplot as pltlabel,count = np.unique(y_train,return_counts=True)
print(label,count)
[0 1 2 3 4 5 6 7 8 9] [5923 6742 5958 6131 5842 5421 5918 6265 5851 5949]
fig = plt.figure()plt.bar(label,count,width=0.7,align="center")
plt.title("Label Distribution")
plt.xlabel("Label")
plt.ylabel("Count")
plt.xticks(label)
plt.ylim(0,7500)for a,b in zip(label,count):plt.text(a,b,"%d" %b,ha="center",va="bottom",fontsize=10)plt.show()
![]()
4.数据处理:one-hot 编码
from keras.utils import np_utilsn_classes = 10
print("Shape before one-hot encoding:",y_train.shape)
Y_train = np_utils.to_categorical(y_train,n_classes)
Y_test = np_utils.to_categorical(y_test,n_classes)
print("Shape after one-hot encoding:",Y_train.shape)
Shape before one-hot encoding: (60000,)
Shape after one-hot encoding: (60000, 10)
print(y_train[0])
print(Y_train[0])
5
[0. 0. 0. 0. 0. 1. 0. 0. 0. 0.]
5.MNIST CNN网络实战
a.Keras sequential model定义MNIST CNN网络
from keras.models import Sequential
from keras.layers import Dense,Dropout,Flatten
from keras.layers import Conv2D,MaxPooling2Dmodel = Sequential()# Feature Extraction
# 第一层卷积,32个3*3的卷积核,激活函数使用relu
model.add(Conv2D(filters=32,kernel_size=(3,3),activation="relu",input_shape=input_shape))# 第二层卷积,64个3*3的卷积核,激活函数使用relu
model.add(Conv2D(filters=64,kernel_size=(3,3),activation="relu"))# 最大池化层,池化窗口为2*2
model.add(MaxPooling2D(pool_size=(2,2)))# Dropout 25%的输入神经元
model.add(Dropout(0.25))# 将Pooled feature map摊平后输入全连接网络
model.add(Flatten())# Classification
# 全联接层
model.add(Dense(128,activation="relu"))# Dropout 50%的输入神经元
model.add(Dropout(0.5))# 使用softmax激活函数做多分类,输出各数字的概率
model.add(Dense(n_classes,activation="softmax"))
WARNING:tensorflow:From D:\software\Anaconda\workplace\lib\site-packages\keras\backend\tensorflow_backend.py:3445: calling dropout (from tensorflow.python.ops.nn_ops) with keep_prob is deprecated and will be removed in a future version.
Instructions for updating:
Please use `rate` instead of `keep_prob`. Rate should be set to `rate = 1 - keep_prob`.
# 查看MNIST CNN模型网络结构
model.summary()
_________________________________________________________________
Layer (type)                 Output Shape              Param #
=================================================================
conv2d_1 (Conv2D)            (None, 26, 26, 32)        320
_________________________________________________________________
conv2d_2 (Conv2D)            (None, 24, 24, 64)        18496
_________________________________________________________________
max_pooling2d_1 (MaxPooling2 (None, 12, 12, 64)        0
_________________________________________________________________
dropout_1 (Dropout)          (None, 12, 12, 64)        0
_________________________________________________________________
flatten_1 (Flatten)          (None, 9216)              0
_________________________________________________________________
dense_4 (Dense)              (None, 128)               1179776
_________________________________________________________________
dropout_2 (Dropout)          (None, 128)               0
_________________________________________________________________
dense_5 (Dense)              (None, 10)                1290
=================================================================
Total params: 1,199,882
Trainable params: 1,199,882
Non-trainable params: 0
_________________________________________________________________
b.编译模型
model.compile()
compile(optimizer, loss=None, metrics=None, loss_weights=None, sample_weight_mode=None, weighted_metrics=None, target_tensors=None)
model.compile(loss='categorical_crossentropy', metrics=['accuracy'], optimizer='adam')
c.训练模型,并指标保存到history中
model.fit()
fit(x=None, y=None, batch_size=None, epochs=1, verbose=1, callbacks=None, validation_split=0.0, validation_data=None, shuffle=True, class_weight=None, sample_weight=None, initial_epoch=0, steps_per_epoch=None, validation_steps=None)
history = model.fit(X_train,Y_train,batch_size=128,epochs=5,verbose=2,validation_data=(X_test,Y_test))
Train on 60000 samples, validate on 10000 samples
Epoch 1/5- 63s - loss: 0.2449 - acc: 0.9256 - val_loss: 0.0553 - val_acc: 0.9823
Epoch 2/5- 63s - loss: 0.0841 - acc: 0.9742 - val_loss: 0.0340 - val_acc: 0.9881
Epoch 3/5- 63s - loss: 0.0644 - acc: 0.9811 - val_loss: 0.0312 - val_acc: 0.9889
Epoch 4/5- 68s - loss: 0.0522 - acc: 0.9838 - val_loss: 0.0316 - val_acc: 0.9907
Epoch 5/5- 64s - loss: 0.0440 - acc: 0.9864 - val_loss: 0.0300 - val_acc: 0.9902
# 将history可视化
fig = plt.figure()plt.subplot(2,1,1)
plt.plot(history.history["acc"])
plt.plot(history.history["val_acc"])
plt.title("Model Accuracy")
plt.xlabel("epoch")
plt.ylabel("accuracy")
plt.legend(["train","test"],loc="lower right")plt.subplot(2,1,2)
plt.plot(history.history["loss"])
plt.plot(history.history["val_loss"])
plt.title("Model Loss")
plt.xlabel("loss")
plt.ylabel("epoch")
plt.legend(["train","test"],loc="upper right")
plt.tight_layout()plt.show()
![]()
d.保存模型
model.save()
You can use model.save(filepath) to save a Keras model into a single HDF5 file which will contain:
- the architecture of the model, allowing to re-create the model
- the weights of the model
- the training configuration (loss, optimizer)
- the state of the optimizer, allowing to resume training exactly where you left off.
You can then use keras.models.load_model(filepath) to reinstantiate your model. load_model will also take care of compiling the model using the saved training configuration (unless the model was never compiled in the first place).
import os
import tensorflow.gfile as gfilesave_dir = "./model/"if gfile.Exists(save_dir):gfile.DeleteRecursively(save_dir)
gfile.MakeDirs(save_dir)model_name = "keras_mnist.h5"
model_path = os.path.join(save_dir,model_name)
model.save(model_path)print("Saved trained model at %s"% model_path)
Saved trained model at ./model/keras_mnist.h5
e.加载模型
from keras.models import load_modelmnist_model = load_model(model_path)
f.统计模型在测试集上的分类结果
loss_and_metrics = mnist_model.evaluate(X_test,Y_test,verbose=2)print("Test Loss:{}".format(loss_and_metrics[0]))
print("Test Accuracy:{}%".format(loss_and_metrics[1]*100))predicted_classes = mnist_model.predict_classes(X_test)correct_indices = np.nonzero(predicted_classes == y_test)[0]
incorrect_indices = np.nonzero(predicted_classes != y_test)[0]print("Classified correctly count:{}".format(len(correct_indices)))
print("Classified incorrectly count:{}".format(len(incorrect_indices)))
Test Loss:0.02999471065380276
Test Accuracy:99.02%
Classified correctly count:9902
Classified incorrectly count:98
实战六:手把手教你用TensorFlow进行手写数字识别相关推荐
- 教你用TensorFlow实现手写数字识别
弱者用泪水安慰自己,强者用汗水磨练自己. 这段时间因为项目中有一块需要用到图像识别,最近就一直在炼丹,宝宝心里苦,但是宝宝不说... 能点开这篇文章的朋友估计也已经对TensorFlow有了一定了解, ...
- 基于tensorflow的手写数字识别
基于tensorflow的手写数字识别 数据准备 引入包 加载数据 查看数据信息 查看一张图片 数据预处理 搭建网络模型 模型的预测与评价 模型的展示 对一张图片进行预测 准确率 数据准备 引入包 i ...
- TF2.0深度学习实战(一):分类问题之手写数字识别
前言: 本专栏将分享从零开始搭建神经网络的学习过程,力争打造最易上手的小白教程.在这过程中,我将使用谷歌TensorFlow2 框架逐一复现经典的卷积神经网络:LeNet-5.AlexNet.VGG系 ...
- 利用Tensorflow实现手写数字识别(附python代码)
手写识别的应用场景有很多,智能手机.掌上电脑的信息工具的普及,手写文字输入,机器识别感应输出:还可以用来识别银行支票,如果准确率不够高,可能会引起严重的后果.当然,手写识别也是机器学习领域的一个Hel ...
- 【MLP实战】001:基于Minist数据集的手写数字识别
本文又是一篇基于Minist数据集的手写数字识别. 首先,mnist数据集: 链接:https://pan.baidu.com/s/1z7R7_jnDKZm9F7M6n8hiIw 提取码:rn8z 首 ...
- OpenCV+TensorFlow图片手写数字识别(附源码)
初次接触TensorFlow,而手写数字训练识别是其最基本的入门教程,网上关于训练的教程很多,但是模型的测试大多都是官方提供的一些素材,能不能自己随便写一串数字让机器识别出来呢?纸上得来终觉浅,带着这 ...
- tensorflow+python flask进行手写识别_使用tensorflow进行手写数字识别
首先要在对应的目录下安装好手写数字识别数据集. 编写代码如下所示: import tensorflow as tf from tensorflow.examples.tutorials.mnist i ...
- TensorFlow 教程——手写数字识别
运行环境 TensorFlow2.0 解决方案 from tensorflow import keras import tensorflow as tf import mnist_reader imp ...
- 【机器学习】机器学习从零到掌握之七 -- 教你使用KNN进行手写数字识别
本文是<机器学习从零到掌握>系列之第7篇 机器学习从零到掌握之一 -- 教你理解K近邻算法 机器学习从零到掌握之二 -- 教你实现K近邻算法 机器学习从零到掌握之三 -- 教你使用K近邻算 ...
最新文章
- Linux: debian/ubuntu下安装和使用Java 11
- 启动LINUX系统后,进入图形化界面的命令
- performSelector may cause a leak because its selector is unknown
- java批量删除接口怎么定义_教你在Java接口中定义方法
- mybatis-查询过程
- 16位汇编第第四讲常用的7种寻址方式
- 阿里云服务器mysql默认密码_阿里云服务器修改MySQL初始密码---Linux学习笔记
- iView学习笔记(三):表格搜索,过滤及隐藏列操作
- 滴滴CTO五轮面试真是太刺激了,Java高级工程师一二三四五面面经(已拿到offer)...
- 基础面试题——HTML/CSS
- Excel的导入与导出(POI)
- 为什么python不能输入中文_一条命令解决mac版本python IDLE不能输入中文问题
- 那些一毕业就选择华为的人,后来都怎么样了
- 计算机科学与技术实训内容,计算机科学与技术专业实训大纲.doc
- 世界五大学习方法之费曼技巧
- linux中多个if嵌套使用方法,Objective-C嵌套if语句
- kaggle论文阅读
- BCH硬分叉完毕,澳本聪放话:一切尚未结束,游戏继续!
- 汽车电子can总线(一)物理层
- 计算机网络之父是谁,因特网_被成为网络之父的是_计算机网络之父