使用amoeba配置mysql读写分离
一,背景介绍:
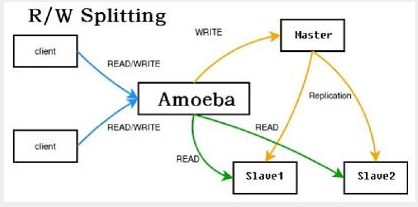
Amoeba(变形虫)项目,专注 分布式数据库 proxy 开发。座落与Client、DB Server(s)之间。对客户端透明。具有负载均衡、高可用性、sql过滤、读写分离、可路由相关的query到目标数据库、可并发请求多台数据库合并结果。要想搭建Amoeba读写分离,首先需要知道MySQL的主从配置。具体的架构图如下图:
二,配置所需的环境:
Amoeba for mysql:192.168.1.28
Master : 192.168.1.247
Slave : 192.168.1.245
database:yazi passwd:root/123456
JDK1.8.0_51
三,具体的搭建和配置步骤如下:
1,配置mysql主从复制,具体参照上篇的mysql主从复制的配置
2,安装配置jdk1.8.0_51以及环境变量
(1),安装jdk命令: rpm -ivh jdk-8u51-linux-x64.rpm
|
1
2
3
4
5
6
7
8
9
10
11
12
13
14
15
16
17
18
19
|
[root@localhost install ] # ll
total 481168
-rw-r--r--. 1 root root 8850470 Nov 2 22:43 apache-tomcat-7.0.63. tar .gz
-rw-r--r--. 1 root root 137808216 Jan 13 15:09 jdk-8u51-linux-x64.rpm
-rw-r--r--. 1 root root 33203321 Nov 20 11:31 mysql-5.6.25. tar .gz
-rw-r--r--. 1 root root 312845162 Nov 13 15:19 mysql-5.6.27-linux-glibc2.5-x86_64. tar .gz
[root@localhost install ] # rpm -ivh jdk-8u51-linux-x64.rpm
Preparing... ########################################### [100%]
1:jdk1.8.0_51 ########################################### [100%]
Unpacking JAR files...
rt.jar...
jsse.jar...
charsets.jar...
tools.jar...
localedata.jar...
jfxrt.jar...
plugin.jar...
javaws.jar...
deploy.jar...
|
(2)配置环境变量:
[root@localhost install]# vi /etc/profile
|
1
2
3
4
5
6
7
8
9
10
11
12
13
14
15
16
17
18
19
20
21
22
23
24
25
26
27
28
29
30
31
32
33
34
35
36
37
38
39
40
41
42
43
44
45
46
47
48
49
50
51
52
53
54
55
56
57
58
59
60
61
62
63
64
65
66
67
68
69
70
71
72
|
# /etc/profile
# System wide environment and startup programs, for login setup
# Functions and aliases go in /etc/bashrc
# It's NOT a good idea to change this file unless you know what you
# are doing. It's much better to create a custom.sh shell script in
# /etc/profile.d/ to make custom changes to your environment, as this
# will prevent the need for merging in future updates.
pathmunge () {
case ":${PATH}:" in
*: "$1" :*)
;;
*)
if [ "$2" = "after" ] ; then
PATH=$PATH:$1
else
PATH=$1:$PATH
fi
esac
}
if [ -x /usr/bin/id ]; then
if [ -z "$EUID" ]; then
# ksh workaround
EUID=` id -u`
UID=` id -ru`
fi
USER= "`id -un`"
LOGNAME=$USER
MAIL= "/var/spool/mail/$USER"
fi
# Path manipulation
if [ "$EUID" = "0" ]; then
pathmunge /sbin
pathmunge /usr/sbin
pathmunge /usr/local/sbin
else
pathmunge /usr/local/sbin after
pathmunge /usr/sbin after
pathmunge /sbin after
fi
HOSTNAME=` /bin/hostname 2> /dev/null `
HISTSIZE=1000
if [ "$HISTCONTROL" = "ignorespace" ] ; then
export HISTCONTROL=ignoreboth
else
export HISTCONTROL=ignoredups
fi
export PATH USER LOGNAME MAIL HOSTNAME HISTSIZE HISTCONTROL
# By default, we want umask to get set. This sets it for login shell
# Current threshold for system reserved uid/gids is 200
# You could check uidgid reservation validity in
# /usr/share/doc/setup-*/uidgid file
if [ $UID -gt 199 ] && [ "`id -gn`" = "`id -un`" ]; then
umask 002
else
umask 022
fi
for i in /etc/profile .d/*.sh ; do
if [ -r "$i" ]; then
if [ "${-#*i}" != "$-" ]; then
. "$i"
else
. "$i" > /dev/null 2>&1
fi
fi
done
unset i
unset -f pathmunge
export JAVA_HOME= /usr/java/jdk1 .8.0_51
export JRE_HOME= /usr/java/jdk1 .8.0_51 /jre
export PATH=$JAVA_HOME /bin :$PATH
export CLASSPATH=.:$JAVA_HOME /lib/dt .jar:$JAVA_HOME /lib/tools .jar
|
(3)配置生效和验证:
|
1
2
3
4
5
|
[root@FileServerA logs] # source /etc/profile
[root@FileServerA logs] # java -version
java version "1.8.0_51"
Java(TM) SE Runtime Environment (build 1.8.0_51-b16)
Java HotSpot(TM) 64-Bit Server VM (build 25.51-b03, mixed mode)
|
3,安装配置amoeba
(1)下载amoeba
(http://item.taobao.com/item.htm?id=41222768202)
(2)压缩包无需安装,直接解压即可
|
1
2
3
4
5
6
7
8
9
10
11
12
13
14
15
16
17
18
19
20
21
22
23
24
25
26
27
28
29
30
31
32
33
34
35
36
37
38
39
40
41
42
43
44
45
46
47
48
49
50
51
52
53
54
55
56
57
58
59
60
61
62
63
64
|
[root@localhost install ] # unzip amoeba-mysql-3.0.5-RC-distribution.zip
Archive: amoeba-mysql-3.0.5-RC-distribution.zip
creating: amoeba-mysql-3.0.5-RC/
creating: amoeba-mysql-3.0.5-RC /lib/
inflating: amoeba-mysql-3.0.5-RC /lib/amoeba-core-3 .0.5-RC.jar
inflating: amoeba-mysql-3.0.5-RC /lib/log4j-1 .2.12.jar
inflating: amoeba-mysql-3.0.5-RC /lib/commons-lang-2 .4.jar
inflating: amoeba-mysql-3.0.5-RC /lib/commons-logging-1 .1.1.jar
inflating: amoeba-mysql-3.0.5-RC /lib/commons-beanutils-1 .8.0.jar
inflating: amoeba-mysql-3.0.5-RC /lib/commons-collections-3 .2.1.jar
inflating: amoeba-mysql-3.0.5-RC /lib/ognl-3 .0.1.jar
inflating: amoeba-mysql-3.0.5-RC /lib/javassist-3 .11.0.GA.jar
inflating: amoeba-mysql-3.0.5-RC /lib/toolkit-common-pool-1 .2.0.jar
inflating: amoeba-mysql-3.0.5-RC /lib/commons-pool-1 .6.jar
inflating: amoeba-mysql-3.0.5-RC /lib/slf4j-api-1 .6.1.jar
inflating: amoeba-mysql-3.0.5-RC /lib/slf4j-log4j12-1 .6.2.jar
inflating: amoeba-mysql-3.0.5-RC /lib/toolkit-common-bean-1 .3.0.jar
inflating: amoeba-mysql-3.0.5-RC /lib/toolkit-common-util-1 .2.0.jar
inflating: amoeba-mysql-3.0.5-RC /lib/dom4j-1 .6.1.jar
inflating: amoeba-mysql-3.0.5-RC /lib/xml-apis-1 .0.b2.jar
inflating: amoeba-mysql-3.0.5-RC /lib/oro-2 .0.8.jar
inflating: amoeba-mysql-3.0.5-RC /lib/commons-digester-1 .8.jar
inflating: amoeba-mysql-3.0.5-RC /lib/toolkit-net-io-2 .2.0.jar
inflating: amoeba-mysql-3.0.5-RC /lib/commons-cli-1 .2.jar
inflating: amoeba-mysql-3.0.5-RC /lib/toolkit-common-runtime-1 .3.0.jar
inflating: amoeba-mysql-3.0.5-RC /lib/spring-core-3 .0.6.RELEASE.jar
inflating: amoeba-mysql-3.0.5-RC /lib/spring-asm-3 .0.6.RELEASE.jar
inflating: amoeba-mysql-3.0.5-RC /lib/spring-context-3 .0.6.RELEASE.jar
inflating: amoeba-mysql-3.0.5-RC /lib/spring-aop-3 .0.6.RELEASE.jar
inflating: amoeba-mysql-3.0.5-RC /lib/aopalliance-1 .0.jar
inflating: amoeba-mysql-3.0.5-RC /lib/spring-beans-3 .0.6.RELEASE.jar
inflating: amoeba-mysql-3.0.5-RC /lib/spring-expression-3 .0.6.RELEASE.jar
inflating: amoeba-mysql-3.0.5-RC /lib/plexus-classworlds-2 .4.2-HEXNOVA.jar
inflating: amoeba-mysql-3.0.5-RC /lib/toolkit-net-benchmark-1 .2.0.jar
inflating: amoeba-mysql-3.0.5-RC /lib/amoeba-mysql-3 .0.5-RC.jar
creating: amoeba-mysql-3.0.5-RC /bin/
inflating: amoeba-mysql-3.0.5-RC /bin/benchmark
inflating: amoeba-mysql-3.0.5-RC /bin/launcher
inflating: amoeba-mysql-3.0.5-RC /bin/mkdirhier
inflating: amoeba-mysql-3.0.5-RC /bin/shutdown
inflating: amoeba-mysql-3.0.5-RC /bin/benchmark .bat
inflating: amoeba-mysql-3.0.5-RC /bin/launcher .bat
inflating: amoeba-mysql-3.0.5-RC /bin/benchmark .classpath
inflating: amoeba-mysql-3.0.5-RC /bin/launcher .classpath
creating: amoeba-mysql-3.0.5-RC /conf/
inflating: amoeba-mysql-3.0.5-RC /conf/access_list .conf
inflating: amoeba-mysql-3.0.5-RC /conf/amoeba .dtd
inflating: amoeba-mysql-3.0.5-RC /conf/amoeba .xml
inflating: amoeba-mysql-3.0.5-RC /conf/dbserver .dtd
inflating: amoeba-mysql-3.0.5-RC /conf/dbServers .xml
inflating: amoeba-mysql-3.0.5-RC /conf/function .dtd
inflating: amoeba-mysql-3.0.5-RC /conf/functionMap .xml
inflating: amoeba-mysql-3.0.5-RC /conf/log4j .dtd
inflating: amoeba-mysql-3.0.5-RC /conf/log4j .xml
inflating: amoeba-mysql-3.0.5-RC /conf/rule .dtd
inflating: amoeba-mysql-3.0.5-RC /conf/rule .xml
inflating: amoeba-mysql-3.0.5-RC /conf/ruleFunctionMap .xml
creating: amoeba-mysql-3.0.5-RC /benchmark/
inflating: amoeba-mysql-3.0.5-RC /benchmark/context .xml
inflating: amoeba-mysql-3.0.5-RC /benchmark/objectMap .dtd
inflating: amoeba-mysql-3.0.5-RC /benchmark/query .xml
inflating: amoeba-mysql-3.0.5-RC /jvm .properties
[root@localhost install ] # mv amoeba-mysql-3.0.5-RC /usr/local/
|
(3)amoeba的配置文件详解:
amoeba.xml:定义前端的控制文件,包括前端的端口,用户名和密码
dbServers.xml:定义后端节点的配置文件。设置数据库,登录mysql的账号和密码
a,配置amoeba.xml文件 http://item.taobao.com/item.htm?id=41222768202
|
1
2
3
4
5
6
7
8
9
10
11
12
13
14
15
16
17
18
19
20
21
22
23
24
25
26
27
28
29
30
31
32
33
34
35
36
37
38
39
40
41
42
43
44
45
46
47
48
49
50
51
52
53
54
55
56
57
58
59
60
61
62
63
64
65
66
67
68
69
70
71
72
73
74
75
76
77
78
79
80
81
82
83
84
85
86
87
88
89
90
91
92
93
94
95
96
97
98
99
100
101
102
103
104
105
106
107
108
109
110
111
112
113
114
115
116
117
118
|
[root@FileServerA conf] # vim amoeba.xml
<!-- service class must implements com.meidusa.amoeba.service.Service -->
<service name= "Amoeba for Mysql" class= "com.meidusa.amoeba.mysql.server.MySQLService" >
<!-- port -->
<property name= "port" >8066< /property > // ***端口号*** //
<!-- bind ipAddress -->
<!--
<property name= "ipAddress" >127.0.0.1< /property >
-->
<property name= "connectionFactory" >
<bean class= "com.meidusa.amoeba.mysql.net.MysqlClientConnectionFactory" >
<property name= "sendBufferSize" >128< /property >
<property name= "receiveBufferSize" >64< /property >
< /bean >
< /property >
<property name= "authenticateProvider" >
<bean class= "com.meidusa.amoeba.mysql.server.MysqlClientAuthenticator" >
<property name= "user" >root< /property >
<property name= "password" >123456< /property >
"amoeba.xml" 91L, 3099C 30,6-41 8%
<?xml version= "1.0" encoding= "gbk" ?>
<!DOCTYPE amoeba:configuration SYSTEM "amoeba.dtd" >
<amoeba:configuration xmlns:amoeba= "http://amoeba.meidusa.com/" >
<proxy>
<!-- service class must implements com.meidusa.amoeba.service.Service -->
<service name= "Amoeba for Mysql" class= "com.meidusa.amoeba.mysql.server.MySQLService" >
<!-- port -->
<property name= "port" >8066< /property > // 设置其他的端口
<!-- bind ipAddress -->
<!--
<property name= "ipAddress" >127.0.0.1< /property >
-->
<property name= "connectionFactory" >
<bean class= "com.meidusa.amoeba.mysql.net.MysqlClientConnectionFactory" >
<property name= "sendBufferSize" >128< /property >
<property name= "receiveBufferSize" >64< /property >
< /bean >
< /property >
<property name= "authenticateProvider" >
<bean class= "com.meidusa.amoeba.mysql.server.MysqlClientAuthenticator" >
<property name= "user" >lqb< /property > // ***远程访问代理的用户名和密码*** //
<property name= "password" >123456< /property > // ***用户名和密码*** //
<property name= "filter" >
<bean class= "com.meidusa.toolkit.net.authenticate.server.IPAccessController" >
<property name= "ipFile" >${amoeba.home} /conf/access_list .conf< /property >
< /bean >
< /property >
< /bean >
< /property >
< /service >
<runtime class= "com.meidusa.amoeba.mysql.context.MysqlRuntimeContext" >
<!-- proxy server client process thread size -->
<property name= "executeThreadSize" >128< /property >
<!-- per connection cache prepared statement size -->
<property name= "statementCacheSize" >500< /property >
<!-- default charset -->
<property name= "serverCharset" >utf8< /property >
<!-- query timeout( default: 60 second , TimeUnit:second) -->
<property name= "queryTimeout" >60< /property >
< /runtime >
< /proxy >
<!--
Each ConnectionManager will start as thread
manager responsible for the Connection IO read , Death Detection
-->
<connectionManagerList>
<connectionManager name= "defaultManager" class= "com.meidusa.toolkit.net.MultiConnectionManagerWrapper" >
<property name= "subManagerClassName" >com.meidusa.toolkit.net.AuthingableConnectionManager< /property >
< /connectionManager >
< /connectionManagerList >
<!-- default using file loader -->
<dbServerLoader class= "com.meidusa.amoeba.context.DBServerConfigFileLoader" >
<property name= "configFile" >${amoeba.home} /conf/dbServers .xml< /property >
< /dbServerLoader >
<queryRouter class= "com.meidusa.amoeba.mysql.parser.MysqlQueryRouter" >
<property name= "ruleLoader" >
<bean class= "com.meidusa.amoeba.route.TableRuleFileLoader" >
<property name= "ruleFile" >${amoeba.home} /conf/rule .xml< /property >
<property name= "functionFile" >${amoeba.home} /conf/ruleFunctionMap .xml< /property >
< /bean >
< /property >
<property name= "sqlFunctionFile" >${amoeba.home} /conf/functionMap .xml< /property >
<property name= "LRUMapSize" >1500< /property >
<property name= "defaultPool" >master< /property >
<property name= "writePool" >master< /property > // ***写的资源池*** //
<property name= "readPool" >viplqb< /property > // ***写的资源池*** //
<property name= "needParse" > true < /property >
< /queryRouter >
< /amoeba :configuration>
|
b,配置dbServers.xml文件
|
1
2
3
4
5
6
7
8
9
10
11
12
13
14
15
16
17
18
19
20
21
22
23
24
25
26
27
28
29
30
31
32
33
34
35
36
37
38
39
40
41
42
43
44
45
46
47
48
49
50
51
52
53
54
55
|
[root@FileServerA conf] # vim dbServers.xml
<?xml version= "1.0" encoding= "gbk" ?>
<!DOCTYPE amoeba:dbServers SYSTEM "dbserver.dtd" >
<amoeba:dbServers xmlns:amoeba= "http://amoeba.meidusa.com/" >
<!--
Each dbServer needs to be configured into a Pool,
If you need to configure multiple dbServer with load balancing that can be simplified by the following configuration:
add attribute with name virtual = "true" in dbServer, but the configuration does not allow the element with name factoryConfig
such as 'multiPool' dbServer
-->
<dbServer name= "abstractServer" abstractive= "true" >
<factoryConfig class= "com.meidusa.amoeba.mysql.net.MysqlServerConnectionFactory" >
<property name= "connectionManager" >${defaultManager}< /property >
<property name= "sendBufferSize" >64< /property >
<property name= "receiveBufferSize" >128< /property >
<!-- mysql port -->
<property name= "port" >3306< /property > // ***设置mysql访问端口号*** //
<!-- mysql schema -->
<property name= "schema" >yazi< /property > // ***设置mysql访问默认库*** //
<!-- mysql user -->
<property name= "user" >root< /property > // ***登录mysql账号和密码*** //
<property name= "password" >123456< /property >
< /factoryConfig >
<poolConfig class= "com.meidusa.toolkit.common.poolable.PoolableObjectPool" >
<property name= "maxActive" >500< /property >
<property name= "maxIdle" >500< /property >
<property name= "minIdle" >1< /property >
<property name= "minEvictableIdleTimeMillis" >600000< /property >
<property name= "timeBetweenEvictionRunsMillis" >600000< /property >
<property name= "testOnBorrow" > true < /property >
<property name= "testOnReturn" > true < /property >
<property name= "testWhileIdle" > true < /property >
< /poolConfig >
< /dbServer >
<dbServer name= "master" parent= "abstractServer" > // ***设置master和ip地址*** //
<factoryConfig>
<!-- mysql ip -->
<property name= "ipAddress" >192.168.1.247< /property >
< /factoryConfig >
< /dbServer >
<dbServer name= "slave1" parent= "abstractServer" > // ***设置slave1和ip地址*** //
<factoryConfig> // ***如果有多个slave主机复制本配置到下边继续添加ip地址*** //
<!-- mysql ip -->
<property name= "ipAddress" >192.168.1.245< /property >
< /factoryConfig >
< /dbServer >
<dbServer name= "viplqb" virtual= "true" >
<poolConfig class= "com.meidusa.amoeba.server.MultipleServerPool" >
<!-- Load balancing strategy: 1=ROUNDROBIN , 2=WEIGHTBASED , 3=HA-->
<property name= "loadbalance" >1< /property > // ***采用轮询方式*** //
<!-- Separated by commas,such as: server1,server2,server1 -->
<property name= "poolNames" >slave1< /property > // ***所有从库的主机都要写上*** //
< /poolConfig >
< /dbServer >
< /amoeba :dbServers>
|
(4)启动amoeba并查看是否有报错。
|
1
2
3
4
5
6
7
8
9
10
11
12
13
14
15
16
17
18
19
|
[root@FileServerA conf] # /usr/local/amoeba-mysql-3.0.5-RC/bin/launcher &
[1] 34774
[root@FileServerA conf] # log4j:WARN ip access config load completed from file:/usr/local/amoeba-mysql-3.0.5-RC/conf/access_list.conf
2016-07-04 13:46:11,874 INFO net.ServerableConnectionManager - Server listening on 0.0.0.0 /0 .0.0.0:8066.
Java HotSpot(TM) 64-Bit Server VM warning: ignoring option PermSize=16m; support was removed in 8.0
Java HotSpot(TM) 64-Bit Server VM warning: ignoring option MaxPermSize=96m; support was removed in 8.0
2016-07-04 13:47:53 [INFO] Project Name=Amoeba-MySQL, PID=32445 , starting...
log4j:WARN log4j config load completed from file : /usr/local/amoeba-mysql-3 .0.5-RC /conf/log4j .xml
2016-07-04 13:47:53,604 INFO context.MysqlRuntimeContext - Amoeba for Mysql current versoin=5.1.45-mysql-amoeba-proxy-3.0.4-BETA
log4j:WARN ip access config load completed from file : /usr/local/amoeba-mysql-3 .0.5-RC /conf/access_list .conf
2016-07-04 13:47:53,789 INFO net.ServerableConnectionManager - Server listening on 0.0.0.0 /0 .0.0.0:8066.
2016-07-04 14:22:55 [INFO] ignore signal:HUP
Java HotSpot(TM) 64-Bit Server VM warning: ignoring option PermSize=16m; support was removed in 8.0
Java HotSpot(TM) 64-Bit Server VM warning: ignoring option MaxPermSize=96m; support was removed in 8.0
2016-07-04 17:31:08 [INFO] Project Name=Amoeba-MySQL, PID=34779 , starting...
log4j:WARN log4j config load completed from file : /usr/local/amoeba-mysql-3 .0.5-RC /conf/log4j .xml
2016-07-04 17:31:08,868 INFO context.MysqlRuntimeContext - Amoeba for Mysql current versoin=5.1.45-mysql-amoeba-proxy-3.0.4-BETA
log4j:WARN ip access config load completed from file : /usr/local/amoeba-mysql-3 .0.5-RC /conf/access_list .conf
2016-07-04 17:31:09,128 INFO net.ServerableConnectionManager - Server listening on 0.0.0.0 /0 .0.0.0:8066.
|
(5)用其他的服务器来进行登录:
|
1
2
3
4
5
6
7
8
9
10
11
12
13
14
15
16
17
18
19
20
21
22
|
[root@mysqlmaster ~] # mysql -ulqb -p -h192.168.1.28 -P8066
Enter password:
Welcome to the MySQL monitor. Commands end with ; or \g.
Your MySQL connection id is 965356058
Server version: 5.1.45-mysql-amoeba-proxy-3.0.4-BETA MySQL Community Server (GPL)
Copyright (c) 2000, 2015, Oracle and /or its affiliates. All rights reserved.
Oracle is a registered trademark of Oracle Corporation and /or its
affiliates. Other names may be trademarks of their respective
owners.
Type 'help;' or '\h' for help. Type '\c' to clear the current input statement.
mysql> show databases;
+--------------------+
| Database |
+--------------------+
| information_schema |
| mysql |
| performance_schema |
| test |
| yazi |
+--------------------+
5 rows in set (0.01 sec)
mysql>
|
备注:当配置这个文件时amoeba.xml ,其他的主机通过代理就可以访问,如上说明amoeba.xml配置的没有问题。
(6)验证读写分离,这个需要配置dbServers.xml这个文件了,接下来即为验证读写分离。
http://item.taobao.com/item.htm?id=41222768202
(a)在没停掉同步之前在主库247上创建一张表;
|
1
2
3
4
5
6
7
8
9
10
11
12
13
14
|
mysql> use yazi;
Reading table information for completion of table and column names
You can turn off this feature to get a quicker startup with -A
Database changed
mysql> show tables;
+----------------+
| Tables_in_yazi |
+----------------+
| sxit |
| test |
+----------------+
2 rows in set (0.00 sec)
mysql> create table lqb ( id int(10) ,name varchar(10),address varchar(20));
Query OK, 0 rows affected (0.02 sec)
|
(b)在从库245上查看,并在slave上停止同步:
|
1
2
3
4
5
6
7
8
9
10
11
12
13
14
|
mysql> use yazi;
Database changed
mysql> show tables;
+----------------+
| Tables_in_yazi |
+----------------+
| lqb |
| sxit |
| test |
+----------------+
3 rows in set (0.00 sec)
mysql> stop slave
-> ;
Query OK, 0 rows affected (0.00 sec)
|
(c)在主从上各插入一条不同的数据
在主库上插入(1,'zhangsan','master');
在从库上插入(2,’lisi','slave);
在主库上执行以下操作:
|
1
2
3
4
5
6
7
8
9
|
mysql> insert into lqb values(1, 'zhangsan' , 'master' );
Query OK, 1 row affected (0.00 sec)
mysql> select * from lqb;
+------+----------+---------+
| id | name | address |
+------+----------+---------+
| 1 | zhangsan | master |
+------+----------+---------+
1 row in set (0.00 sec)
|
在从库上执行以下操作:
|
1
2
3
4
5
6
7
8
9
|
mysql> insert into lqb values(2, 'zhangsan' , 'slave' );
Query OK, 1 row affected (0.00 sec)
mysql> select * from lqb;
+------+----------+---------+
| id | name | address |
+------+----------+---------+
| 2 | zhangsan | slave |
+------+----------+---------+
1 row in set (0.00 sec)
|
(d)登录amoeba服务器查看读操作:显示的是245slave服务器
mysql> select * from lqb;
+------+----------+---------+
| id | name | address |
+------+----------+---------+
| 2 | zhangsan | slave |
+------+----------+---------+
1 row in set (0.00 sec)
(e)在amoeba服务器上测试以下写操作,查看还是245从库上的数据。
|
1
2
3
4
5
6
7
8
9
|
mysql> insert into lqb values(3, 'wanger' , 'test_write' );
Query OK, 1 row affected (0.00 sec)
mysql> select * from lqb;
+------+----------+---------+
| id | name | address |
+------+----------+---------+
| 2 | zhangsan | slave |
+------+----------+---------+
1 row in set (0.00 sec)
|
在主库247上查询,可以看到已插入进来了
|
1
2
3
4
5
6
7
8
|
mysql> select * from lqb;
+------+----------+------------+
| id | name | address |
+------+----------+------------+
| 1 | zhangsan | master |
| 3 | wanger | test_write |
+------+----------+------------+
2 rows in set (0.00 sec)
|
在从库上245查询,还是刚才查询
|
1
2
3
4
5
6
7
|
mysql> select * from lqb;
+------+----------+---------+
| id | name | address |
+------+----------+---------+
| 2 | zhangsan | slave |
+------+----------+---------+
1 row in set (0.00 sec)
|
至此,数据库读写分离已经配置完成,在正式生产环境中,需将读写主机的定义更改,因为数据库用的最多的还是读的操作。我们可以将读或查询交给从来处理,同样的,我们也可以添加多个从主机。让其自动从不同的从主机上读取数据库。
使用amoeba配置mysql读写分离相关推荐
- yii配置mysql_YII2中配置MySQL读写分离
在实际开发中,为了服务更好的响应,通常会设置数据库的读写分离,主库负责写入更新等操作,从库负责读操作. 以下是yii2中配置mysql读写分离,一主多从设置.设置好后,这些从库其中之一将被建立起连接并 ...
- 配置MySQL读写分离架构,采用maxscale
配置MySQL读写分离架构,采用maxscale 配置MySQL读写分离架构 采用maxscale 下载maxscale 配置MySQL主从架构 配置MySQL主服务器 配置MySQL从服务器 配置m ...
- atlas mysql_使用Atlas配置MySQL读写分离
Atlas是360团队弄出来的一套基于MySQL-Proxy基础之上的代理,修改了MySQL-Proxy的一些BUG,并且优化了很多东西.而且安装方便.配置与注释写的都很详细,并且是都是中文,不过从A ...
- mysql读写分离实现_laravel 配置MySQL读写分离
前言:说到应对大流量.高并发的解决方案的时候,总会有这样的回答,如:读写分离,主从复制...等,数据库层今天先不讨论,那么今天我们就来看看怎么在应用层实现读写分离. 框架:laravel5.7 说明: ...
- MyCat 之路 | 配置 Mysql 读写分离+强制走写节点+根据主从延时的读写分离
数据库读写分离对于大型系统或者访问量很高的互联网应用来说,是必不可少的一个重要功能.对于MySQL来说,标准的读写分离是主从模式,一个写节点Master后面跟着多个读节点,读节点的数量取决于系统的压力 ...
- 使用Amoeba实现MySQL读写分离详细步骤(推荐的方式)
什么是Amoeba 为什么使用Amoeba 安装Amoeba ①安装jdk并配置环境变量 vi /etc/profile source /etc/profile 使配置生效 上传Amoeba安装文件: ...
- mysql配置读写分离无效_MySQL数据库的同步配置+MySql 读写分离
MySQL数据库的同步. MySQL是开源的关系型数据库系统.主从同步复制(Replication)是从一台MySQL数据库服务器(主服务器master)复制数据到另一个服务器(从服务器slave)的 ...
- mysql读写分离 同步_MySQL数据库的同步配置+MySql读写分离
使用mysql主从复制的好处有: 1.采用主从服务器这种架构,稳定性得以提升.如果主服务器发生故障,我们可以使用从服务器来提供服务. 2.在主从服务器上分开处理用户的请求,可以提升数据处理效率. 3. ...
- Amoeba数据库代理 实现mysql读写分离
Amoeba 依赖jdk centons7安装jdk8 目前Amoeba for Mysql最新版本为amoeba-mysql-3.0.5-RC-distribution.zip. 安装过程很简单 ...
最新文章
- 要懂得利用和筛选友情链接
- JVM调优总结(6):新一代的垃圾回收算法
- BugkuCTF-Misc:又一张图片,还单纯吗
- python卡尔曼滤波跟踪_使用卡尔曼滤波器以圆周运动跟踪机器人
- 一封陌生土耳其网友的来信
- 【SDOI 2011】Paint 染色
- Linux手机适配,nginx同时适配PC版和手机移动版
- 计算机应用基础试题号2007,2006-2007计算机应用基础期末试题(A卷).pdf
- php mysql存储中文为空_PHP如何解决MySQL存储数据中文乱码
- 带ant 的收发器_ANT无线收发器nRF24AP1及其应用
- [李景山php]每天TP5-20161206|Loader.php-4
- 海量数据相似度计算之simhash短文本查找
- Spring 漏洞及其修复方案
- 第四章第6节水管工游戏
- 密码中对称非对称加密是什么意思?
- Sentieon软件应用之浅层测序分析
- 美团拍店,一个“顺道”赚钱的小项目,去饭店的路上,饭钱有了
- 需求预测模型分类与选择
- access数据库应用系统客观题_Access数据库选择题练习与答案
- python写抽奖转盘_python实现转盘效果 python实现轮盘抽奖游戏