Home Windows Windows 8 Androi...
2019独角兽企业重金招聘Python工程师标准>>> 
Locutus October 28, 2012 52  Print article
- Tweet
 Is your phone feeling a bit boring? Does your tablet need more customization? Sometimes, your devices don't feel personal enough. Other times, it can be bogged down by needless bloatware and other cruft. Free it with one of several free tools!
Rooting, which is for Android devices, allows you to modify crucial system files that would otherwise be locked away. This lets you do things like block ads, remove/freeze bloatware, use a firewall, and much more. Due to the thousands dozens of devices available, there are dozens and dozens of rooting methods; however, there are also some rooters that are fairly universal. Take note although rooting is 100% legal, it may void your warranty.
Jailbreaking, on iOS devices, allows you to install apps, tweaks, and themes that Apple hasn't approved. You can add a fifth (or sixth, or seventh) icon to your dock; you can make the entire system bright red. Although Apple tries hard to not let people jailbreak, the worst they can do is void your warranty; and rest assured, Apple will void your warranty if you jailbreak. (Jailbreaking is 100% legal, although pirating apps is not!)
Homebrewing, which is for HP's WebOS devices, allows you to install apps that aren't in the App Catalog. It also allows you to install tweaks to the WebOS operating system, like faster animations, overclocking, and many more. The best part about homebrewing is that HP is entirely alright with you if you do it.
Disclaimer: Please proceed with caution. Although the art of rooting, jailbreaking, and homebrewing has been been turned into a science (all three are fairly safe to do), all after-market software modifications have the risk of bricking your device. By proceeding below and rooting/jailbreaking/homebrewing your device, you recognize and accept the risks of these processes. Locutus, Ashraf, dotTech and anyone else except yourself are not responsible for any gain, loss, or harm done to you, your device, or your data. If you brick your device and come whine here, Ashraf will probably laugh at you.
Table of Contents
- Android rooting:
- with z4root
- with SuperOneClick
- device-specific rooting
- other
- WebOS homebrewing:
- with WebOS Quick Install
- iOS jailbreaking:
- with Absinthe (5.1.1, all)
- with jailbreakme.com (4.2.1-4.3.3, all)
- Conclusion
Android
Do you like HTC's Sense skin? What about Motoblur? More like Motoblah! By rooting your Android device, you can get more customizability along with more apps.
Android is a unique beast among mobile OSes. Unlike iOS or WebOS, which are made exclusively by one company and only have a few software releases, Android has thousands dozens (maybe hundreds) of devices and many different software versions. As such, it is extremely difficult to make one rooting program work on all devices. However some programs, like SuperOneClick, have managed to get fairly close to the end goal of a universal rooting program, and some others, like z4root, even allow rooting from the comfort of your hand (no computer required).
Rooting Android with z4root
Have Android 2.2 Froyo or below? That means you can root your phone, from the convenient location of your phone! All you'll need is a small bit of time. No computer is required. (If you have above Android 2.2, skip down below to SuperOneClick or device-specific rooting.)
First, you'll need to make sure that non-Market app installs are allowed; this is called sideloading apps. To do this, go to Menu > Settings > Applications and check "Unknown Sources". (If it's greyed out, that means that your carrier has decided to be mean and block sideloading. To remove this restriction, try rooting with SuperOneClick or device-specific rooting below.)
Now that your phone allows sideloading, download z4root onto your phone. Once it has been downloaded, use a file manager to navigate to the APK installer (it will probably be in the download folder) and install z4root. After it is installed, launch z4root from your app tray open it up from your launcher:

Once z4root has been launched, you are half-way finished. Now all you have to do is decide if you want a permanent root, or just a root until you reboot your phone (temporary root). If you want a permanent root, be aware that it won't work on every phone (try SuperOneClick or device-specific rooting if z4root doesn't work for you).
Once you select what type of root you want, just follow on-screen instructions and you will be rooted within minutes. You know you are rooted if you have a "SuperUser" app in your app tray. You may have to reboot your device for this to appear. If the "SuperUser" app appears, congrats! Your Android 2.2 phone is now rooted.
Te following is the list of known phones compatible/incompatible with the permanent root:
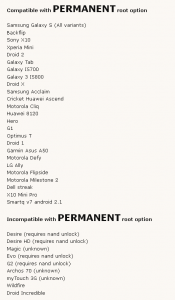
(Click on the list to view it in full size.)
If your phone is not in the list shown above, it may or may not be compatible with z4root. The only way to find out is try it out. If your phone is on the incompatible list, you can only use the temporary root option.
Rooting with SuperOneClick
Rooting with SuperOneClick is a fairly easy affair, but requires a bit of setup first. The first thing you need to do is make sure your device will work with SuperOneClick. It is most likely compatible if it is not one of these (the following are incompatible devices)
- Sprint EVO 4G (HTC Supersonic)
- Droid Incredible (HTC Incredible)
- HTC Desire GSM
- HTC Desire CDMA (HTC BravoC)
- HTC Aria
- Droid Eris (HTC DesireC)
- HTC Wildfire (HTC Buzz)
These phones have locked NAND chips. In order to remove this lock, you must use unrevoked, a NAND unlocker.
So far the known phones that are compatible with SuperOneClick are:
- Acer Liquid Metal
- Dell Streak
- HTC Magic (Sapphire) 32B
- HTC Bee
- LG Ally
- Motorola Atrix 4G
- Motorola Charm
- Motorola Cliq
- Motorola Droid
- Motorola Flipside
- Motorola Flipout
- Motorola Milestone
- Nexus One
- Samsung Captivate
- Samsung Galaxy 551 (GT-I5510)
- Samsung Galaxy Portal/Spica I5700
- Samsung Galaxy S 4G
- Samsung Galaxy S I9000
- Samsung Galaxy S SCH-I500
- Samsung Galaxy Tab
- Samsung Transform M920
- Samsung Vibrant
- Sony Ericsson Xperia E51i X8
- Sony Ericsson Xperia X10
- Sprint Hero
- Telus Fascinate
- Toshiba Folio 100
The key thing to note is just because your phone is not on the above list does not mean SuperOneClick won't work with your phone. As long as your phone is not listed on the incompatible list (first list shown above), then your phone may still work with SuperOneClick. The only way you will know for sure is to give it a try; if you are on Android 2.3 Gingerbread or lower, SuperOneClick will likely work for your device. See device-specific rooting if your device is not compatible with SuperOneClick.
After verifying your phone is rootable, there still remain couple of prerequisites to rooting your device:
- You NEED to put your phone on USB Debugging mode
- You NEED to install make sure the Android drivers for your phone are installed
- Make sure you DO NOT mount your SD card
- If you still can't get something to run, try doing it in recovery mode
To put your device into USB Debugging mode, go to Settings > Applications > Development and check the "USB Debugging" box. After enabling debugging, install drivers for your phone on your computer and plug in your phone.
After installing the drivers, you'll need to download SuperOneClick. Note that, due to the exploit used in the rooting program, it may be detected as a virus; this is to be expected and the program is clean as far as we know. Extract the program and open SuperOneClick.exe (Vista + 7: right click -> run as administrator):
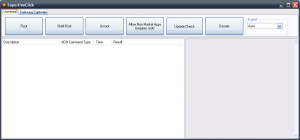
The beauty of SuperOneClick is its rooting method is universal, allowing for all Android devices to be rooted at any version number. So, just hit Root to root your device.
(Sidenote: After rooting, if your device did not allow for sideloading, you can enable sideloading on your device by hitting the Allow Non-Market Apps buttons.)
Once the root procedure has finished, go back to your device. Open your app launcher and you should a new app called "Superuser". This verifies your device has been rooted; if you don't see it, try rebooting your device.
Congratulations! You've successfully rooted your Android device. Now go have fun theming, de-bloating, and modding.
Device-specific Rooting
dotTech has a section on how-to root guides for individual Android devices; you can read the guides from the links below:
Google devices
- How to root Nexus 4
- How to root Galaxy Nexus
- How to root Nexus S
- How to root Nexus 7
- How to root Nexus 10
Samsung devices
- How to root Samsung Galaxy Note II
- How to root Samsung Galaxy Note 10.1
- How to root Samsung Galaxy Tab 7.7
- How to root international Samsung Galaxy S III (GT-I9300)
- How to root international Samsung Galaxy S III LTE (GT-I9305)
- How to root Verizon Samsung Galaxy S III
- How to root Sprint Samsung Galaxy S III
- How to root T-Mobile Samsung Galaxy S III
- How to root AT&T Samsung Galaxy S III
HTC Devices
- How to root HTC Droid DNA
- How to root international (Tegra 3) HTC One X
- How to root AT&T HTC One X
- How to root HTC One S
- How to root Sprint HTC Evo 4G LTE
Motorola Devices
- How to root Motorola RAZR i
- How to root Motorola Photon Q 4G LTE
Amazon Devices
- How to root 7-inch Kindle Fire HD
- How to root 8.9-inch Kindle fire HD
LG Devices
- How to root LG Optimus 4X HD (P880)
ASUS Devices
- How to root ASUS Transformer Pad Infinity (TF700)
- How to root ASUS Transformer Pad TF300T
Other
If z4root nor SuperOneClick worked for your device and we haven't covered your device on dotTech, the best place to find how to root your device is XDA-Developers. Visit XDA and look for your specific device; then roam the forums and look for a thread that explains how to root. (You will most likely find it in the Android Development subforum for your device.) You can even ask questions if you have trouble.
WebOS homebrewing
Pick up a Touchpad this weekend? Congrats! On WebOS, there is a large active community of people that write homebrew applications and tweaks. These applications range from things that weren't submitted to the App Catalog to things that wouldn't be allowed in the App Catalog. Unlike jailbreaking or rooting, setting up your WebOS device for homebrewing is as easy as the Konami code. Literally.
Homebrewing with WebOS Quick Install
Luckily for WebOS users, there is a single, unified app for getting set up. To get started, open your Just Type box and type in upupdowndownleftrightleftrightbastart. (Five points for those of you that know what that is.)

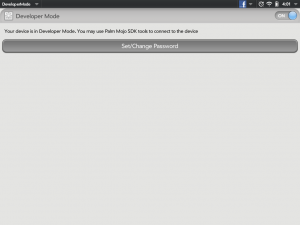
Open the Developer Mode app that appears and flick the switch in the top right corner. It'll ask you for your developer mode password; if this is the first time you've done this, you don't have one. A little while after tapping Submit, you'll be in Developer Mode--congrats!
Now that you're in developer mode, connect your device to your computer. Hit Close when asked if you want to use your device as a USB drive.
Everything else is done from the computer. Download the latest version of WebOS Quick Install, currently version 4.3.1, from here. If you don't have Java, be sure to get it now!
Once downloaded, double click it to launch. It will complain that you don't have Novacom drivers installed. When it does, just hit the install button and wait a few minutes.After the drivers are installed, it should look something like this:
 Hit the globe to search the internet for packages.
 The package we're looking for is called Preware. Once you've found the package, click install. Very shortly afterward, you'll have Preware nicely installed on your device. It'll appear in the downloads tab.

iOS jailbreaking
Apple makes cool toys. However, Apple has not-so-cool restrictions on these toys. Apple likes to build a "walled garden" around its gadgets: You can't buy or download apps they don't approve of, and don't even think about setting custom ringtones. Don't like that icon? That's too bad, as Apple won't let you change it. Luckily, there are ways to blow a hole in this walled garden (without damaging the turnips), and it's called jailbreaking.
Absinthe (5.1.1, all devices)
After downloading Absinthe, extract absinthe-win-2.0.4.exe and run it. Absinthe still won't start, however: that was just an extractor. Now go to the newly created absinthe-win-2.0.4 folder and run absinthe.exe. You'll need to run it as administrator.

Just plug in your device and hit jailbreak. It may take quite a while, especially if you have a large amount of data already on your device, due to some of the exploits it uses. Around halfway through the jailbreak, your device will go into Restore mode. This is perfectly normal and is one of the ways the jailbreak works.
In just a few minutes, you'll be jailbroken! Congratulations!
GreenPois0n Absinthe homepage
[Direct download - Windows]
[Direct download - Mac OS X]
JailbreakMe.com (4.2.1-4.3.3, all devices)
Have an iPad 2 running an older firmware like 4.3.3 or below? Good news! You can jailbreak your iPad, or any other device running 4.3 to 4.3.3, with JailbreakMe.com.
JailbreakMe.com is probably by far the nicest, easiest jailbreak on the planet. You simply have to go to JalbreakMe.com from the device...

...hit "Free"...

...and then install. Wait a minute or two, and suddenly, Cydia! You're ready to enjoy your device like Apple didn't intend it.
Conclusion
It's never fun to be told what to do by Big Brother; this is even more true when it comes to electronics we spend our cold hard cash on. With just a few minutes of your time, you can free your device from the shackles put on it by Corporate America. Jailbreaking, rooting, and homebrewing opens doors for your device that would not be open otherwise. Enjoy! (And remember: Don't pirate apps.)
Originally published August 24, 2011; updated multiple times since then.
Subscribe to dotTech -- never miss an article again!
- RSS Feed

About the author: LocutusView all posts by Locutus
Who is the mysterious Locutus? No one knows, but there is an ancient tale that once his true identity is revealed, something big will happen. What? Who knows. The name Locutus is based off of the Star Trek: The Next Generation character Jean-Luc Pic
转载于:https://my.oschina.net/zhuzihasablog/blog/97926
Home Windows Windows 8 Androi...相关推荐
- Windows/Windows下堪称神器的软件集合
Windows/Windows下堪称(我封的 hhh)神器的软件集合,持续更新 以下排名不分先后,按照字母表顺序排列 CuteHttpFileServer/chfs:免费的.HTTP协议的文件共享服务 ...
- [ffmpeg][qsv][windows]windows下配置fmpeg英特尔qsv
[ffmpeg][qsv][windows]windows下配置fmpeg英特尔qsv 文章目录 [ffmpeg][qsv][windows]windows下配置fmpeg英特尔qsv 预装mingw ...
- Windows - Windows批处理
分享一下我老师大神的人工智能教程!零基础,通俗易懂!http://blog.csdn.net/jiangjunshow 也欢迎大家转载本篇文章.分享知识,造福人民,实现我们中华民族伟大复兴! Wind ...
- memcache php windows,windows系统下安装memcache
关于 memcache 的介绍,这里就不在多说了,读者可以参考:memcached是什么?memcache该何使用? (1)安装memcache首先你得下载两个文件,memcached 的安装文件和p ...
- [Windows]Windows路径探究
Windows路径是我们经常使用的东西,它看似简单,实际上隐含许多细节,这些都是在平常的使用过程中注意不到的.下面让我们来看看各种各样的Windows路径. 提起路径,我们都会想到"绝对路径 ...
- bugzilla perl mysql apache windows,windows下apache安装bugzilla
1. 所需软件 2. 配置apache 打开apache的httpd.conf配置文件找到 Options Indexes FollowSymLinks 在最后面添加ExecCGI参数使其可以作为服务 ...
- Windows——Windows 10 加装 Windoes 7 制作双系统时,Windoes 7 启动卡在正在启动界面,并且重启无效解决方案
问题描述 Windows 10 加装 Windoes 7 制作双系统时Windoes 7启动卡在正在启动界面. 重启无效. 问题分析 笔记本原厂系统 默认UEFI 引导模式+GPT 硬盘分区模式. W ...
- Windows——Windows恢复环境(Windows RE)
基本概念 Windows恢复环境:Windows RE的全称为Windows Recovery Environment,即Windows 恢复环境.Windows RE实质上是提供了一些恢复工具的Wi ...
- php7 mcrypt windows,Windows下php安装mcrypt扩展问题
首先我们看看报错问题:Call to undefined function App\Http\PayModels\Online\mcrypt_get_block_size(),然后我就不断的去找度娘, ...
最新文章
- POJO、VO、PO、FormBean区别:
- colab中的变量怎么读取_Fizyr Retinanet在Colab中进行目标检测
- Java 必须掌握的 20+ 种 Spring 常用注解
- C++ 继承过程中使用访问说明符和虚函数
- 用SNMP实现对大型网络的轻松管理!
- u-boot的Makefile分析
- c语言 嵌入式开发环境搭建,嵌入式C语言环境的搭建
- iPhone 14 Pro外观细节曝光:打孔屏加持 支持新一代的LTPO技术
- 计算机中文件访问时间是什么情况,【反计算机取证必看】Windows系统中文件时间属性的变化及影响因素.pdf...
- Sql Decimal类型 运算结果的精度和小数位数
- C#的二维码生成和解析
- 内容超过7行显示查看全文
- Linux内核启动过程学习
- 怎样用数据分析方法应用KANO模型?
- 微信小程序没登录跳到登录页怎么做_微信小程序退出按钮回退到登录页面
- 【STM32】时钟系统及其结构原理
- 如何使用Photoshop将图片变小?
- 微软终止支持Win7 但系统仍然可正常使用
- NLP(词向量、word2vec和word embedding)
- Qt 禁用ComboBox下拉选项