android 聊天气泡_android聊天气泡在android中构建ios风格的聊天
android 聊天气泡
重点 (Top highlight)
In this post, we’ll explore how to do two things: 1) create live chat message bubbles in Android that are similar to WhatsApp and iMessage and 2) customize Stream Chat’s UI Components.
在本文中,我们将探讨如何做两件事: 1) 在Android中创建实时聊天消息气泡 与WhatsApp和iMessage类似,并且2)自定义了Stream Chat的UI组件 。
We’ll customize Stream Chat Android’s built-in UI components by plugging in a custom message view. This allows us to focus on the text rendering, while Stream does everything else.
我们将通过插入自定义消息视图来自定义Stream Chat Android的内置UI组件。 这使我们可以专注于文本呈现,而Stream可以完成其他所有工作。
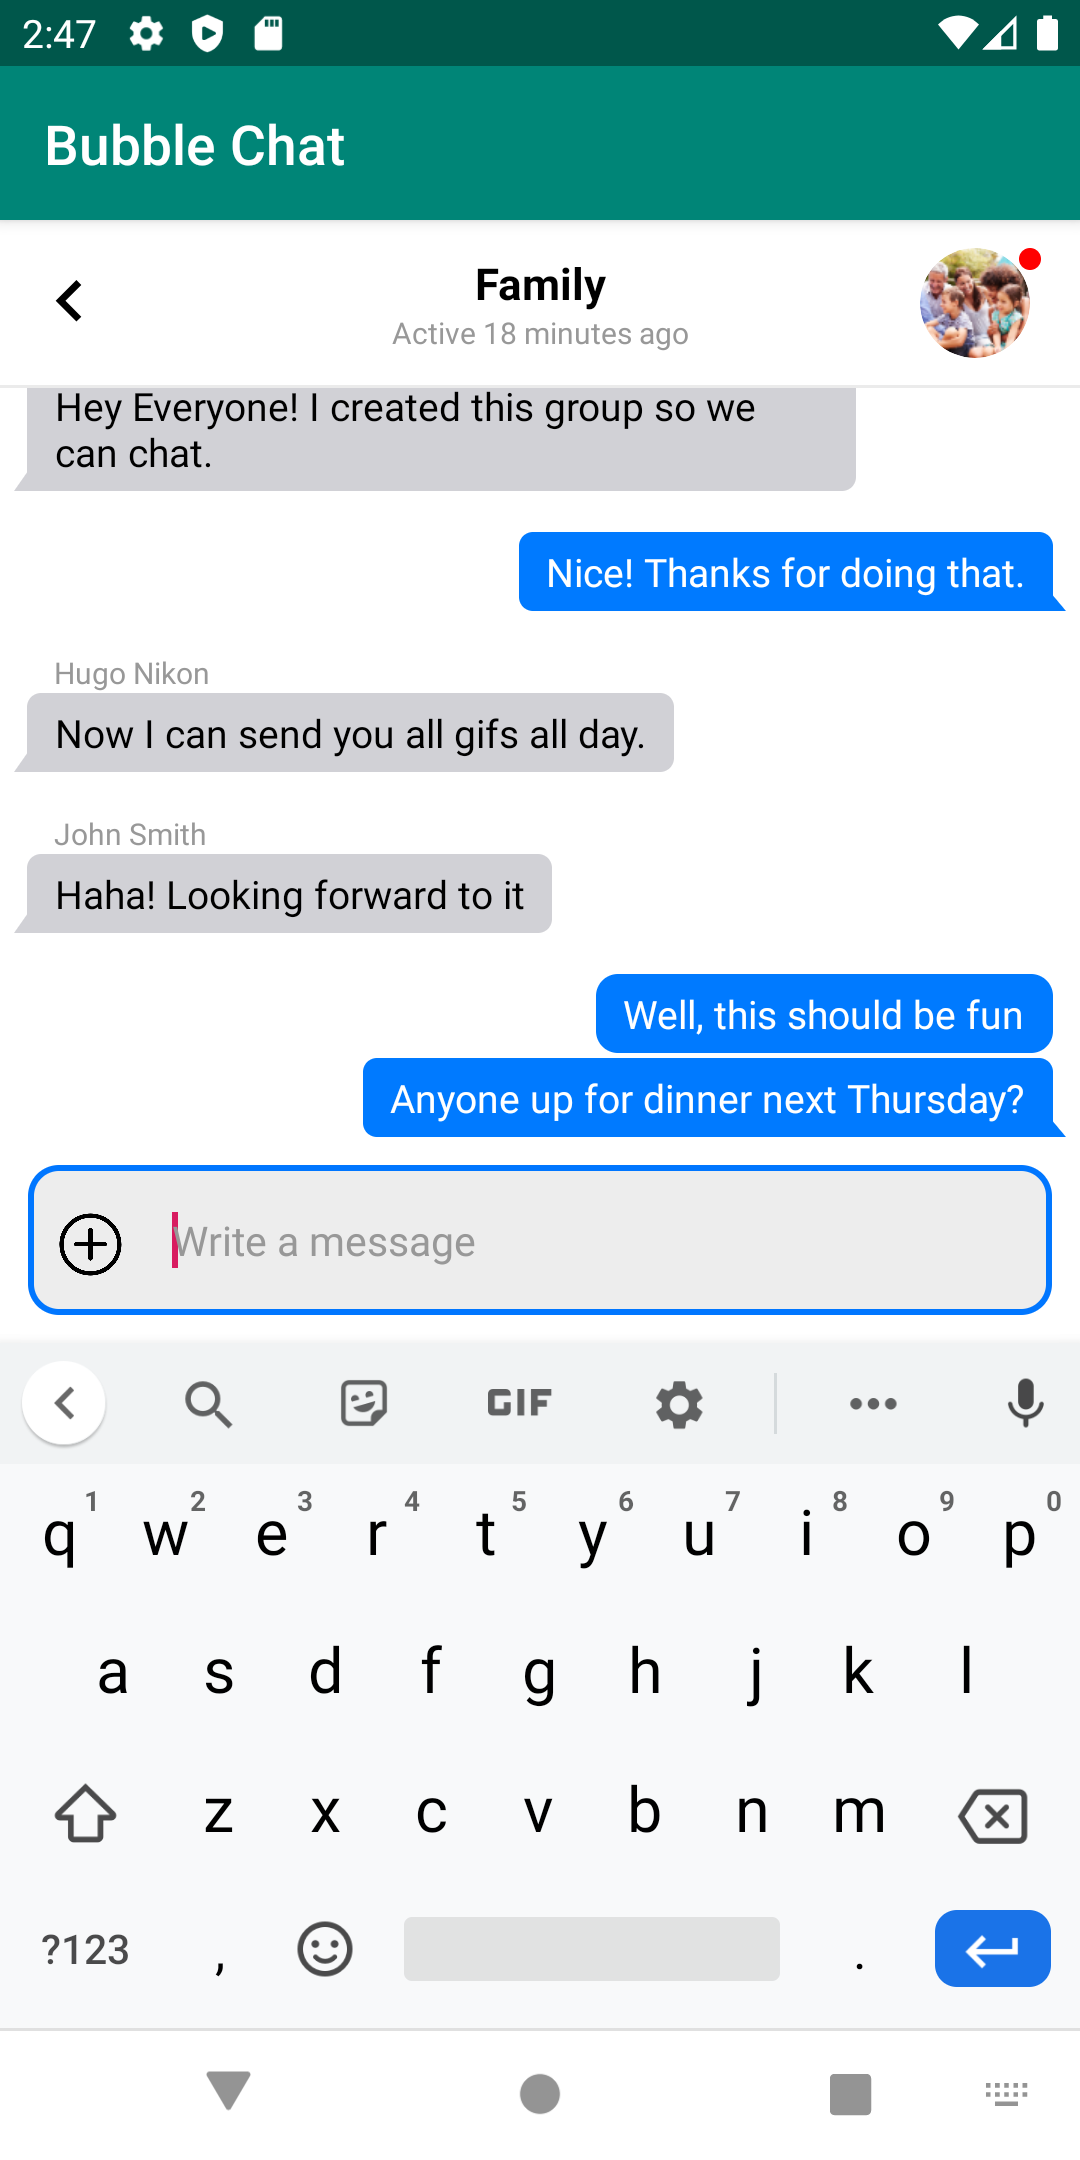
The source code is available here. Once we’re finished, we’ll have a chat experience that looks like this:
源代码可在此处获得 。 完成后,我们将获得如下所示的聊天体验:
先决条件 (Prerequisites)
This post assumes a working knowledge of Android and Kotlin. If you’re unfamiliar with either or both, it may be useful to check out a getting started guide. If you’d like to run the code, you’ll also need a Stream account. Please register here. Once you’re registered, you’ll see a Stream app with an App ID, API Key, and API Secret:
这篇文章假定您具有Android和Kotlin的工作知识。 如果您既不熟悉又不熟悉这两种方法,那么查阅入门指南可能会很有用。 如果您想运行代码,则还需要一个Stream帐户。 请在这里注册 。 注册后,您将看到具有App ID , API Key和API Secret的Stream应用程序:
We won’t be going through how to create the backend to receive our tokens in this tutorial; please refer to this repo for token generation. You can also use Stream’s CLI; if you look in MainActivity.kt, you'll see placeholders to fill in run the application.
在本教程中,我们不会介绍如何创建后端来接收令牌。 请参考此仓库以生成令牌。 您也可以使用Stream的CLI ; 如果查看MainActivity.kt ,则会看到占位符以填充运行该应用程序。
Let’s build.
让我们开始吧。
上市频道 (Listing Channels)
First, we’ll create a view which displays a list of channels for a user to select:
首先,我们将创建一个视图,该视图显示供用户选择的频道列表:
This view is mostly taken care of by Stream’s UI Components. To list our channels, the MainActivity.kt will leverage Stream's ChannelList, and we'll configure it to load all of the channels for our user. Here's the code:
Stream的UI组件主要负责处理此视图。 要列出我们的频道, MainActivity.kt将利用Stream的ChannelList ,我们将其配置为为用户加载所有频道。 这是代码:
First, we initialize our StreamChat instance with our API key. We configure it with the user who'll be using our application. To keep things simple, we'll just declare who's logged in and their frontend token. In a real application, you'd want to perform authentication with a backend that generates this token.
首先,我们使用API密钥初始化StreamChat实例。 我们使用将要使用我们的应用程序的用户来配置它。 为简单起见,我们只声明谁登录以及他们的前端令牌。 在实际的应用程序中,您希望使用生成此令牌的后端执行身份验证。
We also give the user an id, a name, and an image(profile image). Once we've done this, we can declare the layout as " activity_main".
我们还为用户提供id , name和image (个人资料图片)。 完成此操作后,可以将布局声明为“ activity_main ”。
Now, the view needs a view model; in this case, we’ll simply use the default, Stream-provided “ ChannelListViewModel". This is great, as it does all the work to interact with Stream's API. We simply need to configure it to for our user's channels.
现在,视图需要一个视图模型。 在这种情况下,我们将仅使用默认的Stream提供的“ ChannelListViewModel ”。这很棒,因为它完成了与Stream的API交互的所有工作。我们只需将其配置为针对我们用户的频道即可。
The last thing we do is set a “click listener” on each channel. We boot a ChannelActivity, which is where we'll customize the chat messages. Before we look at the code for ChannelActivity let's look at the layout:
我们要做的最后一件事是在每个通道上设置一个“单击侦听器”。 我们启动ChannelActivity ,这是我们定制聊天消息的地方。 在查看ChannelActivity的代码之前,让我们看一下布局:
We use a ConstraintLayout to hold our ChannelListView and associated ProgressBars. Since the view is mostly taken care of by Stream, we just need to configure when it is that our ProgressBars show and what our padding and margin are.
我们使用ConstraintLayout来保存ChannelListView和关联的ProgressBar 。 由于视图主要由Stream处理,因此我们只需要配置何时显示ProgressBar以及padding和margin是什么。
Now, we’re ready to view a specific channel.
现在,我们准备查看特定的频道。
观看频道 (Viewing a Channel)
Once a user clicks a channel, our ChannelActivity starts. Here is the code:
用户点击频道后,我们的ChannelActivity启动。 这是代码:
First, we get our channel information off of the Intent from our ChannelActivity.newIntent call, in MainActivity.kt, and, then, below, we set our content view activity_channel and viewModel:
首先,从MainActivity.kt ChannelActivity.newIntent调用中获取Intent频道信息,然后在下面设置内容视图activity_channel和viewModel :
You’ll notice this was another ConstraintLayout with some views and progress bars; we use Stream's UI Components to build the majority of the view. ChannelHeaderView gives us a nice header with a channel image and channel name (from the parent). MessageListView displays our messages, and MessageInputView gives us a helpful default message input.
您会注意到这是另一个具有某些视图和进度条的ConstraintLayout ; 我们使用Stream的UI组件来构建大部分视图。 ChannelHeaderView为我们提供了一个不错的标题,其中包含频道图片和频道名称(来自父级)。 MessageListView显示我们的消息,而MessageInputView为我们提供有用的默认消息输入。
We use the built-in Stream view model and feed that to each view. However, we customize the MessageListView view by providing a custom message view "factory", BubbleMessageViewHolderFactory. This "factory" hooks into Stream's code to provide a custom view for each message. This class is straightforward since all we're going to do is instantiate our bubble message class, BubbleMessageViewHolder:
我们使用内置的Stream视图模型并将其提供给每个视图。 但是,我们通过提供自定义消息视图“ factory” BubbleMessageViewHolderFactory定义MessageListView视图。 这个“工厂”与Stream的代码挂钩,为每条消息提供自定义视图。 此类很简单,因为我们要做的只是实例化气泡消息类BubbleMessageViewHolder :
Now that we’re hooked into the view rendering, we can customize our messages to look like iMessage or WhatsApp.
现在,我们已经迷上了视图渲染,可以自定义消息,使其看起来像iMessage或WhatsApp。
呈现自定义气泡消息 (Rendering Custom Bubble Messages)
We’re ready to declare our custom bubble view. To hook into Stream’s components, we need to be a subclass of BaseMessageListItemViewHolder. Here is the basic class definition:
我们准备声明我们的自定义气泡视图。 要连接到Stream的组件,我们需要成为BaseMessageListItemViewHolder的子类。 这是基本的类定义:
We’re passed a viewGroup resource from the factory (we will be using " bubble_message"). Then, this view is referred to by itemView. From this, we grab our message header (which will just be spacing, in our case), our text view that will hold the message, and our username view. We also have a MessageListItem and ChannelState, which contain data for our Stream message and channel, respectively. Let's check out our view:
我们从工厂传递了一个viewGroup资源(我们将使用“ bubble_message ”)。 然后,此视图由itemView引用。 由此,我们获取消息标题(在我们的示例中为空格),将保存消息的文本视图以及用户名视图。 我们还有一个MessageListItem和ChannelState ,分别包含我们的Stream消息和通道的数据。 让我们看看我们的观点:
This view is quite simple, as it defines the three pieces we referenced before: the header spacing, the username, and the text. Notice there’s no bubble logic here. To get the correct colours and shapes, we’ll use drawables and some logic in our class to define how the message will look; this layout is simply the scaffolding for us to fill in.
该视图非常简单,因为它定义了我们之前引用的三部分:标题间距,用户名和文本。 注意这里没有气泡逻辑。 为了获得正确的颜色和形状,我们将在类中使用drawable和一些逻辑来定义消息的外观。 这种布局仅仅是我们要填写的脚手架。
Implementing this abstract class requires us to implement setStyle and bind. We'll ignore setStyle for this tutorial since we'll be defining all of our styles outright.
实现此抽象类要求我们实现setStyle和bind 。 在本教程中,我们将忽略setStyle ,因为我们将直接定义所有样式。
You can check out
MessageViewListStyleto see all the ways you can customize the components without building your own class; with that said, in this post, we want to explore how to do it ourselves!您可以查看
MessageViewListStyle来查看无需构建自己的类即可自定义组件的所有方法。 话虽如此,在这篇文章中,我们想探索如何自己做!
Let’s dive in! The bind method is where we configure how the message looks:
让我们潜入吧! bind方法是我们配置消息外观的地方:
We’re given a ChannelState and MessageListItem, which has everything we need to figure out our display. First, we check the type of message. Stream has a few different message types, which represent different things. For example, you may get a message type that indicates a user is typing or a date separator. In our case, we'll focus on two, the actual messages and date separators; we'll ignore any other message type and remove them from rendering, entirely.
我们得到了ChannelState和MessageListItem ,其中包含我们需要弄清楚显示内容的所有内容。 首先,我们检查消息的类型。 流有几种不同的消息类型,它们代表不同的事物。 例如,您可能会收到指示用户正在键入的消息类型或日期分隔符。 在我们的例子中,我们将集中讨论两个实际的消息和日期分隔符。 我们将忽略任何其他消息类型,并将其完全从渲染中删除。
Let’s focus on the actual messages to start; we’ll look at how to render the date separators after. Here is our configMessage method:
让我们专注于开始的实际消息。 之后,我们将介绍如何呈现日期分隔符。 这是我们的configMessage方法:
We do three things: 1) configure the actual text display, 2) decide if we need to show a username 3) determine how much spacing we have between messages.
我们做三件事:1)配置实际的文本显示,2)确定是否需要显示用户名3)确定消息之间有多少间距。
First, let’s see how we configure the actual text and render our bubble message:
首先,让我们看看如何配置实际文本并呈现气泡消息:
We set the TextView's text, then decide if it's "our" message or "theirs". If it's "ours", we display the message on the right, in blue. If it's "theirs", it goes on the left, in grey. To set the justification of the message, we use horizontalBias; setting it to 1 sets the message to the right, and 0 sets the message to the left. We'll also set the text colour based on the background since blue needs white text and grey needs black. Padding is also set differently for the two cases, since the message will have the "tail" on the right or left, depending on whose message it is.
我们设置TextView的文本,然后确定它是“我们的”消息还是“他们的”消息。 如果是“我们的”,我们将在右侧以蓝色显示该消息。 如果是“他们的”,则在左侧为灰色。 为了设置消息的合理性,我们使用horizontalBias ; 将其设置为1会将消息设置在右侧,将0设置将消息设置在左侧。 我们还将基于背景设置文本颜色,因为蓝色需要白色文本,而灰色需要黑色。 两种情况下的填充设置也有所不同,这是因为消息的右侧或左侧将带有“尾巴”,具体取决于消息是谁。
Since we’re replicating iMessage’s style, they don’t render the tail unless it’s the bottom message. Conveniently, Stream gives us position information and makes it easy to check message placement within a group of messages:
由于我们正在复制iMessage的样式,因此除非它是底部消息,否则它们不会渲染尾部。 Stream方便地为我们提供了位置信息,并使其易于检查一组消息中的消息位置:
If the message is the bottom message, it means it’s the only message or the last in a group of messages by the same user. If it’s either of those, we add a tail; if it’s not, we just do a simple bubble. We’ll also set the background of the text view to a “drawable”. Let’s look at “our” message drawables; here’s the drawable with a tail:
如果该消息是底部消息,则意味着它是同一用户中唯一的消息或一组消息中的最后一条消息。 如果是其中任何一个,我们添加一条尾巴; 如果不是,我们只是做一个简单的气泡。 我们还将文本视图的背景设置为“可绘制”。 让我们看一下“我们的”消息可绘制对象; 这是带有尾巴的可绘制对象:
We’re doing a bit of a smart trick by defining layer-list with two items. One is a regular rectangle with rounding, the other is a rotated rectangle that is covered by the standard rectangle. We pad the regular rectangle out to give a small gutter, so the edge of the rotated rectangle sticks out. This gives us a beautiful "tail" for the message bubble.
通过定义包含两个项目的layer-list ,我们正在做一些巧妙的窍门。 一个是带圆角的规则矩形,另一个是由标准矩形覆盖的旋转矩形。 我们将规则的矩形填充出来以提供一个小的装订线,因此旋转后的矩形的边缘会伸出。 这为消息泡提供了一个美丽的“尾巴”。
While we chose to keep it simple here with just rectangles, if you’d like a more stylized tail, such as the one you see in iMessage, you can use vector drawables to convert an SVG to a drawable.
虽然我们选择此处仅用矩形来使其简单,但是如果您想要更具风格化的尾巴(例如在iMessage中看到的尾巴),则可以使用矢量可绘制对象将SVG转换为可绘制对象。
For messages that don’t need a tail, we define a simple shape with some spacing for the tail gutter:
对于不需要尾巴的消息,我们定义一个简单的形状,尾巴槽具有一定的间距:
Messages for “theirs” is the same pattern but mirrored and grey:
“他们的”的信息是相同的模式,但镜像为灰色:
Nice! Now we have some good looking bubbles:
真好! 现在,我们有了一些漂亮的气泡:
Now we can add the username, if necessary, and space the messages correctly. First, we’ll look at configUsername:
现在,如果需要,我们可以添加用户名,并正确间隔消息。 首先,我们来看configUsername :
First, we decide if we show the username at all. There are three cases where we want it gone. If it’s a 1-on-1 chat, if the message is “ours”, or if it’s not the top of a group of messages (otherwise, we’d have usernames on every message within a grouping). This logic means we only label groups of messages from other people in group chats.
首先,我们决定是否显示用户名。 在三种情况下,我们希望它消失了。 如果是一对一聊天,或者消息是“我们的”,或者不是消息组的顶部(否则,分组中的每条消息都有用户名)。 这种逻辑意味着我们仅在群聊中标记来自其他人的消息群。
If we have that case, we set the text of the username TextView to the user's name. We set the bias and margin depending on if it's on the right or the left.
如果遇到这种情况,可以将用户名TextView的文本设置为用户名。 我们根据偏倚和边距来设置偏斜和边距。
Now we can space our messages depending on their placement in a group of messages:
现在,我们可以根据它们在一组消息中的位置来分隔消息:
This is simple since our default spacing is in our layout resource. We simply shrink the height if we’re not the top message. Now you’ll see the nice spacing and appropriate tails with usernames in our group chats:
这很简单,因为我们的默认间距位于布局资源中。 如果我们不是最重要的信息,我们只是缩小高度。 现在,您将在我们的群聊中看到漂亮的空格和带有用户名的尾巴:
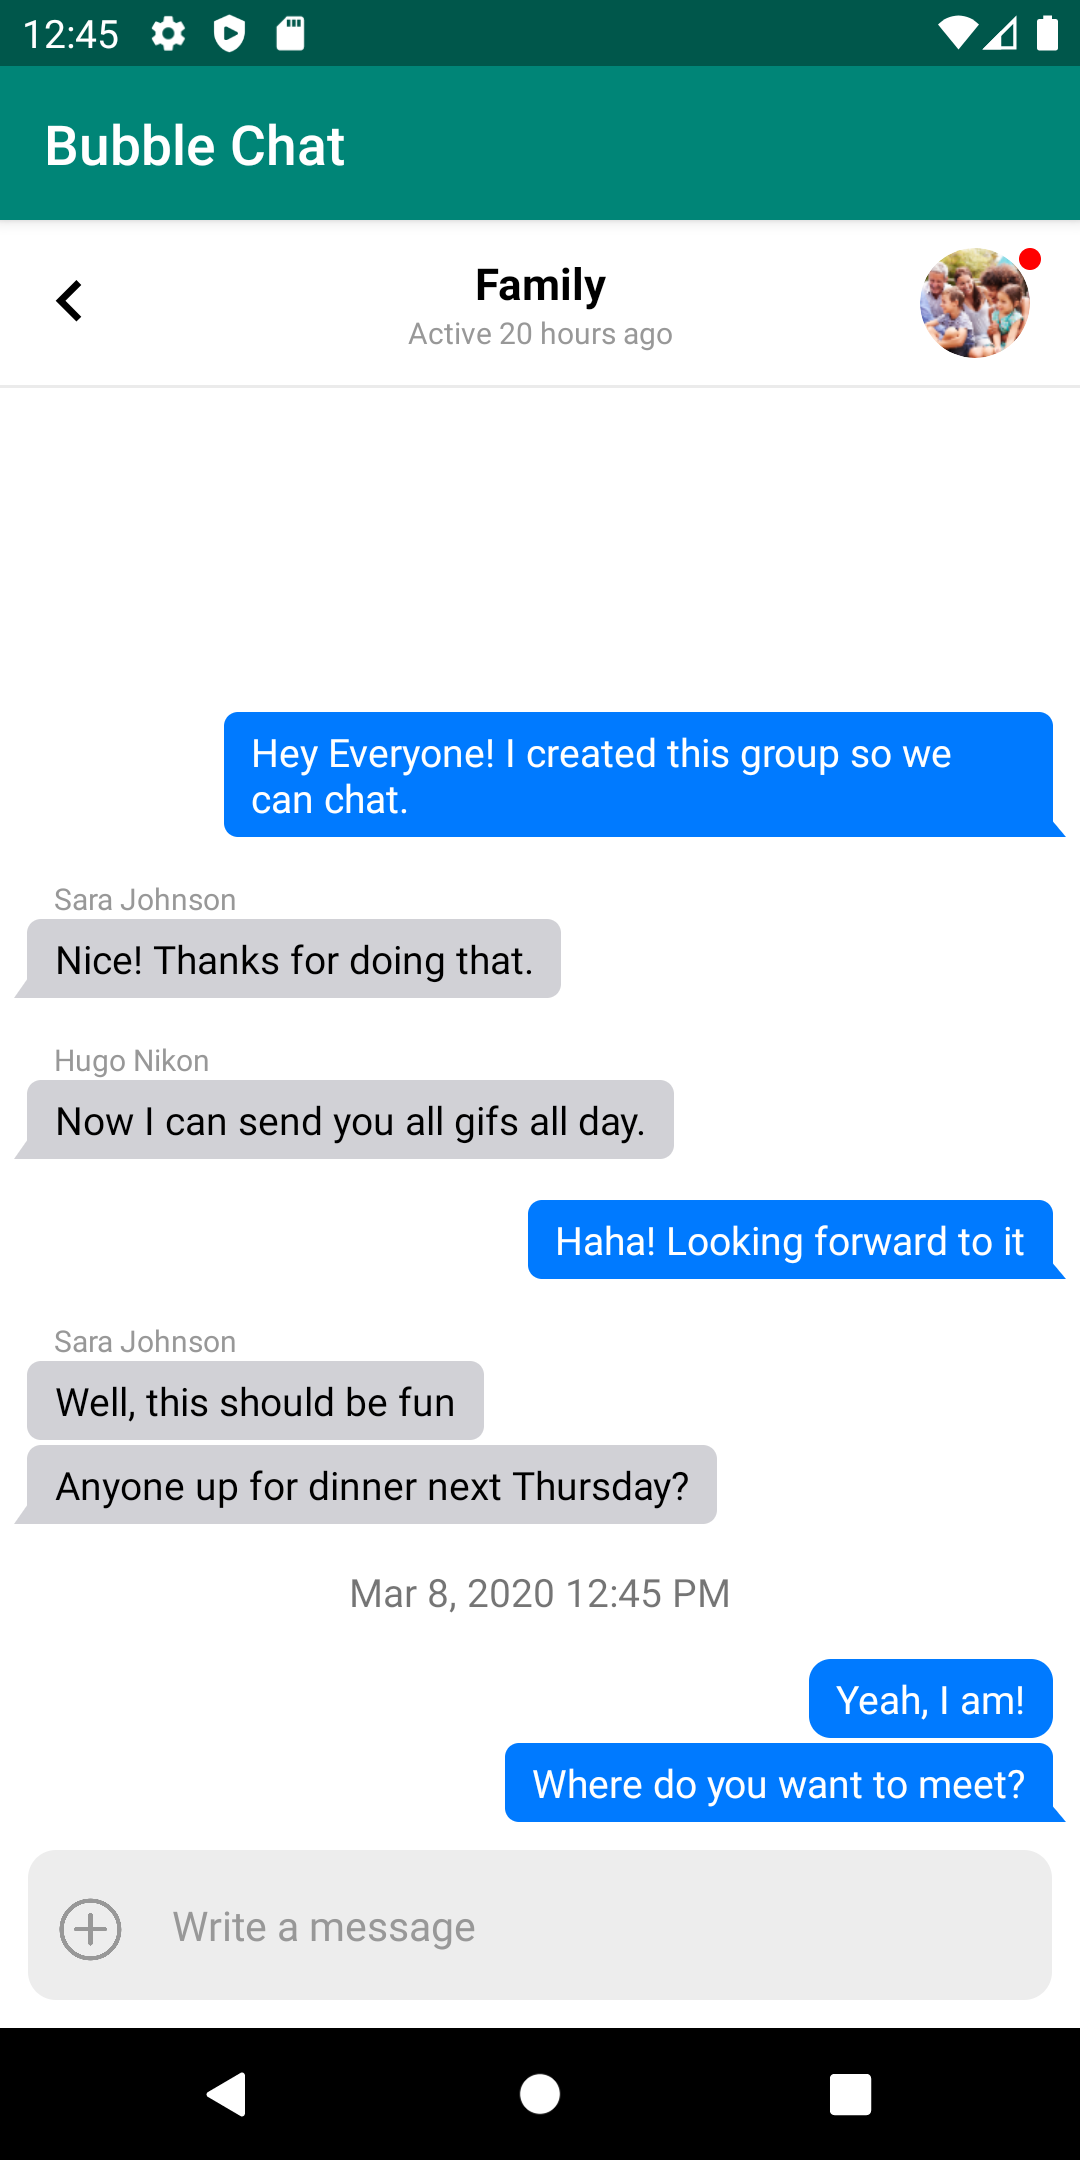
All that’s left is to deal with our date separator messages, and we’re done. These MessageListItems come with no user and just a date. These are used to provide a horizontal separator between messages that are spaced out in time. These messages are automatically created by Stream when it decides the time between messages has been too long, and it'd be nice to group them. For example, if you message back a day later, you can break up the view with a date marker to inform the user of roughly when messages have come in. Here's configDate:
剩下的就是处理我们的日期分隔符消息,我们完成了。 这些MessageListItem没有用户,只有一个日期。 这些用于在时间间隔开的消息之间提供水平分隔符。 当Stream决定消息之间的时间过长时,这些消息将由Stream自动创建,最好对它们进行分组。 例如,如果您在一天后发回消息,则可以使用日期标记拆分视图,以大致通知用户何时configDate消息。这是configDate :
This is straightforward since our default text view has no styling and the correct spacing. We just need to turn off the username view and add the date. Now we have a convenient date separator:
这很简单,因为我们的默认文本视图没有样式和正确的间距。 我们只需要关闭用户名视图并添加日期即可。 现在我们有了一个方便的日期分隔符:
And we’re done. We now have custom bubble messages hooked into Stream.
我们完成了。 现在,我们已将自定义气泡消息挂接到Stream中。
最后的想法 (Final Thoughts)
Replicating iOS style messages on Android is relatively simple with drawables. Stream makes it even simpler with it’s out of the box UI Components. You can start with Stream default views and customize them or build your own. If you want full control, you can ignore the UI Components and use the lower level Stream libraries directly. It’s easy to peel back the layers when you need it.
使用可绘制对象在Android上复制iOS样式消息相对简单。 流使用开箱即用的UI组件使其变得更加简单。 您可以从Stream默认视图开始并对其进行自定义或构建自己的视图。 如果要完全控制,则可以忽略UI组件,而直接使用较低级别的Stream库。 需要时可以很容易地剥离这些层。
For in-depth details on how to use the Stream Chat SDK for Android, check out the interactive tutorial here. You’ll learn how to build everything that is required for real-time chat — typing indicators, reactions, threads, etc.
有关如何使用Android的Stream Chat SDK的详细信息,请在此处查看交互式教程。 您将学习如何构建实时聊天所需的所有内容-键入指示器,React,线程等。
Happy coding.
快乐的编码。
翻译自: https://medium.com/swlh/android-chat-bubbles-building-ios-style-chat-in-android-819757a4e691
android 聊天气泡
http://www.taodudu.cc/news/show-5250694.html
相关文章:
- Flutter 自定义聊天气泡
- flutter图片聊天泡泡_[Flutter]聊天气泡组件
- html聊天效果,HTML5实现QQ聊天气泡效果
- css制作聊天气泡android,CSS3巧妙实现聊天气泡
- Vue3聊天气泡简单实现思路
- cocos creator 聊天气泡
- Android高仿iOS Messages聊天气泡
- iOS制作聊天气泡
- 聊天气泡
- 让你的聊天气泡丰富多彩
- 如何安装共享打印机驱动
- 打印机驱动特殊安装步骤
- 获取cookie时返回RequestsCookieJar的解决方法
- VUE : Uncaught (in promise) TypeError: dataOptions.call is not a function
- TensorFlow estimator训练时 invalid continuation byte
- P4905 报纸(最小割)
- vmware漏洞之三——Vmware虚拟机逃逸漏洞(CVE-2017-4901)Exploit代码分析与利用
- 【NOIP 2016 提高组】换教室
- android eclipse debug coredump,Android P 开启抓取Coredump功能
- python marshal loads failed_python使用marshal模块序列化实例
- Logstash 安装+配置+数据采集示例
- 记一次c++中的文件操作
- 导弹发射各项参数计算涉及计算机应用,《计算机应用基础》复习题七(6页).doc...
- 飞卡日常进度之电机驱动
- HTML抓取不到,抓取不到html,curl和file_get_contents都抓不到,但是页面可以直接打开。...
- 【HDU 4905 多校联合】The Little Devil II【DP+四边形不等式优化】
- Delphi XE4,C++ Builder XE4,RAD Studio XE4 v18.0.4905.60485(With Update 1) 官方下载激活
- UVALive - 4905 Pro-Test Voting
- 2014多校联合四(HDU 4901 HDU 4902 HDU 4905)
- 【jzoj4905】【NOIP2016提高组】【换教室】【动态规划】【期望】
android 聊天气泡_android聊天气泡在android中构建ios风格的聊天相关推荐
- Android底部日期控件,Android开发中实现IOS风格底部选择器(支持时间 日期 自定义)...
本文Github代码链接 先上图吧: 这是笔者最近一个项目一直再用的一个选择器库,自己也在其中做了修改,并决定持续维护下去. 先看使用方法: 日期选择: private void showDateDi ...
- Android学习笔记——RecyclerView编写气泡聊天
声明 本次的代码部分参考郭霖--<第一行代码>,学习recyclerview章节后手动编写的. .9图制作 .9图素材是本人用Windows附件中的画图工具制作的(就是找不到资源),然后导 ...
- android聊天界面对话气泡_你在和脚本谈恋爱(自动化在IM聊天中的应用)
谢谢打开这篇文章的每个你 测开之分层自动化(Python)招生简章 Python自动化测试报告美化 在python中进行数据驱动测试 太嚣张了!他竟用Python绕过了"验证码" ...
- 高德地图关闭气泡高德android,Android-高德地图-显示气泡框
现在的聊天框大多都是气泡框,气泡框长相可爱,有良好的用户体验. 如何把气泡框应用于地图上呢? 步骤一:首先要定义我们的气泡框布局,也就是所谓的layout. popup.xml: android:ba ...
- unity语音聊天--亲加通讯云(Android/iOS)---android
注:最近项目需求要做语音聊天这一块的功能,想了几种方案,最后还是决定用第三方服务,毕竟日活50W以下亲加是免费的! 亲加官方给了一定的技术文档,但是遇到很多坑,我顺便都介绍一下 废话不多说,先介绍An ...
- iPhone14或仍有刘海,设计、芯片都不变;微信聊天对话框支持放大编辑;Android 13正式版发布|极客头条...
「极客头条」-- 技术人员的新闻圈! CSDN 的读者朋友们早上好哇,「极客头条」来啦,快来看今天都有哪些值得我们技术人关注的重要新闻吧. 整理 | 梦依丹 出品 | CSDN(ID:CSDNnews ...
- openfire android 发送图片,基于openfire+smack开发Android即时聊天应用[四]-单人聊天、群聊、发送接收文件等...
这篇文章主要介绍如何实现点对点单人聊天.多人的群聊.以及如何给对方发送文件,如何发送图片消息和语音消息等功能. 1.单人聊天 1.首先创建聊天对象 /** * 创建聊天窗口 * @param jid ...
- iPhone14或仍有刘海,设计、芯片都不变;微信聊天对话框支持放大编辑;Android 13正式版发布|极客头条
「极客头条」-- 技术人员的新闻圈! CSDN 的读者朋友们早上好哇,「极客头条」来啦,快来看今天都有哪些值得我们技术人关注的重要新闻吧. 整理 | 梦依丹 出品 | CSDN(ID:CSDNnews ...
- android 通知栏样式_Android通知样式
android 通知栏样式 We've discussed and implemented basic Notifications in this post. In this tutorial, we ...
最新文章
- 路易斯安那州立大学计算机科学,西北路易斯安那州立大学
- 在GPU上运行,性能是NumPy的11倍,这个Python库你值得拥有
- 数学思想 —— 推广和泛化
- 几个非常有用的iOS学习博客链接
- 三元表达式三个条件判断
- vmware虚拟机上的centos安装Hadoop,以及在本地eclipse上运行mapReduce项目,并将文件输出到HDFS中...
- 在dll中用DirectSound8同时播放多个wav文件不能发声
- VB通用对话框commom dialog中关于filterindex的设置
- java定义负数_java如何定义负数
- 宇枫资本女性刚工作理财建议
- IV-18(前苏联ИВ-18)荧光管电子钟【Energy Pillar.能量柱】
- Java+阿里云手机验证码发送和验证
- 去中心化存储项目终极指南 | Filecoin, Storj 和 PPIO 项目异同 (上)
- iOS 21种设计模式之工厂模式
- 关于未来人工智能时代的一点感想
- Linux查看进程信息相关(Ubuntu)
- prometheus启动报错Unit prometheus.service entered failed state.
- 基于微信美食小程序系统设计与实现 开题报告
- python的fopen函数_打开文件fopen函数的用法
- DownloadManager之大坑