使用PHPExcel生成Excel文件和图表
After my article “How To Make Microsoft Word Documents with PHP” (using Interop capability under Windows), there were quite a few comments urging a pure PHP implementation, i.e., only using a universal PHP library to manipulate Office files.
在我的文章“ 如何使用PHP制作Microsoft Word文档 ”(在Windows下使用Interop功能)之后,有很多评论敦促使用纯PHP实现,即仅使用通用PHP库来处理Office文件。
In this article, we will see how to use a PHPExcel library to provide an “Export to Excel” function in a web app so that the user can export the data into an Excel 2007/2013 file for further analysis.
在本文中,我们将看到如何使用PHPExcel库在Web应用程序中提供“导出到Excel”功能,以便用户可以将数据导出到Excel 2007/2013文件中以进行进一步分析。
NOTE: There are a few PHP libraries that can provide Excel (and Office) file manipulations. The lib we use here is called PHPExcel, a subset of PHPOffice, which can be cloned here.
注意:有一些PHP库可以提供Excel(和Office)文件操作。 我们在这里使用的库称为PHPExcel,它是PHPOffice的子集,可以在此处克隆。
目标 (Objectives)
After this tutorial, we will get:
学习完本教程后,我们将获得:
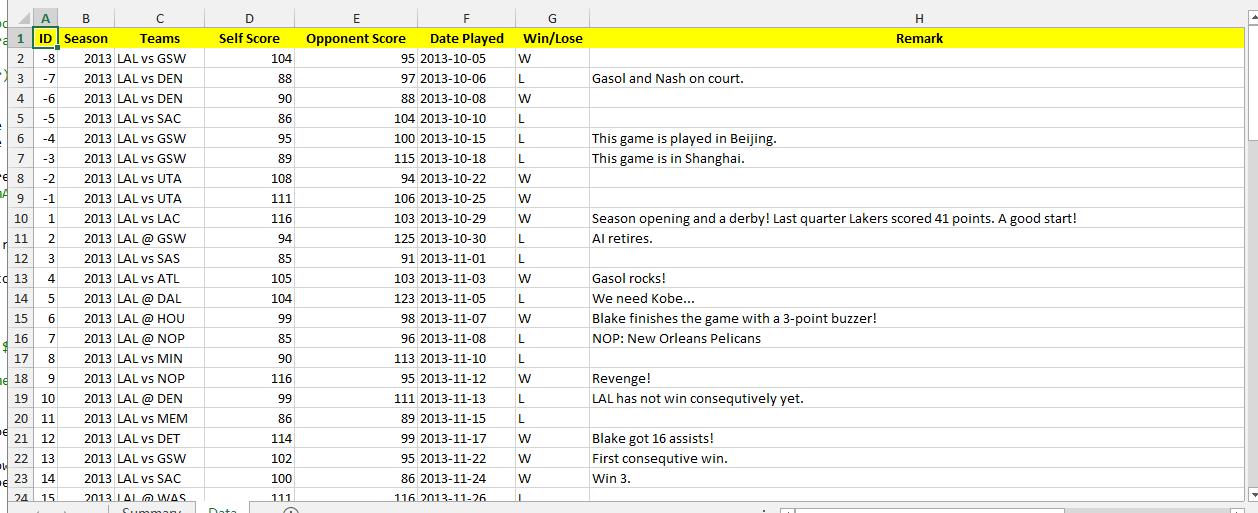
- A sheet showing the game information (date played, teams, score, win/lose status) of my favorite NBA team – LA Lakers, in its 2013-14 season. 显示我最喜欢的NBA球队-LA湖人队在2013-14赛季的比赛信息(比赛日期,球队,得分,胜利/失败状态)的表格。
- A button that will export the data into an Excel 2013 file. 一个将数据导出到Excel 2013文件的按钮。
- That Excel file will be populated with some additional analytic data and a chart also generated by PHP and Excel.该Excel文件将填充一些其他分析数据以及同样由PHP和Excel生成的图表。
Let’s get started.
让我们开始吧。
制备 (Preparation)
To use PHPExcel, we must have PHP version above 5.2.0. There are also 3 PHP extensions to be enabled: php_zip (which is essential to operate Office 2007 formats), php_xml and php_gd2 (optional, but required for exact column width auto-calculation).
要使用PHPExcel,我们必须拥有高于5.2.0PHP版本。 还启用了3个PHP扩展: php_zip (对于Office 2007格式而言必不可少), php_xml和php_gd2 (可选,但对于自动计算列宽是必需的)。
Next, install the library via Composer.
接下来, 通过Composer安装该库。
Of course, we should have our database up and running. The data dump for this tutorial (lakers.sql) has been uploaded to the repo associated with this article. The data is retrieved with a simple SQL statement: “select * from lakers” (total 90 records, including 8 pre-season and 82 regular season games).
当然,我们应该建立并运行数据库。 本教程的数据转储( lakers.sql )已上载到与本文相关的存储库中 。 使用简单SQL语句检索数据:“ select * from lakers ”(总共90条记录,包括8季前赛和82常规赛。)
Also, this demo uses Silex as the MVC framework. Twig will be used as the template engine. Make sure the necessary dependencies are correctly specified in your composer.json file.
另外,此演示使用Silex作为MVC框架。 Twig将用作模板引擎。 确保在composer.json文件中正确指定了必要的依赖项。
索引文件 (The index file)
index.php will be the entry point for our Silex application. There will be two routes defined:
index.php将是我们的Silex应用程序的入口点。 将定义两条路线:
$app->get('/', function () use ($app)
{
$c=new trExcel\Excel();
return $c->index($app);
});
$app->post('/export', function () use ($app)
{
$c=new trExcel\Excel();
return $c->export($app);
});
Route '/' will be our entry point and display the data and the “Export” button. Route '/export' will do the back end handling process that actually exports to Excel. Both functions are wrapped in a user-defined class (classExcel.php). In the rest of this article, we will focus on this file – or more precisely, the export function and related functions defined in this file and discuss several important aspects of Excel manipulation using the PHPExcel library.
路线'/'将是我们的入口点,并显示数据和“导出”按钮。 路由'/export'将执行实际上导出到Excel的后端处理过程。 这两个函数都包装在用户定义的类( classExcel.php )中。 在本文的其余部分中,我们将重点介绍此文件,或更准确地说,是该文件中定义的export功能和相关功能,并讨论使用PHPExcel库进行Excel操作的几个重要方面。
Excel应用程序及其元数据 (Excel application and its meta data)
When we click the icon to launch Excel, the Excel application starts. Under normal circumstances, it will also contain a workbook with 3 (in Excel 2013, only 1) worksheets. The worksheet is the “canvas” we play with. These are the two most important terms in Excel. Other important terms may include: cell, range, etc.
当我们单击图标启动Excel时,Excel应用程序启动。 在正常情况下,它还将包含一个包含3个工作表(在Excel 2013中仅为1个)的工作簿。 工作表是我们玩的“画布”。 这是Excel中两个最重要的术语。 其他重要术语可能包括:单元格,范围等。
To instantiate an Excel file, we use:
要实例化一个Excel文件,我们使用:
$ea = new \PHPExcel(); // ea is short for Excel ApplicationAn Excel application instance usually is mapped to a physical Excel file. It has its own meta data to describe the file that we create. The meta data is shown when we “Alt-Enter” an Excel file (or right click on that file and choose “Properties”):
Excel应用程序实例通常映射到物理Excel文件。 它具有自己的元数据来描述我们创建的文件。 当我们“ Alt-Enter”一个Excel文件(或右键单击该文件并选择“属性”)时,将显示元数据:
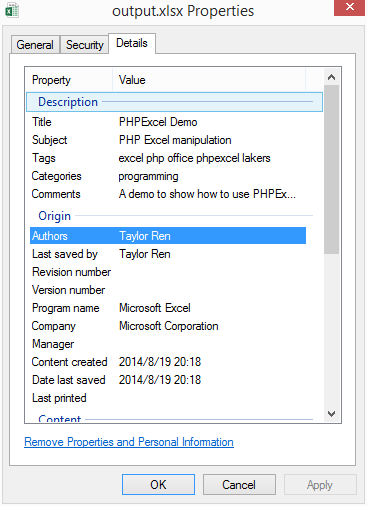
The properties shown in the above dialog will have corresponding setXXXX methods to set these properties, where XXXX is almost identical to the property names listed in the dialog:
上面对话框中显示的属性将具有相应的setXXXX方法来设置这些属性,其中XXXX与对话框中列出的属性名称几乎相同:
$ea->getProperties()
->setCreator('Taylor Ren')
->setTitle('PHPExcel Demo')
->setLastModifiedBy('Taylor Ren')
->setDescription('A demo to show how to use PHPExcel to manipulate an Excel file')
->setSubject('PHP Excel manipulation')
->setKeywords('excel php office phpexcel lakers')
->setCategory('programming')
;
The methods (setXXXX) are quite self explanatory and map to the “Properties” dialog quite well. There are some discrepancies in the mapping, but they are not too difficult for us to make the connection (e.g., “Authors” will be mapped to setCreator).
方法( setXXXX )很容易说明,并且可以很好地映射到“属性”对话框。 映射中存在一些差异,但是对于我们来说建立连接并不困难(例如,“ Authors”将被映射到setCreator )。
工作表和细胞数量 (Worksheet and cell population)
The worksheet is probably the object that we’ll manipulate the most: populating cells with data or formulas, applying styles, doing data filtering, inserting a chart, etc.
工作表可能是我们最常使用的对象:使用数据或公式填充单元格,应用样式,进行数据过滤,插入图表等。
To get the reference to a worksheet, we use:
为了获得对工作表的引用,我们使用:
$ews = $ea->getSheet(0);
$ews->setTitle('Data');
The sheets in a workbook are always 0-indexed. So the 1st (and up to now the only) sheet will be Sheet Zero. The default name of this sheet is always “Worksheet” and we can change it with the setTitle method.
工作簿中的工作表始终为0索引。 因此,第一个(到目前为止是唯一的)工作表将为零工作表。 该工作表的默认名称始终为“工作表”,我们可以使用setTitle方法对其进行更改。
To populate a cell/cells, we have at least two options:
要填充一个或多个单元,我们至少有两个选择:
For those headings, titles, other descriptive items, we will populate them one by one using
setCellValuemethod.对于那些标题,标题和其他描述性项目,我们将使用
setCellValue方法逐一填充它们。For structured data, most of which comes from an SQL
selectstatement, we will use thefromArraymethod.对于结构化数据,其中大多数来自SQL
select语句,我们将使用fromArray方法。
$ews->setCellValue('a1', 'ID'); // Sets cell 'a1' to value 'ID
$ews->setCellValue('b1', 'Season');
...
//Fill data
$ews->fromArray($data, ' ', 'A2');
The fromArray method takes 3 parameters: 1. the data source, in array form; 2. a “filler” value in case the data is NULL; 3. a cell reference to start the filling (from left to right, then up to down).
fromArray方法采用3个参数:1.数据源,采用数组形式; 2.如果数据为NULL,则为“ filler”值; 3.单元格引用开始填充(从左到右,然后从上到下)。
NOTE: When we use PDO to fetch the data, a simple $res = $q->fetchAll(\PDO::FETCH_ASSOC); call will force the returned result data set to contain an associated array only, without index. If fetchall is called without the option PDO::FETCH_ASSOC, the result set will actually contain two sets of identical data, one in associated array form, one in indexed form and will create duplicates in the Excel file when using fromArray.
注意:当我们使用PDO来获取数据时,一个简单的$res = $q->fetchAll(\PDO::FETCH_ASSOC); 调用将强制返回的结果数据集仅包含一个关联数组,没有索引。 如果在不使用选项PDO::FETCH_ASSOC情况下调用fetchall ,则结果集实际上将包含两组相同的数据,一组以关联的数组形式,一组以索引形式,并且在使用fromArray时将在Excel文件中创建重复fromArray 。
We may also want to style the header row (ID, Season, etc). To do that, we also have two ways:
我们可能还想设置标题行的样式( ID , Season等)。 为此,我们还有两种方法:
$header = 'a1:h1';
$ews->getStyle($header)->getFill()->setFillType(\PHPExcel_Style_Fill::FILL_SOLID)->getStartColor()->setARGB('00ffff00');
$style = array(
'font' => array('bold' => true,),
'alignment' => array('horizontal' => \PHPExcel_Style_Alignment::HORIZONTAL_CENTER,),
);
$ews->getStyle($header)->applyFromArray($style);
One way is to use some get methods to retrieve the style object that we want to change and change it. We do this for the “background fill” style.
一种方法是使用一些get方法来检索我们要更改的样式对象并对其进行更改。 我们这样做是为了“背景填充”风格。
The other is to declare a “style” array and specify the styles we want to change and what to change them to. Then, we use applyFromArray to apply the styles in a batch. Here we changed the font and the alignment.
另一个是声明一个“样式”数组,并指定我们要更改的样式以及将其更改为的样式。 然后,我们使用applyFromArray批量应用样式。 在这里,我们更改了字体和对齐方式。
Both methods support range as their parameter ($header='a1:h1';), which is very convenient.
这两种方法都将range作为参数( $header='a1:h1'; ),这非常方便。
Finally, we may want to adjust the column width so they will fit the max displayed length in each column:
最后,我们可能需要调整列宽,以使其适合每列中显示的最大长度:
for ($col = ord('a'); $col <= ord('h'); $col++)
{
$ews->getColumnDimension(chr($col))->setAutoSize(true);
}
Unfortunately, this does not support a range parameter, so we use a for loop to make this happen.
不幸的是,这不支持range参数,因此我们使用for循环来实现这一点。
If we save the file now – we will discuss saving later – we will see that the XLSX file is filled with the data and properly formatted:
如果我们现在保存文件–我们将在稍后讨论保存–我们将看到XLSX文件已填充数据并已正确格式化:
添加另一个工作表并插入公式 (Adding another sheet and inserting formulas)
I always use a separate sheet to store the original data and at least one more sheet to display the summary and/or analytic information.
我总是使用单独的工作表来存储原始数据,并至少再使用一个工作表来显示摘要和/或分析信息。
To insert a new worksheet, we do:
要插入一个新的工作表,我们执行以下操作:
$ews2 = new \PHPExcel_Worksheet($ea, 'Summary');
$ea->addSheet($ews2, 0);
$ews2->setTitle('Summary');
The addSheet method takes two parameters.
addSheet方法采用两个参数。
$ews2: the Excel worksheet instance that we are to insert;$ews2:我们要插入的Excel工作表实例;$location: the index of this worksheet. So 0 means it should become the 1st one. -1 means it should be the last one.$location:此工作表的索引。 所以0意味着它应该成为第一个。 -1表示它应该是最后一个。
With the worksheet inserted, we can populate the cells in this worksheet as usual and apply styles. In this sheet, we will use formulas:
插入工作表后,我们可以照常填充该工作表中的单元格并应用样式。 在此工作表中,我们将使用以下公式:
$ews2->setCellValue('b2', '=COUNTIF(Data!G2:G91, "W")-COUNTIF(Data!G2:G9, "W")');
$ews2->setCellValue('b3', '=COUNTIF(Data!G2:G91, "L")-COUNTIF(Data!G2:G9, "L")');
$ews2->setCellValue('b4', '=b2/(b2+b3)');
You see, it is no different from what we have done in the previous section. The formula string is just like the one we will input in an Excel file to perform the necessary calculation.
您会看到,这与上一节所做的没有什么不同。 公式字符串就像我们将在Excel文件中输入的那样,以执行必要的计算。
NOTE: Please pay special attention to the cell reference (G2:G91). A lazy way of writing that formula is to use a range like G:G. This works fine when there is NO chart in the sheet. If there is a chart, the G:G notation will fail, throwing an exception.
注意:请特别注意单元格引用( G2:G91 )。 编写该公式的一种惰性方法是使用G:G类的范围。 当工作表中没有图表时,此方法工作正常。 如果有图表,则G:G表示法将失败,并引发异常。
This “Summary” sheet looks like this:
此“摘要”表如下所示:
The % shown in cell B4 is set by the following code:
单元格B4显示的%由以下代码设置:
$ews->getStyle('b4')->getNumberFormat()->setFormatCode(\PHPExcel_Style_NumberFormat::FORMAT_PERCENTAGE);Please note some styling issues here. For A1, I have applied the following style:
请在这里注意一些样式问题。 对于A1 ,我应用了以下样式:
$ews2->setCellValue('a1', 'Lakers 2013-2014 Season');
$style = array(
'font' => array('bold' => true, 'size' => 20,),
'alignment' => array('horizontal' => \PHPExcel_Style_Alignment::HORIZONTAL_LEFT,),
);
$ews2->mergeCells('a1:b1');
$ews2->getStyle('a1')->applyFromArray($style);
$ews2->getColumnDimension('a')->setAutoSize(true);
The result shows that the font weight, font size, and alignment are correctly applied. The merging of A1 and B1 into A1 is also done correctly. But, the setAutoSize method fails on this merged cell. The result is that this cell (A1) is still squeezed. This means auto width calculation will not always work. Well, not a big deal, anyway.
结果表明,正确应用了字体粗细,字体大小和对齐方式。 A1和B1合并到A1操作也正确完成。 但是, setAutoSize方法在此合并的单元格上失败。 结果是该单元格( A1 )仍然被挤压。 这意味着自动宽度计算将不总是有效。 好吧,反正没什么大不了的。
一幅画值得一千个字 (A picture is worth a thousand of words)
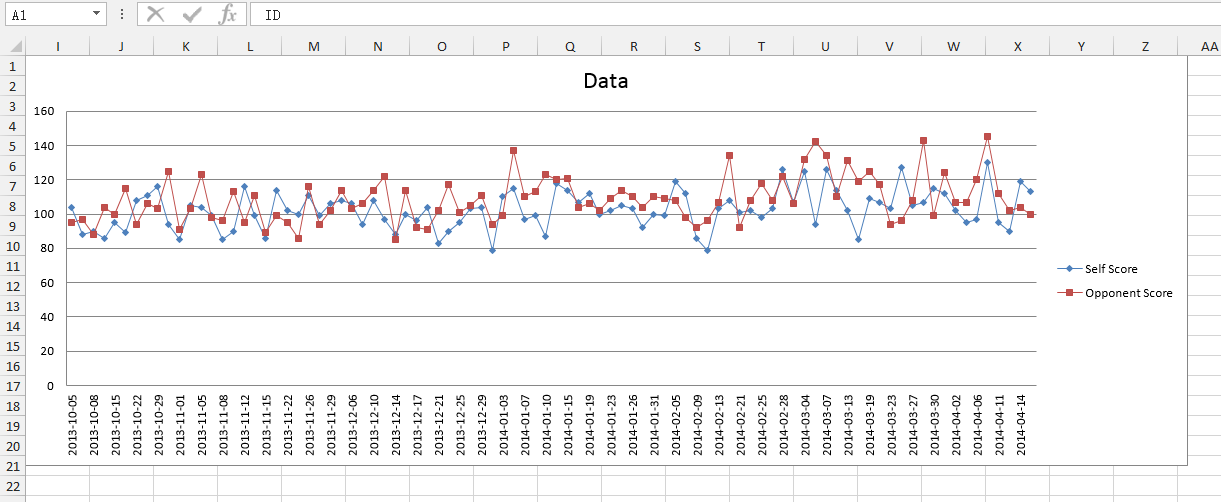
It is always nice to have a visual representation of our data, so the chart will come in handy. Excel has a rich set of built-in charts for us to choose from. PHPExcel can tap into almost all of these. The first chart we are to create is a line chart showing the ups and downs of the scores in each game of the Lakers team and its opponent.
直观地表示我们的数据总是很高兴,因此图表将派上用场。 Excel具有丰富的内置图表供我们选择。 PHPExcel可以利用几乎所有这些。 我们要创建的第一个图表是折线图,显示了湖人队及其对手每场比赛的得分起伏。
Creating a chart is a lengthy coding job, even with the support of a library. The full code of this process can be found in the addChart1 and addChart2 methods that reside in our classExcel.php file. I will just explain the key steps.
即使在库的支持下,创建图表也是一项冗长的编码工作。 可以在我们的classExcel.php文件中的addChart1和addChart2方法中找到此过程的完整代码。 我将只解释关键步骤。
- Data Series Labels数据系列标签
A data series label identifies data series by giving it a name (label). In our case, if we want to show the scores of Lakers and their opponent, we are looking at two labels: Self Score and Opponent Score. Their labels can be found in D1 and E1 respectively:
数据系列标签通过给数据系列命名(标签)来标识它。 在我们的案例中,如果我们想显示湖人及其对手的得分,我们在看两个标签: Self Score和Opponent Score 。 它们的标签可以分别在D1和E1找到:
$dsl=array(
new \PHPExcel_Chart_DataSeriesValues('String', 'Data!$D$1', NULL, 1),
new \PHPExcel_Chart_DataSeriesValues('String', 'Data!$E$1', NULL, 1),
);
A Data Series Label is actually a \PHPExcel_Chart_DataSeriesValues instance. The constructor contains four parameters:
数据系列标签实际上是\PHPExcel_Chart_DataSeriesValues实例。 构造函数包含四个参数:
- The type. For a label, no doubt it should be “String”;方式。 对于标签,毫无疑问,它应该是“ String”;
Source. It is in
D1orE1;资源。 它在
D1或E1;- Format. Normally, providing NULL is sufficient and the default format will be used;格式。 通常,提供NULL就足够了,并且将使用默认格式。
- Count. How much data in the Source. It should normally be 1. 计数。 源中有多少数据。 通常应为1。
- X Axis Value LabelX轴值标签
This identifies the label for the X Axis. For example, on “2013-11-15”, Lakers scored 86 and their opponent scored 89. The “2013-11-15” is the label for those two scores. For our case, we will use the “Date Played” column from row 2 to row 91:
这标识了X轴的标签。 例如,在“ 2013-11-15”上,湖人得分86,而对手得分89。“ 2013-11-15 ”是这两个得分的标签。 对于我们的情况,我们将使用第2行到第91行的“播放日期”列:
$xal=array(
new \PHPExcel_Chart_DataSeriesValues('String', 'Data!$F$2:$F$91', NULL, 90),
);
The constructor is the same, so are the parameters.
构造函数相同,参数也相同。
- Data Series Values数据系列值
We will use “Self Score” (column D) and “Opponent Score” (column E). Both are from row 2 to row 91.
我们将使用“自我得分”(D列)和“竞争得分”(E列)。 两者都是从第2行到第91行。
$dsv=array(
new \PHPExcel_Chart_DataSeriesValues('Number', 'Data!$D$2:$D$91', NULL, 90),
new \PHPExcel_Chart_DataSeriesValues('Number', 'Data!$E$2:$E$91', NULL, 90),
);
After we have the above 3 critical variables, we can set up the Data Series. In Excel, a data series contains the following information essential to creating a chart:
有了以上3个关键变量后,就可以设置数据系列了。 在Excel中,数据系列包含以下创建图表所必需的信息:
- Chart Type图表类型
- Grouping 分组
- Count of data series values数据序列值计数
- Data Series Label数据系列标签
- X Axis Value LabelX轴值标签
- Data Series Values数据系列值
And the constructor is called by simply passing all these parameters:
只需传递所有这些参数即可调用构造函数:
$ds=new \PHPExcel_Chart_DataSeries(
\PHPExcel_Chart_DataSeries::TYPE_LINECHART,
\PHPExcel_Chart_DataSeries::GROUPING_STANDARD,
range(0, count($dsv)-1),
$dsl,
$xal,
$dsv
);
Next, we will create the Plot Area and Legend:
接下来,我们将创建“绘图区”和“图例”:
$pa=new \PHPExcel_Chart_PlotArea(NULL, array($ds));
$legend=new \PHPExcel_Chart_Legend(\PHPExcel_Chart_Legend::POSITION_RIGHT, NULL, false);
A plot area contains a layout of the chart and the Data Series. The layout can specify whether the chart shall show values, percentages, etc. We can use NULL so that a default layout will be used.
绘图区域包含图表和数据系列的布局。 布局可以指定图表是否应显示值,百分比等。我们可以使用NULL,以便使用默认布局。
A legend is used to provide a visual representation of the data groups.
图例用于提供数据组的可视表示。
And now, finally, we can create the chart:
现在,最后,我们可以创建图表了:
$chart= new \PHPExcel_Chart(
'chart1',
$title,
$legend,
$pa,
true,
0,
NULL,
NULL
);
$chart->setTopLeftPosition('K1');
$chart->setBottomRightPosition('M5');
$ews->addChart($chart);
The only new parameter in this constructor is the name of the chart. “chart1” will be good enough. A title of the chart can be created via:
此构造函数中唯一的新参数是图表的name 。 “ chart1”将足够好。 可以通过以下方式创建图表标题:
$title=new \PHPExcel_Chart_Title('Any literal string');After the chart is created, we set its position and size by setting its top-left and bottom right corners’ coordinate and insert it into the worksheet.
创建图表后,我们通过设置其左上角和右下角的坐标来设置其位置和大小,并将其插入工作表中。
NOTE: Most of the time, a cell reference is case insensitive, but please use CAPITAL letter + number when there is a chart in the sheet.
注:在大多数情况下,一个单元格引用是不区分大小写,但请用大写字母+数字时,有片中的图表。
保存文件 (Save the file)
As the last step, we save the file so that the user can download it:
作为最后一步,我们保存文件,以便用户可以下载它:
$writer = \PHPExcel_IOFactory::createWriter($ea, 'Excel2007');
$writer->setIncludeCharts(true);
$writer->save('output.xlsx');
It uses a factory pattern to create a writer object to save the file. A format will be specified (we use “Excel2007” format in our case).
它使用工厂模式创建写入器对象以保存文件。 将指定一种格式(在这种情况下,我们使用“ Excel2007”格式)。
Be sure that we have setIncludeCharts(true) in the saving process, otherwise the chart won’t be there.
确保在保存过程中已设置setIncludeCharts(true) ,否则该图表将不存在。
Remember when I said PHPExcel could tap into almost all chart types? One exception that this lib can’t do well in Excel 2013 is that it does not produce a usable pie chart. In our output.xlsx and our code, we have actually created a pie chart (done in addChart1) but when opening the output.xlsx, Excel 2013 will prompt an error. If we choose continue, the pie chart will be lost and only the line chart (done in addChart2) will be preserved. A bug report has already been filed into its Git repo.
还记得我说过PHPExcel可以利用几乎所有图表类型吗? 该库无法在Excel 2013中很好地执行的一个例外是,它不会产生可用的饼图。 在我们的output.xlsx和代码中,我们实际上已经创建了一个饼图(在addChart1完成),但是当打开output.xlsx ,Excel 2013将提示错误。 如果选择继续,则饼图将丢失,并且仅折线图(在addChart2完成)将被保留。 一个错误报告已经被提交到它的Git仓库中。
Now the “Data” sheet will look like this:
现在,“数据”表将如下所示:
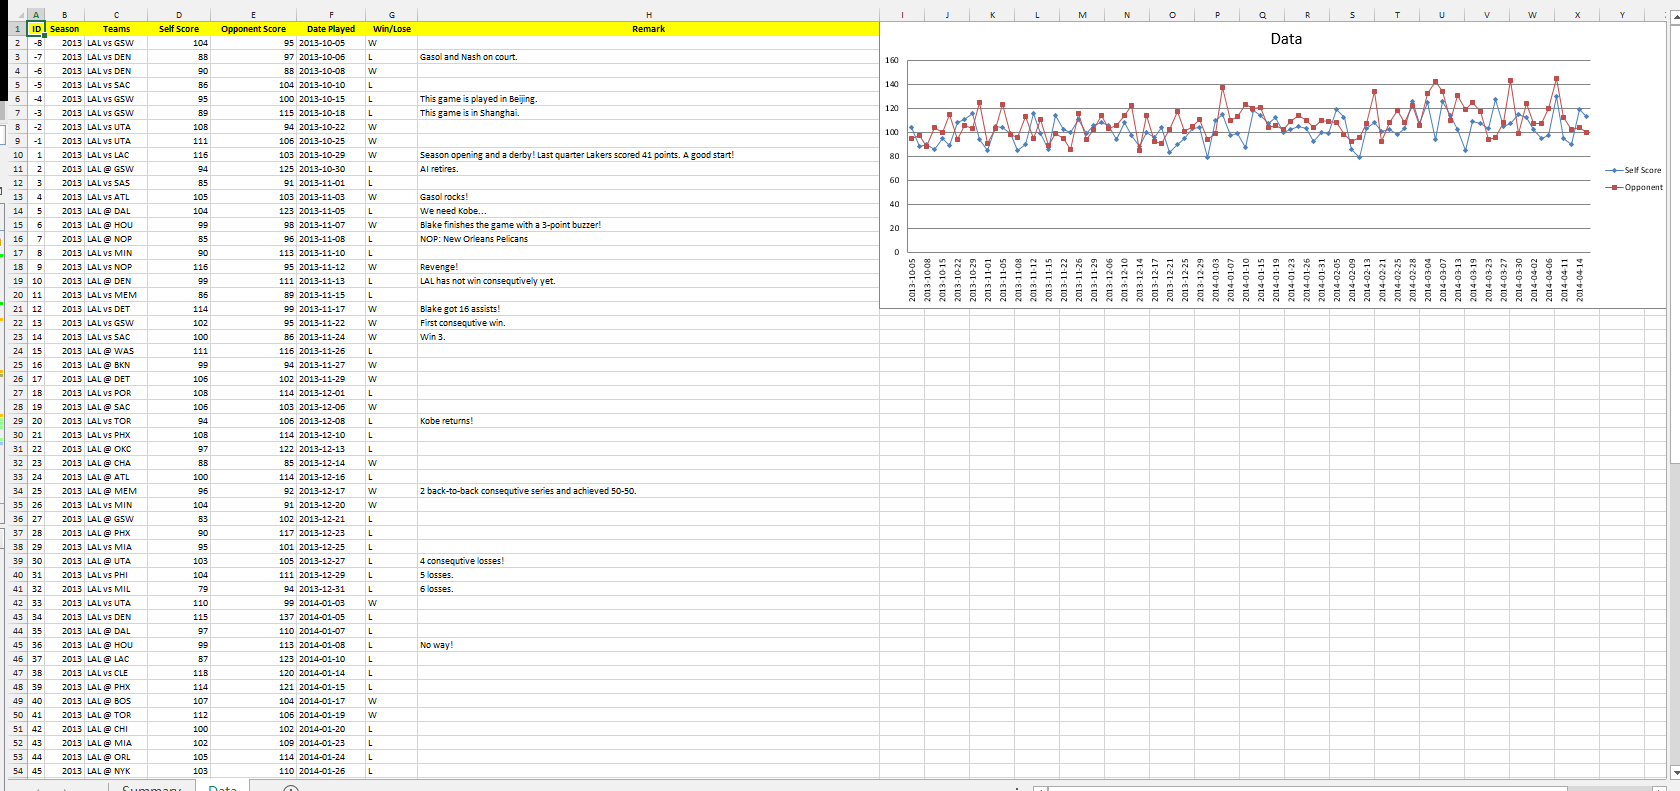
and a zoom-in view of the chart. It is correctly positioned and sized:
以及图表的放大视图。 正确放置并调整大小:
结论 (Conclusion)
In this article, we demonstrated how to use pure PHP and a pure PHP lib (PHPExcel) to manipulate Excel. We created a new file, populated the data, added in a new sheet and analytic data, inserted a chart, and finally saved the file for download.
在本文中,我们演示了如何使用纯PHP和纯PHP库(PHPExcel)来操纵Excel。 我们创建了一个新文件,填充了数据,添加了新的工作表和分析数据,插入了图表,最后保存了文件以供下载。
In general, I found this PHPExcel lib worth trying and easy to learn. Its code insight in an IDE can help us a lot when programming.
通常,我发现此PHPExcel库值得尝试且易于学习。 它在IDE中的代码洞察力可以在编程时为我们提供很多帮助。
We have not covered other common features in an Excel file – we’ll write a followup article on those if the interest is high enough. Let us know!
我们没有在Excel文件中介绍其他常见功能-如果您对这些功能感兴趣的话,我们将就这些功能撰写后续文章。 让我们知道!
Its official documentation and examples are a nice place to find detailed API usage explanations and workable code snippets for common tasks. Read them thoroughly. They can be found in the cloned repo. Give this library a try and let us know of your own use cases!
它的官方文档和示例是查找常见任务的详细API使用说明和可行代码段的好地方。 仔细阅读它们。 它们可以在克隆的仓库中找到。 试试这个库,让我们知道您自己的用例!
翻译自: https://www.sitepoint.com/generate-excel-files-charts-phpexcel/
使用PHPExcel生成Excel文件和图表相关推荐
- php excel 进度,在php中生成Excel文件时显示进度条
我有一个 HTML表单,当您通过单击按钮提交表单时,应用程序使用 PHPExcel生成Excel文件.一切正常,但是当excel文件很大时,等待时间很长.我想添加进度条或显示完整百分比值.我的问题是我 ...
- 【PHP】PHP使用PHPExcel生成Excel表格文件(附带随机生成英文名函数)
[PHP]PHP使用PHPExcel生成Excel表格文件(附带随机生成英文名函数) 前言 由于业务需要,我们需要从业务中汇总数据,并生成Excel文件. 思路是这样的 PHP要导出Excel表格文件 ...
- ASP程序快速生成Excel文件
ASP程序快速生成Excel文件 在一个web项目中,要求将数据生成Excel文件保存到本地,最早使用的方法是直接使用Microsoft的Office Web组件,但是总体感觉是慢(微软的通病).然后 ...
- 【原】Asp.net生成Excel文件并下载(更新:解决使用迅雷下载页面而不是文件的问题)...
这里采用的是在服务端先生成Excel文件,然后利用文件地址下载的方法. 生成Excel文件的方法,见:[原].Net创建Excel文件(插入数据.修改格式.生成图表)的方法 先试用Response.W ...
- 使用PHPExcel实现Excel文件的导入和导出(模板导出)
在之前有写过一篇文章讲述了使用PHP快速生成excel表格文件并下载,这种方式生成Excel文件,生成速度很快,但是有缺点是: 1.单纯的生成Excel文件,生成的文件没有样式,单元格属性(填充色,宽 ...
- Asp.net生成Excel文件并下载(更新:解决使用迅雷下载页面而不是文件的问题)...
这里采用的是在服务端先生成Excel文件,然后利用文件地址下载的方法. 生成Excel文件的方法,见:[原].Net创建Excel文件(插入数据.修改格式.生成图表)的方法 先试用Response.W ...
- phpexcel生成excel并下载
Loader::import('PHPExcel.Classes.PHPExcel'); // tp5中只需将phpexcel文件放入extend文件夹中,即可采用该方法引入,需要先 use thin ...
- 使用phpexcel在excel文件中插入新的数据
使用phpexcel在excel文件中插入新的数据 摘要:在开发中,我们经常需要读写excel表格.今天开发了一下读excel表格,然后使用 insertNewRowBefore 方法插入新行,生成新 ...
- python excel web_使用python在WEB页面上生成EXCEL文件
近日写的一个程序需要在WEB服务器上生成EXCEL文件供用户下载,研究了一下找到了以下比较可行的实现方案,下面以web.py为例,把相关代码贴出来供大家参考: 首先需要下载生成EXCEL的模块,推荐使 ...
最新文章
- Java云托管服务的开支削减策略
- java虚拟机参数-X 与 -XX的区别
- idea for循环快捷键_IDEA骚技巧,编码速度至少快一倍
- 更换 CentOS 7 的下载源为阿里云
- 已知若干点求圆心_【求精干货】高中数学知识点总结归纳高一学生必须掌握
- 可重复使用的外科缝合器行业调研报告 - 市场现状分析与发展前景预测
- ajax页面无刷新分页,JS+Ajax+Jquery实现页面无刷新分页以及分组 超强的实现
- Hadoop The Definitive Guide:Hadoop权威指南-PART 1
- 徐小明:这次我支持房产新政
- 【学习日记】Dom基础
- 360怎样修改wifi服务器,360路由器怎么重新设置? | 192路由网
- 测绘资质专业类别及乙级作业限制范围是什么?
- [Python]TempConvert.py(温度转换)解释拓展
- Python开发【项目】:生产环境下实时统计网站访问日志信息
- git设置用户名密码
- Untiy的阿拉伯文本适配
- 数控机床设备物联网远程控制解决方案
- python绘制热图
- CCS Uniflash烧写CC3200开发板的简易操作笔记
- C语言自定义数组函数