第五阶段:shell编程企业实战,完整版
第五阶段:shell编程企业实战
第一章shell变量核心基础与进阶
1.1节、什么是shell
什么是shell
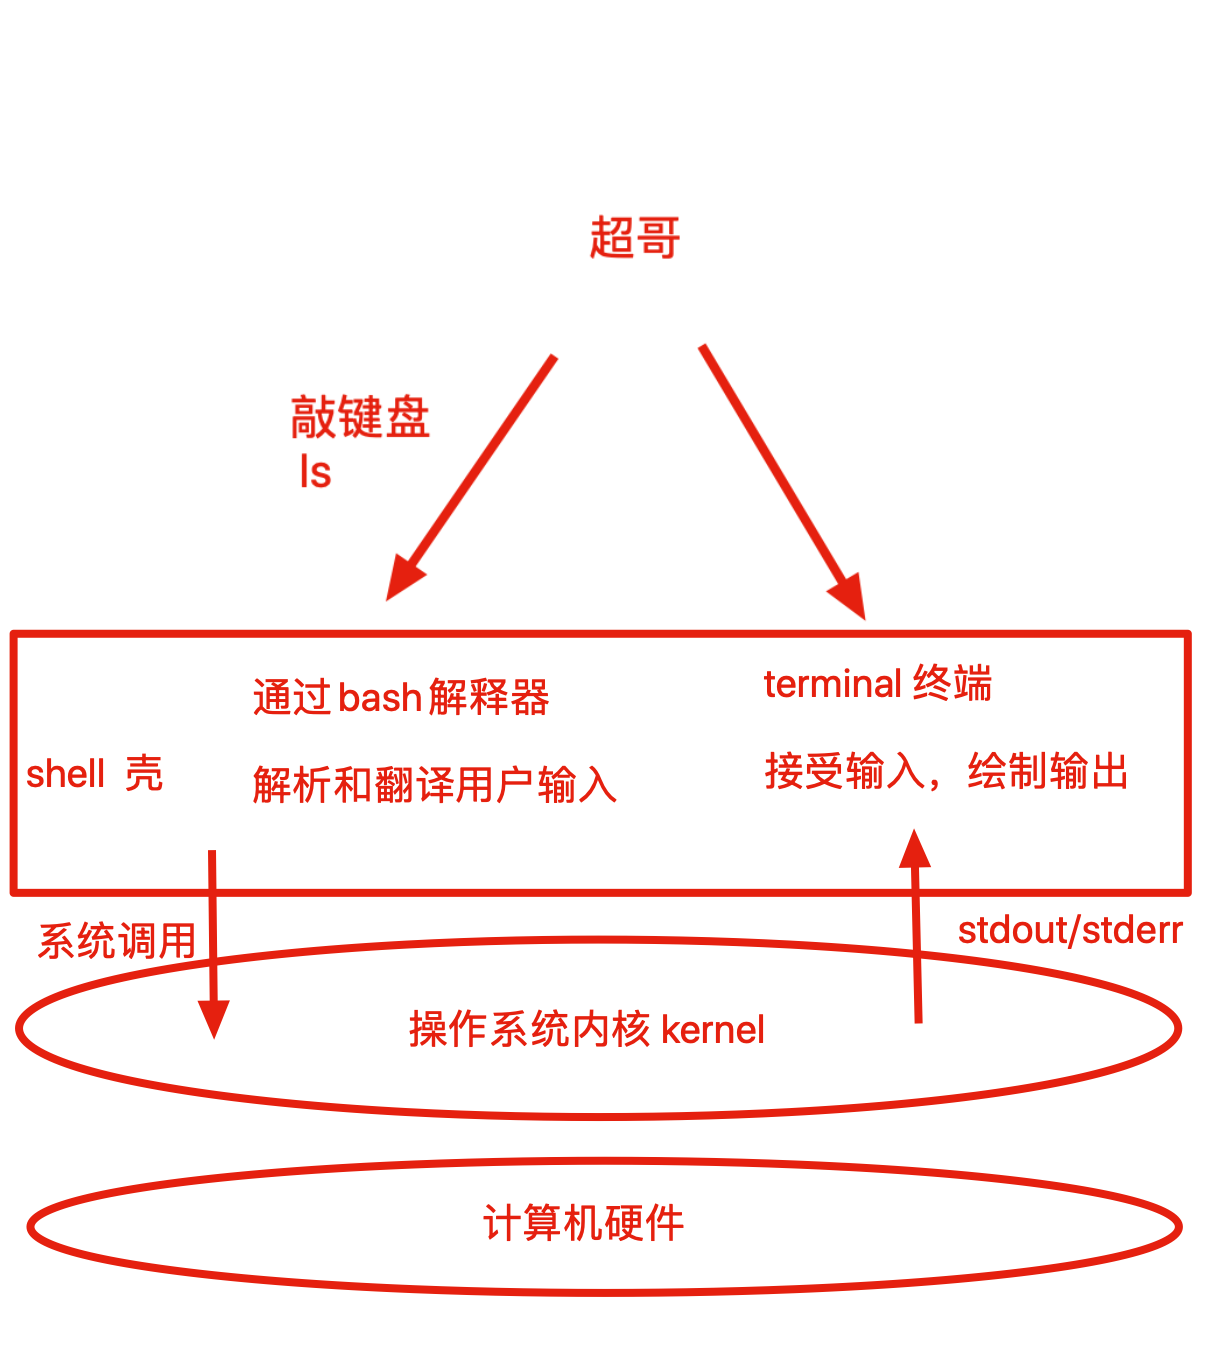
Shell是一个命令解释器,它的作用是解释执行用户输入的命令及程序等,用户输入一条命令,shell就解释执行一条,这种从键盘一输入命令,就可以立即得到回应的对话方式,被称之为交互的方式
Shell存在于操作系统的最外层,负责直接于用户的对话,把用户的输入解释给操作系统,并处理各种各样的操作系统的输出结果,输出到屏幕返回给用户,当我们输入系统用户名和密码,登陆到联系后的所有操作都是由shell解释并执行的
shell的作用是:
解释执行用户输入的命令或程序等
用户输入一条命令,shell就解释一条
键盘输入命令,Linux给予响应的当时,称之为交互式
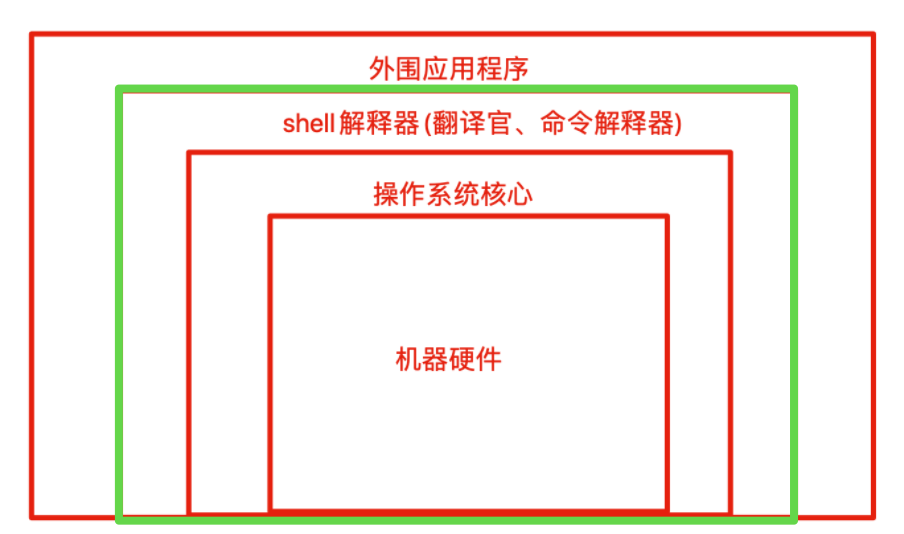
shell是一块包裹着系统核心的壳,处于操作系统的最外层,与用户直接对话,把用户的输入,解释给操作系统,然后处理操作系统的输出结果,输出到屏幕给予用户看到结果。
从我们登陆Linux,输入账号密码到进入Linux交互式界面,所有的操作,都是交给shell解释器并执行
图形化,和命令行的区别也只是
命令行操作,shell解释执行后,输出结果到黑屏命令行界面
图形化操作,shell接受点击动作,输出图案数据
shell脚本的编程规范和习惯
1.开头加脚本解释器
2.附带作者及版权信息
3.脚本扩展名为*.sh
4.脚本存放在固定的目录下
5.脚本中中文
6.成对的符号一次书写完成
7.循环格式一次性输入完成
1.2节 什么是shell脚本
当命令或者程序语句写在文件中,我们执行文件,读取其中的代码,这个程序文件就称之为shell脚本。
在shell脚本里定义多条Linux命令以及循环控制语句,然后将这些Linux命令一次性执行完毕,执行脚本文件的方式称之为,非交互式。
window中存在*.bat批量处理脚本
Linux中常用*.sh脚本文件
shell脚本规则
在Linux系统中,shell脚本或者称之为(bash shell程序)通常都是vim编辑,有Linux命令、bash shell指令、逻辑控制语句和注释信息组成
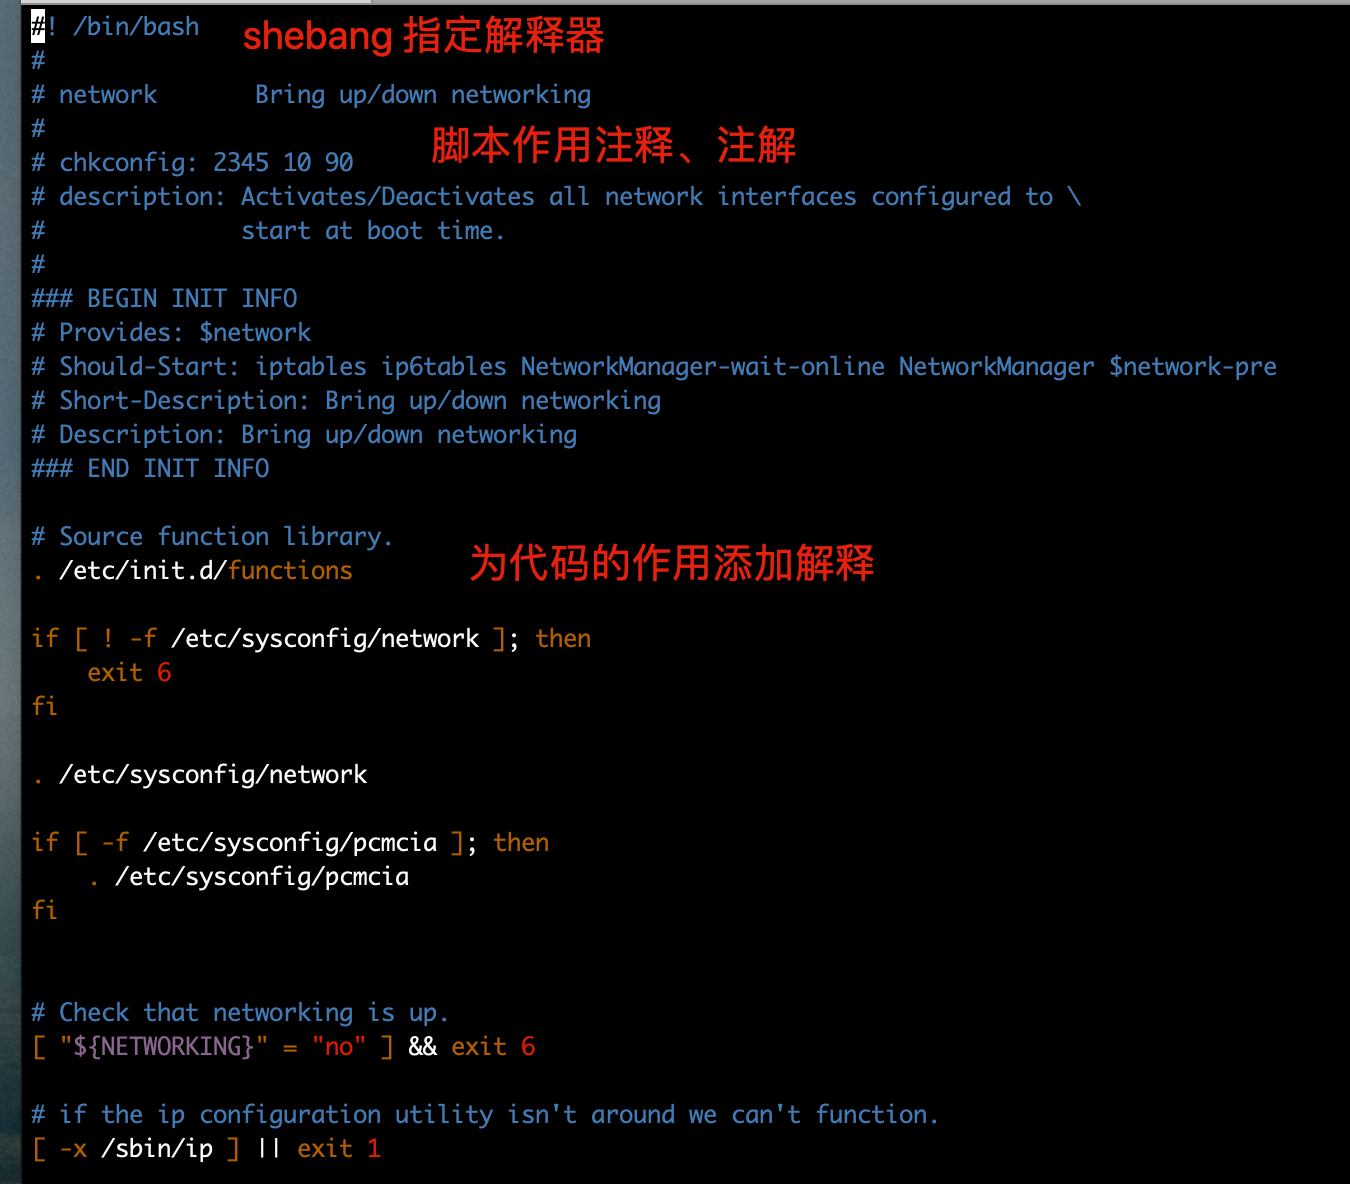
shebang的正确使用
计算机程序中,shebang指的是出现文本文件的第一行前两个字符#!
在Unix系统中,程序会分析,shebang后面的内容,作为解释器的指令,例如
以 #!/bin/sh开头的文件,程序在执行的时候会调用/bin/sh,也就是bash解释器
以#!/usr/bin/python开头的文件,代表指定Python解释器去执行
以#!/usr/bin/env解释器名称、一种在不同平台上都能正确找到解释器的办法
注意事项:
如果脚本为指定shebang,脚本执行的时候,默认用当前shell去解释脚本,即$shell
如果shebang指定了可执行的解释器,如/bin/bash /usr/bin/python,脚本在执行时,文件名参数传递给解释器
如果#!指定的解释器程序没有可执行权限,则会报错“bad interpreter: Permission denied(权限拒绝)”.
如果#!指定的解释程序不是一个可执行文件,那么指定的解释程序会被忽略,转而交给当前的SHELL去执行这个脚本
如果#!指定的解释程序不存在,那么会报错“bad interpreter:No such file or directory(没有这个文件夹或者目录)”。
#!之后的解释程序,需要写其绝对路劲(如:#!/bin/bash),它是不会自动到$PATH中寻找解释器的
如果你使用“bash test.sh”这样的命令来执行脚本,那么#!这一行将会被忽略掉,解释器当然使用命令行中的显示指定的bash**
脚本注释,脚本开发规范
在shell脚本中,#后面的内容代表注释的内容。提供给开发者或使用观看
注释可以单独写一行,也可以跟在命令后面
尽量保持爱写注释的习惯,便于以后回顾代码的含义,尽量使用英文,而非中文
#! /bin/bash# Date : 2019-11-28 14:59:18
# Author:created by chaoge   #作者
# Blog:www.cnblogs.com/pyyu
执行shell脚本的方式
bash script.sh或 sh scrite.sh,文件本身没权限执行,没x权限,则使用的方法,或者脚本未指定shebang,重点推荐的方式
使用绝对、相对路劲执行脚本,需要文件含有x权限
source script.sh或者 .script.sh,代表执行的含义,source等于点.
少见的用法,sh < script.sh
shell和运维
shell甲苯语言很适合处理纯文本类型的数据,且Linux的哲学思想就是一切皆文件,如日志,配置文件、文本、网页文件,大多数都是纯文本类型的,因此shell可以方便的进行文本处理,好比强大的Linux三剑客(grep、sed、awk)
脚本语言
shell脚本语言属于一种弱类型语言,无需生命变量类型,直接定义使用
强类型语言,必须先定义变量类型,确定是数字,字符串等,之后在赋予同类型的值
centos7系统中支持的shell情况,有如下种类
[root@localhost scripts]# cat /etc/shells
/bin/sh
/bin/bash
/sbin/nologin
/usr/bin/sh
/usr/bin/bash
/usr/sbin/nologin
默认的sh解释器
[root@localhost scripts]# ll /usr/bin/sh
lrwxrwxrwx. 1 root root 4 Dec 14 11:52 /usr/bin/sh -> bash
其他脚本语言
PHP是网页程序语言,专注于web页面开发,诸多开元产品,wordpress、discuz开源产品都是PHP开发
Perl语言,擅长支持强大的正则表达式,以及运维工具的开发
Python语言,明星语言,不仅使用脚本程序开发,也擅长web页面开发,如(系统后天,资产管理平台),爬虫程序开发,大量Linux运维工具也由Python开发,甚至有游戏开发也是用
shell的优势
虽然有诸多脚本编程语言,但是对于Linux操作系统内部应用而言,shell是最好的工具,Linux底层命令都支持shell语句,以及结合三剑客(grep、sed、awk)进行高级用法。
- 擅长系统管理脚本开发,如软件启停脚本,监控报警脚本,日志分析脚本
每个语言都有自己的擅长的地方,扬长避短,达到高效运维的目的是最合适的
#linux默认shell
[root@localhost ~]# echo $SHELL
/bin/bash
1.3节 bash特性
bash是什么
bash是一个命令处理器,运行文本窗口中,并能执行用户直接输入的命令
bash还能从文件中读取Linux命令,称之为脚本
bash支持通配符、管道、命令替换、条件判断等逻辑控制语句
bash有诸多方便的功能,有助于月人员提升高作效率
shell回话保留其中回话用户提交执行的命令
[root@shell ~]# history     #查看,历史命令记录,注意【包含文件中和内存中的历史记录】
[root@shell ~]# echo $HISTSIZE    #shell进程可保留的命令历史的条数
1000
[root@shell ~]# echo $HISTFILE     #存放历史命令的文件,用户退出登录后,持久化命令个数
/root/.bash_history#存放历史命令的文件
[root@shell ~]# ls -a ~/.bash_history
/root/.bash_history
history命令
history #命令 以及参数
-c: 清空内存中命令历史;
-r:从文件中恢复历史命令
数字  :显示最近n条命令  history  10
调用历史命令
!n  #执行历史记录中的某n条命令
!!  #执行上一次的命令,或者向上箭头
!string   #执行名字以string开头的最近一次的命令
调用上一次命令的最后一个参数
ESC .   #快捷键
!$
控制历史命令的环境变量
变量名:HISTCONTROL
ignoredups:忽略重复的命令;
ignorespace:忽略以空白字符开头的命令;
ignoreboth:以上两者同时生效;[root@shell ~]# HISTCONTROL=ignoreboth
[root@shell ~]# echo $HISTCONTROL
ignoreboth[root@shell ~]# history
bash特性汇总
- 文件路劲tab键补全
- 命令补全
- 快捷键Ctrl+a、e、u、k、l
- 统匹配符
- 命令历史
- 命令别名
- 命令行展开
1.4节 shell变量
对于计算机角度,x=1,y=2等于定义了两个变量,名字分别是x、y,且赋值了1和2
变量是暂时存储数据的地方,是一种数据标记,数据存储在内容空空间,通过调用正确的变量名字,即可取出对应的值。
shell变量
- 变量定义与赋值,注意变量与值之间不得有空格
name="李知恩"变量名
变量类型,bash默认把所有变量都认为是字符串
bash变量是肉类型,无需事先声明类型,是将声明和赋值同事进行
- 变量替换/引用
[root@shell ~]# name="李知恩"
[root@shell ~]# echo ${name}
李知恩
[root@shell ~]# name="李知恩"
[root@shell ~]# echo $name     #可以省略话括号
李知恩
变量名规则
名称定义要做到见名知意,且按照规则来。且不得引用保留关键字(help检查保留字)
只能包含数字、字母、下划线
不能以数字开头
不能用标点符号
变量严格区分大小写
有效的名变量名
name_haoge
_haoge
haoge1
haogE1
hao2_ge
无效的变量名
?haoge
hao*ge
hao+ge
- 变量的作用域
- 本地变量。只针对当前的shell进程
pstree检查进程树
[root@shell ~]# name=123
[root@shell ~]# echo $name
123
[root@shell ~]# bash
[root@shell ~]# echo $name[root@shell ~]# exit
exit
[root@shell ~]# echo $name
123
环境变量,也称之为全局变量,针对当前shell以及其任意子进程,环境变量也分自定义、内置两种环境变量
局部变量,针对在
shell函数或是shell脚本中定义位置参数变量:用于shell脚本中传递的参数
特殊变量:shell内置的特殊功效变量
$?
0 #表示成功
1-255 #表示错误码
自定义变量
变量赋值:varName=value
变量引用:${varName}、 $varName
双引用,变量名会替换为变量值
[root@chaogelinux ~]# n1=1
[root@chaogelinux ~]# n2=2
[root@chaogelinux ~]#
[root@chaogelinux ~]# n3="$n1"
[root@chaogelinux ~]# echo $n3
1
单引号识别为普通字符串
[root@chaogelinux ~]# n4='$n2'
[root@chaogelinux ~]# echo $n4
$n2
不同的执行方式,不同的shell环境
[root@chaogelinux data]# echo user1='超哥' > testsource.sh
[root@chaogelinux data]# echo $user1[root@chaogelinux data]# sh testsource.sh
[root@chaogelinux data]# echo $user1[root@chaogelinux data]# source testsource.sh
[root@chaogelinux data]# echo $user1
超哥
![]()
解答:
1.每次调用bash都会开启一个子shell,因此不保留当前的shell变量,通过pstree命令检查进程树
2.调用source是抢钱shell环境变量加载脚本,因此保留变量
shell变量面试题
如下输入什么内容
[root@chaogelinux data]# cat test.sh
user1=`whoami`
[root@chaogelinux data]# sh test.sh
[root@chaogelinux data]# echo $user1A.当前用户
B.超哥
C.空   #答案
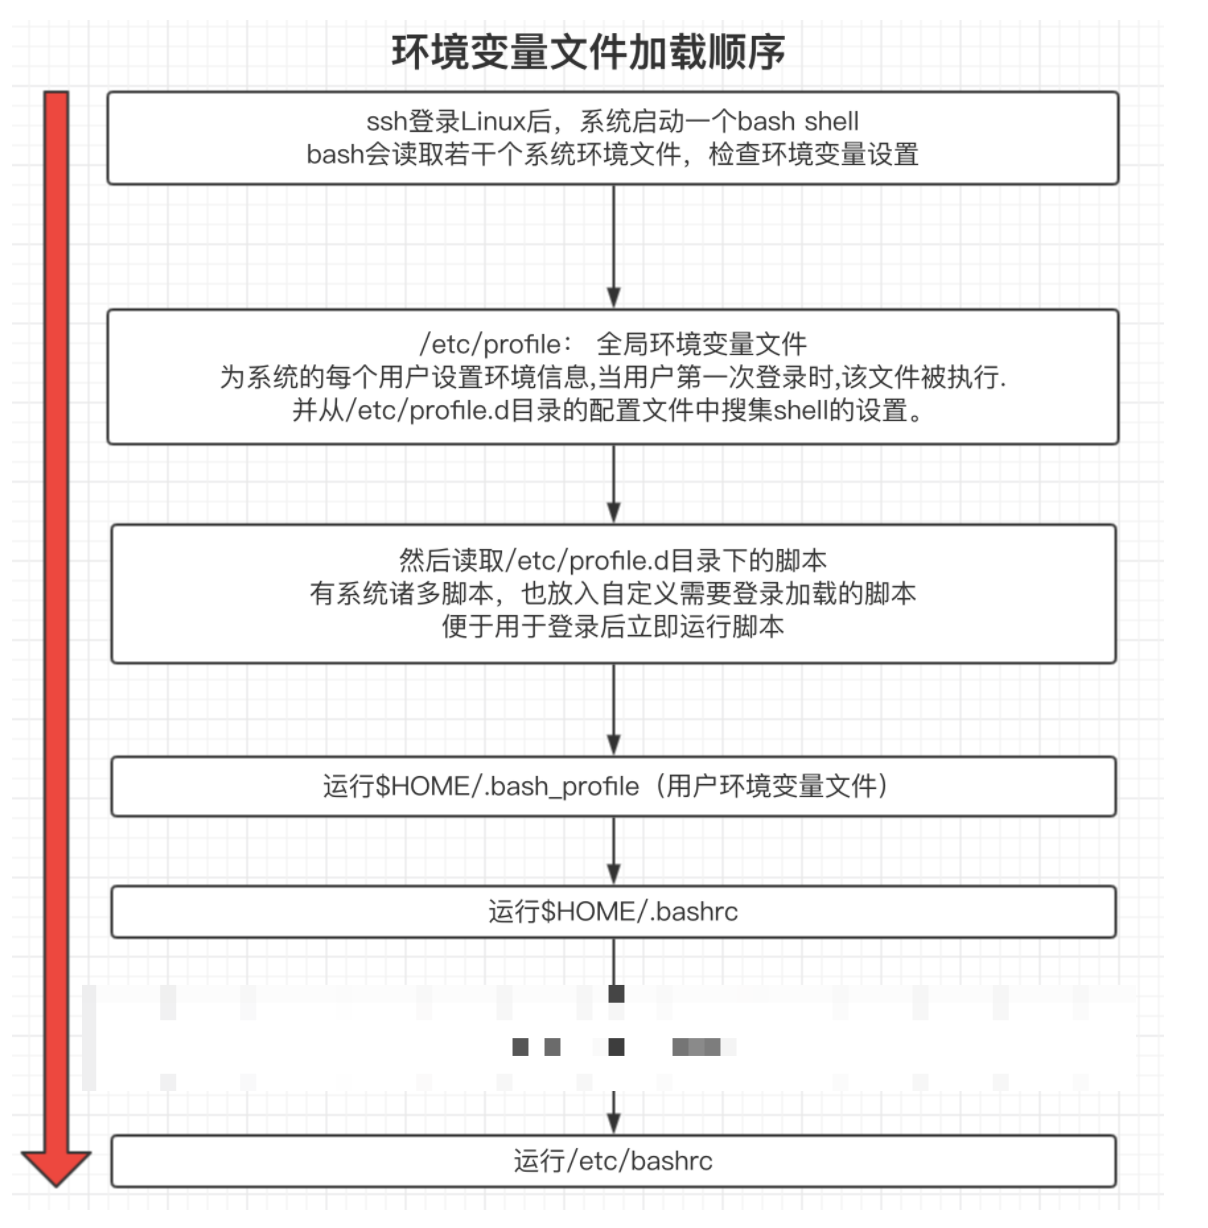
环境变量设置
环境变量一般指的是用export内置命令导出的命令,用于定义shell的运行环境、保证shell命令的正确执行。
shell通过环境变量确定登陆的用户名,PATH路劲、文件系统等各种应用。
环境变量可以在命令行中临时创建,但是用户退出shell终端,变量即丢失,如果永久生效,需要修改环境变量配置文件
用户个人配置文件
~/.bash_profile、~/.bashrc远程定了用户特有文件全局配置文件
/etc/profile、/etc/bashrc,且系统建议最好创建在/etc/profile.d,而非直接修改主文件,修改全局配置文件,影响所有登陆系统的用户
1.每个用户都有自己的环境变量配置文件,~/.bash_profile 、~/.bashrc,且2.以个人配置文件,优先加载变量,读取,以个人的优先生效
当需要给所有用户使用某个变量,写入全局即可/etc/profile
检查系统环境变量的命令
set      #set命令能够找到当前的shell环境中的所有变量,以及包括局部变量(shell脚本文件汇总定义的变量)
env      #env命令只显示全局变量
declare  #decade命令,输出所有的变量。如同set
export   #export命令显示和摄者环境变量值
**环境变量,**也称为全局变量,针对当前shell以及其任意子进程,环境变量也分自定义、内置两种环境变量。
显示环境变量
echo $变量的名字
定义环境变量
PS1、PATH、HOME、UID系统固有的、默认就表示一定意义
定义环境变量尽量大写。环境变量全局生效
撤销环境变量
unset变量名,删除变量或函数。
环境变量的文件
全局文件
/etc/profile
/etc/bashrc
用户变量文件
~/.bashr
~/.bash_profile
**局部变量,**针对在shell函数或是shell脚本中定义
变量内容
变量名=value #<==不加引号。 #解析变量或者 命令。然后输出,纯数字选择不加引号
变量名= ‘value’#<==加引号。 #所见即所得
变量名= “value” #<==加双引号。 #解析变量或者命令,然后输出,字符默认选择双引号,可以把要定义的内容作为一个整体
局部变量定义总结
针对变量名:
1.变量名的定义要有一定的命令规范,并且要见名知意 HaoGe=1,推荐使用驼峰语法
2.变量名仅能使用数字、下划线中的任意多个字符,并且要字母开头
针对变量内容:
3.在脚本汇总定义普通字符串变量,尽量吧变量的内容用双引号括起来
4.单纯数字的变量内容可以不加引号。
5.希望变量的内容原样输出需加单引号
6.希望变量值引号命令并获取的结果就用反引号或${}
针对赋值符号:
7.变量定义使用赋值符号(=),赋值符号两端不要有空格
针对变量输出:
8.使用或者输出变量的内容,可以$变量名,例如echo $OldBoy
9.若变量名(db)后面有其他字符连接的时候,就必须给变量名加上花括号{},例如:$db_t就要改成${db}_t
设置只读变量
readonly,只有shell结束,只读变量失效
#直接readonly显示当前系统只读变量
[root@shell ~]# readonly name="李知恩"
[root@shell ~]# name="李知恩"
-bash: name: readonly variable(只读变量)
系统保留环境变量关键字
bash内嵌入诸多环境变量,用于定义bash的工作环境
[root@shell ~]# export|awk -F '[ :=]' '{print $3}'
bash多命令执行
[root@shell etc]# ls /opt/;cd /tmp/;cd /etc/;cd /server/scripts/
环境变量初始化与加载变量
1.5节 shell特殊参数变量
shell变量
局部变量
定义shell变量,变量名不需要加美元符$,本地变量只在当前shell生存期中有效,如
![]()
变量定义
变量名要求:字母、数字、下划线组成、可以是字母或是下划线开头,如
haoge
hao_ge123
_hao_ge123
变量严格区分大小写
Hao_ge
hao_ge
1.赋值不加引号
story_three=大师兄,快来救我
2.赋值单引号
story_two='大师兄,三师弟被妖怪抓走了'
3.赋值双引号
story_one="大师兄,师傅被妖怪抓走了"
取出变量值
单引号所见即所得,强引用
双引号,输出引号所有内容,识别特殊符号,弱引用
无引号,连续的符号可以不加引号,有空格则歧义最好使用双引号
反引号,引号命令执行结果,等于$()用法
特殊变量
shell的特殊变量,用在如脚本,函数传递参数使用,有如下特殊的,位置参数变量
$0        获取shell脚本文件名,以及脚本路径
$n        获取shell脚本的第n个参数,n在1~9之间,如$1 ,$2, $9 ,大于9则需要写,${10},参数空格隔开
$#        获取执行的shell脚本后面的参数总个数
$*        获取shell脚本所有参数,不加引号等同于$@作用,加上引号"$*"作用是 接收所有参数为单个字符串,"$1 $2.."
$@        不加引号,效果同上,加引号,是接收所有参数为独立字符串,如"$1" "$2"  "$3" ...,空格保留
面试题
$*和 $@区别
$*和$@都表示传递给函数或脚本的所有参数
当$*和$@不被双引号""包围时,它们之间没有任何区别,都是将收到的每个参数看做一份数据,彼此之间可以空格来分隔离。
但是当它们被双引号""包含时,就有区别了:
"$*"会被所有的参数从整体上看做一份数据,而不是每个参数都看做一份数据。
"$@"仍然将每个参数都看作一份参数,彼此之间是独立的
比如传递了5个参数,那么对于"$*"来说,这5各参数会合并到一起形成一份数据,它们之间是无法分割的:而对"$@",这5个参数是相互独立的,它们是5分数据
如果使用echo直接输出"$*"和"$@"做对比,是看不出区别的:但是使用for循环来逐个输出数据,立即就能看出区别来
实践面试题区别
[root@shell scripts]# cat different.sh
#!/bin/bash
##############################################################
# File Name: different.sh
# Version: V1.0
# Author: daihao
# Organization:
# Created Time : 2021-03-25 21:04:25
# Description:
##############################################################
echo "print each param from \"\$*\""
for var in "$*"
doecho "$var"
done
echo "print each param from \"\$@\""
for var in "$@"
doecho "$var"
done
执行如上脚本
root@shell scripts]# sh different.sh  1 2 3 4 5
print each param from "$*"
1 2 3 4 5
print each param from "$@"
1
2
3
4
5
特殊状态变量
$? 上一次命令执行状态返回值,0正确,非0失败
$$  当前shell脚本的进程号
$! 上一次后台进程的PID
$_ 取得上一次命令传入的最后参数
查找方式 man bash   搜索Special Parameters
脚本控制返回值实践
[root@shell scripts]# cat test1.sh
#!/bin/bash
##############################################################
# File Name: test1.sh
# Version: V1.0
# Author: daihao
# Organization:
# Created Time : 2021-03-25 21:26:29
# Description:
##############################################################
#  $#过去参数个数, -ne不等于的情况&&并且
[ $# -ne 2 ] && {echo "must be two args"exit 119 #终止程序运行,且防御119状态码,提供给当前shell的$?变量若是在函数里可以return 119用法
}
echo ok
执行如上脚本
[root@shell scripts]# sh test1.sh 1 2 3
must be two args
[root@shell scripts]# echo $?
119
[root@shell scripts]# sh test1.sh 1 2
ok
[root@shell scripts]# echo $?
0
获取上一次后台执行的程序,PID,$!获取
[root@shell scripts]# nohup ping baidu.com & 1> /dev/null
[2] 2815
[root@shell scripts]# nohup: ignoring input and appending output to ‘nohup.out’[root@shell scripts]# ps -ef|grep ping
root       2813   2710  0 21:42 pts/2    00:00:00 ping baidu.com
root       2815   2710  0 21:42 pts/2    00:00:00 ping baidu.com
root       2817   2710  0 21:42 pts/2    00:00:00 grep --color=auto ping
[root@shell scripts]#
[root@shell scripts]# echo $!
2815
$$ 获取当前脚本的pid
[root@shell scripts]# cat test1.sh
#!/bin/bash
##############################################################
# File Name: test1.sh
# Version: V1.0
# Author: daihao
# Organization:
# Created Time : 2021-03-25 21:26:29
# Description:
##############################################################
#  $#过去参数个数, -ne不等于的情况&&并且
[ $# -ne 2 ] && {echo "must be two args"exit 119 #终止程序运行,且防御119状态码,提供给当前shell的$?变量若是在函数里可以return 119用法
}
echo ok
echo "打印当前脚本的变量$$"[root@shell scripts]# sh test1.sh 1 2
ok
打印当前脚本的变量2839
$_ 获取上次命令的最后一个参数
[root@shell scripts]# sh test1.sh 1 2
ok
打印当前脚本的变量2839
[root@shell scripts]# echo $_
2
1.6节 bash shell内置变量命令
bash本身提供的一些内置命令
echo命令 用于在shell中打印shell变量的值,或者直接输出指定的字符串。linux的echo命令,在shell编程中极为常用, 在终端下打印变量value的时候也是常常用到的,因此有必要了解下echo的用法echo命令的功能是在显示器上显示一段文字,一般起到一个提示的作用。语法
echo(选项)(参数)
选项
-e:激活转义字符。
使用-e选项时,若字符串中出现以下字符,则特别加以处理,而不会将它当成一般文字输出:\a 发出警告声;
\b 删除前一个字符;
\c 不产生进一步输出 (\c 后面的字符不会输出);
\f 换行但光标仍旧停留在原来的位置;
\n 换行且光标移至行首;
\r 光标移至行首,但不换行;
\t 插入tab;
\v 与\f相同;
\\ 插入\字符;
\nnn 插入 nnn(八进制)所代表的ASCII字符;
案例
[root@shell ~]# echo "李知恩";echo "好美"
李知恩
好美
[root@shell ~]# echo -n "李知恩";echo "好美"
李知恩好美
[root@shell ~]# echo -n "李知恩";echo -n "好美"
李知恩好美[root@shell ~]#
[root@shell ~]# echo -e "李知恩\n好美"
李知恩
好美#打印命令,printf
[root@shell ~]# printf "hello\t李知恩\t你好漂亮\n"
hello   李知恩 你好漂亮
eval执行多个命令
[root@shell ~]# eval ls;cd /tmp/
anaconda-ks.cfg
[root@shell tmp]#
exec命令
exec命令 用于调用并执行指令的命令。exec命令通常用在shell脚本程序中,可以调用其他的命令。如果在当前终端中使用命令,则当指定的命令执行完毕后会立即退出终端。
[daihao@shell ~]$ exec date
Thu Mar 25 22:45:01 +08 2021
[root@shell ~]#
export命令
为shell变量或函数设置导出属性。
概要
export [-fn] [name[=word]]...
export -p
主要用途
定义一到多个变量并设置导出属性。
修改一到多个变量的值并设置导出属性。
删除一到多个变量的导出属性。
显示全部拥有导出属性的变量。
为一到多个已定义函数新增导出属性。
删除一到多个函数的导出属性。
显示全部拥有导出属性的函数。
选项
-f:指向函数。
-n:删除变量的导出属性。
-p:显示全部拥有导出属性的变量。
-pf:显示全部拥有导出属性的函数。
-nf:删除函数的导出属性。
--:在它之后的选项无效。
参数
name(可选):变量名或已定义函数名。value(可选):变量的值。返回值
export返回true除非你提供了非法选项或非法名称。例子
# 显示全部拥有导出属性的变量。
# export -p
# export
# 显示全部拥有导出属性的函数。
# export -pf
read命令
read
从键盘读取变量值补充说明
read命令 从键盘读取变量的值,通常用在shell脚本中与用户进行交互的场合。该命令可以一次读取多个变量的值,变量和输入的值都需要使用空格隔开。在read命令后面,如果没有指定变量名,读取的数据将被自动赋值给特定的变量REPLY语法
read(选项)(参数)
选项
-p:指定读取值时的提示符;
-t:指定读取值时等待的时间(秒)。
参数
变量:指定读取值的变量名。
shift命令
shift
移动位置参数。概要
shift [n]
主要用途
将位置参数$n, $n+1...重命名为$1, $2...。
参数
n(可选):大于等于1且小于等于参数个数的整数,默认为1。返回值
返回成功除非n大于参数个数或n小于1以及其他非法值。
1.7节 变量子串的语法介绍
shell子串
${变量}                          #返回变量值
${#变量}                         #返回变量长度,字符长度
${变量:start}                    #返回变量start数值之后的字符,且包含start的数字
${变量:start:length}             #提取start之后的length限制的字符 例如:$name{:4:1}
${变量#word}                     #从变量开头删除最短匹配的word子串
${变量##word}                    #从变量开头,删除最长匹配的word
${变量%word}                     #从变量结尾删除最短的word
${变量%%word}                    #从变量结尾开始删除最长匹配的word#替换
${变量/pattern/string}           #用string代替第一个匹配的pattern
${变量//pattern/string}          #用string代替所有的pattern
shell截取字符串通常有两种方式:从指定位置开始截取和从指定字符(子字符串)开始截取。
这种方式要有两个参数:除了指定起始位置,还需要截取长度,不能最终确定要街企业的字符串。
既然需要指定起始位置,shell同时支持两种计数方式
1.从字符串左边开始计算
如果想要子串的左边开始计算,那么截取字符串的具体格式如下:
${变量:start:length}其中,string是要截取的字符串,start是起始位置(从左边开始,从0开始计算),length还要截取的长度(省略号的话表示直到字符串的末尾)
子串的实际案例
[root@shell ~]# echo $name[root@shell ~]# name="xiaohaoge"
[root@shell ~]# echo $name
xiaohaoge
#统计字符长度
[root@shell ~]# echo ${#name}
9
#截取字符串
[root@shell ~]# echo ${name:3}
ohaoge
[root@shell ~]# echo ${name:5:2}
ao
#设置起点,以及元素长度
[root@shell ~]# echo ${name:4:2}
ha
统计变量长度的方法
[root@shell scripts]# echo $name
xiaohaoge
[root@shell scripts]# echo $name |wc -L                             #计算字符串长度
9
[root@shell scripts]# expr length "$name"                          #expr的length函数计算长度
9
[root@shell scripts]# echo "$name" |awk '{print length($0)}'       #用awk的length函数
9
#最快的方式
[root@shell scripts]# echo ${#name}
9
字符长度计算速度比较
time命令、统计命令执行时长
for循环的shell编程知识
语法
for number in {1..100}
doecho $number
done
#写在一行的方法
for num in {1..100};do echo $num;done
#综合time命令 ${#变量} 计算时间是11s ,最快方式
[root@shell ~]# time for n in {1..10000};do char=`seq -s "xiaohaoge" 100`;echo ${#char} &>/dev/null;donereal 0m11.983s #实践运行的时间
user 0m4.015s #用户态执行的时间
sys 0m8.580s #内核态执行的时间
#计算速度很慢,管道符和wc -L
[root@shell ~]# time for n in {1..10000};do char=`seq -s "xiaohaoge" 100`;echo ${char}|wc -L &>/dev/null;donereal 0m24.116s
user 0m12.052s
sys 0m21.692s
#expr的length函数计算长度
[root@shell ~]# time for n in {1..10000};do char=`seq -s "xiaohaoge" 100`;expr length "${char}" &>/dev/null;donereal 0m24.322s
user 0m8.110s
sys 0m18.617s
#awk再次加工,最慢
[root@shell ~]# time for n in {1..10000};do char=`seq -s "xiaohaoge" 100`;echo "${char}"|awk '{print length($0)}' &>/dev/null;donereal 0m27.039s
user 0m12.482s
sys 0m27.254s
总结:shell编程,尽量使用Linux内置的命令,内置的操作,,和内置的函数,效率最高C语言开发,效率最高,尽可能功能的减少管道符的操作
截取字符串
案例实践
${变量:start:length}             #提取start之后的length限制的字符 例如:$name{:4:1}
root@shell ~]# name="I am xiaohaoge"
[root@shell ~]# echo $name
I am xiaohaoge
[root@shell ~]# echo ${name:2:2}
am
[root@shell ~]# echo ${name:5:4}
xiao
#指定字符内容截取
${变量#word}                     #从变量开头删除最短匹配的word子串
a*c               #匹配开头为a,中间任意个字符,结尾为c的字符串
#从开头匹配字符删除
[root@shell ~]# name2="abcABC123ABCabc"
[root@shell ~]#
[root@shell ~]#
[root@shell ~]# echo ${name2#a*c}    #从开头删除最短的a*c
ABC123ABCabc${变量##word}                    #从变量开头,删除最长匹配的word
[root@shell ~]# echo ${name2##a*c}   #删除最长的[root@shell ~]#
${变量%word} #从变量结尾删除最短的word
${变量%%word} #从变量结尾开始删除最长匹配的word
#利用%形式,从后巷前匹配截取
[root@shell ~]# name2="abcABC123ABCabc"
[root@shell ~]# echo ${name2%a*c}
abcABC123ABC
[root@shell ~]# echo ${name2%%a*c}[root@shell ~]#
替换字符串
${变量/pattern/string} #用string代替第一个匹配的pattern
${变量//pattern/string} #用string代替所有的pattern
[root@shell ~]# str1="Hello,man I am your brother"
[root@shell ~]# echo $str1
Hello,man I am your brother[root@shell ~]# echo ${str1/man/boy}
Hello,boy I am your brother[root@shell ~]# echo $str1
Hello,man I am your brother
[root@shell ~]# echo ${str1//o/O}
HellO,man I am yOur brOther
删除文件的案例
准备测试数据
[root@shell tmp]# touch chaochao_{1..5}_finished.jpg
[root@shell tmp]# touch chaochao_{1..5}_finished.png
[root@shell tmp]# ls -l
total 4
-rw-r--r-- 1 root root   0 Mar 26 10:29 chaochao_1_finished.jpg
-rw-r--r-- 1 root root   0 Mar 26 10:29 chaochao_1_finished.png
-rw-r--r-- 1 root root   0 Mar 26 10:29 chaochao_2_finished.jpg
-rw-r--r-- 1 root root   0 Mar 26 10:29 chaochao_2_finished.png
-rw-r--r-- 1 root root   0 Mar 26 10:29 chaochao_3_finished.jpg
-rw-r--r-- 1 root root   0 Mar 26 10:29 chaochao_3_finished.png
-rw-r--r-- 1 root root   0 Mar 26 10:29 chaochao_4_finished.jpg
-rw-r--r-- 1 root root   0 Mar 26 10:29 chaochao_4_finished.png
-rw-r--r-- 1 root root   0 Mar 26 10:29 chaochao_5_finished.jpg
-rw-r--r-- 1 root root   0 Mar 26 10:29 chaochao_5_finished.png
1.去掉所有文件的_finisjed字符信息去掉
思路
1.单个文件去掉这个字符
[root@shell tmp]# mv chaochao_1_finished.jpg  chaochao_1_.jpg
[root@shell tmp]# ll
total 0
-rw-r--r-- 1 root root 0 Mar 26 10:29 chaochao_1_.jpg2.利用变量的子串功能,去掉后缀字符信息
[root@shell tmp]# f=chaochao_1_finished.png
[root@shell tmp]# echo $f
chaochao_1_finished.png
[root@shell tmp]# echo ${f//_finished/}
chaochao_1.png3.利用变量的反引号的功能,修改文件名
[root@shell tmp]# mv $f `echo ${f//_finished/}`
[root@shell tmp]# ll
total 0
-rw-r--r-- 1 root root 0 Mar 26 10:29 chaochao_1_.jpg
-rw-r--r-- 1 root root 0 Mar 26 10:29 chaochao_1.png
-rw-r--r-- 1 root root 0 Mar 26 10:29 chaochao_2_finished.jpg
-rw-r--r-- 1 root root 0 Mar 26 10:29 chaochao_2_finished.png
-rw-r--r-- 1 root root 0 Mar 26 10:29 chaochao_3_finished.jpg
-rw-r--r-- 1 root root 0 Mar 26 10:29 chaochao_3_finished.png
-rw-r--r-- 1 root root 0 Mar 26 10:29 chaochao_4_finished.jpg
-rw-r--r-- 1 root root 0 Mar 26 10:29 chaochao_4_finished.png
-rw-r--r-- 1 root root 0 Mar 26 10:29 chaochao_5_finished.jpg
-rw-r--r-- 1 root root 0 Mar 26 10:29 chaochao_5_finished.png4.批量文件名替换,去掉剩下所有的jpg文件的_finished字符,只修改所有的jpg文件
[root@shell tmp]# ls *fin*.jpg
chaochao_2_finished.jpg  chaochao_3_finished.jpg  chaochao_4_finished.jpg  chaochao_5_finished.jpg
[root@shell tmp]# for file_name in `ls *fin*jpg`;do echo $file_name;done
chaochao_2_finished.jpg
chaochao_3_finished.jpg
chaochao_4_finished.jpg
chaochao_5_finished.jpg
[root@shell tmp]# for file_name in `ls *fin*jpg`;do mv $file_name `echo ${file_name//_finished/}` ;done
[root@shell tmp]# ls *.jpg
chaochao_1_.jpg  chaochao_2.jpg  chaochao_3.jpg  chaochao_4.jpg  chaochao_5.jpg5.批量文件名替换。去掉剩下所有的png文件的_finished字符,只修改所有的png文件
[root@shell tmp]# for file_name in `ls *fin*.png`;do mv $file_name `echo ${file_name//_finished/}` ;done
[root@shell tmp]# ls *png
chaochao_1.png  chaochao_2.png  chaochao_3.png  chaochao_4.png  chaochao_5.png
shell特殊变量扩展知识
这四个扩展名变量,属于对变量的值进行判断、处理
如果parameter变量为空,返回word字符串,赋值给result变量
result=${parameter:-word}如果para变量为空,则word替代变量值,且返回其值
${parameter:=word}如果para变量为空,word当做stderr输出,否则输出变量值
用于设置变量为空导致错误是,返回的错误信息
${parameter:?word}如果para变量为空,什么都不做,否则word返回
${parameter:+word}
案例实践
:- 判断变量如果为空,就返回后面的字符信息,可以通过result变量去接收
#当haoge变量为空的时候。
[root@shell tmp]# echo $haoge[root@shell tmp]# result=${haoge:-hahaha}
[root@shell tmp]# echo $haoge[root@shell tmp]#  echo $reult[root@shell tmp]#  echo $result
hahaha
#当变量$haoge为空的时候,就把hahaha内容赋值给result,不是赋值给$haoge#如果变量不为空
[root@shell tmp]# haoge=180w
[root@shell tmp]# result2=${haoge:-hahaha}
[root@shell tmp]# echo $haoge
180w
[root@shell tmp]#  echo $result2
180w
:= 如果变量为空,后面的值,赋值给接受者,以及变量本身
#变量值不存在的情况
[root@shell tmp]# result=${haoge:=apple}
[root@shell tmp]# echo $result;echo $haoge
apple
apple
#变量haoge为空,变量apple肯定赋值给result,变量apple赋值给haoge#变量有值的情况
[root@shell tmp]# res=${haoge:=xixihaha}
[root@shell tmp]# echo $res;echo $haoge
apple
apple
:? 当变量为空的时候,主动抛出的错误信息
root@shell tmp]# echo ${new_name}[root@shell tmp]# echo ${new_name:?}
-bash: new_name: parameter null or not set
[root@shell tmp]# echo ${new_name:?该变量值为空}
-bash: new_name: 该变量值为空#当变量有值时,则直接赋值给变量
[root@shell tmp]# new_name="xiaolaodi"
[root@shell tmp]# echo ${new_name:?该变量值为空}
xiaolaodi
:+ 当变量为空时,什么事都不做,否则字符返回给接收者
[root@shell ~]# echo $result[root@shell ~]# echo ${result:+wahaha}[root@shell ~]#
#当变量为空时,则啥都不做,如果变量不为空时,那后面的变量则覆盖前面的变量有值的时候
[root@shell ~]# result=xixihaha
[root@shell ~]# echo ${result:+chaogenb}
chaogenb
[root@shell ~]# echo  ${result:+超哥nb}
超哥nb
[root@shell ~]# res=${result:+超哥nb}
[root@shell ~]# echo $res
超哥nb
实际应用
数据备份,删除过期数据的脚本
#删除/tmp 7天以上的过期数据
find  /tmp -name -type -mite +7|xargs rm -f
#参数解释
find xargs #搜索,且删除
find #需要搜索的目录
-name #需要搜索的文化名字
-type  #文件类型
-mtime +7   #超过七天的的文件cat del_date.sh
find ${dir_path:=/date/mysql_back_date/} -name '*.tar.gz' -type f -mtime +7|xargs rm -f
1.8节 父子shell
1.source和点,执行脚本,只在当前的shell环境中执行生效
2.指定bash 、sh解释器运行脚本,是开启subshell,开启shell运行脚本命令
3…/script,都会指定shebang,通过解释器运行,也是开启subshell运行命令
父shell的概念
pstree看到如下结果,就是父shell环境
pstree
├─sshd─┬─sshd───bash───pstree        │
ps进程管理命令,查看
ps -ef
-f   #显示UID、PID、PPID
-e   #列出所有进程的信息,如同-A选项option#通过命令形式,检查父子shell的关系
ps -ef --forest
![]()
子shell的具体概念
![]()
多个子shell
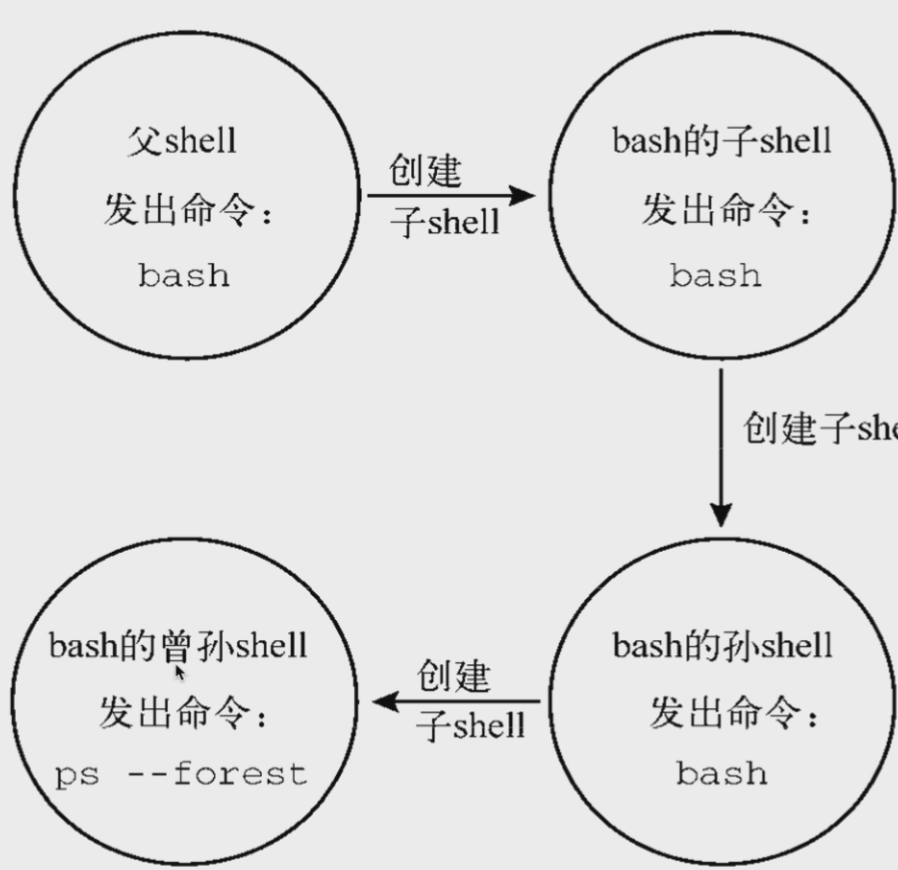
只要输入exit,就能够退出shell环境了
创建进程列表(创建子shell执行命令)
shell的进程列表理念,需要使用()小括号,如下执行方式,就称之为进程列表
加上小括号,就是开启子shell运行命令
[root@shell ~]# (cd ~;pwd;ls;cd /tmp/;pwd;ls)
检查是否在shell环境中
linux默认有关shell的变量
#该变量的值特点,如果是0,就是在当前shell环境中执行的,否则就是开辟子shell去运行的
BAHS_SUBSHELL
[root@shell ~]# echo $BASH_SUBSHELL
0
#检查是否开启子shell运行命令
[root@shell tmp]# cd ~;pwd;ls;cd /opt/;pwd;ls;echo $BASH_SUBSHELL
/root
anaconda-ks.cfg
/opt
0
明确开启子shell运行的命令
进程列表,并且开启子shell运行
[root@shell opt]# (cd ~;pwd;ls;cd /opt/;pwd;ls;echo $BASH_SUBSHELL)
/root
anaconda-ks.cfg
/opt
1
子shell嵌套运行
刚才是一个小括号开启一个shell运行命令
利用括号,开启子shelll的理念,以及检查,在shell脚本中开发中,经常会用到子shell进行多进程的出出力,提高程序并发执行效率
[root@shell opt]# (pwd;echo $BASH_SUBSHELL)
/opt
1
[root@shell opt]# (pwd;(echo $BASH_SUBSHELL))
/opt
2
[root@shell opt]# (pwd;(pwd;(echo $BASH_SUBSHELL)))
/opt
/opt
3
1.9节 内置命令、外置命令
什么是内置命令,什么是外置命令?
内置命令:在 系统启动时就加载内容,常驻内存,执行效率更高,但是占用资源cd
外置命令:系统需要从硬盘中读取程序文件,在读入内存中加载
外置命令:也称之为 ,自己单独下载的文件系统命令
,处于bash shell之外 的程序
/bin
/usr/bin
/sbin
/usr/sbin
[root@shell ~]# which cd
/usr/bin/cd
比如ps命令
通过Linux的type命令,验证是否有内置,外置名命令
[root@shell ~]# type ps
ps is /usr/bin/ps
外置命令的特点内饰:一定会开启子进程执行
[root@shell ~]# ps -f --forest
UID         PID   PPID  C STIME TTY          TIME CMD
root     107008 107006  0 14:28 pts/1    00:00:00 -bash
root     107076 107008  0 15:10 pts/1    00:00:00  \_ ps -f --forest
![]()
内置命令
内置命令不会产生子进程去执行
内置命令和shell视为一体的,是shell的一部分不需要单独全区读取某个文件,系统弄启动后,就执行在内存中了
#查看Linux的内置shell命令
root@shell ~]# compgen -b
用type命令验证即可
[root@shell ~]# type cd
cd is a shell builtin
第2章 shell脚本开发与数值计算
2.1节 shell数值计算
| 算术运算符 | 意义(*表示常用) |
|---|---|
| +、- | 加法(或者正号)、减法(或负号) |
| *、/、% | 乘法、除法、取余(取模) |
| ** | 幂运算 |
| ++、– | 增加及减少、可前置也可放在变量结尾,默认步长为1 |
| !、&&、|| | 逻辑非(取反)、逻辑与(and)、逻辑或(or) |
| < 、<=、 >、>= | 比较符号(小于、小于等于、大于、大于等于) |
| == 、!= 、= | 比较符号(相等、不相等,对等号,对于字符串 “=”也可以表示相当) |
| <<、>> | 向左移位、向右移位 |
| ~ 、|、 &、 ^ | 按位取反、按位异或、按位与、按位或 |
| = 、+= 、-= 、*= 、/= 、$= | 复制运算符,例如a+1相当a=a+1相当a=a-1 |
bash编程常见运算命令汇总
| 运算操作符与运算命令 | 意义(*为推荐) |
|---|---|
| (()) | 用于整数运算的常见运算符,效率很高 |
| let | 用于整数运算,类似(()) |
| expr | 可用于整数运算,但还有很多其它的额外功能 |
| bc | Linx下的计算机程序(适合整数以及小数运算) |
| $[] | 用于整数运算 |
| awk | awk即可用于整数运算,也可以用于小数运算 |
| declare | 定义变量和属性,-i参数可以用于定义整形变量,做运算 |
案例实践
\1. (())实践 推荐
#有关逻辑运算,真、假的区别真为1,假为0
[root@shell scripts]# echo $((8>7))
1
[root@shell scripts]# echo $((6>7))
0#逻辑与的用法&&
[root@shell scripts]# echo $((6>7&&3>4))
0
[root@shell scripts]# echo $((8>7&&3>4))
0
[root@shell scripts]# echo $((6>7&&3>2))
0
# &&符号两边都为真,结果才能为真,值才为1,否则都是0
[root@shell scripts]# echo $((8>7&&3>2))
1#加减乘除
[root@shell scripts]# echo $((3+4))
7
[root@shell scripts]# echo $((5-6))
-1
[root@shell scripts]# echo $((5*6))
30
[root@shell scripts]# echo $((12/6))
2
[root@shell scripts]# echo $((10/6))    #除法去商
1
[root@shell scripts]# echo $((5**2))
25
[root@shell scripts]# echo $((7%4))    #取模,取得余数
3#结合变量计算
[root@shell ~]#  num=5
[root@shell ~]# echo $num
5
[root@shell ~]# ((num=num*3))
[root@shell ~]# echo $num
15
[root@shell ~]# echo $((num=num*3))
45#定义在括号内变量(())计算
[root@shell ~]# ((a=2+2**3-4%3))
[root@shell ~]# echo $a
9
#写法2,必须添加美元符$,否则报错
[root@shell ~]# a=$((2+2**3-4%3))
[root@shell ~]# echo $a
9
方法三、
[root@shell ~]# ((2+2**3-4%3))
[root@shell ~]# echo $((2+2**3-4%3))
9
特殊符号运算
++  #变量+1
--  #变量-1
++a #先计算+1,然后再赋值给a
a++ #先对变量a操作,再进行+1
[root@shell ~]# a=5
[root@shell ~]# echo $((++a))
6
[root@shell ~]# echo $a
6
[root@shell ~]# echo $((a++))
6
[root@shell ~]# echo $a
7
脚本开发,复杂的对用户输入判断的脚本开发
脚本开发思路
1.想好脚本的功能,作用,以及需求
2.转换为shell代码
开发一个,接受用户输入的数字,且对运算符号判断,最终得出结果,的一个计算脚本
1.接受用户输入
2.对用户输入的是不是数字进行判断
3.对输入的运算符号进行判断
4.最终进行结果计算,输入打印
[root@shell scripts]# cat  calculation.sh
#!/bin/bash
##############################################################
# File Name: calculation.sh
# Version: V1.0
# Author:
# Organization:
# Created Time : 2021-03-26 20:34:57
# Description:
##############################################################
#函数的作用,就是把你写的功能代码,进行打包,封装成一个函数名,然后调用该函数名,函数就会执行
#函数体中的代码就会被执行#这个函数作用是,告诉用户,你到底应该输入什么的一个简单提示函数而已
print_usage(){printf "Please enter an integer\n"#给脚本的执行结果,赋予一个状态码,退出码exit 1
}
#接受用户输入的命令,-p参数后面写,给用户看到的提示信息
#read -p "提示信息"  接收用户输入的变量
#123123
#qwe123
read -p "Please input your number:"  firstnum#进行对用户输入判断if语句
#注意判断语法格式!!!
#限制用户必须输入纯数字
#中括号[]里面前后必须有一个空格,是固定的语法
# -n参数是if的语句,对字符串判断,如果字符串为空,条件就不成立,如果字符串不为空,条件成立
#qwe123
#sed的作用就是把上述字符串,“qwe123” 进行替换,把所有的数字都替换为空。那么就不剩下其他非数字的内容了
#如果用户输入的是纯数字,123456
if [ -n "`echo $firstnum|sed 's/[0-9]//g'`" ]
thenprint_usage
fi
#上面的代码都是对用户输入进行判断#此时对运算符进行输入
read -p "Please input your operator:" operator
#对运算符号进行判断
#限制在 + - * / 四个符号
if [ "${operator}" != "+" ] && [ "${operator}" != "-" ] && [ "${operator}" != "*" ] && [ "${operator}" != "/" ]
thenecho "只允许输入 +|-|*|/"exit 2
fi#对第二个变量进行处理
read -p "Please input second number:" secondnumif [ -n "`echo $secondnum|sed 's/[0-9]//g'`" ]
thenprint_usage
fi
#最后进行数值计算,利用双小括号计算
echo "${firstnum}${operator}${secondnum}结果是: $((${firstnum}${operator}${secondnum}))"
执行结果
[root@shell scripts]# sh calculation.sh
Please input your number:123
Please input your operator:+
Please input second number:12
123+12结果是: 135
无注释版本
[root@shell scripts]# cat calculation1.sh
#!/bin/bash
##############################################################
# File Name: calculation1.sh
# Version: V1.0
# Author:
# Organization:
# Created Time : 2021-03-27 09:51:01
# Description:
##############################################################
print_usage(){printf "Please enter an integer!!!\n"exit 1
}
read -p "Please input your number:" firstnum
if [ -n "`echo $firstnum|sed 's/[0-9]//g'`" ]
thenprint_usage
fi
read -p "Please input your operator:" operator
if [ "${operator}" != "+" ] && [ "${operator}" != "-" ] && [ "${operator}" != "*" ] && [ "${operator}" != "/" ]
thenecho "只允许输入 +|-|*|/"exit 2
fi
read -p "Please input second number" secondnum
if [ -n "`echo $secondnum|sed 's/[0-9]//g'`" ]
thenprint_usage
fi
echo "${firstnum}${operator}${secondnum}结果是: $((${firstnum}${operator}${secondnum}))"
let命令计算
let命令的执行,效果等同于,双小括号。但是,双小括号效率更高
let实践
[root@shell scripts]# num=5
[root@shell scripts]# let num=num+4
[root@shell scripts]# echo $num
9
[root@shell scripts]# num2=8
[root@shell scripts]# echo $((num2=num2+4))
12
2.2节开发nginx存活检测脚本
脚本开发的思路
1.先想好该脚本的功能,作用
2.先写伪代码
脚本的开发思路
1.先定义变量,用于存储写变化的值,后去便于脚本的维护
2.先安装服务
3.启动服务
4.修改配置文件
5.重启服务器
[root@shell scripts]# cat check_nginx_status.sh
#!/bin/bash
##############################################################
# File Name: check_nginx_status.sh
# Version: V1.0
# Author:
# Organization:
# Created Time : 2021-03-27 11:27:11
# Description:
##############################################################
CheckUrl(){timeout=5#相当于定一个计数器fails=0success=0#循环的检测,循环执行一些命令while truedowget --timeout=${timeout} --tries=1 http://10.0.1.6/ -q -O /dev/null#if的条件参数-ne不等于0if [ $? -ne 0 ]thenlet fails=fails+1   #失败次数+1elselet success+=1fi#判断当成功次数大于等于1的时候,就可以的出该网站是正确访问的# -ge大于的意思if [ $success -ge 1 ]thenecho "恭喜你,该网站健康在运行"#返回一个状态码。0exit 0fi#当错误此时大于等2的时候,就告警,发邮件等等if [ $fails -ge 2 ];thenecho "该网站一定是挂了,或者有问题了,快去检查"exit 2fidone
}
#注意,函数定义后,已定义调用,执行
CheckUrl
执行结果
[root@shell scripts]# sh check_nginx_status.sh
恭喜你,该网站健康在运行
[root@shell scripts]# sh check_nginx_status.sh
该网站一定是挂了,或者有问题了,快去检查
没注释版本
[root@shell scripts]# cat check_nginx_status.sh
#!/bin/bash
##############################################################
# File Name: check_nginx_status1.sh
# Version: V1.0
# Author:
# Organization:
# Created Time : 2021-03-27 13:32:10
# Description:
##############################################################
CheckUrl(){timeout=5fails=0success=0while truedowget --timeout=${timeout} --tries=1 http://10.0.1.6/ -q -O /dev/nullif [ $? -ne 0 ]thenlet fails=fails+1elselet success+=1fiif [ $success -ge 1 ]thenecho "ok"exit 0fiif [ $fails -ge 2 ];thenecho "fails"  #失败exit 2fidone
}
CheckUrl
执行结果
[root@shell scripts]# sh check_nginx_status.sh
fails
[root@shell scripts]# sh check_nginx_status.sh
ok
expr命令实践
帮助命令
expr --help
#expr命令并不是很好用,给予空格传入参数,但是在shell里一些源字符都是特殊含义的
[root@shell scripts]# expr 3 + 4
7
[root@shell scripts]# expr 3 \* 4
12#求长度
[root@shell scripts]# expr length 123456789
9#逻辑判断 0是错 ,1是正确
[root@shell scripts]# expr 5 \> 6
0
[root@shell scripts]# expr 7 \> 6
1
expr模式匹配
expr命令也支持模式匹配功能
2个特殊符号
:冒号,计算字符串的字符数量,nginx5个字符
.*  任意的字符串重复0次或者多次
语法
expr 字符串 ":"  ".*"
实际
[root@shell scripts]# expr nginx ":" ".*"
5
#判断jpg文件的字符个数
[root@shell scripts]# expr nginx.jpg ":" ".*\.jpg"
9
[root@shell scripts]# expr lizhien.jpgggggggggggggg ":" ".*\.jpg"
11
expr命令判断文件名后缀是否合法
执行脚本,传入一个文件名,然后判断该文件,是否是jpg图片文件
案例实践
思路
1.先明白expr命令的模式匹配功能,字符串匹配上了就统计其长度,匹配不上就返回0
在shell中,0就是为假的意思,非0就是真
对真假条件判断,的不同条件执行
2.脚本开发
[root@shell scripts]# cat  file_huozhui.sh
#!/bin/bash
##############################################################
# File Name: file_huozhui.sh
# Version: V1.0
# Author:
# Organization:
# Created Time : 2021-03-27 14:36:58
# Description:
##############################################################
if expr "$1" ":" ".*\.jpg" &>/dev/null
thenecho "这的却是以jpg结尾的文件恭喜你"
elseecho "这不是jpg文件!不好意思"
fi3.执行测试脚本
[root@shell scripts]# sh file_huozhui.sh  caixukun.jpg
这的却是以jpg结尾的文件恭喜你
[root@shell scripts]# sh file_huozhui.sh  caixukun.png
这不是jpg文件!不好意思
[root@shell scripts]# sh file_huozhui.sh  caixukun.jppg
这不是jpg文件!不好意思
找出长度不大于5的单词
if条件判断参数
-le 小于等于
-lt less then 小于
[root@shell scripts]# vim length_word.sh
#!/bin/bash
##############################################################
# File Name: length_word.sh
# Version: V1.0
# Author:
# Organization:
# Created Time : 2021-03-27 14:59:33
# Description:
##############################################################
#利用for循环
for str1 in I am haoge, I study you to learn linux.
doif [ `expr length $str1` -lt 5  ]thenecho $str1fi
done#执行结果
[root@shell scripts]# sh length_word.sh
I
am
I
you
bc命令
bc命令当做计算机来用的,命令行的计算器
bc命令结合管道符计算数学
[root@shell scripts]# echo "4*4" |bc
16
[root@shell scripts]# echo "4.2*4" |bc
16.8
[root@shell scripts]# num=5
[root@shell scripts]# result=`echo $num*4|bc`
[root@shell scripts]# echo $result
20
bc案例
计算出1~100的总和
脚本开发
方案一、
[root@shell scripts]# echo {1..100}|tr " " "+"   #tr命令替换
1+2+3+4+5+6+7+8+9+10+11+12+13+14+15+16+17+18+19+20+21+22+23+24+25+26+27+28+29+30+31+32+33+34+35+36+37+38+39+40+41+42+43+44+45+46+47+48+49+50+51+52+53+54+55+56+57+58+59+60+61+62+63+64+65+66+67+68+69+70+71+72+73+74+75+76+77+78+79+80+81+82+83+84+85+86+87+88+89+90+91+92+93+94+95+96+97+98+99+100
方案二、[root@shell scripts]# seq -s "+" 100
1+2+3+4+5+6+7+8+9+10+11+12+13+14+15+16+17+18+19+20+21+22+23+24+25+26+27+28+29+30+31+32+33+34+35+36+37+38+39+40+41+42+43+44+45+46+47+48+49+50+51+52+53+54+55+56+57+58+59+60+61+62+63+64+65+66+67+68+69+70+71+72+73+74+75+76+77+78+79+80+81+82+83+84+85+86+87+88+89+90+91+92+93+94+95+96+97+98+99+100
用bc命令计算
[root@shell scripts]# echo {1..100}|tr " " "+"|bc
5050
用双小括号结合seq命令计算
[root@shell scripts]# echo $((`seq -s "+" 100`))
5050
用expr命令计算,稍有负载,expr命令是接受多个参数来计算的
expr接收以空格分割的,多个参数
Linux下结构参数的命令xargs
[root@shell scripts]# seq -s " + " 100|xargs expr
5050
用awk计算
awk也支持小数计算
[root@shell scripts]# echo "2.5 4.0"|awk '{print $1+$2}'
6.5
[root@shell scripts]# echo "2.5 4.0"|awk '{print ($1*$2)}'
10
[root@shell scripts]# echo "2.5 4.0"|awk '{print ($1+4*$2)}'
18.5
中括号计算
$[表达式]
[root@shell scripts]# num=5
[root@shell scripts]# res=$[num+4]
[root@shell scripts]# echo $res
9
[root@shell scripts]# res=$[num*4]
[root@shell scripts]# echo $res
20
2.3节 shell条件测试
注意bash执行脚本是开启子shell,source在当前shell执行、exit是退出shell环境
从shell变量学到选择,我们发现bash的脚本开发,需要结合if语句,进行条件判断,根据不同的结果执行不同的操作。
read也是内置命令
-p 设置提示信息
-t 等待用户输入超时,timeout
实践
[root@shell scripts]# read -t 15 -p "请输入你的名字,年龄:" your_name your_age
请输入你的名字,年龄:haoge 24
[root@shell scripts]# echo $your_name $your_age
haoge 24
test条件测试
test命令最短的定义可能是评估一个表达式;如果条件为真,则返回一个0值,如果表达式不为真,则返回一个大于0的值,也可能将其称为假值。检查最后执行命令的状态的最简短方法是使用$?值。
条件表达式
| 条件测试语法 | 说明 |
|---|---|
| 语法1:test<测试表达式> | 这是利用test命令进行测试 条件表达式的方法。Test命令和“<测试表达式>”之间至少有一个空格 |
| 语法2:[<测试表达式>] | 这是通过[](单中括号)进行测试条件表达式的方法,和test命令的用法相同,[] 的边界和内容之间至少有一个空格 |
| 语法3:[[ 测试表达式]] | 这是通过[[]](双中括号)测试条件表达式的值的方法,是比test和[]更新的语法格式。[[]]的边界和内容之间至少有一个空格 |
| 语法4:((测试表达式)) | 这是通过(())(双小括号)进行测试条件表达式的方法。一般用于 if语句里。(())双小括号两端不需要有空格 |
| 语法5:(命令表达式) | 这是通过小括号实现测试条件表达方式的方法,应用不普遍,了解即可 |
| 语法6:命令表达式 | 这是通过反引号实现条件表达式的方法。应用不普遍了解即可 |
1.条件表达式6中写法:if , while
语法1:test <测试表达式>
语法2:[ <测试表达式> ]       #中括号两端必须有空格(推荐)
语法3:[[ <测试表达式> ]]      #两端必须有空格
语法4: ((<测试表达式>))     #两端并不需要空格
语法5:(命令表达式)
语法6:`命令表达式`
2.条件表达式的编程语法
[ <测试表达式> ] && 命令 || 命令2
如果前面表达式成功,那么就执行命令1,否则执行命令2
if [ <测试表达式> ]
then命令1
Else命令2
fi
通常,在bash的各种条件结构和流程控制结构中都要进行各种测试,然后根据测试结果执行不同的操作,有时也会与if等条件语句相结合,来完成测试判断,减少程序运行的错误
test命令评估执行测试条件表达式后通常会返回“真”或“假”,就像执行命令后的返回值为0表示真,非0表示假一样,通过$?取值
test命令的参数
-e判断该文件是否存在,(普通文件、目录),存在就位真,否则就位假
案例
[root@shell scripts]# test -e hello.py
[root@shell scripts]# echo $?
0
#当结果为假的时候,$?命令自行的返回吗就是非0
[root@shell scripts]# test -e hello.pyy   #当文件不存在
[root@shell scripts]# echo $?
1
test的语法参数大全
语法
关于某个文件名的【类型】侦测(存在与否)如test -e filename# 针对文件类型判断真假
-e 该[文件名] 是否存在?(常用)
-f 该[文件名] 是否为文件(file)?(常用)
-d 该[文件名] 是否为目录 (directory)?(常用)
-b 该[文件名] 是否为一个 block device 装置?
-c 该[文件名] 是否为一个 character device 装置?
-s 该[文件名] 是否为一个 socket 文件?
-p 该[文件名] 是否为一个 FIFO (pipe) 文件?
-L 该[文件名] 是否为连接档?2.关于文件的权限侦测,如 test -f filename-r 侦测改文件是否具有 [可读]的属性?
-w 侦测改文件是否具有 [可写]的属性
-x 侦测改文件是否具有 [可执行]的属性?
-u 侦测改文件是否具有 [SUID]的属性
-g 侦测改文件是否具有 [SGID]的属性
-k 侦测改文件是否具有 [sricky bit]的属性
-s 侦测改文件是否具有 [非空白文件]?3.两个文件之间的比较,如:test file1 -nt file2-nt (newer than)判断 file1 是否比file2新
-ot (older than)判断 file1 是否比file2就
-ef 判断 file2 与 file2 是否为同一个文件,可用在判断 hard link 的判定上。主要意义在判定两个文件是否均指向同一个inode 呢!4.关于整数之间的判定,例如 test n1 -eq n2
#针对变量数值的大小比较进行判断
-eq 两数值相等(equal)
-ne 两数值不等(not equal)
-gt n1 大于 n2 (greater than)
-lt n1 小于 n2 (less than)
-ge n1 大于等于 n2 (greater than or equql)
-le n1 小于等于 n2 (less than or equal)5.判定字符串的数据
test -z string 判断字符串是否为 0?若string为空字符串则为 true
test -n string 判定字符串是否非为 0? 若string为空字符串则为 false
注: -n 亦可省略
test str1 = str2 判定 str1 是否等于str2 ,若相等,则回传 true
test str1 != str2 判定 str1 是否不等于str2 ,若相等,则回传 false6.多重条件判定。例如: test -r file -a -x filename-a (and)两状况同时成立! 例如 test -r file -a -x file 则 file 同事具有 r 与 x 权限是,才回传 true
-o (or)两状况任何一个成立!例如 test -r file -o -x file,则 file 具有 r 与 x 权限时,就会回传true
!反相状态,如 test ! -x file 当 file 不具有 x 时,回传 true
test命令实践
-e 判断文件是否存在,存在就为真,否则就为假
[root@chaogelinux shell_program]# [ -e apple ] && echo "已存在" || echo "不存在"
不存在
[root@chaogelinux shell_program]#
[root@chaogelinux shell_program]#
[root@chaogelinux shell_program]# mkdir apple
[root@chaogelinux shell_program]# [ -e apple ] && echo "已存在" || echo "不存在"
已存在
shell对于真假判断的逻辑,提供&&与运算,并且的两端,是提进关系,||
例如
A条件&& B条件 当A条件成立,并且执行B条件
A条件 || B条件 当A条件不成立的时候,才会执行B条件
# test命令语法
test 测试命令 要测试的对象   对结果进行判断执行的逻辑动作#判断文件是否存在,不存在则执行下一个动作
[root@shell tmp]# test -e heihei.txt && echo "这个文件已存在" || touch "heihei.txt"
[root@shell tmp]# ls
heihei.txt
[root@shell tmp]# test -e heihei.txt && echo "这个文件已存在" || touch "heihei.txt"
这个文件已存在[root@shell scripts]# test -e "hell" && "改文件、目录已存在,不再执行创建动作" || mkdir hello
mkdir: cannot create directory ‘hello’: File exists
-f 判断文件是否是普通文件类型
# && 并且,|| 否则
# -f 是否是普通文件类型
[root@shell scripts]# test -f happy.txt && echo ok || echo no
ok
[root@shell scripts]# test -f happy && echo ok || echo no
no
-d 是否是目录类型
[root@shell scripts]# test -d hello && echo ok || echo on
ok
[root@shell scripts]# rm -rf hello
[root@shell scripts]# test -d hello && echo ok || echo on
on
-z 希望字符串为空,就为真,否则为假
-n 反过来,希望字符串是有内容的,就为真,否则为假
# -z用法
[root@shell scripts]# test -d hello && echo ok || echo on
ok
[root@shell scripts]# rm -rf hello
[root@shell scripts]# test -d hello && echo ok || echo on
on
[root@shell scripts]# test -z "" && echo ok || echo no
ok
[root@shell scripts]# test -z " " && echo ok || echo no
no
# 注意空格,也有东西,长度为1
[root@shell scripts]# expr length " "       #计算字符长度
1# -n用法
[root@shell scripts]# test -n "" && echo ok || echo no
no
[root@shell scripts]# test -n " " && echo ok || echo no
ok
中括号[]的条件测试
脚本常用[]中括号语法,进行条件测试,用的人是最多的
test和[]作用是一样的,用哪个都可以
在条件测试中使用变量,必须添加双引号
注意,中括号,前后的空格
利用-f严谨点创建文件
[root@chaogelinux shell_program]# [ -f happy.txt ] && echo "已存在" || touch happy.txt
[root@chaogelinux shell_program]#
[root@chaogelinux shell_program]# [ -f happy.txt ] && echo "已存在" || touch happy.txt
已存在
语法
[ -n "$filename" ]
[root@shell scripts]# echo $file1
happy.txt
[root@shell scripts]# [ -f "${file1}" ] && echo ok || echo no
ok
[root@shell scripts]# rm -rf happy.txt
[root@shell scripts]# [ -f "$file1" ] && echo ok || echo no
no
双中括号
语法
[[ 条件表达式 ]]
[root@chaogelinux shell_program]# [[ -f hello.shh ]] || echo "条件不成立"
条件不成立
[root@chaogelinux shell_program]# [[ -f hello.sh ]] && echo "该文件已存在"
该文件已存在
文件测试表达式
![]()
[[ 条件表达式 ]]
验证文件是否有权限,
注意:root是超级用户、需要切换普通用户进行实验
-r 文件可读属性测试(注意别用,特殊)
[daihao@shell tmp]$ [[ -r "haha.txt" ]] && cat haha.txt ||echo 没权限
123-w 是否可写,验证文件是否有w权限
[daihao@shell tmp]$ [[ -w "haha.txt" ]] && (echo "456" > haha.txt) ||echo 没权限
[daihao@shell tmp]$ [[ -r "haha.txt" ]] && cat haha.txt ||echo 没权限
456-x 用法
[root@shell scripts]# [[ -x "hello.sh" ]] && sh hello.sh || echo "没权限"
我是shell脚本的第一行代码
[root@shell scripts]# chmod  -x hello.sh
[root@shell scripts]# [[ -x "hello.sh" ]] && sh hello.sh || echo "没权限"
没权限
变量测试
所谓变量测试,在这里就是变量存储这文件名,效果还是一样的
把字符串信息,写入到变量
对变量测试,必须添加双引号
[root@shell tmp]#  file=haha.txt
[root@shell tmp]# [ -f "$file" ] && echo "文件已存在" || echo "文件不存在"
文件已存在
字符串测试表达式的常见功能说明
字符串是运维日常操作的数据类型,在脚本开发里用的也很多,例如判断两个字符串是否为空等
![]()
比较两个字符串变量的值,是否相等,或不等的情况
[ -n “字符串” ] 字符串长度不为0,表达式为真
[ -z “字符串” ] 字符串长度为0,表达式为真
[ “字符串1”== “字符串2” ] 两个字符串相同则为真
[ “字符串1”!== “字符串2”] 两个字符串不行同则为真
注意
1.字符串变量一定要加双引号双引号
2.等号可以用一个或者两个
3.=两端必须要有空格
实践案例
求变量值是否相等
= 用法
[root@shell ~]# [ "xiaohaoge" = "xiaohaoge" ] && echo ok || echo no
ok
[root@shell ~]# [ "iaohaoge" = "xiaohaoge" ] && echo ok || echo no
no#判断不相等
!= 用法
[root@shell ~]# [ "iaohaoge" != "xiaohaoge" ] && echo ok || echo no
ok
[root@shell ~]# [ "xiaohaoge" != "xiaohaoge" ] && echo ok || echo no
no
取反
# -f  是希望文件存在的,切实普通文件类型,条件符号
[root@shell ~]# [ -f happy.txt ]  && echo ok || echo on
on
# ! -f 表示对这个结束取反 [当前该文件是不存在的,因此-f结果是假]
[root@shell ~]# [ ! -f happy.txt ]  && echo ok || echo on
ok
整数比较符号测试
我们在脚本开发中,会用到数值的比较判断,也就是常见的大于、小于、等于之类
| 在[]以及test中使用的比较符号 | 在(())和[[]]中使用的比较符号 | 说明 |
|---|---|---|
| -eq | ==或= | 相等全拼equal |
| -ne | != | 不相等全拼not equal |
| -gt | > | 大于全拼greater than |
| -ge | >= | 大于等于全拼greater equal |
| -lt | < | 小于全拼less than |
| -le | <= | 小于等于全拼less equal |
语法注意:在中括号中,数值条件测试,使用数学比较符号,请添加转义符号\
1.在中括号中,以及test中数字测试的用法
root@shell ~]# [ 2 > 1 ] && echo ok ||echo no
ok#必须添加转义符号
[root@shell ~]# [ 1 \> 2 ] && echo ok ||echo no
no
2.字符比较参数
[root@shell ~]# [ 3 -gt 2 ] && echo ok ||echo no
ok
[root@shell ~]# [ 1 -ge 2 ] && echo ok ||echo no
no
[root@shell ~]# [ 3 -ge 2 ] && echo ok ||echo no
ok[root@shell ~]# n1=55;n2=14
[root@shell ~]# test "$n1" -eq "$n2" && echo ok ||echo no
no
[root@shell ~]# test "$n1" -gt "$n2" && echo ok ||echo no
ok
[root@shell ~]# test "$n2" -lt "$n1" && echo ok ||echo no
ok
[root@shell ~]# test "$n2" -ne "$n1" && echo ok ||echo no
ok
[root@shell ~]# test "$n2" != "$n1" && echo ok ||echo no
ok
[root@shell ~]# test "$n2" = "$n1" && echo ok ||echo no
no
在test和[]语法中,支持-eq此类写法,以及支持> < = !=
双中括号
对单中括号的补充,双中括号还支持正则处理,在双中括号就可以不用添加转义符
[root@shell ~]# [[ 8 > 9 ]] && echo ok || echo no
no
[root@shell ~]# [[ 8 < 9 ]] && echo ok || echo no
ok
[root@shell ~]# [[ 8 -eq 9 ]] && echo ok || echo no
no
[root@shell ~]# [[ 8 -lt 9 ]] && echo ok || echo no
ok
[root@shell ~]# [[ 8 -gt 9 ]] && echo ok || echo no
no
在工作中,用的最多的就是单中括号,双中括号属于特殊场景的扩展语法。并且双中括号也是支持-eq、-lt、>、< =
总结:
- 注意语法,[]和test为一类,可以用-gt -lt以及<> !=等符号
- 而[[]] 、(())属于一类,不能是-gt 、-lt这样的符号
2.4节逻辑运算符号
逻辑运算,也就是生活里的真、假概念
| 在[]和test中使用操作符 | 在[[]]和(())中使用操作符 | 说明 |
|---|---|---|
| -a | && | and与两端都为真则真 |
| -o | || | or或,两端有一个为真则真 |
| ! | ! | not非,相反则为真 |
!取反,也就是结果相反的值
-a是“与”的意思(等同 && 和and),要求,左右两个逻辑值都为真,结果才为真,否则为假
-o是或者的意思,(or和||),左右两个逻辑,只有一个真,结果就为真
结果为真,对应计算机数字是1
结果为假,计算机数字为0
注意选用不同的语法,对应测试符号不一样!!!
逻辑测试表达式
!  #表示取反
&& 、-a  #表示并且
|| 、-o   #表示或者
[]     #使用 -a、 -o
[[]]或(())里面  #使用&& ||
[] 、 [[]]、(()) 这些符号之间连接 使用&& 、||
测试表达式[]、[[]]、(())、test的区别
记住,最常用的就是中括号,搭配,-gt -lt如此用法即可
[$a -gt $b ]
| 条件表达式 | [] | test | [[]] | (()) |
|---|---|---|---|---|
| 边界是否需要空格 | 需要 | 需要 | 需要 | 不需要 |
| 逻辑操作符 | !、-a、-o | !、-a、-o | !、&&、|| | !、&&、|| |
| 整数比较操作符 | -eq、-gt、 -lt、-ge、 -le | eq、-gt、 -lt、-ge、 -le | -eq、-gt、-lt、-ge -le、或=、<、>、 >=、<= | =、<、>、 >=、<= |
| 字符串比较操作符 | =、==、!= | =、==、!= | =、==、!= | =、==、!= |
| 是否支持通配符匹配 | 不支持 | 不支持 | 支持 | 不支持 |
中括号逻辑运算比较
#对文件是否存在测试,进行逻辑判断
[root@shell ~]# file1=/etc/init.d/network
[root@shell ~]# file2=/etc/hostname
[root@shell ~]# echo $file1 $file2
/etc/init.d/network /etc/hostname#条件测试
-a 用法
[root@shell ~]# [ -f "$file1" -a -f "$file2" ] && echo ok ||echo on
ok
[root@shell ~]# file1=/tmp/qwe
[root@shell ~]# [ -f "$file1" -a -f "$file2" ] && echo ok ||echo on
on#只有一个成立
-o 用法
[root@shell ~]# [ -f "$file1" -o -f "$file2" ] && echo ok ||echo on
ok
#注意test和[]是不支持&&和||的
双方中括号用法
-n判断字符串是否a>b,大于就为真
[root@shell ~]# a=""
[root@shell ~]# b="123"
[root@shell ~]# test -n "$a" && echo ok ||echo no
no
[root@shell ~]# test -n "$b" && echo ok ||echo no
ok
[root@shell ~]# [[ -n "$a" && "$a" = "$b" ]] && echo ok ||echo no
no
[root@shell ~]# a="123"
[root@shell ~]# [[ -n "$a" && "$a" = "$b" ]] && echo ok ||echo no
ok#结果取反,该条件,本身是为真,被感叹号,改为le假
#双中括号不支持-a -o条件参数用法
! 用法
[root@shell ~]# echo $a $b
1 123
[root@shell ~]# [[ -n "$a" && ! "$a" = "$b" ]] && echo ok ||echo no
ok
[root@shell ~]# [[ -n "$a" && "$a" != "$b" ]] && echo ok ||echo no
ok
逻辑运算脚本开发
脚本
接受用户输入,判断他是否等于某个数字
[root@shell scripts]# cat test_and_or.sh
#!/bin/bash
##############################################################
# File Name: test_and_or.sh
# Version: V1.0
# Author:
# Organization:
# Created Time : 2021-03-28 09:18:29
# Description:
##############################################################
read -p "please input a char:" var1
#逻辑条件测试
[ "$var1" -eq "1" ] && {echo $var1exit 0
}
[ "var2" = "2" ] && {echo $var1exit 0
}
# 只能输入的是1或者2,否则就报错
[ "$var1" -ne "2" -a "$var1" -ne "1" ] && {echo "脚本出错,必须输入1或者2"exit 1
}
安装lnmp、lamp脚本开发
1.模拟创建出2个安装的脚本;lnmp.sh  lamp.sh
[root@shell scripts]# echo "echo LAMP is installed" >./lamp.sh
[root@shell scripts]# echo "echo LNMP is installed" >./lnmp.sh
[root@shell scripts]# chmod +x lamp.sh
[root@shell scripts]# chmod +x lnmp.sh
2.开发逻辑判断的脚本
[root@shell scripts]# cat   lamp_or_lnmp.sh
#!/bin/bash
##############################################################
# File Name: lanmp_or_lnmp.sh
# Version: V1.0
# Author:
# Organization:
# Created Time : 2021-03-28 09:44:41
# Description:
##############################################################
# 判断脚本目录是否存在
path=/server/scripts# 条件判断
# 开发脚本,真、和假2个情况,优先处理错误的逻辑情况,因为错误的情况最容易处理
[ ! -d "path" ] && mkdir $path -p# 开发该脚本的正常逻辑
cat <<END1.[install lamp]2.[install lnmp]3.[exit]please input the num you want
END
read num# 根据num变量进行逻辑处理
expr $num + 1 &>/dev/null# 判断上条命令的结果
# 限制用户输入的必须是数字
[ $? -ne 0 ] && {echo "The num you input must be {1|2|3}"exit 1
}# 对输入的数字,对1、2、3进行判断
[ "$num" -eq "1" ] && {echo "staring installing lamp...waiting..."sleep 2;[ -x "$path/lamp.sh" ] || {echo "The file does not exist or can't be exec."exit 1
}source $path/lamp.shexit $?
}# 开发选择2的情况,安装lnmp
[ "$num" -eq "2" ] && {echo "starting installing...lnmp...waiting..."sleep 2[ -x "$path/lnmp.sh" ] || {echo "The file does not exist or can't be exec."exit 1
}source $path/lnmp.shexit $?
}
[ "$num" -eq 3  ] && {echo "bye."exit 3
}#限制用户必须输入的是1、2、3
# [[]]支持正则表达式 [[ $num =~ [1-3]  ]]
[[ ! "$num" =~ [1-3] ]]  && {echo "The num you input myst {1|2|3}"exit 4
}
执行结果
[root@shell scripts]# sh  lamp_or_lnmp.sh 1.[install lamp]2.[install lnmp]3.[exit]please input the num you want
1
staring installing lamp...waiting...
LAMP is installed
[root@shell scripts]# sh  lamp_or_lnmp.sh 1.[install lamp]2.[install lnmp]3.[exit]please input the num you want
2
starting installing...lnmp...waiting...
LNMP is installed
[root@shell scripts]# sh  lamp_or_lnmp.sh 1.[install lamp]2.[install lnmp]3.[exit]please input the num you want
3
bye.
[root@shell scripts]# sh  lamp_or_lnmp.sh 1.[install lamp]2.[install lnmp]3.[exit]please input the num you want
4
The num you input myst {1|2|3}
无注释版本
[root@shell scripts]# cat lamp_or_lnmp.sh
#!/bin/bash
##############################################################
# File Name: lanmp_or_lnmp.sh
# Version: V1.0
# Author:
# Organization:
# Created Time : 2021-03-28 09:44:41
# Description:
##############################################################
path=/server/scripts
[ ! -d "path" ] && mkdir $path -p
cat <<END1.[install lamp]2.[install lnmp]3.[exit]please input the num you want
END
read num
expr $num + 1 &>/dev/null
[ $? -ne 0 ] && {echo "The num you input must be {1|2|3}"exit 1
}
[ "$num" -eq "1" ] && {echo "staring installing lamp...waiting..."sleep 2;[ -x "$path/lamp.sh" ] || {echo "The file does not exist or can't be exec."exit 1
}source $path/lamp.shexit $?
}
[ "$num" -eq "2" ] && {echo "starting installing...lnmp...waiting..."sleep 2[ -x "$path/lnmp.sh" ] || {echo "The file does not exist or can't be exec."exit 1
}source $path/lnmp.shexit $?
}
[ "$num" -eq 3  ] && {echo "bye."exit 3
}
[[ ! "$num" =~ [1-3] ]]  && {echo "The num you input myst {1|2|3}"exit 4
}
第3章 shell逻辑判断if开发
3.1节 if条件语句
if条件句单双分支语法
对于if条件语句,简单的说,其语义类似汉语里的“如果”“那么”“否则”。If条件语句是Linux运维人员在实际生产工作使用的最频繁也是最重要的语句,因此,务必重视if条件语句的知识,并牢固掌握。
![]()
if条件句多分支语法
if条件多分支结构主体为“如果……,那么……,否则如果……,那么,如果……,那么,否则……”。
![]()
3.2节开发检查内存脚本
监测文件是否存在
[root@shell scripts]# cat  if_1.sh
#!/bin/bash
##############################################################
# File Name: if_1.sh
# Version: V1.0
# Author:
# Organization:
# Created Time : 2021-03-28 15:21:07
# Description:
##############################################################
if [ -f /etc/hosts ]
thenecho "[ ] it's ok!"
fi
if [[ -f /etc/hosts ]] ;thenecho "[[ ]] it's ok!"
fi
if test -f /etc/hosts ;thenecho "test it's ok!"
fi#执行结果
[root@shell scripts]# sh if_1.sh
[ ] it's ok!
[[ ]] it's ok!
test it's ok!
开发系统监控脚本
开发shell脚本
1.检测Linux剩余可用内存,当可用内存小于100M,就给发邮件给运维
2.并且该脚本加入crontab,没三分钟检查一次
思路:
1.获取当前内存情况
2.配置邮件告警,用Linux发送邮件(mail服务的配置),邮件内容是内存剩余情况
3.开发脚本,判断剩余内存是否小于100M,if判断
4.脚本加入crontab,写定时任务
开发过程
1.获取内存,获取available的数据,它是实现系统可以提供应用程序可用的内存大小
[root@shell scripts]# free -mtotal        used        free      shared  buff/cache   available
Mem:           3773         137        3451          11         184        3397
Swap:           799           0         799#获取内存
total 系统总的可用物理内存大小
used 已被使用的物理内存大小
free 还有多少物理内存可用
shared 被共享使用的物理内存大小
buff/cache 被 buffer 和 cache 使用的物理内存大小
available 还可以被 应用程序 使用的物理内存大小#通过awk获取剩余可用内存
[root@shell scripts]# free -m|awk 'NR==2{print $NF}'
33972.脚本开发  #注意脚本中的注释
[root@shell scripts]# cat check_free.sh
#!/bin/bash
##############################################################
# File Name: check_free.sh
# Version: V1.0
# Author:
# Organization:
# Created Time : 2021-03-28 15:47:46
# Description:
##############################################################
FreeMen=`free -m|awk 'NR==2{print $NF}'`
CHARS="Current memory is $FreeMen"
if [ "$FreeMen" -lt "100" ]  #监测当内存小于100M
thenecho $CHARS|tee /tmp/messages.txt# mail -s "主题" 收件人 <mail -s "`date +%F-%T` $CHARS" 437196165@qq.com < /tmp/messages.txtecho "run out of memory" #内存不足,抓紧维护服务器
fi
配置邮件告警
1.通过yum源安装mail服务
yum install -y mailx
yum install -y sendmail
2.首先发送邮件要对QQ或者163邮箱设置>账户>POP3/SMTP服务>点击开启得到一个授权码
![]()
3.添加如下配置可以在文件随意添加
[root@shell scripts]# tail -5 /etc/mail.rc
set from=437196165@qq.com
set smtp=smtp.qq.com
set smtp-auth-user=437196165@qq.com
set smtp-auth-password=iyepqybxmfwsbgdf
set smtp-auth=login4.测试邮件是否能发送
[root@shell scripts]# echo a |mailx -v -s "1" 437196165@qq.com
执行脚本
[root@shell scripts]# sh  check_free.sh
Current memory is 3353
run out of memory    #译文内存不足
![]()
编写定时任务
[root@shell scripts]# crontab -l
*/3 * * * *  /bin/bash /server/scripts/check_free.sh &>/dev/null
if案例练习
单分支语法
[root@shell scripts]# cat   if_read.sh
#!/bin/bash
##############################################################
# File Name: read.sh
# Version: V1.0
# Author:
# Organization:
# Created Time : 2021-03-28 16:47:08
# Description:
##############################################################
a=$1
b=$2if [ "$a" -lt "$b" ]thenecho "yes,$a less then $b"exit 0
fi
if [ "$a" -eq "$b" ]
thenecho "yes,$a equal $b"exit 0
fi
if [ "$a" -gt "$b" ];thenecho "yes,$a granther than $b"exit 0
fi
执行结果
[root@shell scripts]# sh  if_read.sh  12 35
yes,12 less then 35
[root@shell scripts]# sh  if_read.sh  123 35
yes,123 granther than 35
[root@shell scripts]# sh  if_read.sh  123 123
yes,123 equal 123
多分支脚本,将单分支代码简化
[root@shell scripts]# cat  if_read1.sh
#!/bin/bash
##############################################################
# File Name: if_read1.sh
# Version: V1.0
# Author:
# Organization:
# Created Time : 2021-03-28 17:17:37
# Description:
##############################################################
a=$1
b=$2
if [ "$a" -lt "$b" ];thenecho "yes,$a less then $b"
elif [ "$a" -eq "$b" ];thenecho "yes,$a -equql $b"
elseecho "oh no~$a greater than $b"
fi#执行结果
[root@shell scripts]# sh if_read1.sh 5 6
yes,5 less then 6
[root@shell scripts]# sh if_read1.sh 7 6
oh no~7 greater than 6
[root@shell scripts]# sh if_read1.sh 7 7
yes,7 -equql 7
如何检测服务状态
![]()
服务器本地端口监控,MySQL的状态,
只要结果不为0即为正常
- 端口netstat,ss lsof监控
[root@shell scripts]# netstat -tunlp|grep mysql|wc -l
1
[root@shell scripts]# ss -tunlp|grep mysql|wc -l
1
[root@shell scripts]# lsof -i tcp:3306|wc -l    # 调用lsof方法,判断该返回值大于0即为正常
2
远程监控MySQL端口
yum install telnet nmap nc -y
# nmap命令端口扫描
[root@shell scripts]# nmap 127.0.0.1 -p 3306|grep open|wc -l  #只要结果为1即MySQL就正常
1
[root@shell scripts]# echo -e "\n" |telnet 127.0.0.1 3306 2>/dev/null |grep Connected|wc -l
1
进程检查
[root@shell scripts]# echo -e "\n" |telnet 127.0.0.1 3306 2>/dev/null |grep Connected|wc -l
1
3.3节 php和python连接MySQL
通过php程序或者Python程序访问应用程序接口,读取数据库查看是否能拿到数据,从而得知MySQL是否运行
前提、要准备好Linux的数据库环境
php连接mysql
1.准备好php的环境依赖
yum remove php-mysql -y
yum install php-mysqlnd php -y
2.开发php连接mysql的代码
[root@shell scripts]# cat mysq_test.php
<?php
$mysql_id=mysql_connect("localhost","root","123456") or mysql_error();
if ($mysql_id){echo "mysql connection successful";
}else{echo mysql_error();
}
3.运行程序
[root@shell scripts]# php mysql_test.php
mysql connection syccessful[root@shell scripts]#
python程序连接mysql
1.安装Python3开发环境的依赖
yum install python3 python3-devel phthon3-pip
2.通过Python的包管理,工具,安装连接mysql的模块
pip3 install pymysql
3.开发Python连接mysql的代码,#注意Python的代码,空格数量是严格把控的
[root@shell scripts]# cat test_python_mysql.py
import pymysqldb = pymysql.connect(host="localhost",user='root',password='123456',db='mysql',charset='utf8'
)
# 操控数据库
cursor=db.cursor()
cursor.execute('select version()')data=cursor.fetchone()print ("数据库连接正确,该数据库版本是: %s"%data)
db.close()#执行该脚本
[root@shell scripts]# python3 test_python_mysql.py
数据库连接正确,该数据库版本是: 5.5.68-MariaDB
shell脚本检测mysql服务状态
echo "----------方法一"
if [ `netstat -tunlp|grep 3306|wc -l` -eq "1" ]
thenecho "mysql is running"
elseecho "mysql is soped."systemctl start mariadb
fiecho "----------方法二"
if [ `ss -tunlp|grep mysql|wc -l` -eq "1" ]
thenecho "mysql is running"
elseecho "mysql is soped."systemctl start mariadb
fiecho "----------方法三"
# 调用lsof方法,判断该返回值大于0即可
if [ `lsof -i tcp:3306|wc -l` -gt "0" ]
thenecho "mysql is running"
elseecho "mysql is soped."systemctl start mariadb
fiecho "----------方法四"
# 开发php脚本的执行
# 限执行该php读取mysql是否存活
# 根据该命令的返回值,判断mysql是否存活
php /server/scripts/mysql_test.php   #注意文件路径
if [ "$?" -eq 0 ]
thenecho "mysql is running"
elseecho "mysql is soped."systemctl start mariadb
fiecho "----------方法五"
python3 /server/scripts/test_python_mysql.py   #注意文件路径
if [ "$?" -eq 0 ]
thenecho "mysql is running"
elseecho "mysql is soped."systemctl start mariadb
fi
执行结果
[root@shell scripts]# sh   test_mysql.sh
----------方法一
mysql is running
----------方法二
mysql is running
----------方法三
mysql is running
----------方法四
mysql connection syccessfulmysql is running
----------方法五
数据库连接正确,该数据库版本是: 5.5.68-MariaDB
mysql is running
3.4节rsync启停脚本开发
检查系统环境
[root@shell scripts]# rpm -qa rsync
rsync-3.1.2-4.el7.x86_64
[root@shell scripts]# ls -l /etc/rsyncd.conf
-rw-r--r--. 1 root root 458 Apr 11  2018 /etc/rsyncd.conf
2.检查配置文件是否存在
[root@shell scripts]# ll /usr/lib/systemd/system/rsyncd.service
-rw-r--r--. 1 root root 237 Apr 11  2018 /usr/lib/systemd/system/rsyncd.service
3.检查是否有rsync服务运行
[root@shell scripts]# netstat -tunlp|grep 873
[root@shell scripts]# /usr/bin/rsync --daemon     #启动rsync服务
[root@shell scripts]# netstat -tunlp|grep 873
tcp        0      0 0.0.0.0:873             0.0.0.0:*               LISTEN      6703/rsync
tcp6       0      0 :::873                  :::*                    LISTEN      6703/rsync  # 停止rsync服务
killall rsync
pkill rsync
开发rsync启停脚本
/etc/init.d/rsync
脚本开发
[root@shell ~]# cat /etc/init.d/rsync.sh
#!/bin/bash
##############################################################
# File Name: rsync.sh
# Version: V1.0
# Author:
# Organization:
# Created Time : 2021-03-29 10:13:53
# Description:
##############################################################
# -ne if条件的不等于,$#返回传递非脚本的参数个数,$0取得脚本文件名# 限制用户必须传入一个参数
if [ "$#" -ne 1 ]
thenecho "Usage: $0 {start|stop|restart}"exit 1
fi# 当用户选择是启动rsync
if [ "$1" = "start" ]
then/usr/bin/rsync --daemonsleep 2# 验证端口是否启动if [ `netstat -tunlp|grep rsync|wc -l` -ge 1 ]thenecho "Rsync is started"exit 0fi
elif [ "$1" = "stop" ]
thenkillall rsync &>/dev/nullsleep 2if [ `netstat -tunlp|grep rsync|wc -l` -eq 0 ]thenecho "Rsync is stoped"exit 0fi
elif [ "$1" = "restart" ]
thenkillall rsyncsleep 1killpro=`netstat -tunlp|grep rsync|wc -l`/usr/bin/rsync --daemonsleep 1startpro=`netstat -tunlp|grep rsync|wc -l`if [ "$killpro" -eq 0 -a "$startpro" -ge 1 ]thenecho "Rsync is restarted"exit 0fi
elseecho "Usage: $0 {start|stop|restart}"exit 1
fi
执行结果
[root@shell ~]# chmod +x /etc/init.d/test_rsync
[root@shell ~]# /etc/init.d/rsync.sh start
Rsync is started
[root@shell ~]# netstat -tunlp|grep 873
tcp        0      0 0.0.0.0:873             0.0.0.0:*               LISTEN      8055/rsync
tcp6       0      0 :::873                  :::*                    LISTEN      8055/rsync
[root@shell ~]# /etc/init.d/rsync.sh stop
Rsync is stoped
[root@shell ~]# netstat -tunlp|grep 873
[root@shell ~]# /etc/init.d/rsync.sh restart
rsync: no process found
Rsync is restarted
[root@shell ~]# netstat -tunlp|grep 873
tcp        0      0 0.0.0.0:873             0.0.0.0:*               LISTEN      8086/rsync
tcp6       0      0 :::873                  :::*                    LISTEN      8086/rsync
无注释版本
[root@shell scripts]# cat /etc/init.d/rsync
#!/bin/bash
##############################################################
# File Name: rsync.sh
# Version: V1.0
# Author:
# Organization:
# Created Time : 2021-03-29 10:13:53
# Description:
##############################################################
if [ "$#" -ne 1 ]
thenecho "Usage: $0 {start|stop|restart}"exit 1
fi
if [ "$1" = "start" ]
then/usr/bin/rsync --daemonsleep 2if [ `netstat -tunlp|grep rsync|wc -l` -ge 1 ]thenecho "Rsync is started"exit 0fi
elif [ "$1" = "stop" ]
thenkillall rsync &>/dev/nullsleep 2if [ `netstat -tunlp|grep rsync|wc -l` -eq 0 ]thenecho "Rsync is stoped."exit 0fi
elif [ "$1" = "restart" ]
thenkillall rsyncsleep 1killpro=`netstat -tunlp|grep rsync|wc -l`/usr/bin/rsync --daemonsleep 1startpro=`netstat -tunlp|grep rsync|wc -l`if [ "$killpro" -eq 0 -a "$startpro" -ge 1 ]thenecho "Rsync is restarted"exit 0fi
elseecho "Usage: $0 {start|stop|restart}"exit 1
fi
第4章 shell函数开发
4.1节 为什么用函数
shell函数开发
shell脚本中的代码是按照执行的优先级的顺序从上往下抒写的,代码量越大,在脚本调试的时候就越难排错,当因执行需要调整代码执行顺序的时候就需要不断的复制粘贴,或者删除部分代码来完成,这和从写一个脚本花费的时候相比甚至需要更长的时间。
代码量大后遇到的问题:单个脚本代码量大 (300-500行),阅读修改耗时费力,排错困难,改变执行顺序困难,为了解决这些问题,我们可以把代码模块化,按需调用
函数介绍
shell中允许将一组命令集合或语句形成一段可用代码,这些代码块称为shell函数。给这段代码起个名字称为函数名,后续可以直接调用该段代码的功能。将完成一个功能的一段代码进行命名、封装
函数的优点:
代码模块化,调用方便,节省内存
代码模块化,代码量少,排错简单
代码模块化,可以改变代码的执行顺序
函数的语法
语法一:function 函数名 () {代码块return 返回值}语法二:
function 函数名{代码块return 返回值}
语法三:
函数名(){代码块return 返回值
}函数中return说明:
1.return可以结束一个函数,类似于前面讲的循环控制语句break(结束当前循环,执行循环体后面的代码)
2.return默认返回函数中最后一个命令的退出状态,也可以给定参数值,该参数值的范围是0-256之间。
3.如果没有return命令,函数将返回最后一个Shell的退出值。
使用函数的关键点
执行函数的基础概念
有关函数执行基础概念
- 执行shell函数,直接写函数名字即可,无需添加其他内容
- 函数必须先定义,再执行,shell脚本自上而下加载
- 函数体内定义的变量,称之为局部变量
- 函数体内需要添加return语句,作用是退出函数,且赋予返回值给调用该函数的程序,也就是shell脚本(在shell脚本中,定义,使用函数,shell脚本执行结束后,通过$?获取其return的返回值)
- return语句和exit不同(return只能写在函数中,exit是shell内置命令,用于退出shell环境)
- return是结束函数的执行,返回一个(退储值、返回值)
- exit是结束shell环境,,返回一个(退出值、返回值)给当前的shell
- 函数如果单独写入一个文件里,需要source读取
- 函数内,使用local关键字,定义局部变量
函数实践
[root@mysql5-6 scripts]# cat  func.sh
#!/bin/bash
##############################################################
# File Name: func.sh
# Version: V1.0
# Author:
# Organization:
# Created Time : 2021-04-01 09:25:31
# Description:
##############################################################
function xiaohaoge(){cd /tmpecho "抓紧时间学习"echo “然后出去找份好工作” >> ./xx.txtreturn 0
}
xiaohaoge#执行结果
[root@mysql5-6 scripts]# sh func.sh
抓紧时间学习
[root@mysql5-6 scripts]# cat  /tmp/xx.txt
“然后出去找份好工作”
场景二、
函数定义和执行,分开在不同的文件中,Linux自带的诸多脚本,都是基于该形式使用的
- 函数写在一个文件中,只定义不执行
- 另外一个脚本中,读取该函数文件,且加载该函数
1.先生成一个my_fuc.sh脚本,作用是只记录函数,不运行
[root@mysql5-6 scripts]# cat  my_func.sh
#!/bin/bash
xiaohaoge(){echo "函数学的怎么样了?"
}2检查当前的环境变量
set|grep ^xiaohaoge
3.利用,或这source命令读取shell脚本,能够加载其变量到当前的shell环境中
[root@mysql5-6 scripts]# source  my_func.sh
4.再次验证
[root@mysql5-6 scripts]# set |grep ^xiaohaoge
xiaohaoge ()
5.可以退出当前shell,再次登陆,查看该环境变量
[root@mysql5-6 ~]# exit
[root@mysql5-6 ~]# set |grep ^xiaohaoge
[root@mysql5-6 ~]#
6.再次加载my_func.sh且执行该函数
[root@mysql5-6 scripts]# source func.sh
抓紧时间学习
[root@mysql5-6 scripts]# set |grep ^xiaohaoge
xiaohaoge ()
#当读取函数后,执行xiaohaoge就相当于执行source func.sh
[root@mysql5-6 scripts]# xiaohaoge
抓紧时间学习
对于脚本的加载
有关source和bash是否开启shell,且在当前shell环境中,加载函数的一个深入理解
在创建一个fun2.sh,该脚本就是读取my_func.sh且调用函数
[root@mysql5-6 ~]# cat /server/scripts/func2.sh
#!/bin/bash
#条件测试
#加载函数
[ -f /server/scripts/my_func.sh ] && . /server/scripts/my_func.sh || exit
#执行函数
xiaohaoge#执行结果
[root@mysql5-6 ~]# source /server/scripts/func2.sh
函数学的怎么样了?
[root@mysql5-6 ~]# xiaohaoge
函数学的怎么样了?
[root@mysql5-6 ~]# set |grep ^xiaohaoge
xiaohaoge ()
函数脚本传入参数实践
先定义一个脚本
[root@mysql5-6 scripts]# cat my_func.sh
#!/bin/bash
hello(){echo "依次传入的参数,依次是:$1、$2、$2、并且参数个数一共数量"
}
然后再另一个脚本读取上一个脚本的函数
[root@mysql5-6 scripts]# cat func2.sh
#!/bin/bash
#条件测试
# 加载函数
[ -f /server/scripts/my_func.sh ] && . /server/scripts/my_func.sh || exit
#执行函数
hello $1 $2 $3
执行结果
[root@mysql5-6 scripts]# bash func2.sh a b c
依次传入的参数,依次是:a、b、b、并且参数个数一共数量3
4.2节 开发检测网站存活脚本
给脚本传入参数,检测url是否正常
[root@mysql5-6 scripts]# cat check_url2.sh
#!/bin/bash
##############################################################
# File Name: check_url2.sh
# Version: V1.0
# Author:
# Organization:
# Created Time : 2021-04-01 11:11:05
# Description:
##############################################################
function usage(){echo "Usage:$0 url"exit 1
}
#功能检测url
check_url(){wget --spider -q -o /dev/null --tries=1 -T 5 $1
# 对状态码判断,网站是否正常
if [ "$?" -eq 0 ]
thenecho "$1 is running..."
elseecho "$1 is down..."
fi
}# 参考C语言开发的形式,设立一个main函数,是入口函数的概念
# 这也是一个普通的shell函数,也得调用才行
main() {# 判断用户输入if [ "$#" -ne 1 ]thenusageficheck_url $1
}
# 执行函数
main $*#执行结果
[root@mysql5-6 scripts]# bash check_url2.sh www.baidu.com
www.baidu.com is running...
4.3节 开发rsync专业脚本
[root@mysql5-6 scripts]#  cat /etc/init.d/rsync.sh
#!/bin/bash
##############################################################
# File Name: rsync.sh
# Version: V1.0
# Author:
# Organization:
# Created Time : 2021-03-29 10:13:53
# Description:
##############################################################
function usage(){echo "Usage: $0 {start|stop|restart}"exit 1
}
function start(){/usr/bin/rsync --daemonsleep 1if [ `netstat -tunlp|grep rsync|wc -l` -ge "1" ]thenecho "rsync is started"elseecho "rsync isn,t start"fi
}
function stop(){killall rsync &>/dev/nullsleep 1if [ `netstat -tunlp|grep rsync|wc -l` -eq "0" ]thenecho "rsync is stopted"elseecho "rsync isn,t stoped!"fi
}
function restart(){killall rsyncsleep 1killpro=`netstat -tunlp|grep rsync|wc -l`/usr/bin/rsync --daemonsleep 1startpro=`netstat -tunlp|grep rsync|wc -l`if [ "$killpro" -eq 0 -a "$startpro" -ge 1 ]thenecho "Rsyncd is restarted"exit 0fi
}
function main(){if [ "$#" -ne 1 ]thenusagefiif [ "$1" = "start" ]thenstartelif [ "$1" = "stop" ]thenstopelif [ "$1" = "restart" ]thenrestartelseusagefi
}
main $*
执行结果
[root@mysql5-6 scripts]# /etc/init.d/rsync.sh stop
rsync is stopted
[root@mysql5-6 scripts]# netstat -tunlp|grep rsync
[root@mysql5-6 scripts]# /etc/init.d/rsync.sh start
rsync is started
[root@mysql5-6 scripts]# netstat -tunlp|grep rsync
tcp        0      0 0.0.0.0:873             0.0.0.0:*               LISTEN      61303/rsync
tcp6       0      0 :::873                  :::*                    LISTEN      61303/rsync
[root@mysql5-6 scripts]# /etc/init.d/rsync.sh restart
Rsyncd is restarted
[root@mysql5-6 scripts]# netstat -tunlp|grep rsync
tcp        0      0 0.0.0.0:873             0.0.0.0:*               LISTEN      61320/rsync
tcp6       0      0 :::873                  :::*                    LISTEN      61320/rsync
4.4节 nginx启动脚本开发
注意安装目录路劲
[root@localhost scripts]# cat nginxd.sh #!/bin/bash
#Description:
#Author:
#Created Time:
#nginx service manage script#variables
nginx_install_doc=/opt/nginx119/
proc=nginx
nginxd=$nginx_install_doc/sbin/nginx
pid_file=$nginx_install_doc/logs/nginx.pid# Source function library.
if [ -f /etc/init.d/functions ];then. /etc/init.d/functions
elseecho "not found file /etc/init.d/functions"exit
fi#假如pid文件存在,那么统计一下nginx进程数量
if [ -f $pid_file ];thennginx_process_id=`cat $pid_file` nginx_process_num=`ps aux |grep $nginx_process_id|grep -v "grep"|wc -l`
fi#function
start () {#如果nginx 没有启动直接启动,否则报错 已经启动
if [ -f $pid_file ]&&[ $nginx_process_num -ge 1 ];thenecho "nginx running..."
else#如果pid文件存在,但是没有进程,说明上一次非法关闭了nginx,造成pid文件没有自动删除,所以启动nginx之前先删除旧的pid文件if [ -f $pid_file ] && [ $nginx_process_num -lt 1 ];thenrm -f $pig_file#可以使用两个函数,两种方法来执行命令,并返回执行结果#1)daemon#2)action   建议这个,简单易用#echo " nginx start `daemon $nginxd` "action "nginx start" $nginxdfi#echo " nginx start `daemon $nginxd` "action "nginx start" $nginxd
fi}stop () {#判断nginx启动的情况下才会执行关闭,如果没启动直接报错,或者提示用户服务没启动,这里我直接报错的原因是为了给大家演示失败的输出
if [ -f $pid_file ]&&[ $nginx_process_num -ge 1 ];thenaction "nginx stop" killall -s QUIT $procrm -f $pid_file
elseaction "nginx stop" killall -s QUIT $proc 2>/dev/null
fi
}restart () {stopsleep 1start
}reload () {#重载的目的是让主进程重新加载配置文件,但是前提是服务必须开启
#这里先判断服务是否开启,开启就执行加载,没有开启直接报加载错误
if [ -f $pid_file ]&&[ $nginx_process_num -ge 1 ];thenaction "nginx reload" killall -s HUP $proc
elseaction "nginx reload" killall -s HUP $proc 2>/dev/null
fi
}status () {if [ -f $pid_file ]&&[ $nginx_process_num -ge 1 ];thenecho "nginx running..."
elseecho "nginx stop"
fi
}#callable
case $1 in
start) start;;
stop) stop;;
restart) restart;;
reload) reload;;
status) status;;
*) echo "USAGE: $0 start|stop|restart|reload|status";;
esac
执行结果
[root@shell scripts]# sh nginxd.sh stop
nginx stop                                                 [  OK  ]
[root@shell scripts]# sh nginxd.sh status
nginx stop
[root@shell scripts]# netstat -tunlp|grep nginx
[root@shell scripts]# sh nginxd.sh start
nginx start                                                [  OK  ]
[root@shell scripts]# netstat -tunlp|grep nginx
tcp        0      0 0.0.0.0:80              0.0.0.0:*               LISTEN      2374/nginx: master
[root@shell scripts]# sh nginxd.sh reload
nginx reload                                               [  OK  ]
[root@shell scripts]# lsof -i :80
COMMAND  PID   USER   FD   TYPE DEVICE SIZE/OFF NODE NAME
nginx   2660   root    6u  IPv4  81234      0t0  TCP *:http (LISTEN)
nginx   2928 nobody    6u  IPv4  81234      0t0  TCP *:http (LISTEN)
#因为nginx平滑重启pid不变所以这里想要看到脚本有变化需要改动nginx的子进程worker_processes  3;
[root@shell scripts]# sh nginxd.sh reload
nginx reload                                               [  OK  ]
[root@shell scripts]# lsof -i :80
COMMAND  PID   USER   FD   TYPE DEVICE SIZE/OFF NODE NAME
nginx   2660   root    6u  IPv4  81234      0t0  TCP *:http (LISTEN)
nginx   2943 nobody    6u  IPv4  81234      0t0  TCP *:http (LISTEN)
nginx   2944 nobody    6u  IPv4  81234      0t0  TCP *:http (LISTEN)
nginx   2945 nobody    6u  IPv4  81234      0t0  TCP *:http (LISTEN)
第5章 shell编程之case
5.1节case语法
case语句用在,针对同一个变量,进行多次判断比较值的情况,就可以使用case语句,简化if,elif,else的代码
case语句的语法
case "变量" in值1)指令1...;;值2)指令2...;;值3)指令3...;;*)指令4...
esac
上述语法case将变量的值和表达式的值比较,匹配上了就执行对应的代码,到分号结束
case执行流程

案例事件
[root@mysql5-6 scripts]# cat case.sh
#!/bin/bash
##############################################################
# File Name: case.sh
# Version: V1.0
# Author:
# Organization:
# Created Time : 2021-04-01 14:54:09
# Description:
##############################################################
read -p "请输入一个数字:" num
case "$num" in1)echo "你输入的是$num";;2)echo "你输入的是$num";;[3-9])echo "你输入的是3-9之间的 $num";;*)echo "你输入的不是在1-9之间。退下吧:"exit 1;
esac
执行结果
[root@mysql5-6 scripts]# bash case.sh
请输入一个数字:1
你输入的是1
输出颜色字体
脚本中的echo显示内容带颜色显示,echo显示带颜色,**需要使用参数-e**
格式如下
echo -e "\033[字背景颜色;文字颜色m字符串\033[0m"
例如
[root@mysql5-7 ~]# echo -e "\033[41;36m something here \033[0m"
其中41的位置代表底色, 36m的位置是代表字的颜色
1、字背景颜色和文字颜色之间是英文的
2、文字颜色后面有个m
3、字符串前后可以没有空格,如果有的话,输出也是同样有空格下面是相应的字和背景颜色,可以自己来尝试找出不同颜色搭配`
字颜色:30—–37
echo -e "\033[30m 黑色字 \033[0m"
echo -e "\033[31m 红色字 \033[0m"
echo -e "\033[32m 绿色字 \033[0m"
echo -e "\033[33m 黄色字 \033[0m"
echo -e "\033[34m 蓝色字 \033[0m"
echo -e "\033[35m 紫色字 \033[0m"
echo -e "\033[36m 天蓝字 \033[0m"
echo -e "\033[37m 白色字 \033[0m"
#字背景颜色范围:40—–47
echo -e "\033[40;37m 黑底白字 \033[0m"
echo -e "\033[41;37m 红底白字 \033[0m"
echo -e "\033[42;37m 绿底白字 \033[0m"
echo -e "\033[43;37m 黄底白字 \033[0m"
echo -e "\033[44;37m 蓝底白字 \033[0m"
echo -e "\033[45;37m 紫底白字 \033[0m"
echo -e "\033[46;37m 天蓝底白字 \033[0m"
echo -e "\033[47;30m 白底黑字 \033[0m"
#最后面控制选项说明\033[0m 关闭所有属性\033[1m 设置高亮度\033[4m 下划线\033[5m 闪烁\033[7m 反显\033[8m 消隐
#设置背景色
\033[40m — \33[47m 设置背景色
\033[nA 光标上移n行
\033[nB 光标下移n行
\033[nC 光标右移n行
\033[nD 光标左移n行
\033[y;xH设置光标位置
\033[2J 清屏
\033[K 清除从光标到行尾的内容
\33[s 保存光标位置
\033[u 恢复光标位置
\033[?25l 隐藏光标
\033[?25h 显示光标
用法例子  光标下移三行
[root@mysql5-7 ~]# echo -e "\033[0m today is fine \033[3B"today is fine
第六章循环shell编程
6.1什么是循环
while设置条件条件成立后,循环开始,直到人为设置中断循环的条件结束
until,和while循环相反,当条件不成的时候,循环开始,直到条件成立了循环结束
for
select
while循环主要用于程序后台运行,需要持续运行的守护进程
while循环语法
while <条件表达式>
do条件成立后,需要执行的代码
done

while循环实践
1.每两秒输出一次系统的负载
[root@shell ~]# while [ 1 -lt 2 ];do echo hello;sleep 1;done
hello
hello
[root@shell ~]# while [ 1 -gt 2 ];do echo hello;sleep 1;done
6.2开发一个监控CPU平均负载的脚本
案例需求
分别打印CPU 1min 5min 15min 负载值
[root@shell scripts]# cat load.sh
#!/bin/bash
##############################################################
# File Name: load.sh
# Version: V1.0
# Author:
# Organization:
# Created Time : 2021-04-02 21:12:50
# Description:
##############################################################
while true
douptime >> /tmp/uptime.logsleep 2
done
执行结果
while循环结合后台运行,不占用端口
[root@shell scripts]# bash load.sh &
[1] 11956
#用tail -f  实时监测
[root@shell ~]# tail -f /tmp/uptime.log 21:37:52 up 16:59,  3 users,  load average: 0.00, 0.01, 0.0521:37:54 up 16:59,  3 users,  load average: 0.00, 0.01, 0.05查看该进程
[root@shell scripts]# ps -ef|grep load.sh
root      11956   3727  0 21:56 pts/0    00:00:00 bash load.sh
root      12076   3727  0 21:58 pts/0    00:00:00 grep --color=auto load.sh[root@shell scripts]# jobs -l
[1]+ 11956 Running                 bash load.sh &#后台程序调入前台
[root@shell scripts]# fg 1
bash load.sh
| 用法 | 说明 |
|---|---|
| sh whilel.sh & | 把脚本whilel.sh放到后台执行(后台运行脚本时常用) |
| nohup whilel.sh & | 使用nohup把脚本while.sh放到后台执行 |
| Ctl+c | 停止执行当前脚本或任务 |
| Ctl+z | 暂停执行当前脚本或任务 |
| bg | 把当前脚本或任务放到后台执行,可以理解为backgrund |
| gf | 当前脚本或任务拿到前台执行如果有多个任务,可使用fg加任务编号调出对应脚本任务,如fg2,调用出第二个脚本任务,fg可以理解为frontground |
| jobs | 查看当前执行的脚本或任务 |
| kill | 关闭执行的脚本任务,即以“kill %任务编号”的形式关闭脚本,这个任务编号,可以通过jobs获取 |
while实践
双小括号双中括号判断实践
[root@shell scripts]# cat while_num.sh
#!/bin/bash
num=5
#判断循环
while [[ $num > 0 ]]
#while [[ $num > 0 ]]
#while (( $num > 0))
do# 注意这里,需要对while的条件判断,做限制echo "$num"((num--)) #对num变量进行减一的操作
done#执行结果
[root@shell scripts]# bash while_num.sh
5
4
3
2
1
[root@shell scripts]#
seq命令开发实践
[root@shell scripts]# cat while_num.sh
#!/bin/bash
num="$1"
#判断循环
# 模拟seq 5 -1 1
while [[ $num > 0 ]]
#while [[ $num > 0 ]]
#while (( $num > 0))
do# 注意这里,需要对while的条件判断,做限制echo "$num"((num--)) #对num变量进行减一的操作
done#执行结果
[root@shell scripts]# bash while_num.sh  5
5
4
3
2
1
until循环实践
until循环和while循环相反,当条件不成的时候,循环开始,直到条件成立了循环结束
[root@shell scripts]# cat while_num.sh
#!/bin/bash
num="$1"
#判断循环
until [ $num -lt 1 ]
do# 注意这里,需要对while的条件判断,做限制echo "$num"((num--)) #对num变量进行减一的操作
done#执行结果
[root@shell scripts]# bash while_num.sh 5
5
4
3
2
1
while求和计算
[root@shell scripts]# cat while1.num.sh
#!/bin/bash
num=1
sum=0
while [ $num -le 100 ]
do((sum=sum+num))   #双小括号,进行变量及计算与数值#对数值num变量进行,加一操作((num++))
done
#对总和变量进行判断,是否正确计算,以及打印
[ "$sum" -ne 0 ] && printf "1加到100的总和是:$sum\n"#执行结果过
[root@shell scripts]# bash while1.num.sh
1加到100的总和是:5050
6.3while监控网站存活脚本开发
需求:while监控网站,每隔10s确定一次
[root@shell scripts]# cat check_web.sh www.baidu.com
#!/bin/bash
##############################################################
# File Name: check_web.sh
# Version: V1.0
# Author:
# Organization:
# Created Time : 2021-04-03 09:00:43
# Description:
##############################################################
usage(){echo "Usage: $0 url"exit 1
}
if [ "$#" -ne 1 ]
thenusage
fi
while true
doif [ `curl -o /dev/null --connect-timeout 5 -s -w "%{http_code}" $1|egrep -w "200|301|302"|wc -l` -ne 1  ]thenecho "$1 website error..."elseecho "$1 website is running"fisleep 10
done
执行结果
[root@shell scripts]# bash check_web.sh www.baidu.com
www.baidu.com website is running
6.4检测多个URL脚本开发
#shell数组的概念:一个变量存取多个值
[root@shell scripts]# cat check_url_list.sh
#!/bin/bash
##############################################################
# File Name: check_url1.sh
# Version: V1.0
# Author:
# Organization:
# Created Time : 2021-04-03 09:55:54
# Description:
##############################################################
# 对脚本执行的次数进行统计
check_count=0
url_list=(http://www.baidu.comhttp://www.taobao.comhttp://10.0.1.6
)
#开发一个倒计时函数
wait(){echo "3秒后开始检查RUL"echo ""#for循环for i in $(seq 3 -1 1)doecho "$i"sleep 1doneecho "-------程序开始运行"
}
check_url(){wait# 对数组进行循环遍历# C语言风格的for循环# 语法for ((初始变量;变量的循环范围设置,变量递增))# 该for询函是变量3次的意思for ((i=0;i<`echo ${#url_list[*]}`;i++))dowget -o /dev/null -T 3 --tries=2  --spider ${url_list[$i]} >/dev/null 2>&1if [ $? -eq 0 ]thenecho "${url_list[$i]} is running"elseecho "${url_list[$i]} is error"fidone((check_count++))
}
main(){while truedocheck_urlecho "-----------检车次数是:${check_count}---------"sleep 3done
}
main
执行结果
[root@shell scripts]# bash check_url_list.sh
3秒后开始检查RUL3
2
1
-------程序开始运行
http://www.baidu.com is running
http://www.taobao.com is running
http://10.0.1.6 is error
-----------检车次数是:1---------
shell数组的定义和使用
语法
定义数组
url_list=("url1" "url2" "url3")案例实践
1.定义数组
[root@shell ~]# url_list=("url1" "url2" "url3")
2.取出数组的所有的值
[root@shell ~]# echo ${url_list[*]}
url1 url2 url3
3.获取数组的元素个数,也是遵循变量子串的功能
[root@shell ~]# echo ${#url_list[*]}
3
4.获取单个数的值
#查看组数的完整信息
[root@shell ~]# set|grep url_list
url_list=([0]="url1" [1]="url2" [2]="url3")
[root@shell ~]# echo ${url_list[2]}
url3
模拟开发cat命令之exec命令
exec读取文件
exec命令 用于调用并执行指令的命令。exec命令通常用在shell脚本程序中,可以调用其他的命令。如果在当前终端中使用命令,则当指定的命令执行完毕后会立即退出终端。
#支持文件读取,把文件数据,读取到shell脚本中
[root@shell scripts]# cat  2.txt
好好学习
天天向上#利用exec命令读取文件
[root@shell scripts]# cat exec_file.sh
#!/bin/bash
exec </server/scripts/2.txt
while read line
doecho $line
done#执行结果
[root@shell scripts]# bash exec_file.sh
好好学习
天天向上
6.5开发nginx日志分析脚本
需求
开发一个分析nginx的日志,分析每一行的信息,计算nginx给客户端相应的总字节数,通过nginx.conf的配置文件这个参数$body_bytes_sent获取总字节数
[root@shell scripts]# tail -5 /opt/nginx119/logs/access.log
10.0.1.6 - - [03/Apr/2021:10:36:54 +0800] "HEAD / HTTP/1.1" 200 0 "-" "Wget/1.14 (linux-gnu)"
10.0.1.6 - - [03/Apr/2021:10:37:01 +0800] "HEAD / HTTP/1.1" 200 0 "-" "Wget/1.14 (linux-gnu)"
10.0.1.6 - - [03/Apr/2021:10:37:07 +0800] "HEAD / HTTP/1.1" 200 0 "-" "Wget/1.14 (linux-gnu)"
10.0.1.6 - - [03/Apr/2021:10:37:14 +0800] "HEAD / HTTP/1.1" 200 0 "-" "Wget/1.14 (linux-gnu)"
10.0.1.6 - - [03/Apr/2021:10:37:21 +0800] "HEAD / HTTP/1.1" 200 0 "-" "Wget/1.14 (linux-gnu)"
思路
1.shell脚本该读取日志文件,每一行的读取,进行对每一行的分析
exec命令 用于调用并执行指令的命令。exec命令通常用在shell脚本程序中,可以调用其他的命令。如果在当前终端中使用命令,则当指定的命令执行完毕后会立即退出终端。
#支持文件读取,把文件数据,读取到shell脚本中
脚本开发
#!/bin/bash
##############################################################
# File Name: 1.sh
# Version: V1.0
# Author:
# Organization:
# Created Time : 2021-04-02 21:48:12
# Description:
##############################################################
sum=0
exec <$1
# 每一次循环,就是处理每一行信息
while read line
dosize=`echo $line|awk '{print $10}'`expr $size + 1 &>/dev/null# 处理到某一行,没有该Body_butes_send的数据,特殊情况if [ $? -ne 0 ];then# 跳过本次循环,继续下一次的循环,表示某一行日志是无用的continuefi# 如下就是处理Body_butes_send的数据的情况了((sun=sum+$size))done# 所有行都读取处理完毕后,继续操作 # $1表示传入进来的参数,也就是文件名# ${sum}/1024是获取KB单位的大小${sum}/1024/1024获取的MB大小echo "$1 分析出来的总共给客户端发送的数据是:`echo $((${sum}/1024))kB大小`"
执行结果
[root@shell scripts]# bash  count_nginx_log.sh /opt/nginx119/logs/learn_nginx_error.log
/opt/nginx119/logs/learn_nginx_error.log 分析出来的总共给客户端发送的数据是:0kB大小
6.6节开发防ddos攻击脚本
ddos介绍
分布式拒绝服务(DDos)攻击是通过大规模互联网来了淹没目标服务器或其周边基础设施,以破坏目标服务器,服务或网络正常流量的恶意行为
思路
分析web服务器的日志,来统计客户端的ip信息,iptables
iptables -I INPUT -s ip -j DROP #来封禁恶意流量
shell封禁ddos攻击脚本
统计恶意流量ip地址
cat /opt/nginx119/logs/access.log |awk '{print $1}'|grep -v "^$"|sort |uniq -c
[root@shell scripts]# cat ddos.sh
#!/bin/bash
##############################################################
# File Name: ddos_nginx.sh
# Version: V1.0
# Author:
# Organization:
# Created Time : 2021-04-03 13:28:03
# Description:
#############################################################le trule true
file=$1
while true
do
# 过了出客户端的ip信息
awk '{print $1}' ${file}|grep -v "^$"|sort|uniq -c >/tmp/my_access_ip.log
# 对ip文件,进行统计处理了
# 找出恶意的ip地址,进行封禁
exec < /tmp/my_access_ip.log
# 循环分析每一行的数据
while read line
do# 找出ip,ip=`echo $line|awk '{print$2}'`#再找出访问的次数count=`echo $line|awk '{print $1}'`#对恶意的请求进行判断。#访问次数大于500的,肯定是非正常访问,应该进行封禁#并且iptables里面没有该ip,则新加一个 规则if [ $count -gt 500 ] && [ `iptables -L -n|grep "$ip"|wc -l` -lt 1 ]theniptables -I INPUT -s $ip -j DROPecho "$line is dropped!!" >> /tmp/drop_list_$(date +%F).logfidonesleep 3600
done
执行结果
[root@shell scripts]# bash ddos.sh &
[1] 106085
[root@shell scripts]# cat /tmp/drop_list_2021-04-03.log
24 10.0.1.1 is dropped!!
38 10.0.1.8 is dropped!![1]+  Stopped                 bash ddos.sh
[root@mysql ~]# wget --spider -T 5 -q -o /dev/null -t 2 10.0.1.6
[root@mysql ~]#
最终结果
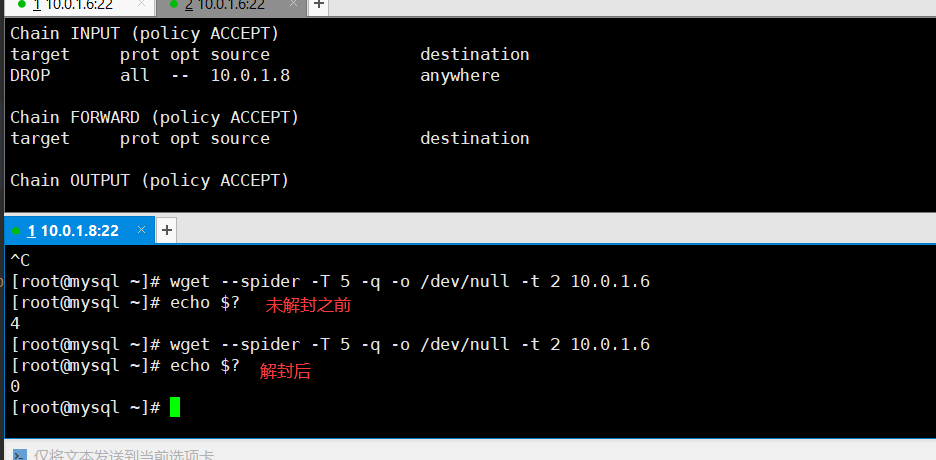
总结
while循环一般用于希望循环运行,持续运行,不退出的应用,例如守护进程在后台运行
case语句可用if语句代替,而当如启停脚本开发时,对固定的字符串判断,可以用case
第七章shell编程之for循环
7.1节 for循环语法实践
for循环语句和while循环类似,但是for主要用于有次数限制的循环,而不是无限循环
for循环:用于将一组命令执行已知的次数
for语法1
for 变量 in 变量取值的列表
doecho $变量
donefor循环后面紧跟着一个变量,变量会依次获取 in关键字后面的变量列表的内容
每次取出一个,然后进入do,done的循环,执行其中代码
然后继续循环,只带这个取值列表的内容为空了。循环结束
for语法2
类似C语言编程风格的for循环
for ((expr1;expr2;expr3))
do代码
donefor((变量初始化定义;设置变量的取值范围;变量递增/递减))
doshell
done
for循环执行流程图

案例实践
[root@shell scripts]# cat  for1.sh
#!/bin/bash
for num in `seq 10`
#跟上面一样
#for num in 1 2 3 4 5 6 7 8 9 10
doecho $num
done[root@shell scripts]# cat  for1.sh
#!/bin/bash
#写法二
for ((num=1;num<=10;num++))
doecho $num
done
解释
for循环关键字的双括号是固定语法,第一个表达式是白能量的初始化;第二个是变量的范围设置;第三个变量是变量的自增,自减
逆序输出10-1
[root@shell scripts]# cat for2.sh
#!/bin/bash
#写法一
for num in 10 9 8 7 6 5 4 3 2 1
doecho "$num"
done
echo "----------------------------------"
#写法二
for num in {10..1}
doecho "$num"
done
echo "----------------------------------"
#写法
for num in `seq 10 -1 1`
doecho $num
done
7.2节通过for循环,获取当前目录,以及其子目录的所有文件名
1.准备好测试的数据
[root@shell scripts]# mkdir -p /tmp/shell/
[root@shell tmp]# mkdir -p /tmp/shell/{a..c}
[root@shell tmp]# tree /tmp/shell/
/tmp/shell/
├── a
├── b
└── c3 directories, 0 files
2.创建一些文件内容
[root@shell scripts]# touch /tmp/shell/a/{1..3}.txt
3.此时的数据源
[root@shell ~]# tree -F /tmp/shell/
/tmp/shell/
├── 1.txt
├── 2.txt
├── 3.txt
├── a/
│   ├── 1.txt
│   ├── 2.txt
│   └── 3.txt
├── b/
└── c/
脚本如下
开发一个能够找出Linux目录,以及其目录的所有文件
#!/bin/bash
##############################################################
# File Name: for_list_file.sh
# Version: V1.0
# Author:
# Organization:
# Created Time : 2021-04-03 15:54:25
# Description:
##############################################################
# 开发功能函数,作用就是列出文件中的内容
function list_file(){# 进行第一次的目录询函遍历
for file in `ls $1`
do# 进行目录递归的搜索# 继续搜索是文件类型的file# 针对每一次的file变量,进行判断,是文件,还是目录# 获取该file的绝对路径,在利用条件判断是文件还是目录dir_or_file=$1"/"$file# 判断如果是dir的话,就继续进行列出其内容if [ -d "$dir_or_file" ]thenlist_file $dir_or_fileelseecho $dir_or_filefi
done
}
list_file $1
执行结果
[root@shell scripts]# bash for_list_file.sh /tmp/shell
/tmp/shell/1.txt
/tmp/shell/2.txt
/tmp/shell/3.txt
/tmp/shell/a/1.txt
/tmp/shell/a/2.txt
/tmp/shell/a/3.txt
7.3节 开发批量修改文件后缀脚本
-x 参数可以看出shell执行的流程,每一行代码的执行的
批量修改文件后缀
[root@shell scripts]# cat for_rename.sh
#!/bin/bash
##############################################################
# File Name: for_rename.sh
# Version: V1.0
# Author:
# Organization:
# Created Time : 2021-04-03 17:09:43
# Description:
##############################################################
cd /tmp/shell/
for file in `ls .|grep -E "*.txt"`
do rename "txt" "log" $file
done
name "txt" "log" $file
done
执行结果
[root@shell scripts]# bash for_rename.sh
[root@shell scripts]# ls /tmp/shell/
10.log  1.log  2.log  3.log  4.log  5.log  6.log  7.log  8.log  9.log  a  b  c
7.4节开发批量修改文件名的脚本
1.准备一些测试文件
[root@localhost scripts]# touch  /tmp/shell/haoge{1..10}.txt
[root@localhost scripts]# ls /tmp/shell/
haoge10.txt  haoge2.txt  haoge4.txt  haoge6.txt  haoge8.txt
haoge1.txt   haoge3.txt  haoge5.txt  haoge7.txt  haoge9.txt
批量修改给文件名字haoge 改成xiaohaoge666
[root@localhost scripts]# cat  for_sed.sh
#!/bin/bash
##############################################################
# File Name: for_sed.sh
# Version: V1.0
# Author:
# Organization:
# Created Time : 2021-04-03 20:14:45
# Description:
##############################################################
cd /tmp/shell/
for file in `ls *.txt`
do# 执行重名命令的动作# sed针对文件的数据量进行修改# 改的是文件里的数据信息mv $file `echo $file|sed 's/haoge/xiaohaoge666/g'`
done
执行结果
[root@localhost scripts]# bash  for_sed.sh
[root@localhost shell]# ls
xiaohaoge66610.txt  xiaohaoge6662.txt  xiaohaoge6664.txt  xiaohaoge6666.txt  xiaohaoge6668.txt
xiaohaoge6661.txt   xiaohaoge6663.txt  xiaohaoge6665.txt  xiaohaoge6667.txt  xiaohaoge6669.txt
把所有的文件,去掉666的后缀
[root@localhost shell]# rename "666" "" /tmp/shell/*.txt
[root@localhost shell]# ls
xiaohaoge10.txt  xiaohaoge2.txt  xiaohaoge4.txt  xiaohaoge6.txt  xiaohaoge8.txt
xiaohaoge1.txt   xiaohaoge3.txt  xiaohaoge5.txt  xiaohaoge7.txt  xiaohaoge9.txt
for嵌套循环
打印九九乘法表
#!/bin/bash
for ((a=1;a<=9;a++))
do# 第二层for循环,模式 b数字for ((b=1;b<=9;b++))do#如果a大于等于bif [[ a -ge b ]]thenecho -n -e "$b * "$a" =$[a*b]\t"fidoneecho " "
done
执行结果
[root@localhost scripts]# bash for_table.sh
1 * 1 =1
1 * 2 =2   2 * 2 =4
1 * 3 =3   2 * 3 =6   3 * 3 =9
1 * 4 =4   2 * 4 =8   3 * 4 =12  4 * 4 =16
1 * 5 =5   2 * 5 =10  3 * 5 =15  4 * 5 =20  5 * 5 =25
1 * 6 =6   2 * 6 =12  3 * 6 =18  4 * 6 =24  5 * 6 =30  6 * 6 =36
1 * 7 =7   2 * 7 =14  3 * 7 =21  4 * 7 =28  5 * 7 =35  6 * 7 =42  7 * 7 =49
1 * 8 =8   2 * 8 =16  3 * 8 =24  4 * 8 =32  5 * 8 =40  6 * 8 =48  7 * 8 =56  8 * 8 =64
1 * 9 =9   2 * 9 =18  3 * 9 =27  4 * 9 =36  5 * 9 =45  6 * 9 =54  7 * 9 =63  8 * 9 =72  9 * 9 =81
7.5节 开发MySQL分库备份脚本
mysql的数据库概念
数据库可以理解为是一个文件夹
库中的数据表可以理解为文件夹的一堆execl表格
数据表里的数据可以理解为exec表格的数据
读写表中的数据可以理解为增删改查一个exec表格的数据
忘记MySQL数据库密码解决办法
1.修改mysql的配置文件
vim /etc/my.cnf
2.在配置[mysqld]添加如下参数
skip-grant-tables #跳过授权表,让你免密登陆数据库
3.重启数据库
/etc/init.d/mysqld start
4.此时就可登陆数据了,是不需要密码了
mysql -uroot -p
5.查看所有的数据
show databases;
6.进入数据库,查看库中的数据表,,比如进入一个目录,一样的操作
use mysql;
7.查看库中的表
show tables;
8.查看标中的数据
elect * from event;
9.给mysql设置密码的SQL语句
UPDATE mysql.user
SET authentication_string = PASSWORD('123456')
WHERE user = 'root' ANDhost = 'localhost';
10.刷新授权表
flush privileges;
11.删除my.cnf中的免密登陆参数,然后重启,用密码登陆
/etc/init.d/restart
开发mysql数据库的分库,分表备份脚本
[root@shell scripts]# cat mysql_dump_db_table.sh
#!/bin/bash
##############################################################
# File Name: mysql_backup.sh
# Version: V1.0
# Author:
# Organization:
# Created Time : 2021-04-03 21:45:10
# Description:
##############################################################
# 数据库连接,配置信息,定义为变量
MYUSER=root
MYPWD=123456
DBPATH=/my_mysql_db_back
MYCMD="mysql -u$MYUSER -p$MYPWD"
# mysql的备份命令
MYDUMP="mysqldump -u$MYUSER -p$MYPWD"
# 首先要确保数据目录存在
[ ! -d "$DBPATH" ] && mkdir $DBPATH
# 利用for循环,对数据进行读取,以及备份
# 先找出所有所有数据的名字
for dbname in `$MYCMD -e "show databases;"|sed '1d' |egrep -v "mysql|schema"`
do# 就要针对数据库备份的操作了# 创建和库同名的文件夹mkdir ${DBPATH}/${dbname}_$(date +%F) -p# 循环嵌套的,备份该数据中的数据表for table in `$MYCMD -e "show tables from $dbname;"|sed '1d'`do# 针对数据表进行备份操作$MYDUMP $dbname $table |gzip > $DBPATH/${dbname}_$(date +%F)/${dbname}_${table}.sql.gzdone
done
执行结果
[root@shell scripts]# bash mysql_dump_db_table.sh
[root@shell scripts]# ls /my_mysql_db_back/
test_2021-04-04  zrlog_2021-04-04  zrlog_test_2021-04-04
无注释版本
[root@shell scripts]# cat mysql_back.sh
#!/bin/bash
##############################################################
# File Name: mysql_back.sh
# Version: V1.0
# Author:
# Organization:
# Created Time : 2021-04-04 08:28:16
# Description:
##############################################################
MYUSER=root
MYPWD=123456
DBPATH=/my_mysql_db_back
MYCMD="mysql -u$MYUSER -p$MYPWD"
MYDUMP="mysqldump -u$MYUSER -p$MYPWD"
[ ! -d "$DBPATH" ] && mkdir $DBPATH
for dbname in `$MYCMD -e "show databases;"|sed '1d' |egrep -v "mysql|schema"`
domkdir ${DBPATH}/${dbname}_$(date +%F) -p for table in `$MYCMD -e "show tables from $dbname;"|sed '1d'`do$MYDUMP $dbname $table |gzip > $DBPATH/${dbname}_$(date +%F)/${dbname}_${table}.sql.gzdone
done
7.6节for循环系统用户且设置随机密码
批量创建系统账号,密码
# 格式化结果输出
# [确定] 【失败】
#
# Use LSB init script functions for printing messages, if possible
#
lsb_functions="/lib/lsb/init-functions"
if test -f $lsb_functions ; then. $lsb_functions
else# Include non-LSB RedHat init functions to make systemctl redirect workinit_functions="/etc/init.d/functions"if test -f $init_functions; then. $init_functionsfilog_success_msg(){echo " SUCCESS! $@"}log_failure_msg(){echo " ERROR! $@"}
fi
# 上述是对结果美化,格式化的代码
下面写我们的功能代码
[root@shell scripts]# cat for_user_pwd.sh
#!/bin/bash
##############################################################
# File Name: for_user_pwd.sh
# Version: V1.0
# Author:
# Organization:
# Created Time : 2021-04-04 09:59:42
# Description:
##############################################################
# Use LSB init script functions for printing messages, if possible
#
lsb_functions="/lib/lsb/init-functions"
if test -f $lsb_functions ; then. $lsb_functions
else# Include non-LSB RedHat init functions to make systemctl redirect workinit_functions="/etc/init.d/functions"if test -f $init_functions; then. $init_functionsfilog_success_msg(){echo " SUCCESS! $@"}log_failure_msg(){echo " ERROR! $@"}
fi
#上面是结果美化user="xiaohaoge"
pwdfile="/tmp/my_pwd.file"
# 循环创建10个用户
# -w就是输出1-10的时候。不够的地方,补一个0
for num in `seq -w 10`
do# 生成随机数的密码,且加大免密难度的操作pwd=`echo "$RANDOM" | md5sum |cut -c3-11`useradd $user$num &>/dev/null && \# 把每次生成的用户名和密码,写入到一个密码文件中存储echo -e "$user$num:$pwd" >>$pwdfile# 可以对结果进行格式化判断打印了if [ $? -eq 0 ]thenlog_success_msg "$user$num is success create"elselog_failure_msg "$user$num is not create,fail"fi
done
echo "----------------"
# 批量设置密码,批量修改密码
chpasswd < $pwdfile
# 查看一次密码文件的信息,然后清空该密码文件
cat $pwdfile && > $pwdfile
执行结果
[root@shell scripts]# bash for_user_pwd.sh SUCCESS! xiaohaoge01 is success createSUCCESS! xiaohaoge02 is success createSUCCESS! xiaohaoge03 is success createSUCCESS! xiaohaoge04 is success createSUCCESS! xiaohaoge05 is success createSUCCESS! xiaohaoge06 is success createSUCCESS! xiaohaoge07 is success createSUCCESS! xiaohaoge08 is success createSUCCESS! xiaohaoge09 is success createSUCCESS! xiaohaoge10 is success create
----------------
xiaohaoge01:3a548c617
xiaohaoge02:c6569608f
xiaohaoge03:3f9e97d02
xiaohaoge04:ed3c7bea7
xiaohaoge05:d39496697
xiaohaoge06:64ce73791
xiaohaoge07:05943f264
xiaohaoge08:7e1379ef5
xiaohaoge09:9a8a6bfa4
xiaohaoge10:cd313b7fa
一键清空上述,上述创建的用户数据
[root@shell scripts]# for user in `awk -F ":" '{print $1}' /etc/passwd|grep xiaohaoge`;do userdel -rf $user;done
有关md5文件内容
md5sum命令作用
在网络传输、设备之间转存,复制大文件等时,可能会出现传输前后数据不一致的情况,这种情况在网络相当不稳定的环境中,容易出现,那么检验文件的完整性,也是势在必行的
它会逐位对文件的内容进行校验,是文件的内容,与文件名无关,也就是文件内容相同,其md5值相同。md5值是一个128位的二进制数据,转换成16进制则是32(128/4)位的进制值
md5检验,有很小的概率不同的文件生成的md5可能相同,比md5更安全的校验算法还有SHA*系列的。
md5sum和shalsum程序可以对数据应用对应的算法来生成校验值
md5sum是一个长度为32个字符的16进制串,md5sum命令用于生成和校验文件的md5值
实践
在很多场景下,会用到随机数,掌握随机数生成是很有必要的
Unix和Linux支持多种校验和程序,但强健性最好且使用最为广泛的校验和算法是MD5和SHA-1。md5sum和sha1sum程序可以对数据应用对应的算法来生成校验和
使用下列命令计算md5sum
[root@shell scripts]# md5sum /etc/passwd
6049fe1604f3ac65070cf76ef841b87e /etc/passwd
如上所示,md5sum是一个长度为32个字符的十六进制串。
我们可以将输出的校验和重定向到一个文件中,以备后用
[root@shell scripts]# expr length 6049fe1604f3ac65070cf76ef841b87e
32
[root@shell scripts]# md5sum /etc/passwd >/tmp/pwd.md5
[root@shell scripts]# cat /tmp/pwd.md5
6049fe1604f3ac65070cf76ef841b87e /etc/passwd
[root@shell scripts]# md5sum -c /tmp/pwd.md5
/etc/passwd: OK
[root@shell scripts]# useradd xhg
[root@shell scripts]# md5sum /etc/passwd
# 校验文件 -c, --check 从文件中读取MD5 的校验值并予以检查
de9959b086464d9b415877ec9b23cd30 /etc/passwd
[root@shell scripts]# md5sum -c /tmp/pwd.md5
/etc/passwd: FAILED
md5sum: WARNING: 1 computed checksum did NOT match
shell生成随机数
1.通过RANDOM变量实现
RANDOM变量随机数范围在0~32767,可以添加一些字符串正价密码复杂度
[root@shell scripts]# for ((i=1;i<=10;i++));do echo $RANDOM;done
29788
19040
5076
21993
21322
8683
2913
6390
25475
27453
结合md5sum与RANDOM随机数,并且截取部分字符串
[root@shell scripts]# echo "haha$RANDOM"
haha4700
[root@shell scripts]# echo "haha$RANDOM"|md5sum
ad08f160c905d80e9c4c13c61f2793b8 -#截取8~15位字符创
[root@shell scripts]# echo "haha$RANDOM"|md5sum|cut -c8-15
9408c6fe
通过UUID生成随机数
[root@shell scripts]# cat /proc/sys/kernel/random/uuid
e2f30922-08e0-4397-abd4-0cb8b090917c
UUID意思是全球通用唯一识别码,其作用是让分布式系统中所有元素都有唯一的辨识信息,他能够是的网络中的任意一台机器都有唯一的UUID编码,因为,加入了硬件、时间、机器运行状态等信息计算得出。
第8章shell循环流程控制
8.1什么是循环控制
for、while循环目前已知for循环可以设置一个边界的条件,用于结束循环,循环固然很重,学会终端循环、设置条件也很重要,可以进行复杂的逻辑控制
break,终端循环
continue,跳过本地循环
exit 退出脚本
return 退出函数
break、continue主要用于for、while、if控制程序的走向
exit用于终止所有语句,退出当前脚本,以及给当前shell返回状态值
return只用在函数内,返回函数执行状态值
![]()
图解循环控制
break解释
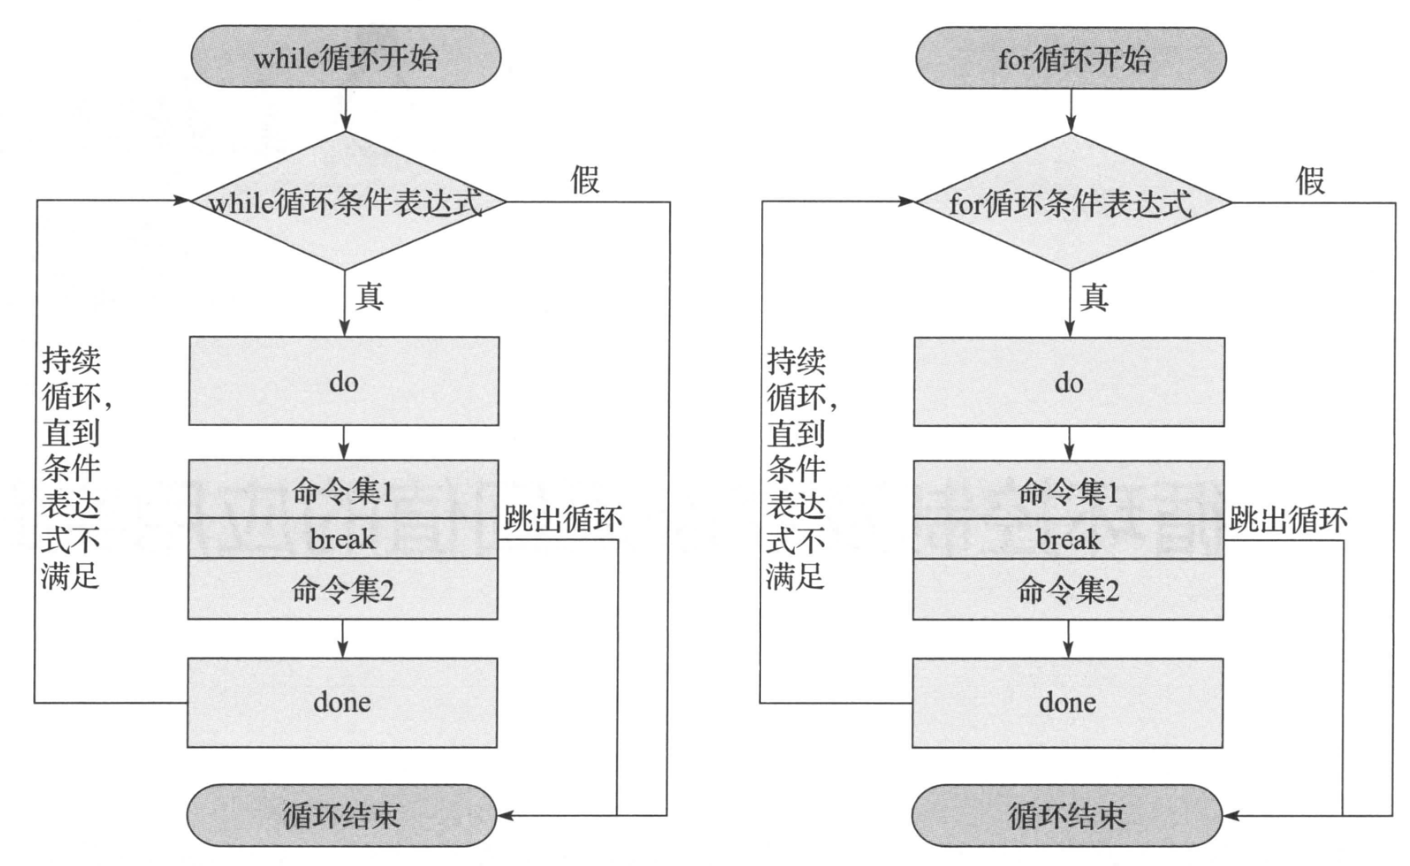
continue解释

exit解释
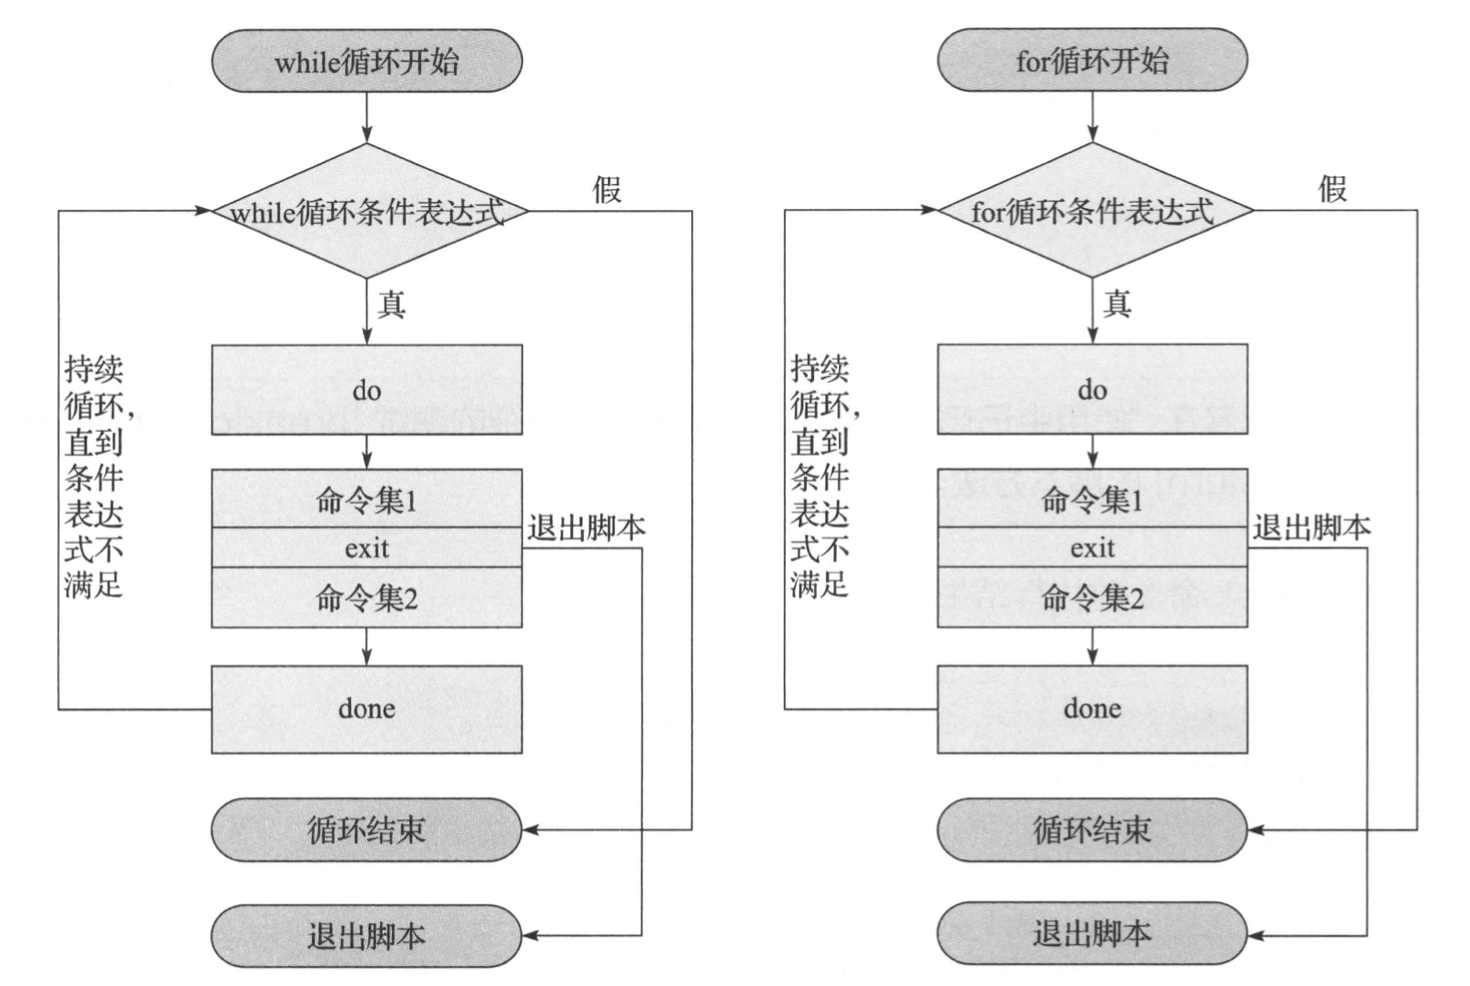
循环控制实践脚本
用于测试break、continue、exit、return的脚本
[root@shell scripts]# cat for_status.sh
#!/bin/bash
# 帮助信息
if [ $# -ne 1 ];thenecho "Usage: $0 {break|continue|exit|return}"exit 1
fi
test(){for ((i=0;i<=5;i++))do# 当i变量,循环到3的时候,接受脚本传进来的参数,进行循环控制if [ $i -eq 3 ];then# 如果传入进来的是return语句,这里就会退出函数,且拿到函数的返回码$*; #接收用户参数 break,continue,exit,return看不同的结果fiecho $idone echo "我是被定义的函数,我被执行了"
}
# 执行函数,传入参数
test $*
# 判断上述的函数,执行结果
func_result=$?
# 如果是return的话,就打印如下的信息
if [ `echo $* return|wc -l` -eq 1 ]
then echo "return's exit status_code is : $func_result"
fi
echo "脚本执行结束"
执行结果
#什么都不加
[root@shell scripts]# bash for_status.sh
Usage: for_status.sh {break|continue|exit|return}#break,到3循环结束
[root@shell scripts]# bash for_status.sh break
0
1
2
我是被定义的函数,我被执行了
脚本执行结束#continue,循环跳过了3
[root@shell scripts]# bash for_status.sh continue
0
1
2
4
5
我是被定义的函数,我被执行了
脚本执行结束#exit,退出脚本,不再执行后续代码
[root@shell scripts]# bash for_status.sh exit
0
1
2# return,结束当前函数执行
[root@shell scripts]# bash for_status.sh return
0
1
2
return's exit status_code is : 0
脚本执行结束
8.2节破解md5sum
例如如下的字符串,是RANDOM随机数结合md5sum加密后得出的连续10位结果,想要破解,如何实现?
4fe8bf20ed
提示:RANDOM范围0~32767,将其所有的数字,通过md5sum加密,得到一个结果数据库,然后进行数据比对。
1.生成所有数字的随机数,以及md5sum的校验值,生成一个数据库校验文件
#!/bin/bash
for num in {0..32767}
doecho "`echo $num|md5sum` $num" >> /tmp/my_random_md5sum.db
done
执行结果
[root@shell scripts]# bash create_random_md5sum.sh
[root@shell scripts]# ll -h /tmp/my_random_md5sum.db
-rw-r--r-- 1 root root 1.4M Apr 4 17:21 /tmp/my_random_md5sum.db
[root@shell scripts]# cat /tmp/my_random_md5sum.db |wc -l
32768
[root@shell scripts]# tail -5 /tmp/my_random_md5sum.db
a192ee21829ee00faf2fb95708b5b18f - 32763
a7bc9db1c5d7d3a5bb85ea9abbe65f57 - 32764
21d4a02fdd7c330fbc27e79ade953f2d - 32765
de50e2ca2c30a982d886b19f6198cc69 - 32766
63fceb28a8c4c72fd3b2f5d71950ee08 - 32767
开发检索脚本
#!/bin/bash
md5sum="4fe8bf20ed"
while read line
do # 判断哪一行正好是符合结果的if [ `echo $line|grep $md5sum|wc -l` -eq 1 ]thenecho "恭喜你找到了,慈航完整的结果是: $line"# 此时结果已经找到了,循环就可以结束了breakfi
done </tmp/my_random_md5sum.db
程序检索的结果如下
[root@shell scripts]# bash check_md5.sh
恭喜你找到了,慈航完整的结果是: 1dcca23355272056f04fe8bf20edfce0 - 5
第9章 shell之数组开发
9.1节初始shell数组
所谓数组,就是有一组数据,而不是单个的数据
# 普通白能量
name="xiaohaoge"
echo ${name}
# 数组变量
[root@shell scripts]# names=(xiao hao ge)
[root@shell scripts]# echo ${names[*]}
xiao hao ge
数组变量
语法
定义数组,一个数组变量,中是可以存储多个值的
存储多个变量的值
数组名=(值1 值2 值3 值4)
[root@shell scripts]# names=(xiao hao ge)
输出数组的变量的值
在shell环境中找到该变量
[root@shell scripts]# set |grep mingzi
mingzi=([0]="xiao" [1]="hao" [2]="ge")
数组就是多个元素的集合,把多个元素,用一个变量名存储,然后再挨个给元素标记序号
数组包含了2大特征
1.数组内的变量
2.每一个变量的下标(索引),也就是上述命令,看到的标号
数组

普通变量,和数组变量定义的区别
[root@shell ~]# hero="小卤蛋 公孙离 后裔"
[root@shell ~]# echo $hero
小卤蛋 公孙离 后裔
[root@shell ~]# heros=(小卤蛋 公孙离 后裔)
[root@shell ~]# set |grep ^heros
heros=([0]="小卤蛋" [1]="公孙离" [2]="后裔")
9.2节数组的曾删改查
方法一、小括号将变量值括起来,赋值给数组变量,注意变量之间空格分隔,最终的值赋予一个变量
[root@shell ~]# set |grep ^stu
students=([0]="张三" [1]="李四" [2]="二蛋")# 获取数组中所有的元素
语法
${数组变量[索引号]}
# 这里写入*符号,表示获取所有的元素
echo ${students[*]}
# 定义,和使用,获取元素
[root@shell ~]# echo ${students[*]}
张三 李四 二蛋
[root@shell ~]# echo ${students[2]}
二蛋
[root@shell ~]# echo ${students[0]}
张三
键值对赋值,根据下标位置添加
key----value的形式,叫做键值对
下标--------元素的值
[root@shell ~]# heros=([0]=后裔 [1]=孙尚香 [2]=露娜)
[root@shell ~]# set |grep ^heros
heros=([0]="后裔" [1]="孙尚香" [2]="露娜")
[root@shell ~]# echo ${heros[*]}
后裔 孙尚香 露娜
定义无序的索引,并且shell自动进行排序存储
[root@shell ~]# heros2=([4]=猴子 [1]=孙尚香 [2]=公孙离)
[root@shell ~]# echo ${heros2[*]}
孙尚香 公孙离 猴子
[root@shell ~]# set |grep ^heros2
heros2=([1]="孙尚香" [2]="公孙离" [4]="猴子")
[root@shell ~]# heros2=([4]=猴子 [1]=孙尚香 [2]=公孙离 [0]=马超)
[root@shell ~]# set |grep ^heros2
heros2=([0]="马超" [1]="孙尚香" [2]="公孙离" [4]="猴子")
挨个的针对索引取值
[root@shell ~]# heros2=([4]=猴子 [1]=孙尚香 [2]=公孙离 [0]=马超)
[root@shell ~]# set |grep ^heros2
heros2=([0]="马超" [1]="孙尚香" [2]="公孙离" [4]="猴子")
[root@shell ~]# echo ${heros2[2]}
公孙离
方法三:通过小标,挨个添加
索引存在则修改元素值
索引不存在则新增该元素----值
# 给数组添加元素
[root@shell ~]# heros_list=([4]=猴子 [1]=孙尚香 [2]=公孙离 [0]=马超)
[root@shell ~]# heros_list[7]=镜
[root@shell ~]# set |grep heros_list
heros_list=([0]="马超" [1]="孙尚香" [2]="公孙离" [4]="猴子" [7]="镜")
# 索引不存在则新增该元素----值
[root@shell ~]# heros_list[1]=刘备
[root@shell ~]# set |grep heros_list
heros_list=([0]="马超" [1]="刘备" [2]="公孙离" [4]="猴子" [7]="镜")
方法四:动态定义数组变量的值
[root@shell ~]# my_shell_list=($(ls /server/scripts/*.sh))
[root@shell ~]# set |grep my_shell
my_shll_list=([0]="/server/scripts/1.sh" [1]="/server/scripts/check_md5.sh" [2]="/server/scripts/check_url_list.sh" [3]="/server/scripts/check_url.sh" [4]="/server/scripts/check_web.sh" [5]="/server/scripts/count_nginx_log.sh" # 获取变量所有的值
[root@shell ~]# echo ${my_shell_list[*]}
/server/scripts/1.sh /server/scripts/check_md5.sh /server/scripts/check_url_list.sh /server/scripts/check_url.sh /server/scripts/check_web.sh /server/scripts/count_nginx_log.sh # 获取数组变量单个的值
[root@shell ~]# echo ${my_shell_list[3]}
/server/scripts/check_url.sh
方法五:采用declare -a array,创建数组变量,用法很少可不需要关注
shell数组元素获取与删除
获取数组元素个数
和变量子串一样,也就是获取数组的长度
数组也是变量,只不够有点特殊
# 获取数组元素个数
[root@shell ~]# heros=(后裔 孙尚香 露娜)
[root@shell ~]# echo ${heros}
后裔
[root@shell ~]# echo ${heros[2]}
露娜
[root@shell ~]# echo ${heros[*]}
后裔 孙尚香 露娜
# 获取元素个数
[root@shell ~]# echo ${#heros[*]}
3# 修改数组元素
[root@shell ~]# echo ${heros[*]}
后裔 孙尚香 露娜
[root@shell ~]# heros[1]="德莱文"
[root@shell ~]# echo ${heros[*]}
后裔 德莱文 露娜
数组元素清除
用法和清除变量是一样的,可以单独清除小标的值,也可以清除所有数组的值
删除数组变量的元素
# 删除变量
unset 变量名# 清空数组变量
[root@shell ~]# unset heros
[root@shell ~]# echo ${heros[*]}[root@shell ~]# # 单独删除某个数组元素,给予索引删除,基于小标删除
[root@shell ~]# heros_list=(德莱文 薇恩 赏金猎人 瑞文)
[root@shell ~]# set |grep heros_list
heros_list=([0]="德莱文" [1]="薇恩" [2]="赏金猎人" [3]="瑞文")
[root@shell ~]# unset heros_list[2]
[root@shell ~]# set |grep heros_list
_=heros_list
heros_list=([0]="德莱文" [1]="薇恩" [3]="瑞文")
shell数组切片与替换
数组切片
数组切片语法
echo {heros[*]:指定切片的起点:切出几个元素}
第一个冒号是起点
第二个冒号后面是元素个数
数组切片实践
[root@shell ~]# heros=(后裔 鲁班 狄仁杰 伽罗)
[root@shell ~]# echo ${heros[*]}
后裔 鲁班 狄仁杰 伽罗
[root@shell ~]# echo ${#heros[*]}
4
[root@shell ~]# echo ${heros[*]:2:3}
狄仁杰 伽罗# 第二个索引到结尾
[root@shell ~]# echo ${heros[*]:2}
狄仁杰 伽罗
替换元素类似于sed语法
语法,但是不会修改原有数据
${数组名[*]/查找字符/替换字符}
# 替换最后一个元素 注意!!!数组的替换,功能是不会修改元素数据的
[root@shell ~]# heros=(后裔 鲁班 狄仁杰 伽罗)
[root@shell ~]# echo ${heros[*]}
后裔 鲁班 狄仁杰 伽罗
[root@shell ~]# echo ${heros[*]/伽罗/李元芳}
后裔 鲁班 狄仁杰 李元芳
[root@shell ~]# echo ${heros[*]}
后裔 鲁班 狄仁杰 伽罗
9.3节获取数组的索引号
可以检索和打印在索引或管理数组中使用的键(而不是他们各自的值)
可以通过添加!来执行。数组名称前的运算符如下:
语法
${!ARRAY_NAME[*]}
实践
# 获取元素的key,也就是元素的索引号
[root@shell ~]# heros=(后裔 鲁班 狄仁杰 伽罗 妲己 沈梦溪 哪吒 马超 关羽 瑶)
[root@shell ~]# echo ${!heros[*]}
0 1 2 3 4 5 6 7 8 9
# 查找数组个数
[root@shell ~]# echo ${#heros[*]}
10
变量子串
数组遍历,基于for遍历,基于索引的索引,获取值
这里就要注意,@和*的区别
带有*的循环将生产单个结果,将数组的所有元素都保存为一个单词
使用@时,数组需要使用双引号引起来,(使用@时),扩展为数组的每个元素提供了一个单次的结果
# 为什么要了解*和@的区别
# 数组获取元素使用[*]结果是保存为了一个整体
仅仅如下是看不出任何区别的
[root@shell ~]# echo ${heros[*]}
后裔 鲁班 狄仁杰 伽罗 妲己 沈梦溪 哪吒 马超 关羽 瑶
# 当使用数组的[@]的时候,每一个元素都是单独的一个个体
# 当和for循环进行遍历的时候,就能看出区别了
# for循环至此就可以根据元素的个数,来决定循环的次数
[root@shell ~]# echo ${heros[@]}
后裔 鲁班 狄仁杰 伽罗 妲己 沈梦溪 哪吒 马超 关羽 瑶
[root@shell ~]#
for循环数组
# 简单的通过一行代码,看出[*]和[@]的区别,在数组中
[root@shell ~]# for hero in "${heros[*]}" ;do echo $hero ;done
后裔 鲁班 狄仁杰 伽罗 妲己 沈梦溪 哪吒 马超 关羽 瑶
[root@shell ~]# for hero in "伽罗 妲己 马超" ;do echo $hero ;done
伽罗 妲己 马超
[root@shell ~]# for hero in "${heros[@]}" ;do echo $hero ;done
后裔
鲁班
狄仁杰
伽罗
妲己
沈梦溪
哪吒
马超
关羽
瑶
[root@shell ~]# for hero in 伽罗 妲己 马超 ;do echo $hero ;done
伽罗
妲己
马超
for循环遍历数组
for循环遍历数组,获取数组元素的key进行取值
[root@shell scripts]# cat for_array.sh
#!/bin/bash
heros=([8]后裔 [9]鲁班 [0]狄仁杰 [7]伽罗 [4]妲己 [2]沈梦溪 [6]哪吒 [5]马超 [3]关羽 [1]瑶)
# for循环去所有的key,也就是所有的下标,然后根据下标,循环的取值
for index in "${!heros[@]}"
doecho -e "数组中的元素,挨个是:${heros[$index]} 下标是:$index"
done# 执行结果
[root@shell scripts]# bash for_array.sh
数组中的元素,挨个是:[8]后裔 下标是:0
数组中的元素,挨个是:[9]鲁班 下标是:1
数组中的元素,挨个是:[0]狄仁杰 下标是:2
数组中的元素,挨个是:[7]伽罗 下标是:3
数组中的元素,挨个是:[4]妲己 下标是:4
数组中的元素,挨个是:[2]沈梦溪 下标是:5
数组中的元素,挨个是:[6]哪吒 下标是:6
数组中的元素,挨个是:[5]马超 下标是:7
数组中的元素,挨个是:[3]关羽 下标是:8
for遍历数组方式2
注意:此方案只能获取,连续key的数组
[root@shell scripts]# cat for_array2.sh
#!/bin/bash
heros=([8]后裔 [9]鲁班 [0]狄仁杰 [7]伽罗 [4]妲己 [2]沈梦溪 [6]哪吒 [5]马超 [3]关羽 [1]瑶)
length=${#heros[@]}
for ((i=0;i<${length};i++))
doecho $i ${heros[$i]}
done# 执行结果
[root@shell scripts]# bash for_array2.sh
0 [8]后裔
1 [9]鲁班
2 [0]狄仁杰
3 [7]伽罗
4 [4]妲己
5 [2]沈梦溪
6 [6]哪吒
7 [5]马超
8 [3]关羽
9 [1]瑶
数组生产实践
找出如下作文中,字符数大于6的单词
As the New Year has passed away, I think the cold weather will pass away and gets warm soon, but I am wrong. This morning, it snows again and I have to wear a lot of clothes. I guess this is the last snow and the summer is coming soon. I miss summer. I can swim and play with my friends in summer.
新年已经过去了,我觉得寒冷的天气很快就会过去,转而变暖,但是我错了。今天早上就下起了雪,我不得不穿很多衣服。我想这是最后一场雪了,夏天快要到了。我想念夏天。我可以在夏天游泳,和我的朋友们一起玩耍。
#!/bin/bash
# 定义数组
words=(As the New Year has passed away, I think the cold weather will pass away and gets warm soon, but I am wrong. This morning, it snows again and I have to wear a lot of clothes. I guess this is the last snow and the summer is coming soon. I miss summer. I can swim and play with my friends in summer.)# 写法一、
for ((i=0;i<${#words[*]};i++))
do# 针对数组元素的长度进行统计if [ ${#words[$i]} -gt 6 ]thenecho "长度大于6的单词是:${words[$i]} ,且该单词的下标是: $i"fi
done #写法二、
for word in ${words[*]}
doif [ `expr length $word` -gt 6 ];thenecho "长度大于6的单词:$word"fi
done
执行结果
[root@shell scripts]# bash words_array.sh
该长度大于6的单词是:weather ,且该单词的下标是 11
该长度大于6的单词是:morning, ,且该单词的下标是 24
该长度大于6的单词是:clothes. ,且该单词的下标是 36
该长度大于6的单词是:summer. ,且该单词的下标是 52
该长度大于6的单词是:friends ,且该单词的下标是 60
该长度大于6的单词是:summer. ,且该单词的下标是 62
----------------------------------
长度大于6的单词是:weather
长度大于6的单词是:morning,
长度大于6的单词是:clothes.
长度大于6的单词是:summer.
长度大于6的单词是:friends
长度大于6的单词是:summer.
9.4节批量检查网站
需求
1.采用shell数组,检测策略模拟用户访问
2.每隔10秒检测一次,无效站点报警
[root@shell scripts]# cat check_array_url.sh
#!/bin/bash
##############################################################
# File Name: check_array_url.sh
# Version: V1.0
# Author:
# Organization:
# Created Time : 2021-04-05 14:03:45
# Description:
##############################################################
# Use LSB init script functions for printing messages, if possible
#
lsb_functions="/lib/lsb/init-functions"
if test -f $lsb_functions ; then. $lsb_functions
else# Include non-LSB RedHat init functions to make systemctl redirect workinit_functions="/etc/init.d/functions"if test -f $init_functions; then. $init_functionsfilog_success_msg(){echo " SUCCESS! $@"}log_failure_msg(){echo " ERROR! $@"}
fi# 开发逻辑脚本
# 定义网站数组
url_list=(http://www.baidu.comhttp://www.taobao.comhttp://10.0.1.6)
# 计数器,对网站检测的次数统计
check_count=0
# 倒计时函数
function wait(){echo -n "3秒之后,开始执行,检测url中... "for ((i=0;i<3;i++))doecho -n ".";sleep 1doneecho " "
}# 开发检测url的函数
function check_url(){waitfor ((i=0;i<`echo ${#url_list[*]}`;i++))do#网站监测代码wget -o /dev/null -T 3 --tries=1 --spider ${url_list[$i]} >/dev/null 2>&1if [ $? -eq 0 ]thenlog_success_msg "is running:${url_list[$i]}"elselog_failure_msg "is fail ${url_list[$i]}"fidone# 对该函数的执行次数统计,也就是表示网站检测了几次((check_count++))
}
# 程序入口函数
main(){# 希望脚本执行持续的运行,模拟守护进程一直运行while truedocheck_urlecho "----------check count:${check_count}-------------" sleep 10 done
}
main
执行结果
[root@shell scripts]# bash check_array_url.sh
3秒之后,开始执行,检测url中... ... SUCCESS! is running:http://www.baidu.comSUCCESS! is running:http://www.taobao.comSUCCESS! is running:http://10.0.1.6
第10章 shell之三剑客进阶
10.1节 awk内置变量介绍
我们所学的centos7,awk,也就是gawk
[root@shell ~]# ls -l /usr/bin/awk
lrwxrwxrwx. 1 root root 4 Dec 14 11:52 /usr/bin/awk -> gawk
awk能够对原始数据进行格式化展示,适合处理各种数据格式化任务
使用变量
awk该编程语言一特性就是使用变量存取值,支持两种类型变量
- 内置变量
- 自定义变量
awk的一些内置变量,存放处理数据文件中的数据字段和记录的信息
内置变量
字段awk使用$1 $2 $3的形式记录字段的位置,以此类推,awk默认分割符是空格。
以及可以使用-F选项修改分隔符,NR内置变量指定行号
# 打印/etc/password第一开列的1到5行
[root@shell ~]# awk -F ":" 'NR==1,NR==5{print $1}' /etc/passwd
root
bin
daemon
adm
lp
awk数据字段和记录变量
[外链图片转存失败,源站可能有防盗链机制,建议将图片保存下来直接上传(img-LhT2un86-1618467549980)(https://i.loli.net/2021/04/09/FmbQ8ATIKfpDlgw.png)]
案例
awk逐行处理文本的时候,以输入分割符为准,把文本切成多个片段,默认符号是空格。
当我们处理特殊文件,没有空格的时候,可以自由指定分隔符号特点
FS变量就是控制分隔符的作用
[root@shell tmp]# cat num.txt
data11,data12,data13,data14,data15
data21,data22,data23,data24,data25
data31,data32,data33,data34,data35[root@shell tmp]# awk 'BEGIN{FS=","}{print $1,$2,$3}' num.txt
data11 data12 data13
data21 data22 data23
data31 data32 data3
还可以通过修改OFS变量,控制输出的时的分隔符
[root@shell tmp]# awk 'BEGIN{FS=",";OFS="|"}{print $1,$2,$3}' num.txt
data11|data12|data13
data21|data22|data23
data31|data32|data3[root@shell tmp]# awk 'BEGIN{FS=",";OFS="~~"}{print $1,$2,$3}' num.txt
data11~~data12~~data13
data21~~data22~~data23
data31~~data32~~data33
数据变量
除了字段和记录分隔符变量,awk还提供了写内置变量用于了解数据的变化。
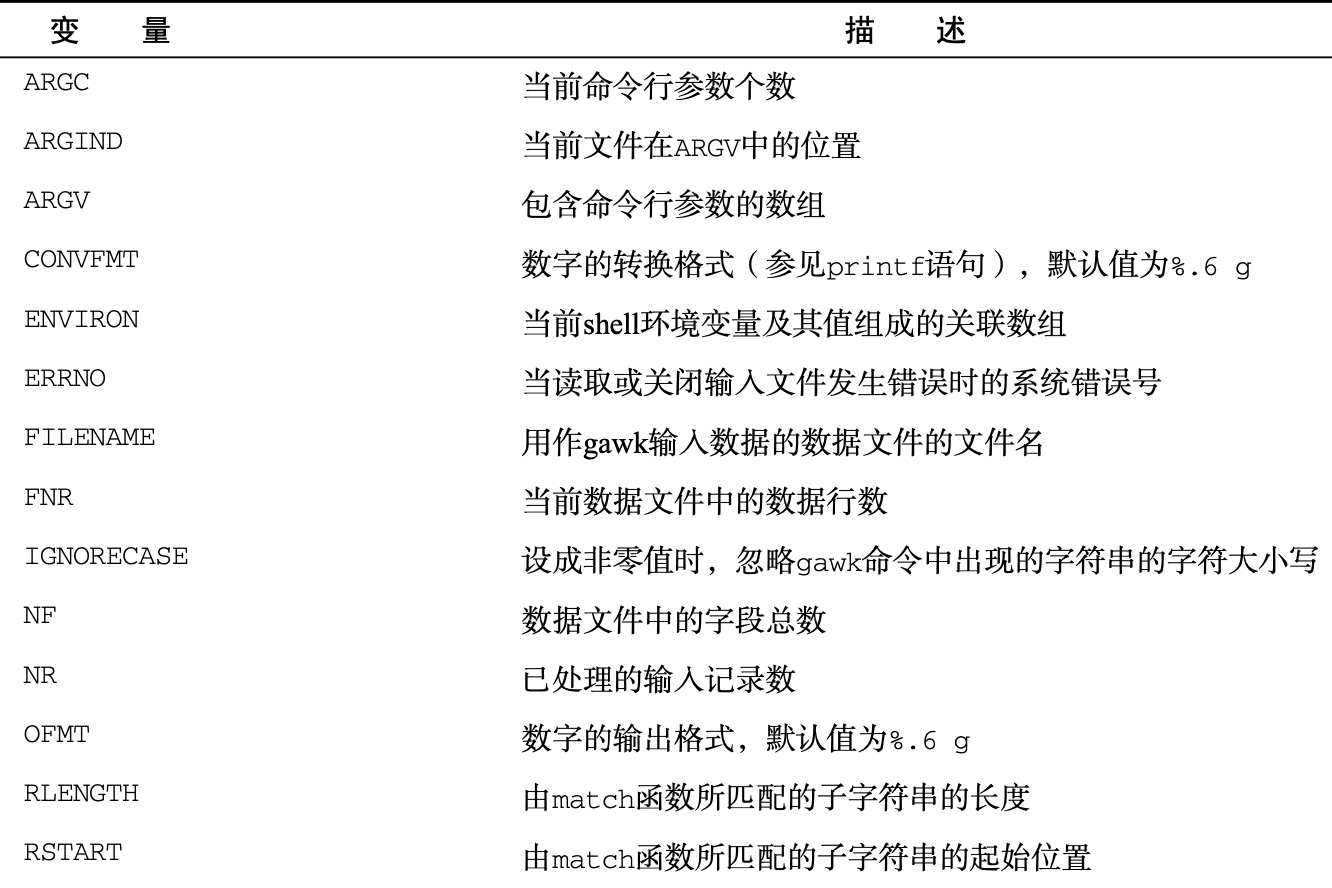
ARGC和ARGV变量允许awk从shell中获取命令行数参数的总数,但是awk不会把脚本文件当做参数的一部分
ARGC变量表示命令行上的参数,包括awk命令和文件名
[root@shell tmp]# awk 'BEGIN{print ARGC}'
1
[root@shell tmp]# awk 'BEGIN{print ARGC}' num.txt
2
[root@shell tmp]# awk 'BEGIN{print ARGC}' num.txt xixi
3
ARGV数组值从索引0开始,表示awk本身,索引1表示第一个命令行参数
[root@shell tmp]# awk 'BEGIN{print ARGV[0]}'
awk
[root@shell tmp]# awk 'BEGIN{print ARGV[0],ARGV[1]}' num.txt
awk num.txt
[root@shell tmp]# awk 'BEGIN{print ARGV[0],ARGV[1],ARGV[2]}' num.txt data.txt
awk num.txt data.txt
awk内置变量的引号不用加美元符
ENCIRON变量
该变量用关联数组提取shell环境变量,注意点:关联数组用文本字符串作为数组的索引值,而不是数值。
在计算机科学中,关联数组(英语:Associativr Array),又称映射(Map),字典
(Dictionary)是一个抽象的数据结构,它包含着类似于(键,值)的有序对,一个关联数组中的有序可以重复(如C++中的multimap)也可以不重复(如C++中的map)。
数值索引的中的key是shell的环境变量名,值是shell环境变量的值
[root@shell tmp]# awk 'BEGIN{print ENVIRON["HOME"],ENVIRON["PATH"]}'
/root /opt/jdk/bin:/opt/jdk/jre/bin:/usr/local/sbin:/usr/local/bin:/usr/sbin:/usr/bin:/opt/nginx119/sbin:/root/bin
awk跟踪数据字段记录时,变量FNR,NF和NR用起来很方便了,比如不知道awk到底分隔了多少个数据字段,可以根据NF变量获取最后一个数据字段
FNR # FNR:各文件分别计数的行号
NF # NF:number of Field,当前行的字段的个数(即当前行被分割成了几列),字段数量
NR # NR:行号,当前处理的文本行的行号。
案例
[root@shell tmp]# awk 'BEGIN{FS=":";OFS=" - "}{print $1,$NF}' /etc/passwd|head -3
root - /bin/bash
bin - /sbin/nologin
daemon - /sbin/nologin
NF变量就记录了字段的数量,因此$NF也就是最后一个字段
NR和FNR变量
FNR和NR变量类似,FNR变量含有当前数据文件已经被处理过的记录数量
NR变量含有已处理的记录总数
看下案例差别
[root@shell tmp]# awk 'BEGIN{FS=","}{print $1,"FNR="FNR}' num.txt
data11 FNR=1
data21 FNR=2
data31 FNR=3
可以看出,FNR变量是记录处理的数量,也就是行数
NR和FNR的区别?
[root@shell tmp]# awk 'BEGIN{FS=","}{print $1,"FNR="FNR,"NR="NR}END{print NR}' num.txt num.txt
data11 FNR=1 NR=1
data21 FNR=2 NR=2
data31 FNR=3 NR=3
data11 FNR=1 NR=4
data21 FNR=2 NR=5
data31 FNR=3 NR=6
6
我们会发现,FNR变量的值在awk处理第二个文件数据的时候被重置,而NR变量则在处理第二个数据文件时继续统计
自定义变量
shell脚本与awk变量
awk允许自定义变量在程序中使用,awk自定义的变量可以是任何数目的字母,数字,下划线,不得已数字开头,而且区分大小写
例如
[root@shell ~]# awk 'BEGIN{test="hello";print test}'
hello[root@shell ~]# awk 'BEGIN{name="xiaohaoge";print name;name="hello";print name}'
xiaohaoge
hello
数值计算
[root@shell ~]# awk 'BEGIN{x=4;x=x*2+3;print x}'
11
命令行与变量复制,花式用法
使用awk命令可以给脚本中的变量赋值
该作用可以不改变脚本的情况下,改变脚本的作用
[root@shell tmp]# cat num.txt
data11,data12,data13,data14,data15
data21,data22,data23,data24,data25
data31,data32,data33,data34,data35[root@shell tmp]# cat script1
BEGIN{FS=","}
{print $n}[root@shell tmp]# awk -f script1 n=2 num.txt
data12
data22
data32
使用命令行参数定义变量会有一个问题,设置变量之后,这个值在代码的BEGIN部分不可用,例如
[root@shell tmp]# cat script2
BEGIN{print "The starting value is",n;FS=","}
{print $n}[root@shell tmp]# awk -f script2 n=2 num.txt
The starting value is
data12
data22
data32
发现这里只打印了第三列的值,但是没明白在BEGIN里输出的n的值
这里可以选用-v选项解决,允许在awk的BEGIN开始之前的设定变量
[root@shell tmp]# awk -v n=2 -f script2 num.txt
The starting value is 2
data12
data22
data32
10.2节awk数组与for循环遍历元素
为了能够在单个变量,存储多个值,许多编程语言都提供了数组,awk也支持关联数组功能,也就是可以理解为字典的作用
关联数组的索引可以是任意文本字符串,每一个字符串都可以对应一个数值
定义数组变量
语法
var[index]=element
var是变量名字,index是索引,element是值
定义数组,和使用。获取数组的元素值
[root@shell ~]# awk 'BEGIN{student["name"]="小浩哥";print student["name"]}'
小浩哥
awk数组元素的数值计算
[root@shell ~]# awk 'BEGIN{num[1]=6;num[2]=7;sum=num[1]+num[2];print sum}'
13
[root@shell ~]# awk 'BEGIN{num[1]=6;num[2]=7;sum=num[1]-num[2];print sum}'
-1
[root@shell ~]# awk 'BEGIN{num[1]=6;num[2]=7;sum=num[1]/num[2];print sum}'
0.857143
[root@shell ~]# awk 'BEGIN{num[1]=6;num[2]=7;sum=num[1]*num[2];print sum}'
42
循环数组的值
awk数组的特点是,只能根据index,才能拿到,首先的获取所有的index
for (var in array)
{语句
}
例如
[root@shell ~]# awk 'BEGIN{stu["name"]="xiaohaoge"
stu["age"]="24"
stu["addr"]="湖南长沙"
for (i in stu)
{print "索引值是:",i,"---索引的值是:",stu[i]}
}'
索引值是: age ---索引的值是: 24
索引值是: addr ---索引的值是: 湖南长沙
索引值是: name ---索引的值是: xiaohaoge
注意awk数组的索引是没有序号的,但是根据index索引,获取值是唯一的
删除数组变量
语法
delete array[index]
一旦删除了索引,就无法用用它提取元素了
[root@shell ~]# awk 'BEGIN{> var["a"]=1
> var["b"]=2
> var["d"]=3
> var["h"]=4
> for (s in var)
> {print "Index: ",s," - Value:",var[s]};delete var["d"];print "----";for (s in var){print "Index:",s,"Value:",var[s]}}'
Index: h - Value: 4
Index: a - Value: 1
Index: b - Value: 2
Index: d - Value: 3
----
Index: h Value: 4
Index: a Value: 1
Index: b Value: 2
使用模式
awk的模式,我们已知有BEGIN和END两关键字处理,数据量开始与结束两个模式
正则表达式
正则表达式必须出现要控制的脚本左花括号前面
# 匹配含有data的记录
[root@shell tmp]# awk 'BEGIN{FS=","}/data/{print $1}' num.txt
data11
data21
data31
匹配操作符
(matching operator)匹配操作符号是波浪线~,使用方法如下
$1 ~ /^data/
$1表示记录中的第一个数据字段,该正则会过滤出第一个字段以文本data开头的所有记录。
案例
[root@shell tmp]# awk -F "," '$2 ~ /^data/{print $1,$2,$3}' num.txt
data11 data12 data13
data21 data22 data23
data31 data32 data33
该匹配操作符使用正则^data来比较数据字段
实际场景,搜索特定数据
[root@shell tmp]# awk -F : '$1 ~ /hao/{print $1 ,$NF}' /etc/passwd
daihao-linux /bin/bash
xiaohaoge01 /bin/bash
xiaohaoge02 /bin/bash[root@shell tmp]# awk -F : '$1 ~ /^xiao/{print $1 ,$NF}' /etc/passwd
xiaohaoge01 /bin/bash
xiaohaoge02 /bin/bash
这个语法会在第一列中查找文本,以xiao开头。如果找到了该记录,打印该记录的第一个和最后一个字段
排除语法
搜索出除了以a,b,c开头行的用户
[root@shell tmp]# awk -F ":" '$1 ~ /^[a-c]/{print $1 $NF}' /etc/passwd
bin/sbin/nologin
adm/sbin/nologin
abrt/sbin/nologin
!感叹号进行排除
[root@shell tmp]# awk -F ":" '$1 !~ /^[a-s]/{print $1 $NF}' /etc/passwd
tss/sbin/nologin
xhg/bin/bash
xiaohaoge01/bin/bash
xiaohaoge02/bin/bash
10.3节数学表达式
除了正则,还可以用数学表达式,过滤如UID,GID寻找用户信息
常见的数学表达式
x == y:值x等于y。
x <= y:值x小于等于y。
x < y:值x小于y。
x >= y:值x大于等于y。
x > y:值x大于y。
# 找出所有组GID为0的用户
[root@shell ~]# awk -F ":" '$4==0{print $0}' /etc/passwd
root:x:0:0:root:/root:/bin/bash
sync:x:5:0:sync:/sbin:/bin/sync
shutdown:x:6:0:shutdown:/sbin:/sbin/shutdown
halt:x:7:0:halt:/sbin:/sbin/halt
operator:x:11:0:operator:/root:/sbin/nologin[root@shell ~]# awk -F ":" '$4==0{print $1,$NF}' /etc/passwd
root /bin/bash
sync /bin/sync
shutdown /sbin/shutdown
halt /sbin/halt
operator /sbin/nologin# 找出UID大于1000的用户信息
[root@shell ~]# awk -F ":" '$3>1000{print $0}' /etc/passwd
xhg:x:1001:1001::/home/xhg:/bin/bash
xiaohaoge01:x:1002:1002::/home/xiaohaoge01:/bin/bash
xiaohaoge02:x:1003:1003::/home/xiaohaoge02:/bin/bash
结构化命令
awk也支持逻辑判断
10.4节awk条件表达式
awk支持标准的if语句
if (条件)语句
案例
如果UID在1000,1005之间就打印用户信息
[root@shell ~]# awk -F ":" '{if ($3>1000 && $3<1005)print $1}' /etc/passwd
xhg
xiaohaoge01
xiaohaoge02
执行多条语句
[root@shell tmp]# cat test_data
10
25
5
13
50[root@shell tmp]# awk '{> if ($1>20)
> {> num=$1*2
> print num
> }
> }' test_data
50
100
if else语句
awk也支持if语句不成立,执行其他语句
[root@shell tmp]# cat test_data
10
25
5
13
50
[root@shell tmp]# awk '{> if ($1>20)
> {x=$1*2;print x}
> else{x=$1/2;print x}
> }' test_data
5
50
2.5
6.5
100
单行写法
单行写法。要注意分号;和花括号{}的使用
[root@shell tmp]# awk '{if($1>20){x=$1*2;print x}else{x=$1/2;print x}}' test_data
5
50
2.5
6.5
100# 不创建变量,直接操作字段数数据
[root@shell tmp]# awk '{if($1>20)print $1*2;else print $1/2}' test_data
5
50
2.5
6.5
100
awk与while循环计算
awk也支持的循环功能
语法
while (条件表达式)
{条件成立后的代码
}
while循环会遍历数据,且检查结束条件
[root@shell tmp]# cat test_data
130 120 135
160 113 140
145 173 215# 该循环作用是相加三个列值,求平均值
# awk中普通变量是不需要加美元符的
# 当出现$1 $2的时候,就表示awk处理的第一个,第二个字段的数据
[root@shell tmp]# awk '{total=0
i=1
while (i<4)
{total+=$i # 分别相加 $1 $2 $3 此时的total变量就得到每一行的总和
i++
}
avg=total/3
print "平均数是:",avg,"每一行的总和是:",total
}' test_data平均数是: 128.333 每一行的总和是: 385
平均数是: 137.667 每一行的总和是: 413
平均数是: 177.667 每一行的总和是: 533
循环中断
awk支持在while循环里使用break和continue调出循环
[root@shell tmp]# awk '{> total=0
> i=1
> while (i<4)
> {> total=total+$i
> if (i==2)
> break
> i++
> }
> avg=total/2
> print "此时的total总值为:",total,"avg平均数的值是:",avg
> }' test_data此时的total总值为: 250 avg平均数的值是: 125
此时的total总值为: 273 avg平均数的值是: 136.5
此时的total总值为: 318 avg平均数的值是: 159
for循环
awk也支持for循环,且是C语言风格
[root@shell tmp]# awk '{> total=0
> for(i=1;i<4;i++)
> {> total+=$i
> }
> avg=total/3
> print "每一行的总和是:",total,"每一行的平均数:",avg
> }' test_data每一行的总和是: 385 每一行的平均数: 128.333
每一行的总和是: 413 每一行的平均数: 137.667
每一行的总和是: 533 每一行的平均数: 177.667
for循环的计数器比起while要好用了。
10.5节awk内置函数
awk内置的函数功能非常强大,可以进行常见的数学,字符串等运算
数学函数
[外链图片转存失败,源站可能有防盗链机制,建议将图片保存下来直接上传(img-tlTclVdv-1618467549982)(https://i.loli.net/2021/04/10/X2GLtRoZ1nriwbp.png)]
int()函数用法,得到整数,如同其他编程语言的floor函数
floor函数,其功能是“向下取整”,或者说”向下舍入“、”向零取舍“,取不大于x的最大整数,与”四舍五入“不同,下取整是直接取按照数轴上最近要求值的左边值,即不大于要求值的最大的那个整数。
int()函数会生成值和0之间最接近该值整数。
例如int()函数值为5.6返回5,值为-5.6时趣-5
rand()函数用于创建随机数,但是只会在0和1之间,要得到更大的数,就要放大返回值。
srand()随机数种子,计算机无法产生绝对的随机数,生成只能是伪随机数,也就是根据某规则生成的,因此可以加入随机数种子,根据系统时间的变化,产生不同的随机数
具体用法,注意随机数种子必须写在BEGIN里,这是awk的机制,我们必须在awk开始计算前,加入随机种子
案例实践
获取随机数,且判断,尝试多少次后,得到小于10的数
[root@shell tmp]# awk -F "\t" 'BEGIN{> srand();
> }
> {> value=int(rand()*100)
> print "本次获取的整数是:",value
> if (value<=10)
> print "本地的值是:",value,"\t访问的次数是:",NR
> }'本次获取的整数是: 6
本地的值是: 6 访问的次数是: 1
随机数简单写法
[root@shell tmp]# awk 'BEGIN{srand();print rand()}'
0.405172
[root@shell tmp]# awk 'BEGIN{srand();print rand()}'
0.542692
[root@shell tmp]# awk 'BEGIN{srand();print rand()}'
0.0989231
[root@shell tmp]# awk 'BEGIN{srand();print rand()}'
0.0989231# 快速获取0~100的随机数
[root@shell tmp]# awk 'BEGIN{srand();print int(rand()*100)}'
30
[root@shell tmp]# awk 'BEGIN{srand();print int(rand()*100)}'
3[root@shell tmp]# awk 'BEGIN{srand();print int(rand()*100)}'
59
[root@shell tmp]# awk 'BEGIN{srand();print int(rand()*100)}'
16
字符串函数
[外链图片转存失败,源站可能有防盗链机制,建议将图片保存下来直接上传(img-V8jTmWdw-1618467549983)(https://i.loli.net/2021/04/10/maqxZ2nirYgvSkE.png)]
[外链图片转存失败,源站可能有防盗链机制,建议将图片保存下来直接上传(img-JEeK93Fn-1618467549984)(https://i.loli.net/2021/04/10/PlHs7qdeOtkQNJf.png)]
案例
替换文本大小写
[root@shell tmp]# awk '{print toupper($0)}' data.txt
THIS IS AN APPLE.
THIS IS A BOY.THIS IS A GRIL.
[root@shell tmp]# cat data.txt
This is an apple.
This is a boy.This is a gril.
统计字符长度,以及大小转换
[root@shell tmp]# awk 'BEGIN{name="xiaohaoge 666";print toupper(name);print length(name)}'
XIAOHAOGE 666
13
全局替换函数gsub()
[root@shell tmp]# awk 'BEGIN{name="xiaohaoge";print "替换前的变量是: "name;gsub("xiao","DA",name);print "替换之后的变量值是:",name}'
替换前的变量是: xiaohaoge
替换之后的变量值是: DAhaoge
排序函数asort(),经过排序后的数组,索引会被重置
asort根据value进行排序
# 生成关联数组
[root@shell tmp]# awk 'BEGIN{stu["a"]=66;stu["b"]=77;stu["c"]=44;for (i in stu){print "索引是:",i,"---对应的值是:",stu[i]}}'
索引是: a ---对应的值是: 66
索引是: b ---对应的值是: 77
索引是: c ---对应的值是: 44# asort()排序,新数组
[root@shell tmp]# awk 'BEGIN{stu["a"]=66;stu["b"]=77;stu["c"]=44;asort(stu,new_stu);for (i in new_stu){print "索引值:",i,"--对应的值是:",new_stu[i]}}'
索引值: 1 ---对应的值是: 44
索引值: 2 ---对应的值是: 66
索引值: 3 ---对应的值是: 77
排序函数asorti(),排序的索引
当关联数组的索引是字符串时,可以使用asorti()函数排序,如果是数字,直接for循环即可
# 当前关联数组
[root@shell tmp]# awk 'BEGIN{t["c"]=66;t["b"]=88;t["a"]=3;for(i in t){print i,t[i]}}'
a 3
b 88
c 66# 排序后
[root@shell tmp]# awk 'BEGIN{t["c"]=66;t["b"]=88;t["a"]=3;\
> len=asorti(t,new_t);\
> for(i=1;i<=len;i++){print i,new_t[i]} }
> '
1 a
2 b
3 c# 那么可以根据排序后的索引,对原关联数组进行排序
[root@shell tmp]# awk 'BEGIN{t["c"]=66;t["b"]=88;t["a"]=3;\
> len=asorti(t,new_t);\
> for(i=1;i<=len;i++){print i,new_t[i],t[new_t[i]]}}'
1 a 3
2 b 88
3 c 66
10.6节awk时间函数
[外链图片转存失败,源站可能有防盗链机制,建议将图片保存下来直接上传(img-ReuMxj9P-1618467549985)(https://i.loli.net/2021/04/10/svQZiauGVcMto89.png)]
时间函数用在日志文件格式化处理非常有用
[root@shell tmp]# awk 'BEGIN{> date=systime()
> day=strftime("%A,%B %d,%Y",date)
> print day
> }'
Saturday,April 10,202
自定义函数
自定义函数
function name([variables])
{语句
}
自定义函数必须写在awk最开始的地方
定义awk脚本
oot@shell tmp]# cat func.awk
function find_min(num1,num2)
{if (num1<num2)return num1return num2
}function find_max(num1,num2)
{if (num1>num2)return num1return num2
}function main(num1,num2)
{# 找最小值result=find_min(num1,num2)print "最小值= ",result# 找最大值result=find_max(num1,num2)print "最大值= ",result
}
BEGIN {main(10,30)
}# 执行结果
[root@shell tmp]# awk -f func.awk
最小值= 10
最大值= 30
awk实践
现有一个数据文件,可以使用awk进行格式化数据处理
[root@shell tmp]# cat scores.txt
Rich Blum,team1,100,115,95
Barbara Blum,team1,110,115,100
Christine Bresnahan,team2,120,115,118
Tim Bresnahan,team2,125,112,116
对每只队伍的成绩排序,其计算平均分
# 脚本
[root@shell tmp]# cat bowling.sh
#!/bin/bash
##############################################################
# File Name: bowling.sh
# Version: V1.0
# Author:
# Organization:
# Created Time : 2021-04-10 16:10:38
# Description:
##############################################################
# for循环首先迭代出队名然后去重
for team in $(awk -F, '{print $2}' scores.txt|uniq)
do# 循环内部计算,传递shell变量给awkawk -v team=$team 'BEGIN{FS=",";total=0}{# 如果队名一致,就计算三场总分if ($2==team){total+=$3+$4+$5;
}
}END {# 求平均数avg=total/6;print "Total for",team,"is",total,",the average is ",avg}' scores.txt
done
执行结果
[root@shell tmp]# bash bowling.sh
Total for team1 is 635 ,the average is 105.833
Total for team2 is 706 ,the average is 117.667
10.7节 sed与for循环统计PATH文件数
正表达式练习题
计算PATH目录下的文件数
PATH目录下的都是二进制命令文件
1.查看PATH值
[root@shell ~]# echo $PATH
/opt/jdk/bin:/opt/jdk/jre/bin:/usr/local/sbin:/usr/local/bin:/usr/sbin:/usr/bin:/opt/nginx119/sbin:/root/bin2.获取每个目录的字符串,利用sed替换功能
[root@shell ~]# echo $PATH|sed 's/:/ /g'
/opt/jdk/bin /opt/jdk/jre/bin /usr/local/sbin /usr/local/bin /usr/sbin /usr/bin /opt/nginx119/sbin /root/bin3.分离目录后,可以for循环遍历取值
[root@shell ~]# for dir in `echo $PATH|sed 's/:/ /g'`;do echo $dir;done
/opt/jdk/bin
/opt/jdk/jre/bin
/usr/local/sbin
/usr/local/bin
/usr/sbin
/usr/bin
/opt/nginx119/sbin
/root/bin4最终计算文件脚本
[root@shell scripts]# cat sed_cont_path.sh
#!/bin/bash
##############################################################
# File Name: sed_cont_path.sh
# Version: V1.0
# Author:
# Organization:
# Created Time : 2021-04-11 16:35:14
# Description:
##############################################################
dir_path=$(echo $PATH|sed 's/:/ /g')
# 用于计算文件数量
count=0
for dir in $dir_path
docheck_dir=$(ls $dir)# 循环嵌套,一次处理文件夹中的所有内容for item in $check_dirdocount=$[count+1]doneecho "本次循环中,该目录$dir 存在文件数量是:---- $count"# 还得对count变量归零操作,才能对下一个目录。进行0计算次数count=0
done# 执行结果
[root@shell scripts]# bash sed_cont_path.sh
本次循环中,该目录/opt/jdk/bin 存在文件数量是:---- 49
本次循环中,该目录/opt/jdk/jre/bin 存在文件数量是:---- 14
本次循环中,该目录/usr/local/sbin 存在文件数量是:---- 0
本次循环中,该目录/usr/local/bin 存在文件数量是:---- 0
本次循环中,该目录/usr/sbin 存在文件数量是:---- 465
本次循环中,该目录/usr/bin 存在文件数量是:---- 1114
本次循环中,该目录/opt/nginx119/sbin 存在文件数量是:---- 1
本次循环中,该目录/root/bin 存在文件数量是:---- 0
10.8节 sed进阶
sed编辑器可以满足大多数日常文本
sed多行操作
sed命令的特点是单行数据操作,基于换行符的位置把数据分成行,然后sed一行一行的处理,重复过程。
如果需要跨行对数据处理,这就麻烦了
比如文本里找一个短语linux System Administratirs Group,这个长语句可能出现在两行,默认的sed就无法识别这种断句。
sed开发者也考虑到了这个情况,提供了处理方案。
sed特殊指令
N:将数据流中的下一行加起来,创建一个多行组处理,multiline group
D:删除多行的一组
P:打印多行组的一行
next命令
sed小写的n命令会告诉sed编辑器移动到数据流中的下一行文本。
sed编辑器再移动到下一行文本前,会在当前行执行完毕所有定义好的命令。
单行next命令改变了这个流程。
# 利用sed删除空行
[root@shell tmp]# cat data.txt
This is an apple.This is a boy.This is a gril.[root@shell tmp]# sed '/^$/d' data.txt
This is an apple.
This is a boy.
This is a gril.# 删除apple下一行的空格
[root@shell tmp]# sed '/apple/{n;d}' data.txt
This is an apple.
This is a boy.This is a gril.
此时sed编辑器匹配到apple这一行后,通过n指令,让sed编辑器移动到文本的下一行,也就是空行,然后通过d指令,删除了该行
此时sed执行完毕命令后,继续重复查找apple,然后尝试删除apple的下一行。
如果找不到apple字符串,也就不会执行了任何动作了
合并文本行
刚才了用小写的n将文本的下一行移动到sed的模式空间,属于是单行处理
大写的N指令将下一行文本添加到模式空间中已经有的文本后面,实现多行文本处理。
这个动作是将数据流的两个文本行合并在同一个模式空间里处理
[root@shell tmp]# cat data2.txt
This is the header line.
This is the first data line.
This is the second data line.
This is the last line.[root@shell tmp]# sed '/first/{N;s/\n/*******/}' data2.txt
This is the header line.
This is the first data line.*******This is the second data line.
This is the last line.这里sed找到first一行后,用N指令把下一行合并到first改行,并且执行s替换指令,结果是如上合并了一行。
10.9节sed保持空间与模式空间
sed我们已知有一块模式空间(pattern space)用于sed编辑器执行命令的时候,保存待检查的文本。
sed还有一块空间叫做保持空间的缓冲区域(hold space)。
sed之所以能以行为单位的编辑或修改文本,其原因在于它使用了两个空间:一个是活动的“模式空间(pattern space)”,另一个是起辅助作用的“保持空间(hold space)这2个空间的使用。
模式空间:可以想成工程里面的流水线,数据之间在它上面进行处理。
保持空间:可以想象成仓库,我们在进行数据处理的时候,作为数据的暂存区域。
正常情况下,如果不显示使用某些高级命令,保持空间不会使用到!
[外链图片转存失败,源站可能有防盗链机制,建议将图片保存下来直接上传(img-VKG2stbX-1618467549987)(https://i.loli.net/2021/04/12/QbE6rxOyGJSFmIM.png)]
一般情况下,数据的处理只使用模式空间(pattern space),按照如上的逻辑即可完成主要任务。但是某些时候,通过使用保持空间(hold space),还可以带来意想不到的效果。
sed编辑器保持空间命令
[外链图片转存失败,源站可能有防盗链机制,建议将图片保存下来直接上传(img-gzrSzauv-1618467549988)(https://i.loli.net/2021/04/12/IiwR4dBgPNjWKoC.png)]
这些命令可以将文本从模式空间复制到保持空间。
[外链图片转存失败,源站可能有防盗链机制,建议将图片保存下来直接上传(img-BZDRHWw1-1618467549989)(https://i.loli.net/2021/04/12/WNyeROlV7whCxMH.png)]
这些保持空间的命令用于将文本从模式空间复制到保持空间。这样就可以清空模式空间加载其他需要处理的字符串。
案例
# 用h和g命令将数据在两个缓冲空间移动。
# h从流水线,复制到一个暂存区域,模式空间,复制到保持空间
# g和h相反
[root@shell tmp]# cat data2.txt This is the header line.
This is the first data line.
This is the second data line.
This is the last line.# 模式空间
[root@shell tmp]# sed -n '/first/{h;p;n;p;g;p}' data2.txt
This is the first data line.
This is the second data line.
This is the first data line.# 保持空间
[root@shell tmp]# sed -n '/first/{p;n;p}' data2.txt
This is the first data line.
This is the second data line.我们看下这个案例
- sed过滤含有first的单词的行
- 当出现含有first单词的行,h指令将该行复制到保持空间
- p命令此时打印模式空间第一行的数据,也就是first的行
- n命令提取数据流的下一行,并且也放到了模式空间
- p命令再次打印模式空间的内容,也就是打印了second那一行。
- g命令此时将保持空间的内容放回模式空间,替换当前文本
- p命令再次打印模式空间的内容,又打印了first内容了。
此时可以看出,保持空间的指令,可以来回移动文本行,再看一个案例
[root@shell tmp]# sed -n '/first/{h;n;p;g;p}' data2.txt
This is the second data line.
This is the first data line.
若是这里去掉一个p打印,则会看出不同的结果了。
排除命令
sed编辑会将一些处理命令应用到数据流中的每一个文本行,单个行,或者一些区间行。也支持排除某个区间。
sed支持用感叹号!来排除命令,让某个命令不起作用。
[root@shell tmp]# cat data2.txt This is the header line.
This is the first data line.
This is the second data line.
This is the last line.[root@shell tmp]# sed '/header/p' data2.txt -n
This is the header line.
[root@shell tmp]# sed '/header/!p' data2.txt -nThis is the first data line.
This is the second data line.
This is the last line.
sed G命令 获得保持空间内容,并追加大当前模式空间的后面
在使用sed的时候,就是保持空间默认只有一个空行,将它附加到已有行后面
技巧,大写G指令,只要判断不是最后一行,才会追加保持空间的内容,且忽略最后一行
# 使用排除符号! 和尾行符号$确保sed不会在最后一行添加空白行
[root@shell tmp]# sed '$!G' data2.txt # 除了最后一行,其他行都添加空行This is the header line.This is the first data line.This is the second data line.This is the last line.
如果文件已经有了一些空白行,但是你想要给所有的行加倍间距
[root@shell tmp]# cat data2.txt This is the header line.This is the first data line.This is the second data line.This is the last line.[root@shell tmp]# sed '/^$/d;$!G' data2.txt
This is the header line.This is the first data line.This is the second data line.This is the last line.
给问文件中行编号
sed指令之一
= 打印当前行号
d 删除,删除选择的行
更多命令参数参考http://linux.51yip.com/search/sed
sed可以使用=命令打印当前行号
[root@shell tmp]# cat data2.txt
This is the header line.
This is the first data line.
This is the second data line.
This is the last line.[root@shell tmp]# sed '=' data2.txt |sed 'N;s/\n/ /'
1 This is the header line.
2 This is the first data line.
3 This is the second data line.
4 This is the last line.
sed删除空白行的进阶
用sed删除所有的空白行
[root@shell tmp]# cat data2.txt -n1 This is the header line.2 3 4 5 This is the first data line.6 7 This is the second data line.8 9 10 This is the last line.
[root@shell tmp]# sed '/^$/d' data2.txt
This is the header line.
This is the first data line.
This is the second data line.
This is the last line.
删除连续的空白行
有些文件里会有讨厌的多个空白行,删除连续的空白行是用地址区间检查数据流
删除连续的空白行的关键在于创建一个非空白行和空白行的地址区间,sed碰到该区间,不删除,其他的空白行区间删除
sed语法
区间是/./到/^$/
sed '/./,/^$/!d' !d这表示不删除该区间
这就好比sed '1,3p' 打印1到3行一样
无论数据行之间有多少个空白行,都会只保留一个空白行了。
[root@shell tmp]# sed '/./,/^$/!d' data2.txt
This is the header line.This is the first data line.This is the second data line.This is the last line.
删除开头的空白行
数据文件经常也会存在空白行,若是导入数据库也会生成空项,较为麻烦
sed命令
/./,$!d
该sed命令表示不删除有益内容,删除开头空白行。
[root@shell tmp]# cat data2.txt This is the header line.This is the first data line.This is the second data line.This is the last line.# 删除开头空白行
[root@shell tmp]# sed '/./,$!d' data2.txt
This is the header line.This is the first data line.This is the second data line.This is the last line.
删除HTML标签
现在从网站上下载html并且保存使用的场景还是较多,例如爬虫等场景,HTML的标签较多,如何筛选出有益的信息
[root@shell tmp]# cat data2.txt
<html>
<head>
<title>This is the page title</title> </head>
<body>
<p>
This is the <b>first</b> line in the Web page.
This should provide some <i>useful</i>
information to use in our sed script.
</body>
</html>
对HTML标签的删除大部分是成对的删除,例如
<b> </b>
对于标签的删除正则,要小心,否则会删错,例如这样的正则
s/<.*>//g 这样的正则是有问题的
[root@shell tmp]# sed 's/<.*>//g' data2.txt This is the line in the Web page.
This should provide some
information to use in our sed script.
这里是有问题,发现titile标签整行被删除了,以及加粗,斜体的文本都不见了。
sed认为的是在大于号、小于号之间的文本都要被替换为空。
正确的正则改成如下
# 正确的思路应该是让sed编辑器忽略掉,嵌入在原始标签里的大于号,排除写法[^>]
[root@shell tmp]# sed 's/<[^>]*>//g;/^$/d' data2.txt
This is the page title
This is the first line in the Web page.
This should provide some useful
information to use in our sed script.第五阶段:shell编程企业实战,完整版相关推荐
- Shell编程—企业生产案例
Linux系统Shell编程-企业生产案例(一) 企业数据库可以说是重点保护对象啊,没有之一,数据在当今企业里就是生命线,因此今天就来说一说,如何通过shell脚本来检查或监控MYSQL数据库服务是否 ...
- ARM体系结构与编程_2015.08_P513_完整版PDF电子书下载 带索引书签目录高清版
ARM体系结构与编程_2015.08_P513_完整版PDF电子书下载 带索引书签目录高清版_13864654 下载链接http://pan.baidu.com/s/1cDq8pS 基本信息 作者: ...
- 最新QT从入门到实战完整版(07 对象树)
最新QT从入门到实战完整版(07 对象树) 一.07 对象树 来自 一.07 对象树 看到我们创建了一个按钮,然后并且让它显示到窗口中啊,那下边大家看一下我刚才创建的按钮啊.都写的是new啊,都写的是 ...
- 最新QT从入门到实战完整版(08.qt中的坐标系-09 信号和槽-点击按钮关闭窗口_)
最新QT从入门到实战完整版(08.qt中的坐标系-09 信号和槽-点击按钮关闭窗口_) 一.08.qt中的坐标系 二,09 信号和槽-点击按钮关闭窗口_ 来自 一.08.qt中的坐标系 二,09 信号 ...
- qt学习笔记 来自B站【最新QT从入门到实战完整版|传智教育】
最新QT从入门到实战完整版|传智教育 目录在这里 2022.2.4 day1 06 QPushButton创建 07 对象树 08 Qt的坐标系 09 信号和槽-点击按钮关闭窗口 10 自定义信号和槽 ...
- shell编程,实战高级进阶教学
shell编程从入门到高级教程 一.shell编程初识 1.1 shell能做什么 1. 自动化批量系统初始化程序 (update,软件安装,时区设置,安全策略...) 2. 自动化批量软件部署程序 ...
- c语言百题大战之求n的阶乘,网易大神第五人格百题大战题库下载-第五人格百题大战答案完整版下载v1.52.7_86PS软件园...
网易大神第五人格百题大战题库答案完整版是款非常实用的辅助工具.在这款工具中将会为玩家们带来最新最准确的答案供玩家们完成所有的问题.在第五人格百题大战题库中玩家们只需要找到对应的题目就可以找到自己想要的 ...
- Shell 编程(实战篇)
一.shell实现100台服务器的公钥的批量分发:LLD规划:100台服务器ip为:192.168.42.101-201,root密码:123456 考虑因素: 1.如何创建秘钥 2.检查与服务器之间 ...
- C++Primer第五版——习题答案+详解(完整版)
C++Primer第五版--习题答案详解 新手入门必看的书.知识是一个系统化并且相互关联的体系,零散的东西每天收获如果不形成自己的体系的话,那将是毫无意义的,所以我觉得有必要将这本书先啃一遍,消化其 ...
最新文章
- Android log打印不出来
- ubuntu nginx php-fpm mysql_Ubuntu下安装Nginx,PHP5(及PHP-FPM),MySQL
- OpenCV边缘检测专题
- 字符串类String
- 添加chorme插件时出现“程序包无效”
- 2020-10-25(个人int误区)
- JavaScript实现求最大公约数 (GCD)的算法(附完整源码)
- Spring和Struts2整合
- 支付宝王益:40岁写30年代码是一种什么体验?
- Ubuntu中安装python3
- redis hash field过期时间_Redis系列-Redis数据类型
- 2、linux网络编程--无连接与面向连接的区别
- [转]_int64、long long 的区别
- Linux下使用SFTP命令
- —— GPS测量原理及应用复习-1 ——
- Oracle使用函数达到drop table if exists
- 常州大学/教务系统/教室相关
- css中导入自定义字体库
- LeetCode--宝石与石头
- python-20180103-1