CentOS 6.8 编译安装MySQL5.5.32
MySQL多实例的配置
通过上文 CentOS 6.8 编译安装MySQL5.5.32 ,我们完成了编译安装,接下配置多实例
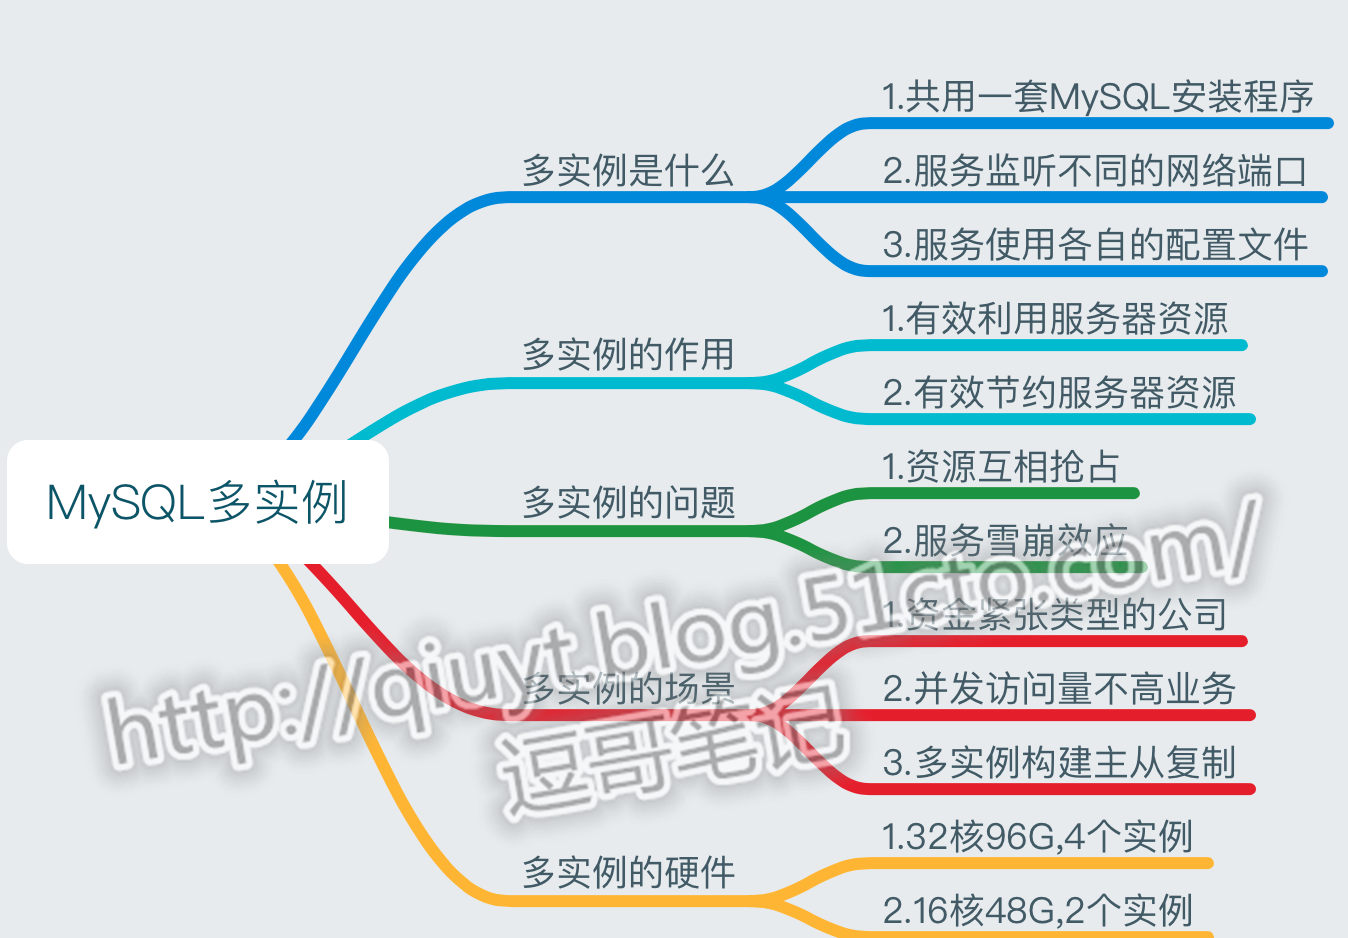
本图借鉴徐亮伟"思维简图"
5,添加多实例目录
|
1
2
3
4
5
6
7
|
[root@db01 application]# mkdir -p /data/{3306,3307}/data
[root@db01 application]# tree /data/
/data/
├── 3306
│ └── data
└── 3307
└── data,
|
6,上传多实例配置文件
|
1
2
3
4
5
6
7
8
9
10
11
12
13
|
[root@db01 /]# cd /
[root@db01 /]# rz -y data.zip
[root@db01 /]# unzip data.zip
[root@db01 /]# tree data
data
├── 3306 ##3306实例目录
│ ├── data
│ ├── my.cnf
│ └── mysql
└── 3307
├── data
├── my.cnf
└── mysql
|
##多实例 文件对比 配置文件中 只有字符串 3306与3307,与serverID 的不同
7,给Mysql启动脚本增加执行权限
|
1
2
|
find /data -type f -name "mysql"|xargs chmod 700
chown -R mysql.mysql /data
|

8,多实例初始化,作用就是加载mysql自带的库与表##
|
1
2
3
4
5
6
|
cd /application/mysql/scripts
./mysql_install_db --defaults-file=/data/3306/my.cnf --basedir=/application/mysql/ --datadir=/data/3306/data --user=mysql
./mysql_install_db --defaults-file=/data/3307/my.cnf --basedir=/application/mysql/ --datadir=/data/3307/data --user=mysql
##提示:--basedir=/application/mysql/为MySQL的安装路径,--datadir为数据文件目录。
另,注意mysql_install_db和MySQL5.1的路径不同,MySQL5.1不在MySQL bin路径下了。
|
编译过程,注意要有2个OK 才算成功
|
1
2
3
4
5
6
7
8
9
10
11
12
13
14
15
16
17
18
19
20
21
22
23
24
25
26
27
28
29
30
31
32
33
34
35
36
37
38
39
40
41
42
|
[root@db02 scripts]# ./mysql_install_db --basedir=/application/mysql --datadir=/data/3306/data --user=mysql
WARNING: The host 'db02' could not be looked up with resolveip.
This probably means that your libc libraries are not 100 % compatible
with this binary MySQL version. The MySQL daemon, mysqld, should work
normally with the exception that host name resolving will not work.
This means that you should use IP addresses instead of hostnames
when specifying MySQL privileges !
Installing MySQL system tables...
OK #<==两个OK是初始化成功的标志。
Filling help tables...
OK #<==两个OK是初始化成功的标志。
To start mysqld at boot time you have to copy
support-files/mysql.server to the right place for your system
PLEASE REMEMBER TO SET A PASSWORD FOR THE MySQL root USER !
To do so, start the server, then issue the following commands:
/application/mysql/bin/mysqladmin -u root password 'new-password'
/application/mysql/bin/mysqladmin -u root -h db02 password 'new-password'
Alternatively you can run:
/application/mysql/bin/mysql_secure_installation
which will also give you the option of removing the test
databases and anonymous user created by default. This is
strongly recommended for production servers.
See the manual for more instructions.
You can start the MySQL daemon with:
cd /application/mysql ; /application/mysql/bin/mysqld_safe &
You can test the MySQL daemon with mysql-test-run.pl
cd /application/mysql/mysql-test ; perl mysql-test-run.pl
Please report any problems with the /application/mysql/scripts/mysqlbug script!
###请注意如下几行英文的说明及报错
New default config file was createdas /application/mysql//my.cnf and
will be used by default by theserver when you start it.
You may edit this file to changeserver settings
#从上文说明中可以指导mysql的默认配置文件已经变到了/application/mysql//my.cnf
WARNING: Default config file/etc/my.cnf exists on the system
This file will be read by defaultby the MySQL server
If you do not want to use this,either remove it, or use the
--defaults-file argument tomysqld_safe when starting the server
#从上文说明中可以看到数据库启动时会读取/etc/my.cnf,因此有可能会导致无法启动,避免的方法就是使用mysqld_safe启动服务时采用--defaults-file参数指定配置文件,前文已将/etc/my.cnf改名了,所以,就不需要指定参数了,这里是一个坑,读者要注意。
此步骤必须要初始化成功,否则,后面会出现登录不了数据库等各种问题。
[root@oldboy ~]# mysql
ERROR1045 (28000): Access denied for user 'root'@'localhost' (using password: NO)
解决办法:重新初始化数据库即可,此问题一般都是数据库初始化问题,或者数据库文件损坏,以及目录权限问题
|
9,MySQL 初始化原理
初始化数据库的就是加载MySQL自带的库与表 例如:生成的test及mysql库表等。
初始化数据库后,查看数据目录,生成哪些文件
|
1
2
3
4
5
6
7
8
9
|
[root@db02 scripts]# ls -l /data/3306/data/
total 143372
-rw-rw---- 1 mysql mysql 134217728 Apr 29 03:32 ibdata1
-rw-rw---- 1 mysql mysql 4194304 Apr 29 03:32 ib_logfile0
-rw-rw---- 1 mysql mysql 4194304 Apr 29 03:32 ib_logfile1
-rw-rw---- 1 mysql mysql 4194304 Apr 29 03:32 ib_logfile2
drwx------ 2 mysql root 4096 Apr 29 03:31 mysql ##用于存放管理mysql数据
drwx------ 2 mysql mysql 4096 Apr 29 03:31 performance_schema #内部性能库
drwx------ 2 mysql root 4096 Apr 29 03:31 test ##测试库
|
10,启动MySQL 命令 多实例(3306/3307)
|
1
2
3
4
5
6
7
8
9
10
11
12
13
14
15
16
17
18
19
20
21
|
[root@db02 scripts]# /data/3306/mysql start ##启动脚本见百度云连接
Starting MySQL...
[root@db02 scripts]# /data/3307/mysql start
Starting MySQL...
[root@db02 scripts]# ps -ef|grep 330
root 13426 1 0 11:32 pts/1 00:00:00 /bin/sh /application/mysql/bin/mysqld_safe --defaults-file=/data/3306/my.cnf
mysql 14150 13426 0 11:32 pts/1 00:00:05 /application/mysql-5.5.32/bin/mysqld --defaults-file=/data/3306/my.cnf --basedir=/application/mysql --datadir=/data/3306/data --plugin-dir=/application/mysql/lib/plugin --user=mysql --log-error=/data/3306/mysql_oldboy3306.err --open-files-limit=1024 --pid-file=/data/3306/mysqld.pid --socket=/data/3306/mysql.sock --port=3306
root 17840 1 0 12:57 pts/1 00:00:00 /bin/sh /application/mysql/bin/mysqld_safe --defaults-file=/data/3307/my.cnf
mysql 18540 17840 15 12:57 pts/1 00:00:01 /application/mysql-5.5.32/bin/mysqld --defaults-file=/data/3307/my.cnf --basedir=/application/mysql --datadir=/data/3307/data --plugin-dir=/application/mysql/lib/plugin --user=mysql --log-error=/data/3307/mysql_oldboy3307.err --open-files-limit=1024 --pid-file=/data/3307/mysqld.pid --socket=/data/3307/mysql.sock --port=3307
root 18558 1286 0 12:57 pts/1 00:00:00 grep --color=auto 330
##如果启动失败,请检查日志,路径是在 每个实例下都有个err文件,例如下面的3306
[root@db02 scripts]# vi /data/3306/mysql_oldboy3306.err
#MySQL5.6.36版本会出现如下错误:
[root@db02 scripts]# /data/3306/mysql start
Starting MySQL...
170508 12:56:08 mysqld_safe error: log-error set to '/data/3306/oldboy_3306.err', however file don't exists. Create writable for user 'mysql'.
#解决方法:
touch /data/3306/oldboy_3306.err
chown mysql.mysql /data/3306/oldboy_3306.err
/data/3306/mysql start ##3307实例也是如此操作,主要是缺少错误日志文件导致无法启动
|
11,连接MySQL数据库( 以socket区分,多实例)
|
1
2
3
4
5
6
7
8
9
10
11
|
[root@db02 scripts]# mysql -uroot -p -S /data/3306/mysql.sock #-S指定要启动实例的socket-bash: mysql: command not found #报错是因为没有设定环境变量
解决方法的两种思路: (建议使用第二种)
1)将mysql 路径添加到环境变量
echo "PATH=$PATH:/application/mysql/bin/">>/etc/profile
source /etc/profilep
2)将mysql 需要执行的文件或脚本,拷贝到第一个已经有环境变量权限的目录下,去执行。
cp /application/mysql/bin/* /usr/local/sbin/
再次连接,登录3306
[root@db02 ~]# mysql -uroot -p -S /data/3306/mysql.sock
[root@db02 ~]# mysql -uroot -p -S /data/3307/mysql.sock
Enter password: Welcome to the MySQL monitor. Commands end with ; or \g.Your MySQL connection id is 2Server version: 5.5.32-log Source distributionCopyright (c) 2000, 2013, Oracle and/or its affiliates. All rights reserved.Oracle is a registered trademark of Oracle Corporation and/or itsaffiliates. Other names may be trademarks of their respectiveowners.Type 'help;' or '\h' for help. Type '\c' to clear the current input statement.mysql>
|
12,添加开机自启动 (多实例 multi instances)
|
1
2
3
|
[root@db02 ~]# echo "# mysql multi instances" >>/etc/rc.local #添加注释,及实例启动项
[root@db02 ~]# echo "/data/3306/mysql start " >>/etc/rc.local
[root@db02 ~]# echo "/data/3307/mysql start " >>/etc/rc.loca
|
13,新增一个3308实例
|
1
2
3
4
5
6
7
8
9
10
11
12
13
14
15
16
|
mkdir -p /data/3308/data
\cp /data/3306/my.cnf /data/3308/
\cp /data/3306/mysql /data/3308/
sed -i 's/3306/3308/g' /data/3308/my.cnf
sed -i 's/server-id = 6/server-id = 8/g' /data/3308/my.cnf
sed -i 's/3306/3308/g' /data/3308/mysql
chown -R mysql:mysql /data/3308
chmod 700 /data/3308/mysql
cd /application/mysql/scripts
./mysql_install_db --defaults-file=/data/3308/my.cnf --datadir=/data/3308/data --basedir=/application/mysql --user=mysql
chown -R mysql:mysql /data/3308
egrep "server-id|log-bin" /data/3308/my.cnf
touch /data/3308/oldboy_3308.err
chown mysql /data/3308/oldboy_3308.err
/data/3308/mysql start #mysql启动慢,如果此段命令放到脚本中支持,需要sleep 3-5秒
netstat -lnt|grep 3308
|
测试3308实例
|
1
2
3
4
5
|
[root@db02 scripts]# mysqld_safe /data/3308/mysql.sock #目前已启动3个实例
[root@db02 scripts]# netstat -lnt|grep 330
tcp 0 0 :::3306 :::* LISTEN
tcp 0 0 :::3307 :::* LISTEN
tcp 0 0 :::3308 :::* LISTEN
|
14,Mysql多实例启动故障排错说明
如果MySQL多实例有服务没有被启动,排除方法如下:
如果发现没有显示MySQL对应的实例端口,请稍微等待几秒在检查,MySQL服务的启动稍慢
如果还是不行,请查看MySQL实例对应的错误日志,路径在my.cnf配置文件中最下面定义:
例如:3306实例的错误日志为:/data/3306/*.err
细看所有执行命令返回的屏幕输出,不要忽略关键的输出内容。
辅助查看系统日志/var/log/messages
如果是MySQL关联了其他服务,同时查看相关服务日志
仔细阅读,重新查看操作的步骤是否正确,书写命令及字符串是否正确。
多看日志,多多总结,终究会称为高手的。
转载自: http://blog.51cto.com/qiuyt/1920687
转载于:https://www.cnblogs.com/dc0012/p/8654106.html
CentOS 6.8 编译安装MySQL5.5.32相关推荐
- centos8安装mysql5.5_CentOS 6.8 编译安装MySQL5.5.32 (二 多实例)
MySQL多实例的配置 通过上文 CentOS 6.8 编译安装MySQL5.5.32 ,我们完成了编译安装,接下配置多实例 本图借鉴徐亮伟"思维简图" 5,添加多实例目录[roo ...
- cmake编译安装MySQL5.5.32
注意:在虚拟机cmake安装mysql5.5.32时,将虚拟机内存调至2G.(原创,请勿转载!) 一.安装MySQL依赖包 [root@cmake ~]# yum install pcre pcre- ...
- Linux随笔16-主从DNS服务搭建以及智能DNS服务搭建、基于CentOS7.6编译安装MySQL-5.7.32
Contents 1. DNS主从服务器搭建 1.1. DNS简介 1.2. DNS主从服务搭建 1.2.1. 主DNS服务器配置 1.2.2. 从DNS服务器配置 1.2.3. Web服务器准备 1 ...
- 红帽7编译安装mysql_精通RHEL7编译安装mysql-5.5.32
准备环境 安装mysql依赖包 yum install -y ncurses-devel [root@localhost ~]# cd tools/ [root@localhost tools]# l ...
- centos 6.2 编译安装mysql_CentOS 6.2编译安装Nginx1.2.0+MySQL5.5.25+PHP5.3.13
CentOS 6.2编译安装Nginx1.2.0+MySQL5.5.25+PHP5.3.13 2013-10-24 15:31:12 标签:服务器 防火墙 file 配置文件 written 一.配置 ...
- CentOS 6.2编译安装Nginx1.2.0+MySQL5.5.25+PHP5.3.13+博客系统WordPress3.3.2
说明: 操作系统:CentOS 6.2 32位 系统安装教程:CentOS 6.2安装(超级详细图解教程): http://www.osyunwei.com/archives/1537.html 准备 ...
- centos 编译mysql5.6_centos下编译安装MySQL5.6
,虚拟机centos6.5mini 网络适配器"桥接模式" 继续上一次的Apache编译后,编译安装MySQL5.6 MySQL5.6和以前的版本不同之处在于用cmake就行编译, ...
- CentOS 6.2编译安装Nginx1.2.0+MySQL5.5.25+PHP5.3.13
CentOS 6.2编译安装Nginx1.2.0+MySQL5.5.25+PHP5.3.13 2013-10-24 15:31:12 标签:服务器 防火墙 file 配置文件 written 一.配置 ...
- centos 6.5 编译安装了 Nginx1.6.0+MySQL5.6.19+PHP5.5.14
centos 6.5 编译安装了 Nginx1.6.0+MySQL5.6.19+PHP5.5.14 -------------------------------------------------- ...
- mysql+1.6安装,CentOS 7.0编译安装Nginx1.6.0+MySQL5.6.19+PHP5.5.14方法
这篇文章主要介绍了CentOS 7.0编译安装Nginx1.6.0+MySQL5.6.19+PHP5.5.14方法分享,需要的朋友可以参考下准备篇: 一.配置防火墙,开启80端口.3306端口 Cen ...
最新文章
- 从0梳理1场时间序列赛事!
- 洛谷P2234 [HNOI2002]营业额统计(01Tire树)
- python中等高线填充颜色_Python matplotlib使用colormap更改contourf plot中指定值的颜色...
- AppStore IPv6-only审核被拒原因分析及解决方案-a
- 搭建IIS并配置网站之旅
- LeetCode 18. 四数之和 思考分析(双指针解)
- appium for java教程_appium自动化测试入门(java版)
- bert 多义词_广告行业中那些趣事系列15:超实用的基于BERT美团搜索实践
- Sql Server RowNumber和表变量分页性能优化小计
- Java实现数组转字符串及字符串转数组的方法
- easyUI跨Tab操作datagrid
- 进程间通信之CreatePipe
- STM32中RTC唤醒停止模式
- openwrt路由器samba拒绝访问
- python绘制跳棋棋盘
- Beam Search(集束搜索)算法
- Web前端技术基础实验报告二之格式化文本、段落与列表
- ios打包报错: DXT1 compressed textures are not supported when publishing to iPhone
- symbian OS 简单介绍
- 一个事物两个方面的对比举例_对比:把两种相反的事物或一种事物相对立的两个方面作比较. 作用:鲜明地突出了主要事物或事物的主要方面的××特征....