七天学会ASP.NET MVC(七)——创建单页应用
目录
- 引言
- 最后一篇学什么
- 实验32—整理项目组织结构
- 关于实验32
- 实验33——创建单页应用——第一部分—安装
- 什么是Areas?
- 关于实验33
- 实验34——创建单页应用——第二部分—显示Employee
- 实验35——创建单页应用——第三部分—新建Employee
- 实验36——创建单页应用——第三部分—上传
实验32 ———整理项目组织结构
实验32与其他实验不同,本实验并不是在之前实验基础之上为程序添加新的功能,实验32主要目的是整理项目结构,使项目条理清晰,能够结构化系统化,便于其他人员理解。
1. 创建解决方案文件夹
右键单击,选择“新解决方案文件夹—>添加—>新解决方案”,命名为“View And Controller”
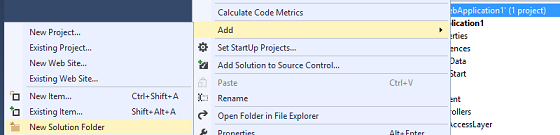
重复上述步骤 ,创建文件夹“Model”,“ViewModel”,”Data Access Layer”
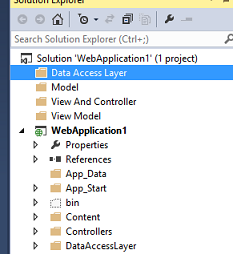
2. 创建数据访问层工程
右击“Data Access Layer”文件夹,新建类库“DataAccessLayer”。
3. 创建业务层和业务实体项
在Model文件夹下创建新类库“BusinessLayer”和“BusinessEntities”
4. 创建ViewModel 项
在ViewModel 文件夹下新建类库项“ViewModel“
5. 添加引用
为以上创建的项目添加引用,如下:
1. DataAccessLayer 添加 BusinessEntities项
2. BusinessLayer 添加DataAccessLayer和 BusinessEntities项
3. MVC WebApplication 选择 BusinessLayer,BusinessEntities, ViewModel
4. BusinessEntities 添加 System.ComponentModel.DataAnnotations
6. 设置
1.将DataAccessLayer文件夹下的 SalesERPDAL.cs文件,复制粘贴到新创建的 DataAccessLayer 类库中。
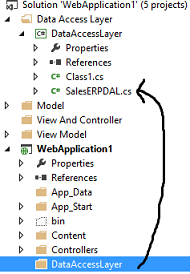
2. 删除MVC项目(WebApplication1)的DataAccessLayer文件夹
3. 同上,将Model文件夹中的 Employee.cs, UserDetails.cs 及 UserStatus.cs文件复制到新建的 BusinessEntities文件夹中。
4. 将MVC项目中的Model文件夹的 EmployeeBusinessLayer.cs文件粘贴到新建的 BusinessLayer的文件夹中。
5. 删除MVC中的Model文件夹
6. 将MVC项目的ViewModels文件夹下所有的文件复制到新建的ViewModel 类库项中。
7. 删除ViewModels文件夹
8. 将整个MVC项目剪切到”View And Controller”解决方案文件夹中。
7. Build
选择Build->Build Solution from menu bar,会报错。

8. 改错
1. 给ViewModel项添加System.Web 引用
2. 在DataAccessLayer 和 BusinessLayer中使用Nuget 管理,并安装EF(Entity Framework)(如果对于Nuget的使用有不理解的地方可以查看第三篇博客文章)
注意:在Business Layer中引用EF 是非常必要的,因为Business Layer与DataAccessLayer 直接关联的,而完善的体系架构它自身的业务层是不应该与DataAccessLayer直接关联,因此我们必须使用pattern库,协助完成。
3. 删除MVC 项目中的EF
- 右击MVC 项目,选择”Manage Nuget packages“选项
- 在弹出的对话框中选择”Installed Packages“
- 则会显示所有的已安装项,选择EF,点解卸载。
9. 编译会发现还是会报错
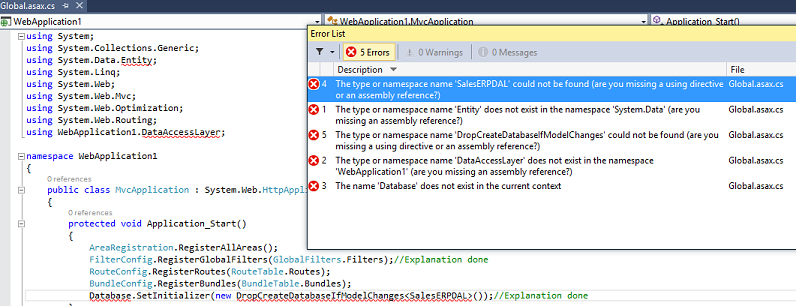
10. 修改错误
报错是由于在项目中既没有引用 SalesERPDAL,也没有引用EF,在项目中直接引用也并不是优质的解决方案。
1. 在DataAccessLayer项中 新建带有静态方法”SetDatabase“的类”DatabaseSettings“
1: using System.Data.Entity;2: using WebApplication1.DataAccessLayer;3: namespace DataAccessLayer4: {5: public class DatabaseSettings6: {7: public static void SetDatabase()8: {9: Database.SetInitializer(new DropCreateDatabaseIfModelChanges<SalesERPDAL>());<saleserpdal>10: }11: } 12: }2. 在 BusinessLayer项中新建带有”SetBusiness“ 静态方法的”BusinessSettings“类。
1: using DataAccessLayer;2: 3: namespace BusinessLayer4: {5: public class BusinessSettings6: {7: public static void SetBusiness()8: {9: DatabaseSettings.SetDatabase();10: }11: }12: }3. 删除global.asax 中的报错的Using语句 和 Database.SetInitializer 语句。 调用 BusinessSettings.SetBusiness 函数:
1: using BusinessLayer;2: .3: .4: .5: BundleConfig.RegisterBundles(BundleTable.Bundles);6: BusinessSettings.SetBusiness();
再次编译程序,会发现成功。
关于实验32
什么是解决方案文件夹?
解决方案文件夹是逻辑性的文件夹,并不是在物理磁盘上实际创建,这里使用解决方案文件夹就是为了使项目更系统化更有结构。
实验33——创建单页应用 1—安装
实验33中,不再使用已创建好的控制器和视图,会创建新的控制器及视图,创建新控制器和视图原因如下:
1. 保证现有的选项完整,也会用于旧版本与新版本对比
2. 学习理解ASP.NET MVC 新概念:Areas
接下来,我们需要从头开始新建controllers, views,ViewModels。
下面的文件可以被重用:
- 已创建的业务层
- 已创建的数据访问层
- 已创建的业务实体
- 授权和异常过滤器
- FooterViewModel
- Footer.cshtml
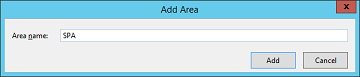
1. 创建新Area
右击项目,选择添加->Area,在弹出对话框中输入SPA,点击确认,生成新的文件夹,因为在该文件夹中不需要Model中Area的文件夹,删掉。

接下来我们先了解一下Areas的概念
Areas
Areas是实现Asp.net MVC 项目模块化管理的一种简单方法。
每个项目由多个模块组成,如支付模块,客户关系模块等。在传统的项目中,采用“文件夹”来实现模块化管理的,你会发现在单个项目中会有多个同级文件夹,每个文件夹代表一个模块,并保存各模块相关的文件。
然而,在Asp.net MVC 项目中使用自定义文件夹实现功能模块化会导致很多问题。
下面是在Asp.Net MVC中使用文件夹来实现模块化功能需要注意的几点:
- DataAccessLayer, BusinessLayer, BusinessEntities和ViewModels的使用不会导致其他问题,在任何情况下,可视作简单的类使用。
- Controllers—只能保存在Controller 文件夹,但是这不是大问题,从MVC4开始,控制器的路径不再受限。现在可以放在任何文件目录下。
- 所有的Views必须放在“~/Views/ControllerName” or “~/Views/Shared”文件夹。
2. 创建必要的ViewModels
在ViewModel类库下新建文件夹并命名为SPA,创建ViewModel,命名为”MainViewModel“,如下:
1: using WebApplication1.ViewModels;2: namespace WebApplication1.ViewModels.SPA3: {4: public class MainViewModel5: {6: public string UserName { get; set; }7: public FooterViewModel FooterData { get; set; }//New Property8: }9: }3. 创建Index action 方法
在 MainController 中输入:
1: using WebApplication1.ViewModels.SPA;2: using OldViewModel=WebApplication1.ViewModels;
在MainController 中新建Action 方法,如下:
1: public ActionResult Index()2: {3: MainViewModel v = new MainViewModel();4: v.UserName = User.Identity.Name;5: v.FooterData = new OldViewModel.FooterViewModel();6: v.FooterData.CompanyName = "StepByStepSchools";//Can be set to dynamic value7: v.FooterData.Year = DateTime.Now.Year.ToString();8: return View("Index", v);9: }using OldViewModel=WebApplication1.ViewModels 这行代码中,给WebApplication1.ViewModels 添加了别名OldViewModel,使用时可直接写成OldViewModel.ClassName这种形式。
如果不定义别名的话,会产生歧义,因为WebApplication1.ViewModels.SPA 和 WebApplication1.ViewModels下有名称相同的类。
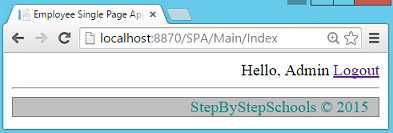
4.创建Index View
创建与上述Index方法匹配的View
1: @using WebApplication1.ViewModels.SPA2: @model MainViewModel3: <!DOCTYPE html>4: 5: <html>6: <head>7: <meta name="viewport" content="width=device-width" />8: <title>Employee Single Page Application</title>
5. 运行测试
关于实验33
为什么在控制器名前需要使用SPA关键字?
在ASP.NET MVC应用中添加area时,Visual Studio会自动创建并命名为“[AreaName]AreaRegistration.cs”的文件,其中包含了AreaRegistration的派生类。该类定义了 AreaName属性和用来定义register路劲信息的 RegisterArea 方法。
在本次实验中你会发现nameSpaArealRegistration.cs文件被存放在“~/Areas/Spa”文件夹下,SpaArealRegistration类的RegisterArea方法的代码如下:
1: context.MapRoute(2: "SPA_default",3: "SPA/{controller}/{action}/{id}",4: new { action = "Index", id = UrlParameter.Optional }5: );这就是为什么一提到Controllers,我们会在Controllers前面加SPA关键字。
SPAAreaRegistration的RegisterArea方法是怎样被调用的?
打开global.asax文件,首行代码如下:
1: AreaRegistration.RegisterAllAreas();
RegisterAllAreas方法会找到应用程序域中所有AreaRegistration的派生类,并主动调用RegisterArea方法
是否可以不使用SPA关键字来调用MainController?
AreaRegistration类在不删除其他路径的同时会创建新路径。RouteConfig类中定义了新路径仍然会起作用。如之前所说的,Controller存放的路径是不受限制的,因此它可以工作但可能不会正常的显示,因为无法找到合适的View。
实验34——创建单页应用2—显示Employees
1.创建ViewModel,实现“显示Empoyee”功能
在SPA中新建两个ViewModel 类,命名为”EmployeeViewModel“及”EmployeeListViewModel“:
1: namespace WebApplication1.ViewModels.SPA2: {3: public class EmployeeViewModel4: {5: public string EmployeeName { get; set; }6: public string Salary { get; set; }7: public string SalaryColor { get; set; }8: }9: }1: namespace WebApplication1.ViewModels.SPA2: {3: public class EmployeeListViewModel4: {5: public List<employeeviewmodel> Employees { get; set; }6: }7: }注意:这两个ViewModel 都是由非SPA 应用创建的,唯一的区别就在于这次不需要使用BaseViewModel。
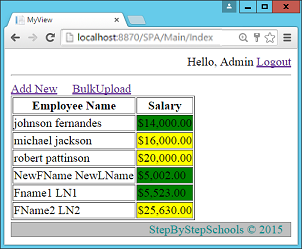
2. 创建EmployeeList Index
在MainController 中创建新的Action 方法”EmployeeList“action 方法
1: public ActionResult EmployeeList()2: {3: EmployeeListViewModel employeeListViewModel = new EmployeeListViewModel();4: EmployeeBusinessLayer empBal = new EmployeeBusinessLayer();5: List<employee> employees = empBal.GetEmployees();6: 7: List<employeeviewmodel> empViewModels = new List<employeeviewmodel>();8: 9: foreach (Employee emp in employees)10: {11: EmployeeViewModel empViewModel = new EmployeeViewModel();12: empViewModel.EmployeeName = emp.FirstName + " " + emp.LastName;13: empViewModel.Salary = emp.Salary.Value.ToString("C");14: if (emp.Salary > 15000)15: {16: empViewModel.SalaryColor = "yellow";17: }18: else19: {20: empViewModel.SalaryColor = "green";21: }22: empViewModels.Add(empViewModel);23: }24: employeeListViewModel.Employees = empViewModels;25: return View("EmployeeList", employeeListViewModel);26: }注意: 不需要使用 HeaderFooterFilter
3. 创建AddNewLink 分部View
之前添加AddNewLink 分部View已经无法使用,因为Anchor标签会造成全局刷新,我们的目标是创建”单页应用“,因此不需要全局刷新。
在”~/Areas/Spa/Views/Main“ 文件夹新建分部View”AddNewLink.cshtml“。
<a href="#" onclick="OpenAddNew();">Add New</a>
<a href="#" onclick="OpenBulkUpload();">Bulk Upload</a>
4. 创建 AddNewLink Action 方法
在MainController中创建 ”GetAddNewLink“ action 方法。
1: public ActionResult GetAddNewLink()2: {3: if (Convert.ToBoolean(Session["IsAdmin"]))4: {5: return PartialView("AddNewLink");6: }7: else8: {9: return new EmptyResult();10: }11: }5. 新建 EmployeeList View
在“~/Areas/Spa/Views/Main”中创建新分部View 命名为“EmployeeList”。
1: @using WebApplication1.ViewModels.SPA2: @model EmployeeListViewModel3: <div>4: @{5: Html.RenderAction("GetAddNewLink");6: }7: 8: <table border="1" id="EmployeeTable">9: <tr>10: <th>Employee Name</th>6. 设置EmployeeList 为初始页面
打开“~/Areas/Spa/Views/Main/Index.cshtml”文件,在Div标签内包含EmployeeList action结果。
<div>@Html.Action("EmployeeList", "Main");</div>7. 运行
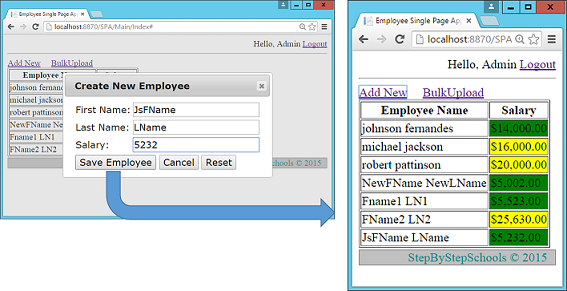
实验 35——创建单页应用3—创建Employee
1. 创建AddNew ViewModels
在SPA中新建 ViewModel类库项的ViewModel,命名为“CreateEmployeeViewModel”。
1: namespace WebApplication1.ViewModels.SPA2: {3: public class CreateEmployeeViewModel4: {5: public string FirstName { get; set; }6: public string LastName { get; set; }7: public string Salary { get; set; }8: }9: }2. 创建AddNew action 方法
在MainController中输入using 语句:
1: using WebApplication1.Filters;
在MainController 中创建AddNew action 方法:
1: [AdminFilter]2: public ActionResult AddNew()3: {4: CreateEmployeeViewModel v = new CreateEmployeeViewModel();5: return PartialView("CreateEmployee", v);6: }3. 创建 CreateEmployee 分部View
在“~/Areas/Spa/Views/Main”中创建新的分部View“CreateEmployee”
1: @using WebApplication1.ViewModels.SPA2: @model CreateEmployeeViewModel3: <div>4: <table>5: <tr>6: <td>7: First Name:8: </td>
4. 添加 jQuery UI
右击项目选择“Manage Nuget Manager”。找到“jQuery UI”并安装。
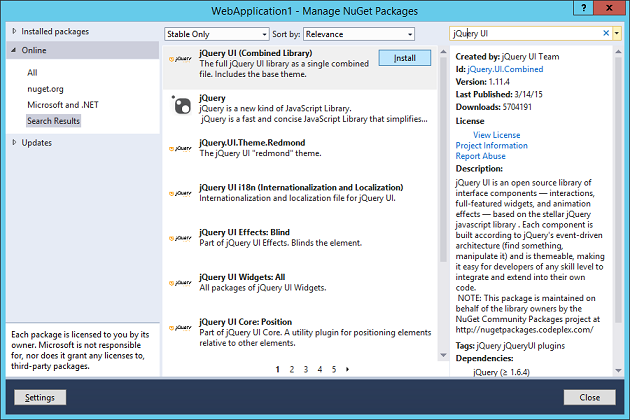
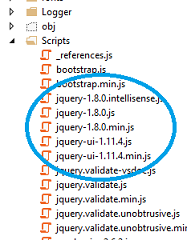
项目中会自动添加.js和.css文件
5. 在项目中添加jQuery UI
打开“~/Areas/Spa/Views/Main/Index.cshtml”,添加jQuery.js,jQueryUI.js 及所有的.css文件的引用。这些文件会通过Nuget Manager添加到jQuery UI 包中。
1: <head>2: <meta name="viewport" content="width=device-width" />3: <script src="~/Scripts/jquery-1.8.0.js"></script>4: <script src="~/Scripts/jquery-ui-1.11.4.js"></script>5: <title>Employee Single Page Application</title>6: <link href="~/Content/themes/base/all.css" rel="stylesheet" />7: ...
6. 实现 OpenAddNew 方法
在“~/Areas/Spa/Views/Main/Index.cshtml”中新建JavaScript方法“OpenAddNew”。
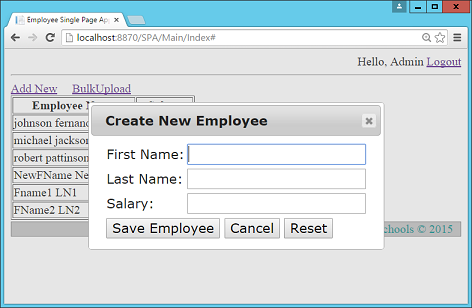
1: <script>2: function OpenAddNew() {3: $.get("/SPA/Main/AddNew").then4: (5: function (r) {6: $("<div id='DivCreateEmployee'></div>").html(r).7: dialog({8: width: 'auto', height: 'auto', modal: true, title: "Create New Employee",9: close: function () {10: $('#DivCreateEmployee').remove();11: }12: });13: }14: );15: }16: </script>7. 运行
完成登录步骤后导航到Index中,点击Add New 链接。
8. 创建 ResetForm 方法
在CreateEmployee.cshtml顶部,输入以下代码,创建ResetForm函数:
1: @model CreateEmployeeViewModel2: <script>3: function ResetForm() {4: document.getElementById('TxtFName').value = "";5: document.getElementById('TxtLName').value = "";6: document.getElementById('TxtSalary').value = "";7: }8: </script>9. 创建 CancelSave 方法
在CreateEmployee.cshtml顶部,输入以下代码,创建CancelSave 函数:
1: document.getElementById('TxtSalary').value = "";2: }3: function CancelSave() {4: $('#DivCreateEmployee').dialog('close');5: }在开始下一步骤之前,我们先来了解我们将实现的功能:
- 最终用户点击保存按钮
- 输入值必须在客户端完成验证
- 会将合法值传到服务器端
- 新Employee记录必须保存到数据库中
- CreateEmployee对话框使用完成之后必须关闭
- 插入新值后,需要更新表格。
为了实现三大功能,先确定一些实现计划:
1.验证
验证功能可以使用之前项目的验证代码。
2.保存功能
我们会创建新的MVC action 方法实现保存Employee,并使用jQuery Ajax调用
3. 服务器端与客户端进行数据通信
在之前的实验中,使用Form标签和提交按钮来辅助完成的,现在由于使用这两种功能会导致全局刷新,因此我们将使用jQuery Ajax方法来替代Form标签和提交按钮。
寻求解决方案
1. 理解问题
大家会疑惑JavaScript和Asp.NET 是两种技术,如何进行数据交互?
解决方案: 通用数据类型
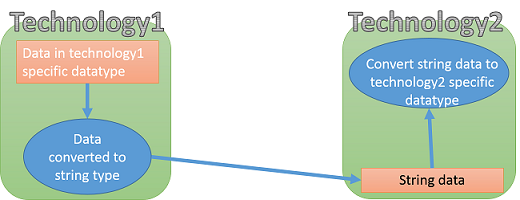
由于这两种技术都支持如int,float等等数据类型,尽管他们的存储方式,大小不同,但是在行业总有一种数据类型能够处理任何数据,称之为最兼容数据类型即字符串类型。
通用的解决方案就是将所有数据转换为字符串类型,因为无论哪种技术都支持且能理解字符串类型的数据。
问题:复杂数据该怎么传递?
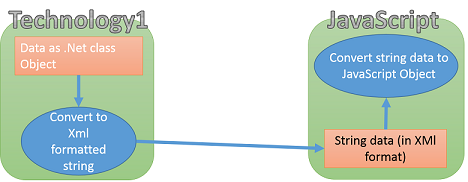
.net中的复杂数据通常指的是类和对象,这一类数据,.net与其他技术传递复杂数据就意味着传类对象的数据,从JavaScript给其他技术传的复杂类型数据就是JavaScript对象。因此是不可能直接传递的,因此我们需要将对象类型的数据转换为标准的字符串类型,然后再发送。
解决方案—标准的通用数据格式
可以使用XML定义一种通用的数据格式,因为每种技术都需要将数据转换为XML格式的字符串,来与其他技术通信,跟字符串类型一样,XML是每种技术都会考虑的一种标准格式。
如下,用C#创建的Employee对象,可以用XML 表示为:
1: <employee></employee><Employee>
2: <EmpName>Sukesh</EmpName>
3: <Address>Mumbai</Address>
4: </Employee>
因此可选的解决方案就是,将技术1中的复杂数据转换为XML格式的字符串,然再发送给技术2.
然而使用XML格式可能会导致数据占用的字节数太多,不易发送。数据SiZE越大意味着性能越低效。还有就是XML的创建和解析比较困难。
为了处理XML创建和解析的问题,使用JSON格式,全称“JavaScript Object Notation”。
C#创建的Employee对象用JSON表示:
1: {
2: EmpName: "Sukesh",
3: Address: "Mumbai"
4: }
JSON数据是相对轻量级的数据类型,且JAVASCRIPT提供转换和解析JSON格式的功能函数。
1: var e={
2: EmpName= “Sukesh”,
3: Address= “Mumbai”
4: };
5: var EmployeeJsonString = JSON.stringify(e);//This EmployeeJsonString will be send to other technologies.
1: var EmployeeJsonString=GetFromOtherTechnology();
2: var e=JSON.parse(EmployeeJsonString);
3: alert(e.EmpName);
4: alert(e.Address);
数据传输的问题解决了,让我们继续进行实验。
10. 创建 SaveEmployee action
在MainController中创建action,如下:
1: [AdminFilter]2: public ActionResult SaveEmployee(Employee emp)3: {4: EmployeeBusinessLayer empBal = new EmployeeBusinessLayer();5: empBal.SaveEmployee(emp);6: 7: EmployeeViewModel empViewModel = new EmployeeViewModel();8: empViewModel.EmployeeName = emp.FirstName + " " + emp.LastName;9: empViewModel.Salary = emp.Salary.Value.ToString("C");10: if (emp.Salary > 15000)11: {12: empViewModel.SalaryColor = "yellow";13: }14: else15: {16: empViewModel.SalaryColor = "green";17: }18: return Json(empViewModel);19: }上述代码中,使用Json方法在MVC action方法到JavaScript之间传Json字符串。
11. 添加 Validation.js 引用
1: @using WebApplication1.ViewModels.SPA
2: @model CreateEmployeeViewModel
3: <script src="~/Scripts/Validations.js"></script>
12. 创建 SaveEmployee 方法
在CreateEmployee.cshtml View中,创建 SaveEmployee方法:
1: ...2: ...3: 4: function SaveEmployee() {5: if (IsValid()) {6: var e =7: {8: FirstName: $('#TxtFName').val(),9: LastName: $('#TxtLName').val(),10: Salary: $('#TxtSalary').val()11: };12: $.post("/SPA/Main/SaveEmployee",e).then(13: function (r) {14: var newTr = $('<tr></tr>');15: var nameTD = $('<td></td>');16: var salaryTD = $('<td></td>');17: 18: nameTD.text(r.EmployeeName);19: salaryTD.text(r.Salary); 20: 21: salaryTD.css("background-color", r.SalaryColor);22: 23: newTr.append(nameTD);24: newTr.append(salaryTD);25: 26: $('#EmployeeTable').append(newTr);27: $('#DivCreateEmployee').dialog('close'); 28: }29: );30: }31: }32: </script>13. 运行
关于实验35
JSON 方法的作用是什么?
返回JSONResult,JSONResult 是ActionResult 的子类。在第六篇博客中讲过MVC的请求周期。
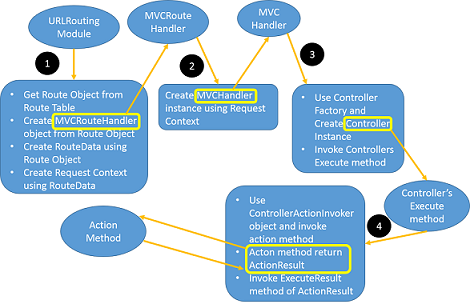
ExecuteResult是ActionResult中声明的抽象方法,ActionResult所有的子类都定义了该方法。在第一篇博客中我们已经讲过ViewResult 的ExecuteResult方法实现的功能,有什么不理解的可以翻看第一篇博客。
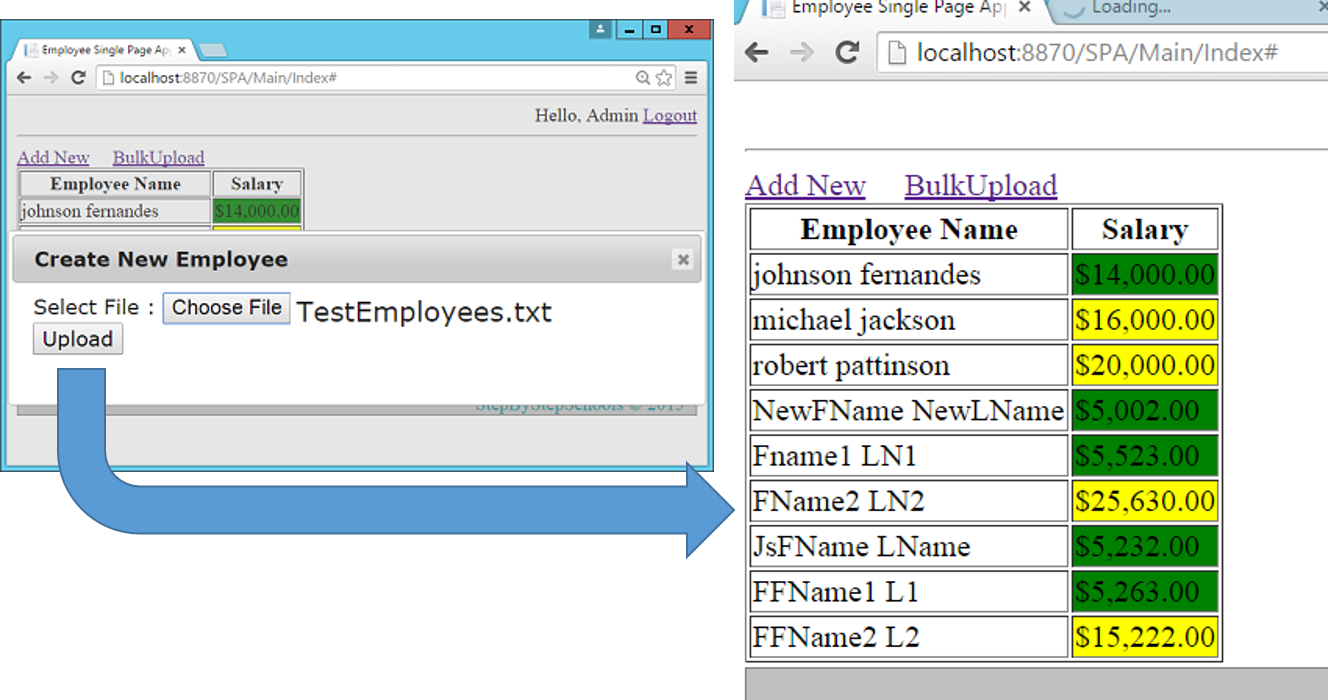
实验36——创建单页应用—4—批量上传
1. 创建SpaBulkUploadController
创建新的AsyncController“ SpaBulkUploadController”
1: namespace WebApplication1.Areas.SPA.Controllers2: {3: public class SpaBulkUploadController : AsyncController4: {5: }6: }2. 创建Index Action
在步骤1中的Controller中创建新的Index Action 方法,如下:
1: [AdminFilter]2: public ActionResult Index()3: {4: return PartialView("Index");5: }3. 创建Index 分部View
在“~/Areas/Spa/Views/SpaBulkUpload”中创建 Index分部View
1: <div>2: Select File : <input type="file" name="fileUpload" id="MyFileUploader" value="" />3: <input type="submit" name="name" value="Upload" onclick="Upload();" />4: </div>
4. 创建 OpenBulkUpload 方法
打开“~/Areas/Spa/Views/Main/Index.cshtml”文件,新建JavaScript 方法OpenBulkUpload
1: function OpenBulkUpload() {2: $.get("/SPA/SpaBulkUpload/Index").then3: (4: function (r) {5: $("<div id='DivBulkUpload'></div>").html(r).dialog({ width: 'auto', height: 'auto', modal: true, title: "Create New Employee",6: close: function () {7: $('#DivBulkUpload').remove();8: } });9: }10: );11: }12: </script>13: </head>14: <body>15: <div style="text-align:right">5. 运行

6. 新建FileUploadViewModel
在ViewModel SPA文件夹中新建View Model”FileUploadViewModel”。
1: namespace WebApplication1.ViewModels.SPA2: {3: public class FileUploadViewModel4: {5: public HttpPostedFileBase fileUpload { get; set; }6: }7: }7. 创建Upload Action
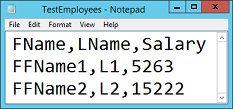
1: [AdminFilter]2: public async Task<actionresult> Upload(FileUploadViewModel model)3: {4: int t1 = Thread.CurrentThread.ManagedThreadId;5: List<employee> employees = await Task.Factory.StartNew<list<employee>>6: (() => GetEmployees(model));7: int t2 = Thread.CurrentThread.ManagedThreadId;8: EmployeeBusinessLayer bal = new EmployeeBusinessLayer();9: bal.UploadEmployees(employees);10: EmployeeListViewModel vm = new EmployeeListViewModel();11: vm.Employees = new List<employeeviewmodel>();12: foreach (Employee item in employees)13: {14: EmployeeViewModel evm = new EmployeeViewModel();15: evm.EmployeeName = item.FirstName + " " + item.LastName;16: evm.Salary = item.Salary.Value.ToString("C");17: if (item.Salary > 15000)18: {19: evm.SalaryColor = "yellow";20: }21: else22: {23: evm.SalaryColor = "green";24: }25: vm.Employees.Add(evm);26: }27: return Json(vm);28: }29: 30: private List<employee> GetEmployees(FileUploadViewModel model)31: {32: List<employee> employees = new List<employee>();33: StreamReader csvreader = new StreamReader(model.fileUpload.InputStream);34: csvreader.ReadLine();// Assuming first line is header35: while (!csvreader.EndOfStream)36: {37: var line = csvreader.ReadLine();38: var values = line.Split(',');//Values are comma separated39: Employee e = new Employee();40: e.FirstName = values[0];41: e.LastName = values[1];42: e.Salary = int.Parse(values[2]);43: employees.Add(e);44: }45: return employees;46: }8. 创建Upload 函数
打开”~/Areas/Spa/Views/SpaBulkUpload”的Index View。创建JavaScript函数,命名为“Upload”
1: <script>2: function Upload() {3: debugger;4: var fd = new FormData();5: var file = $('#MyFileUploader')[0];6: fd.append("fileUpload", file.files[0]);7: $.ajax({8: url: "/Spa/SpaBulkUpload/Upload",9: type: 'POST',10: contentType: false,11: processData: false,12: data: fd13: }).then(function (e) {14: debugger;15: for (i = 0; i < e.Employees.length; i++)16: {17: var newTr = $('<tr></tr>');18: var nameTD = $('<td></td>');19: var salaryTD = $('<td></td>');20: 21: nameTD.text(e.Employees[i].EmployeeName);22: salaryTD.text(e.Employees[i].Salary);23: 24: salaryTD.css("background-color", e.Employees[i].SalaryColor);25: 26: newTr.append(nameTD);27: newTr.append(salaryTD);28: 29: $('#EmployeeTable').append(newTr);30: }31: $('#DivBulkUpload').dialog('close');32: });33: }34: </script>9. 运行
总结
以上本系列的七篇文章就是介绍MVC知识的全部内容了,看到这里你是否已经对MVC的知识有了较为全面的掌握?在具备MVC知识的同时,使用一些开发工具将会使我们的开发过程变得事半功倍,借助 ComponentOne Studio ASP.NET MVC 这款轻量级控件,开发效率大大提高的同时,工作量也会大大减少。
七天学会MVC 就到这里结束了,谢谢大家的支持,希望大家都能够掌握所讲述的MVC知识,希望都能够进步!
原文链接:http://www.codeproject.com/Articles/1010152/Learn-MVC-Project-in-Days-Day
转载于:https://www.cnblogs.com/yi-ye/p/5672866.html
七天学会ASP.NET MVC(七)——创建单页应用相关推荐
- 七天学会ASP.NET MVC (一)——深入理解ASP.NET MVC
七天学会ASP.NET MVC (一)--深入理解ASP.NET MVC 系列文章 七天学会ASP.NET MVC (一)--深入理解ASP.NET MVC 七天学会ASP.NET MVC (二)-- ...
- 七天学会ASP.NET MVC (五)——Layout页面使用和用户角色管理
系列文章 七天学会ASP.NET MVC (一)--深入理解ASP.NET MVC 七天学会ASP.NET MVC (二)--ASP.NET MVC 数据传递 七天学会ASP.NET MVC (三)- ...
- 七天学会ASP.NET MVC
七天学会ASP.NET MVC (一)--深入理解ASP.NET MVC 七天学会ASP.NET MVC (二)--ASP.NET MVC 数据传递 七天学会ASP.NET MVC (三)--ASP. ...
- 七天学会ASP.NET MVC (二)——ASP.NET MVC 数据传递
通过第一天的学习之后,我们相信您已经对MVC有一些基本了解. 本节所讲的内容是在上节的基础之上,因此需要确保您是否掌握了上一节的内容.本章的目标是在今天学习结束时利用最佳实践解决方案创建一个小型的MV ...
- 3分钟学会在 ASP.NET MVC 中创建、读取和编辑 Excel 电子表格
在本文中,您将学习如何在ASP.NET MVC 应用程序中创建.读取和编辑 Excel 电子表格.为此,我们将创建一个由功能丰富的网格控件组成的电子表格应用程序,用于显示和编辑 Excel 文件,如下 ...
- razor页面跳转_如何在Blazor中使用Razor页面创建单页应用程序
razor页面跳转 In this article, we are going to create a Single Page Application (SPA) using Razor pages ...
- 即时低码数据库Web应用-ASP.NET Core 3.1单页应用(SPA)
目录 介绍 网格记录在编辑/添加上的持久性 用于创建单页应用程序(SPA)的步骤 在SQL Server Management Studio中创建数据库 打开Visual Studio Communi ...
- 低代码Web应用程序构造方法-ASP.NET Core 2.2单页应用程序(SPA)
目录 介绍 网格记录在编辑/添加上的持久性 以下步骤用于创建单页应用程序(SPA) 在SQL Server Management Studio中创建数据库 打开Visual Studio社区2019 ...
- Excel数据透视表经典教程八《创建单页/自定义字段透视表》
前言: 一.单页字段透视表:当对多个表格进行数据透视分析时,不能直接点击插入数据透视表操作.因此,需要创建单页或者自定义字段透视表. 二.自定义字段透视表:由于上述创建的单页字段透视表,对于不同的表格 ...
最新文章
- 视觉实战|使用人工神经网络进行图像分类
- k8s 关键字以及管理流程。
- vue 双向数据绑定的实现学习(一)
- Google Drive客户端
- CSS学习笔记--CSS语法与选择器
- 06-windows下Orcale使用Database Configuration Assistant建立数据库
- c语言寻找文件指令,c语言实现文件查找
- 美元反弹外汇分析,黄金外汇买卖近期将有怎样的行情_小豹科技
- 使用小马激活工具激活Windows后,浏览器的首页被篡改,如何改回去?
- 多测师肖sir__ui分层
- [python]---药品数据分析及预测(包括数据集,源码,报告)
- itunes更新失败卸载失败(AppleMobileDeviceSupport6464安装时回滚的解决办法)
- 第21届国际足联世界杯观后感
- Hive On Spark
- Windows窗体Winform----show()与showDialog()的区别
- 开始学习SHAREPOINT 2003。
- Notepad操作指南
- 计算机中腾讯QQ程序的安装路径,更改应用商店内应用的安装位置
- CAPL编程中的思想:if...else...判断语句还能这么玩
- 第7章、 Linux 档案与目录管理
热门文章
- python从零基础到项目实战怎么样-2018完整Python零基础到项目精通的学习书籍
- python处理excel大数据-【Python 模块】 xlrd 读取 Excel 文件
- 想学python看什么书-请问想学python和JAVA得看什么书?
- python画直方图代码-Python绘制直方图及子图的方法分析(代码示例)
- python编程在哪里写程序-第一个Python程序——在屏幕上输出文本
- 软件测试用python一般用来做什么-如何将Python应用到实际测试工作中?
- python难学嘛-python语言难学吗
- python3最新稳定版本-Python 3.9.0 稳定版发布
- python 缺点-Python的3个主要缺点及其解决方案
- python画动态爱心-【Python】五分钟画一条动态心形曲线~