python怎么画条形图-python绘制条形图方法代码详解
1.首先要绘制一个简单的条形图
import numpy as np
import matplotlib.pyplot as plt
from matplotlib import mlab
from matplotlib import rcParams
fig1 = plt.figure(2)
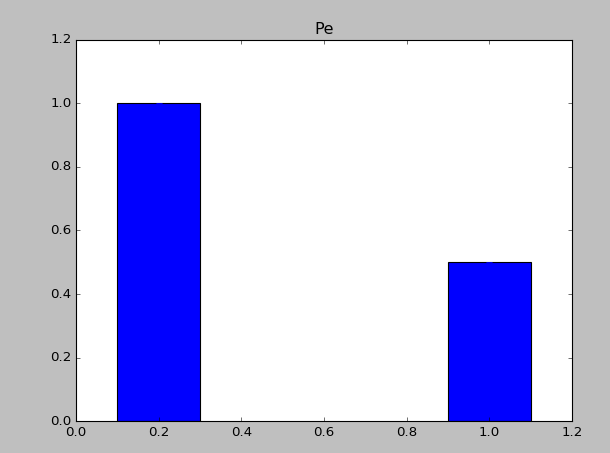
rects =plt.bar(left = (0.2,1),height = (1,0.5),width = 0.2,align="center",yerr=0.000001)
plt.title('Pe')
plt.show()
1.1上面中rects=plt.bar(left=(0.2,1),height=(1,0.5),width=0.2,align=”center”,yerr=0.000001)这句代码是最重要的,其中left表示直方图的开始的位置(也就是最左边的地方),height是指直方图的高度,当直方图太粗时,可以通过width来定义直方图的宽度,注意多个直方图要用元组,yerr这个参数是防止直方图触顶。
2.增加直方图脚注
import numpy as np
import matplotlib.pyplot as plt
from matplotlib import mlab
from matplotlib import rcParams
fig1 = plt.figure(2)
rects =plt.bar(left = (0.2,1),height = (1,0.5),width = 0.2,align="center",yerr=0.000001)
plt.title('Pe')
plt.xticks((0.2,1),('frst','second'))
plt.show()

3.条形图上显示具体的数字(自动编号)
import numpy as np
import matplotlib.pyplot as plt
from matplotlib import mlab
from matplotlib import rcParams
fig1 = plt.figure(2)
rects =plt.bar(left = (0.2,1),height = (1,0.5),width = 0.2,align="center",yerr=0.000001)
plt.title('Pe')
def autolabel(rects):
for rect in rects:
height = rect.get_height()
plt.text(rect.get_x()+rect.get_width()/2., 1.03*height, '%s' % float(height))
autolabel(rects)
plt.xticks((0.2,1),('frst','second'))
plt.show()

4.改变颜色
import numpy as np
import matplotlib.pyplot as plt
from matplotlib import mlab
from matplotlib import rcParams
fig1 = plt.figure(2)
rects =plt.bar(left = (0.2,1),height = (1,0.5),color=('r','g'),width = 0.2,align="center",yerr=0.000001)
plt.title('Pe')
def autolabel(rects):
for rect in rects:
height = rect.get_height()
plt.text(rect.get_x()+rect.get_width()/2., 1.03*height, '%s' % float(height))
autolabel(rects)
plt.xticks((0.2,1),('frst','second'))
plt.show()

5.添加图注
import numpy as np
import matplotlib.pyplot as plt
from matplotlib import mlab
from matplotlib import rcParams
fig1 = plt.figure(2)
rects1 =plt.bar(left = (0.2),height = (0.5),color=('g'),label=(('no1')),width = 0.2,align="center",yerr=0.000001)
rects2 =plt.bar(left = (1),height = (1),color=('r'),label=(('no2')),width = 0.2,align="center",yerr=0.000001)
plt.legend()
plt.xticks((0.2,1),('frst','second'))
plt.title('Pe')
def autolabel(rects):
for rect in rects:
height = rect.get_height()
plt.text(rect.get_x()+rect.get_width()/2., 1.03*height, '%s' % float(height))
autolabel(rects1)
autolabel(rects2)
plt.show()

6大家根据自己的需要自己来绘制自己的条形图
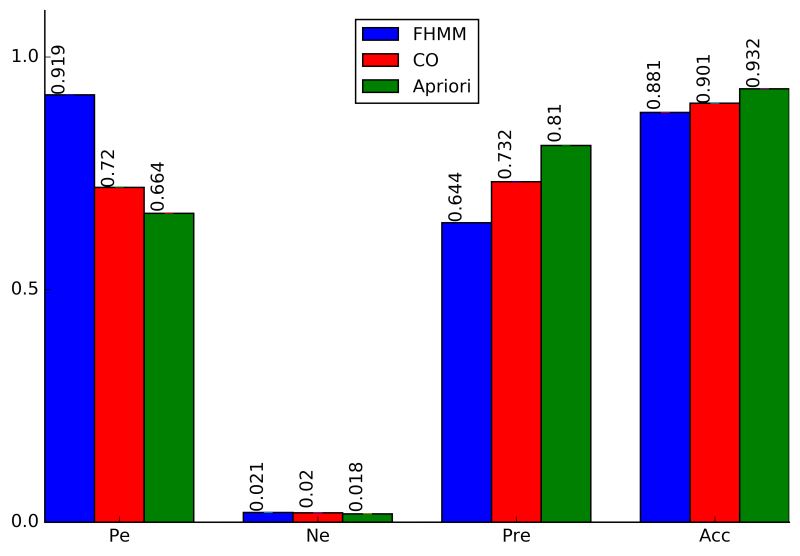
下面回答网友提问,如何画在条形图上垂直显示数据:
下面这个函数是用来垂直显示的,其中设置角度就可以以任意方式来显示。
def autolabel(rects,Num=1.12,rotation1=90,NN=1):
for rect in rects:
height = rect.get_height()
plt.text(rect.get_x()-0.04+rect.get_width()/2., Num*height, '%s' % float(height*NN),rotation=rotation1)
调用方式如下
rects1 =plt.bar(left = (0.05),height = (Pe_FH),color=('b'),label=('FHMM'),width = 0.1,align="center",yerr=0.000001);
autolabel(rects1,1.09);
下面是效果图
总结
以上就是本文关于python绘制条形图方法代码详解的全部内容,希望对大家有所帮助。感兴趣的朋友可以继续参考本站:
如有不足之处,欢迎留言指出。感谢朋友们对本站的支持!
python怎么画条形图-python绘制条形图方法代码详解相关推荐
- 如何在python制作计算器_Python简易计算器制作方法代码详解
主要用到的工具是Python中的Tkinter库 比较简单 直接上图形界面和代码 引用Tkinter库 from tkinter import * 建立主窗口对象 window=Tk() #设置窗口对 ...
- python画条形图-python绘制条形图方法代码详解
1.首先要绘制一个简单的条形图 import numpy as np import matplotlib.pyplot as plt from matplotlib import mlab from ...
- python绘制条形图用什么函数_python绘制条形图方法代码详解
1.首先要绘制一个简单的条形图 import numpy as np import matplotlib.pyplot as plt from matplotlib import mlab from ...
- python的socket模块_Python socket模块方法实现详解
这篇文章主要介绍了python socket模块方法实现详解,文中通过示例代码介绍的非常详细,对大家的学习或者工作具有一定的参考学习价值,需要的朋友可以参考下 socket ssh (不带防止粘包的方 ...
- python split函数 空格_最易懂的Python新手教程:从基础语法到代码详解
导读:本文立足基础,讲解Python和PyCharm的安装,及Python最简单的语法基础和爬虫技术中所需的Python语法. 作者:罗攀 蒋仟 如需转载请联系华章科技 本文涉及的主要知识点如下: P ...
- python语法错误概述_Python 错误和异常代码详解
程序中的错误一般被称为 Bug,无可否认,这几乎总是程序员的错... 程序员的一生,始终伴随着一件事 - 调试(错误检测.异常处理).反反复复,最可怕的是:不仅自己的要改,别人的也要改...一万头草泥 ...
- kmeans python interation flag_机器学习经典算法-logistic回归代码详解
一.算法简要 我们希望有这么一种函数:接受输入然后预测出类别,这样用于分类.这里,用到了数学中的sigmoid函数,sigmoid函数的具体表达式和函数图象如下: 可以较为清楚的看到,当输入的x小于0 ...
- python文件对象提供了3个读方法、分别是-Python读写文件模式和文件对象方法实例详解...
本文实例讲述了Python读写文件模式和文件对象方法.分享给大家供大家参考,具体如下: 一. 读写文件模式 利用open() 读写文件时,将会返回一个 file 对象,其基本语法格式如: open ( ...
- python中的str方法和repr方法_详解Python中__str__和__repr__方法的区别
对我当前工程进行全部测试需要花费不少时间.既然有 26 GB 空闲内存,为何不让其发挥余热呢? tmpfs 可以通过把文件系统保存在大内存中来加速测试的执行效率. 但优点也是缺点,tmpfs 只把结果 ...
最新文章
- mpython掌控板作品_mPython掌控板Easy-IoT物联
- Django 中的 cookie 和 session
- 吴文俊AI最高成就奖颁给清华张钹院士,之前曾空缺七年
- spss相关性分析_SPSS有话说:如何得出问卷或量表的结构或维度——探索性因素分析...
- 面试必问:CPU 占用高,如何一击即中!
- 微信读书vscode插件_vscode 常用的插件
- TCP/IP协议与Http协议的区别详解
- centos7如何安装cloud-init
- Mr.J-- HTTP学习笔记(十)-- Cookie机制
- 电脑常见故障排除手册(黑屏、死机、重启、蓝屏)
- Linux中的screen命令使用
- android监控io产生的应用,Android IO性能分析及排查
- maven项目,pom.xml文件变成小虫子(蜘蛛)解决办法
- Lazada对卖家履约及时率规则进行更新调整-新增OVL限单
- V8引擎如何回收内存以及如何优化
- C++ 高精度除法运算(c=a/b)
- 慢性病监测及早期干预迫在眉睫
- Ceph入门到精通-rados bench性能基准测试
- 电脑开机后显示服务器没有声音,电脑没有声音了是怎么回事 如何处理电脑没有声音的问题...
- 微信域名检测的C#实现